Chapter 10. Library Installation and Additional Tips

There are several options to install TensorFlow. Google has prepared packages for many architectures, operating systems, and Graphic Processing Unit (GPU). Although the execution of machine learning tasks is much faster on a GPU, both install options are available:

In this chapter, you will learn:

Linux installation

First of all, we should make a disclaimer. As you probably know, there is a really big number of alternatives in the Linux realm, and they have their own particular package management. For this reason, we chose to use the Ubuntu 16.04 distribution. It is undoubtedly the most widespread Linux distro, and additionally, Ubuntu 16.04 is an LTS version, or Long Term Support. This means that the distro will have three years of support for the desktop version, and five years for the server one. This implies that the base software we will run in this book will have support until the year 2021!

Note

You will find more information about the meaning of LTS at https://wiki.ubuntu.com/LTS

Ubuntu, even if considered a more newbie-oriented distro, has all the necessary support for all the technologies that TensorFlow requires, and has the most extended user base. For this reason, we will be explaining the required steps for this distribution, which will also be really close to those of the remaining Debian-based distros.

Tip

At the time of the writing, there is no support for 32 bits Linux in TensorFlow, so be assured to run the examples in the 64 bits version.

Initial requirements

For the installation of TensorFlow, you can use either option:

  • An AMD64-based image running on the cloud
  • An AMD64 instruction capable computer (commonly called a 64 bit processor)

Tip

On AWS, a well suited ami image, is code ami-cf68e0d8. It will work well on a CPU and if you so wish, on GPU images.

Ubuntu preparation tasks (need to apply before any method)

As we are working on the recently-released Ubuntu 16.04, we will make sure that we are updated to the latest package versions and we have a minimal Python environment installed.

Let's execute these instructions on the command line:

$ sudo apt-get update
$ sudo apt-get upgrade -y 
$ sudo apt-get install -y build-essential python-pip python-dev python-numpy swig python-dev default-jdk zip zlib1g-dev

Pip Linux installation method

In this section, we will use the pip (pip installs packages) package manager, to get TensorFlow and all its dependencies.

This is a very straightforward method, and you only need to make a few adjustments to get a working TensorFlow installation.

CPU version

In order to install TensorFlow and all its dependencies, we only need a simple command line (as long as we have implemented the preparation task).

So this is the required command line, for the standard Python 2.7:

$ sudo pip install --upgrade https://storage.googleapis.com/tensorflow/linux/cpu/tensorflow-0.9.0-cp27-none-linux_x86_64.whl

Then you will find the different dependent packages being downloaded and if no problem is detected, a corresponding message will be displayed:

CPU version

Pip installation output

Testing your installation

After the installation steps we can do a very simple test, calling the Python interpreter, and then importing the TensorFlow library, defining two numbers as a constant, and getting its sum after all:

$ python
>>> import tensorflow as tf
>>> a = tf.constant(2)
>>> b = tf.constant(20)
>>> print(sess.run(a + b))

GPU support

In order to install the GPU-supporting TensorFlow libraries, first you have to perform all the steps in the section the GPU support, from Install from source.

Then you will invoke:

$ sudo pip install -upgrade https://storage.googleapis.com/tensorflow/linux/gpu/tensorflow-0.10.0rc0-cp27-none-linux_x86_64.whl

Tip

There are many versions of pre-packaged TensorFlow.

They follow the following form:

https://storage.googleapis.com/tensorflow/linux/[processor type]/tensorflow-[version]-cp[python version]-none-linux_x86_64.whl

Tip

Where [version] can be cpu or gpu, [version] is the TensorFlow version (actually 0.11), and the Python version can be 2.7, 3.4, or 3.5.

Virtualenv installation method

In this section, we will explain the preferred method for TensorFlow using the virtualenv tool.

From the virtualenv page (virtualenv.pypa.io):

"Virtualenv is a tool to create isolated Python environments.(...) It creates an environment that has its own installation directories, that doesn't share libraries with other virtualenv environments (and optionally doesn't access the globally installed libraries either)."

By means of this tool, we will simply install an isolated environment for our TensorFlow installation, without interfering with all the other system libraries which in turn won't affect our installation either.

These are the simple steps we will follow (from a Linux terminal):

  1. Set the LC_ALL variable:
    $ export LC_ALL=C
    
  2. Install the virtualenv Ubuntu package from the installer:
    $ sudo apt-get install python-virtualenv
    
  3. Install the virtualenv package:
    virtualenv --system-site-packages ~/tensorflow
    
  4. Then to make use of the new TensorFlow, you will always need to remember to activate the TensorFlow environment:
    source ~/tensorflow/bin/activate
    
  5. Then install the tensorflow package via pip:
    pip install --upgrade https://storage.googleapis.com/tensorflow/linux/cpu/tensorflow-0.9.0-cp27-none-linux_x86_64.whl
    

You will be able to install all the alternative official tensorflow packages transcribed in the pip linux installation method.

Environment test

Here we will do a minimal test of TensorFlow.

First, we will activate the newly-created TensorFlow environment:

$ source ~/tensorflow/bin/activate

Then, the prompt will change with a (tensorflow) prefix, and we can execute simple code which loads TensorFlow, and sums two values:

(tensorflow) $ python
>>> import tensorflow as tf
>>> a = tf.constant(2)
>>> b = tf.constant(3)
>>> print(sess.run(a * b))
6

After your work is done, and if you want to return to normal environment, you can simply deactivate the environment:

(tensorflow)$ deactivate

Docker installation method

This TensorFlow installation method uses a recent type of operation technology called containers.

Containers are in some ways related to what virtualenv does, in that with Docker, you will have a new virtual environment. The main difference is the level at which this virtualization works. It contains the application and all dependencies in a simplified package, and these encapsulated containers can run simultaneously, all over a common layer, the Docker engine, which in turn runs over the host operative system.

Docker installation method

Docker main architecture( image source - https://www.docker.com/products/docker-engine)

Installing Docker

First of all, we will install docker via the apt package:

sudo apt-get install docker.io

Allowing Docker to run with a normal user

In this step, we create a Docker group to be able to use Docker as a user:

sudo groupadd docker

Tip

It is possible that you get the error; group 'docker' already exists. You can safely ignore it.

Then we add the current user to the Docker group:

sudo usermod -aG docker [your user]

Tip

This command shouldn't return any output.

Reboot

After this step, a reboot is needed for the changes to apply.

Testing the Docker installation

After the reboot, you can try calling the hello world Docker example, with the command line:

$ docker run hello-world

Testing the Docker installation

Docker Hello World container

Run the TensorFlow container

Then we run (and install if it was not installed before) the TensorFlow binary image (in this case the vanilla CPU binary image):

docker run -it -p 8888:8888 gcr.io/tensorflow/tensorflow

Run the TensorFlow container

TensorFlow installation via PIP

After the installation is finished, you will see the final installation steps, and Jupyter notebook starting:

Run the TensorFlow container

Note

Many of the samples use the Jupyter notebook format. In order to execute and run them, you can find information about installation and use for many architectures at it's home page, jupyter.org

Linux installation from source

Now we head to the most complete and developer-friendly installation method for TensorFlow. Installing from source code will allow you to learn about the different tools used for compiling.

Installing the Git source code version manager

Git is one of the most well-known source code version managers in existence, and is the one chosen by Google, publishing its code on GitHub.

In order to download the source code of TensorFlow, we will first install the Git source code manager:

Git installation in Linux (Ubuntu 16.04)

To install Git on your Ubuntu system, run the following command:

$ sudo apt-get install git

Installing the Bazel build tool

Bazel (bazel.io) is a build tool, based on the internal build tool Google has used for more than seven years, known as Blaze, and released as beta on September 9, 2015.

It is additionally used as the main build tool in TensorFlow, so in order to do some advanced tasks, a minimal knowledge of the tool is needed.

Tip

Different advantages, compared with competing projects, such as Gradle, the main ones being:

  • Support for a number of languages, such as C++, Java, Python, and so on
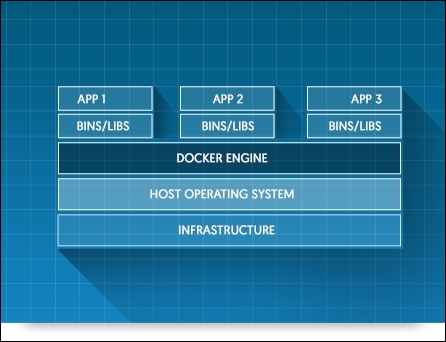
  • Support for creating Android and iOS applications, and even Docker images
  • Support for using libraries from many different sources, such as GitHub, Maven, and so on
  • Extensiblity through an API for adding custom build rules

Adding the Bazel distribution URI as a package source

First we will add the Bazel repository to the list of available repositories, and its respective key to the configuration of the apt tool, which manages dependencies on the Ubuntu operating system.

$ echo "deb http://storage.googleapis.com/bazel-apt stable jdk1.8" | sudo tee /etc/apt/sources.list.d/bazel.list
$ curl https://storage.googleapis.com/bazel-apt/doc/apt-key.pub.gpg | sudo apt-key add -

Adding the Bazel distribution URI as a package source

Bazel installation

Updating and installing Bazel

Once we have all the package source installed, we proceed to install Bazel via apt-get:

$ sudo apt-get update && sudo apt-get install bazel

Tip

This command will install Java and a big number of dependencies, so it could take some time to get it installed.

Installing GPU support (optional)

This section will teach us to install the required packages needed to have GPU support in our Linux setup.

Actually the only way to get GPU computing support is through CUDA.

Check that the nouveau NVIDIA graphic card drivers don't exist. To test this, execute the following command and check if there is any output:

lsmod | grep nouveau

If there is no output, see Installing CUDA system packages, if not, execute the following commands:

$ echo -e "blacklist nouveau\nblacklist lbm-nouveau\noptions nouveau modeset=0\nalias nouveau off\nalias lbm-nouveau off\n" | sudo tee /etc/modprobe.d/blacklist-nouveau.conf
$ echo options nouveau modeset=0 | sudo tee -a /etc/modprobe.d/nouveau-kms.conf
$ sudo update-initramfs -u
$ sudo reboot (a reboot will occur)

Installing CUDA system packages

The first step is to install the required packages from the repositories:

sudo apt-get install -y linux-source linux-headers-`uname -r` 
nvidia-graphics-drivers-361
nvidia-cuda-dev
sudo apt install nvidia-cuda-toolkit
sudo apt-get install libcupti-dev

Tip

If you are installing CUDA on a cloud image, you should run this command before this commands block:

sudo apt-get install linux-image-extra-virtual

Creating alternative locations

The current TensorFlow install configurations expect a very rigid structure, so we have to prepare a similar structure on our filesystem.

Here are the commands we will need to run:

sudo mkdir /usr/local/cuda
cd /usr/local/cuda
sudo ln -s /usr/lib/x86_64-linux-gnu/ lib64
sudo ln -s /usr/include/ include
sudo ln -s /usr/bin/ bin
sudo ln -s /usr/lib/x86_64-linux-gnu/ nvvm
sudo mkdir -p extras/CUPTI
cd extras/CUPTI
sudo ln -s /usr/lib/x86_64-linux-gnu/ lib64
sudo ln -s /usr/include/ include
sudo ln -s /usr/include/cuda.h /usr/local/cuda/include/cuda.h
sudo ln -s /usr/include/cublas.h /usr/local/cuda/include/cublas.h
sudo ln -s /usr/include/cudnn.h /usr/local/cuda/include/cudnn.h
sudo ln -s /usr/include/cupti.h /usr/local/cuda/extras/CUPTI/include/cupti.h
sudo ln -s /usr/lib/x86_64-linux-gnu/libcudart_static.a /usr/local/cuda/lib64/libcudart_static.a
sudo ln -s /usr/lib/x86_64-linux-gnu/libcublas.so /usr/local/cuda/lib64/libcublas.so
sudo ln -s /usr/lib/x86_64-linux-gnu/libcudart.so /usr/local/cuda/lib64/libcudart.so
sudo ln -s /usr/lib/x86_64-linux-gnu/libcudnn.so /usr/local/cuda/lib64/libcudnn.so
sudo ln -s /usr/lib/x86_64-linux-gnu/libcufft.so /usr/local/cuda/lib64/libcufft.so
sudo ln -s /usr/lib/x86_64-linux-gnu/libcupti.so /usr/local/cuda/extras/CUPTI/lib64/libcupti.so

Installing cuDNN

TensorFlow uses the additional cuDNN package to accelerate the deep neural network operations.

We will then download the cudnn package:

$ wget http://developer.download.nvidia.com/compute/redist/cudnn/v5/cudnn-7.5-linux-x64-v5.0-ga.tgz

Then we need to unzip the packages and link them:

$ sudo cp cuda/lib64/libcudnn* /usr/local/cuda/lib64
$ sudo cp cuda/include/cudnn.h /usr/local/cuda/include/

Clone TensorFlow source

Finally, we arrive at the task of getting TensorFlow source code.

Getting it is as easy as executing the following command:

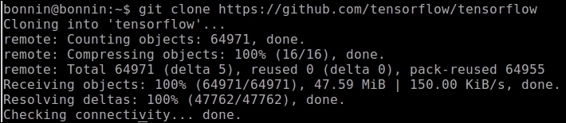
$ git clone https://github.com/tensorflow/tensorflow

Clone TensorFlow source

Git installation

Configuring TensorFlow build

Then we access the tensorflow main directory:

$ cd tensorflow

And then we simply run the configure script:
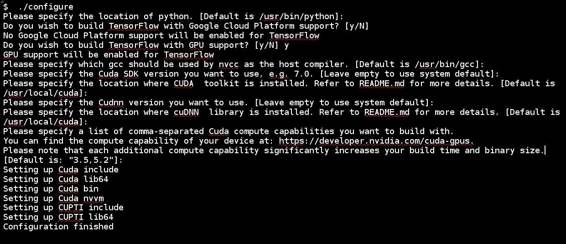
$ ./configure

In the following figure you can see the answers to most of the questions (they are almost all enters and yes)

Configuring TensorFlow build

CUDA configuration

So we are now ready to proceed with the building of the library.

Tip

If you are installing it on AWS, you will have to execute the modified line:

TF_UNOFFICIAL_SETTING=1 ./configure

Building TensorFlow

After all the preparation steps, we will finally compile TensorFlow. The following line could get your attention because it refers to a tutorial. The reason we build the example is that it includes the base installation, and provides a means of testing if the installation worked.

Run the following command:

$ bazel build -c opt --config=cuda //tensorflow/cc:tutorials_example_trainer

Testing the installation

Now it is time to test the installation. From the main tensorflow installation directory, just execute the following command:

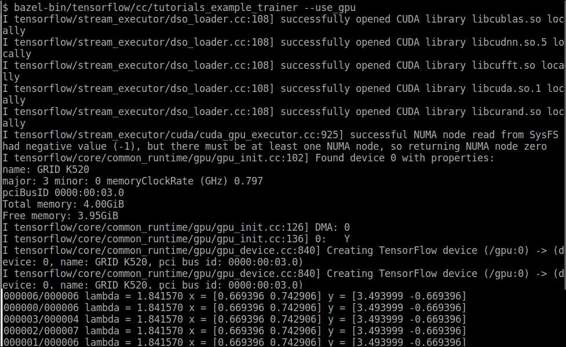
$ bazel-bin/tensorflow/cc/tutorials_example_trainer --use_gpu

This is a sample representation of the commands output:

Testing the installation

TensorFlow GPU test

Windows installation

Now it is the turn of the Windows operating system. First, we have to say that this is not a first choice for the TensorFlow ecosystem, but we can definitely play and develop with the Windows operating system.

Classic Docker toolbox method

This method uses the classic toolbox method, which is the method that works with the majority of the recent Windows releases (from Windows 7, and always with a 64 bit operating system).

Tip

In order to have Docker working (specifically VirtualBox), you need to have the VT-X extensions installed. This is a task you need to do at the BIOS level.

Installation steps

Here we will list the different steps needed to install tensorflow via Docker in Windows.

Downloading the Docker toolbox installer

The current URL for the installer is located at https://github.com/docker/toolbox/releases/download/v1.12.0/DockerToolbox-1.12.0.exe.

After executing the installer, we will see the first installation screen:

Downloading the Docker toolbox installer

Docker Toolbox installation first screen

Downloading the Docker toolbox installer

Docker toolbox installer path chooser

Then we select all the components we will need in our installation:

Downloading the Docker toolbox installer

Docker Toolbox package selection screen

After various installation operations, our Docker installation will be ready:

Downloading the Docker toolbox installer

Docker toolbox installation final screen

Creating the Docker machine

In order to create the initial machine, we will execute the following command in the Docker Terminal:

docker-machine create vdocker -d virtualbox

Creating the Docker machine

Docker initial image installation

Then, in a command window, type the following:

FOR /f "tokens=*" %i IN ('docker-machine env --shell cmd vdocker') DO %i docker run -it b.gcr.io/tensorflow/tensorflow

This will print and read a lot of variables needed to run the recently-created virtual machine.

Then finally, to install the tensorflow container, we proceed as we did with the Linux counterpart, from the same console:

docker run -it -p 8888:8888 gcr.io/tensorflow/tensorflow

Tip

If you don't want to execute Jupyter, but want to directly boot into a console, you run the Docker image this way:

run -it -p 8888:8888 gcr.io/tensorflow/tensorflow bash

MacOS X installation

Now let's turn to installation on MacOS X. The installation procedures are very similar to Linux. They are based on the OS X El Capitan edition. We will also refer to version 2.7 of Python, without GPU support.

The installation requires sudo privileges for the installing user.

Install pip

In this step, we will install the pip package manager, using the easy_install package manager which is included in the setup tools Python package, and is included by default in the operating system.

For this installation, we will execute the following in a terminal:

$ sudo easy_install pip

Install pip

Then we will install the six module, which is a compatibility module to help Python 2 programs support Python 3 programming:

To install six, we execute the following command:

sudo easy_install --upgrade six

Install pip

After the installation of the six package, we proceed to install the tensorflow package, by executing the following command:

sudo pip install -ignore-packages six https://storage.googleapis.com/tensorflow/mac/cpu/tensorflow-0.10.0-py2-none-any.whl

Install pip

Then we adjust the path of the numpy package, which is needed in El Capitan:

sudo easy_install numpy

Install pip

And we are ready to import the tensorflow module and run some simple examples:

Install pip

Summary

In this chapter, we have reviewed some of the main ways in which a TensorFlow installation can be performed.

Even if the list of possibilities is finite, every month or so we see a new architecture or processor being supported, so we can only expect more and more application fields for this technology.