Getting Started Programming with Qt Widgets
在本主题中,我们通过使用C和Qt Widgets模块实现一个简单的记事本应用程序来教授Qt的基本知识。 我们使用Qt Creator IDE和Qt Designer生成一些代码,但是您也可以自己编写所有代码。
阅读完本主题后,您可以参考我们的概述和API文档,以查找正在开发的应用程序所需的信息。
在本主题中,我们首先使用Qt Creator创建带有必需文件的项目。 然后,我们使用Qt Designer修改用户界面文件,以在桌面上的窗口中显示文本编辑和按钮。 这代表具有GUI的简单Qt应用程序。 最后,我们通过创建用于打开和保存文件的操作来向应用程序添加用户交互。
您可以在snippets / widgets-tutorial / notepad目录的qtdoc存储库中找到最终的记事本源文件。 You can either fetch the Qt 5 sources from Qt Project or install them as part of Qt 5.
Creating the Notepad Project
在向导的帮助下,可以在Qt Creator中设置新项目,该向导将指导您逐步完成项目创建过程。 向导会提示您输入该特定类型的项目所需的设置,并为您创建项目。
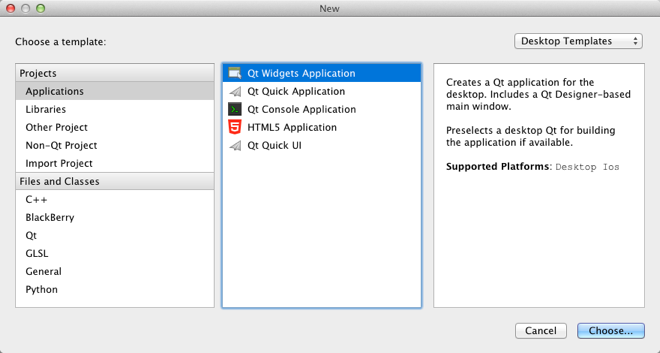
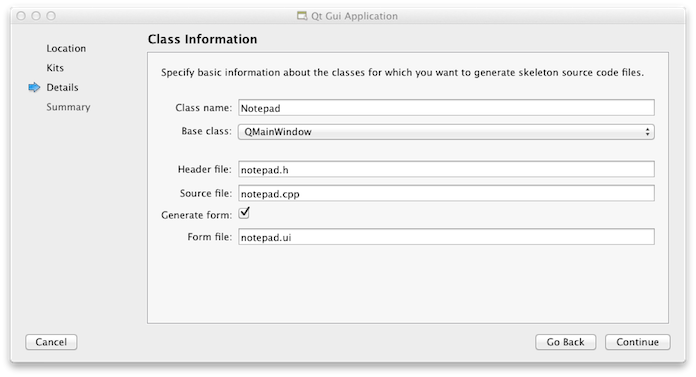
To create the Notepad project, select File > New File or Project > Applications > Qt Widgets Application > Choose, and follow the instructions of the wizard. In the Class Information dialog, type Notepad as the class name and select QMainWindow as the base class.
Qt窗口小部件应用程序向导创建一个项目,该项目包含一个主源文件和一组指定用户界面的文件(记事本窗口小部件):
- notepad.pro-项目文件。
- main.cpp-应用程序的主要源文件。
- notepad.cpp-记事本小部件的记事本类的源文件。
- notepad.h-记事本小部件的记事本类的头文件。
- notepad.ui-记事本小部件的UI窗体。
The .cpp, .h, and .ui files come with the necessary boiler plate code for you to be able to build and run the project. The .pro file is complete. We will take a closer look at the file contents in the following sections.
Learn More
| About | Here |
|---|---|
| 使用Qt Creator | Qt Creator |
| 使用Qt Creator创建其他类型的应用程序 | Qt Creator Tutorials |
Main Source File
该向导在main.cpp文件中生成以下代码:
  #include "notepad.h"
  #include <QApplication>

  int main(int argc, char *argv[])
  {
      QApplication a(argc, argv);
      Notepad w;
      w.show();

      return a.exec();
  }
让我们逐行浏览代码。 以下各行包括“Notepad”小部件和QApplication的头文件。 所有Qt类都有一个以它们命名的头文件。
  #include "notepad.h"
  #include <QApplication>
以下行定义了main 函数,它是所有基于C和C++的应用程序的入口点:
  int main(int argc, char *argv[])
  {
下一行创建一个QApplication对象。 该对象管理应用程序范围的资源,对于运行任何使用Qt小部件的Qt程序是必需的。 它使用在argv中运行的argc命令行参数构造一个应用程序对象。 (对于不使用Qt小部件的GUI应用程序,可以改为使用QGuiApplication。)
QApplication a(argc, argv);
下一行创建Notepad对象。 这是向导为其创建类和UI文件的对象。 用户界面包含视觉元素,这些视觉元素在Qt中称为widgets。 小部件的示例是文本编辑,滚动条,标签和单选按钮。 小部件也可以是其他小部件的容器。例如对话框或主应用程序窗口。
Notepad w;
下一行在其自己的窗口中的屏幕上显示了记事本小部件。 由于小部件还可以充当容器(例如,QMainWindow,其中包含工具栏,菜单,状态栏和其他一些小部件),因此可以在其自己的窗口中显示单个小部件。 默认情况下,小部件不可见;函数show()使小部件可见。
w.show();
下一行使QApplication进入其事件循环。 Qt应用程序运行时,将生成事件并将其发送到该应用程序的小部件。 事件的示例是鼠标按下和按键。
return a.exec();
Learn More
| About | Here |
|---|---|
| 小部件和窗口几何 | Window and Dialog Widgets |
| 事件和事件处理 | The Event System |
Designing a UI
该向导将生成XML格式的用户界面定义notepad.ui。 在Qt Creator中打开notepad.ui文件时,它将在集成的Qt Designer中自动打开。
在构建应用程序时,Qt Creator将启动Qt 用户界面编译器(uic),该程序读取.ui文件并创建相应的C头文件ui_notepad.h。
Using Qt Designer
该向导将创建一个使用QMainWindow的应用程序。 它具有自己的布局,您可以在其中添加菜单栏,停靠小部件,工具栏和状态栏。 中心区域可以被任何类型的小部件占据。 向导将“记事本”小部件放置在此处。
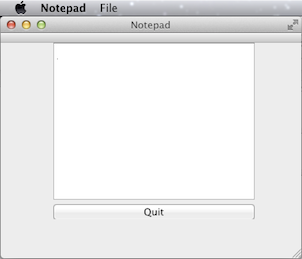
让我们使用Qt Designer将QTextEdit对象和QPushButton对象添加到主窗口。 当您在文本编辑小部件中键入文本时,它将接收按键事件并通过绘制键入的文本来做出响应。 按下(即用鼠标单击)该按钮将退出记事本应用程序。
要在Qt Designer中添加小部件:
- 在Qt Creator 编辑器模式下,在Projects视图中双击notepad.ui文件,以在集成的Qt Designer中启动该文件。
- Drag and drop the following widgets to the form:
- Text Edit (QTextEdit)
- Push Button (QPushButton)
- Double-click the Push Button widget and enter the text Quit.
- In the Properties pane, change the value of objectName to quitButton.
- Press Ctrl+A (or Cmd+A) to select the widgets and click Lay out Vertically (or press Ctrl+L) to apply a vertical layout (QVBoxLayout).
- Press Ctrl+S (or Cmd+S) to save your changes.
The UI now looks as follows in Qt Designer:

您可以在代码编辑器中查看生成的XML文件:
  <?xml version="1.0" encoding="UTF-8"?>
  <ui version="4.0">
   <class>Notepad</class>
   <widget class="QMainWindow" name="Notepad">
    <property name="geometry">
     <rect>
      <x>0</x>
      <y>0</y>
      <width>400</width>
      <height>300</height>
     </rect>
    </property>
    <property name="windowTitle">
     <string>Notepad</string>
    </property>
    <widget class="QWidget" name="centralWidget">
     <widget class="QWidget" name="">
      <property name="geometry">
       <rect>
        <x>70</x>
        <y>0</y>
        <width>268</width>
        <height>235</height>
       </rect>
      </property>
      <layout class="QVBoxLayout" name="verticalLayout">
       <item>
        <widget class="QTextEdit" name="textEdit"/>
       </item>
       <item>
        <widget class="QPushButton" name="quitButton">
         <property name="text">
          <string>Quit</string>
         </property>
        </widget>
       </item>
      </layout>
     </widget>
    </widget>
    <widget class="QMenuBar" name="menuBar">
      ...
以下行包含XML声明,该声明指定文档中使用的XML版本和字符编码:
<?xml version="1.0" encoding="UTF-8"?>
文件的其余部分指定一个ui元素,该元素定义了记事本小部件:
<ui version="4.0">
以下代码段创建了一个QVBoxLayout小部件,其中包含一个QTextEdit和QPushButton小部件。 如前所述,小部件可以包含其他小部件。 可以直接设置子窗口小部件的边界(位置和大小),但是使用布局通常更容易。 布局管理窗口小部件的子项的边界。 例如,QVBoxLayout将子级放置在垂直行中。
  <layout class="QVBoxLayout" name="verticalLayout">
   <item>
    <widget class="QTextEdit" name="textEdit"/>
   </item>
   <item>
    <widget class="QPushButton" name="quitButton">
     <property name="text">
      <string>Quit</string>
     </property>
    </widget>
   </item>
  </layout>
UI文件与Notepad类的头文件和源文件一起使用。 我们将在后面的部分中查看UI文件的其余部分。
Notepad Header File
The wizard generated a header file for the Notepad class that has the necessary #includes, a constructor, a destructor, and the Ui object. The file looks as follows:
  #include <QMainWindow>

  namespace Ui {
  class Notepad;
  }

  class Notepad : public QMainWindow
  {
      Q_OBJECT

  public:
      explicit Notepad(QWidget *parent = 0);
      ~Notepad();

  private:
      Ui::Notepad *ui;
  };
以下行包含提供主要应用程序窗口的QMainWindow:
#include <QMainWindow>
以下几行在Ui名称空间中声明Notepad类,该名称空间是uic工具从.ui文件生成的UI类的标准名称空间:
  namespace Ui {
  class Notepad;
  }
类声明包含Q_OBJECT宏。 它必须在类定义中排在首位,并将我们的类声明为QObject。 自然,它还必须继承自QObject。 QObject为普通C++类增加了一些功能。 值得注意的是,可以在运行时查询类名和插槽名。 也可以查询插槽的参数类型并调用它。
  class Notepad : public QMainWindow
  {
      Q_OBJECT
以下几行声明了一个构造函数,该构造函数的默认参数为parent。 值0表示该窗口小部件没有父级(它是顶级窗口小部件)。
  public:
      explicit Notepad(QWidget *parent = 0);
下一行声明了一个虚拟析构函数,以释放对象在其生命周期中获取的资源。 According to the C++ naming convention, destructors have the same name as the class they are associated with, prefixed with a tilde (~). In QObject, destructors are virtual to ensure that the destructors of derived classes are invoked properly when an object is deleted through a pointer-to-base-class.
~Notepad();
以下各行声明一个成员变量,该成员变量是指向记事本UI类的指针。 成员变量与特定类相关联,并且可用于其所有方法。
  private:
      Ui::Notepad *ui;
Notepad Source File
向导为Notepad类生成的源文件如下所示:
  #include "notepad.h"
  #include "ui_notepad.h"

  Notepad::Notepad(QWidget *parent) :
      QMainWindow(parent),
      ui(new Ui::Notepad)
  {

      ui->setupUi(this);
  }

  Notepad::~Notepad()
  {
      delete ui;
  }
以下几行包括由向导生成的Notepad类头文件和由uic工具生成的UI头文件:
  #include "notepad.h"
  #include "ui_notepad.h"
下面的行定义了Notepad构造函数:
Notepad::Notepad(QWidget *parent) :
下面的行调用QMainWindow构造函数,该构造函数是Notepad类的基类:
QMainWindow(parent),
以下行创建UI类实例,并将其分配给ui成员:
ui(new Ui::Notepad)
以下行设置了UI:
ui->setupUi(this);
在析构函数中,我们删除ui:
  Notepad::~Notepad()
  {
      delete ui;
  }
Project File
向导将为我们生成以下项目文件notepad.pro:
  QT       += core gui

  greaterThan(QT_MAJOR_VERSION, 4): QT += widgets

  TARGET = Notepad
  TEMPLATE = app

  SOURCES += main.cpp\
          notepad.cpp

  HEADERS  += notepad.h

  FORMS    += notepad.ui
项目文件指定用于生成项目的应用程序名称和qmake模板,以及项目中包含的源文件,头文件和UI文件。
You could also use qmake's -project option to generate the .pro file. Although, in that case, you have to remember to add the line QT += widgets to the generated file in order to link against the Qt Widgets Module.
Learn More
| About | Here |
|---|---|
| Using Qt Designer | Qt Designer Manual |
| Layouts | Layout Management, Widgets and Layouts, Layout Examples |
| The widgets that come with Qt | Qt Widget Gallery |
| 主窗口和主窗口类 | Application Main Window, Main Window Examples |
| QObjects和Qt对象模型(这对于理解Qt是必不可少的) | Object Model |
| qmake和Qt构建系统 | qmake Manual |
Adding User Interaction
现在,我们有了一个用户界面,但是它实际上并没有做任何有用的事情,因为它只包含一个文本编辑和一个按钮,以及一些用于退出,最小化和最大化应用程序的标准功能。 为了使该应用程序有用,我们将向其中添加用户交互。 首先,我们将向按钮添加功能。 其次,我们将添加一些功能,用于将文件加载到文本编辑中以及将文本编辑的内容另存为文件。
Adding Push Buttons
大多数桌面操作系统具有使用户能够退出应用程序的标准方法。 但是,在此示例中,我们使用此基本功能来说明如何向应用程序添加用户交互。 为此,我们添加一个连接到Quit按钮的插槽。
To exit the application when the Quit button is pushed, you use the Qt signals and slots mechanism. A signal is emitted when a particular event occurs and a slot is a function that is called in response to a particular signal. Qt widgets have predefined signals and slots that you can use directly from Qt Designer.
To use Qt Designer to add a slot for the quit function, right-click the Quit button to open a context-menu and then select Go to slot > clicked().
A private slot, on_quitButton_clicked(), is added to the Notepad widget class header file, notepad.h and a private function, Notepad::on_quitButton_clicked(), is added to the Notepad widget class source file, notepad.cpp. We just need to write the code to execute the quit function in the source file.
Let us look at the modified code in the header file, notepad.h:
  namespace Ui {
  class Notepad;
  }

  class Notepad : public QMainWindow
  {
      Q_OBJECT

  public:
      explicit Notepad(QWidget *parent = 0);
      ~Notepad();

  private slots:
      void on_quitButton_clicked();

  private:
      Ui::Notepad *ui;
  };
The following code uses Qt's signals and slots mechanism to make the application exit when the Quit button is pushed. Qt Designer uses QMetaObject auto-connection facilities to connect the button's clicked() signal to a slot in the Notepad class. The uic tool automatically generates code in the dialog's setupUi() function to do this, so Qt Designer only needs to declare and implement a slot with a name that follows a standard convention.
  private slots:
      void on_quitButton_clicked();
The corresponding code in the source file, notepad.cpp, looks as follows:
  void Notepad::on_quitButton_clicked()
  {

  }
The code defines the private function that is executed when QPushButton emits the clicked() signal.
We now complement the code to have the quit() slot of QApplication exit Notepad:
  void Notepad::on_quitButton_clicked()
  {
      QCoreApplication::quit();
  }
Learn More
| About | Here |
|---|---|
| Signals and slots | Signals & Slots |
Adding Menu Items
Often, in a main window, the same slot should be invoked by several widgets. Examples are menu items and buttons on a tool bar. To make this easier, Qt provides QAction, which can be given to several widgets, and be connected to a slot. For instance, both QMenu and QToolBar can create menu items and tool buttons from the same QAction.
To learn how to use actions with signals and slots, we add menu items to open and save a document and connect them to slots.
As before, we use Qt Designer to add the widgets to the user interface. The wizard creates an application with a QMenu widget, with the text Type Here as a placeholder for menu and menu item names. Double-click the text to enter names for the File menu and Open and Save menu items. Qt Designer automatically generates the appropriate actions.
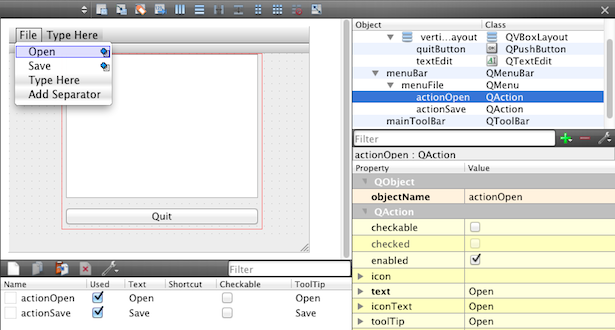
To connect the actions to slots, right-click an action and select Go to slot > triggered().
QAction instances are created with the text that should appear on the widgets that we add them to (in our case, menu items). If we also wanted to add the actions to a tool bar, we could have specified icons for them.
The modified code in notepad.ui now looks as follows:
    <widget class="QMenuBar" name="menuBar">
     <property name="geometry">
      <rect>
       <x>0</x>
       <y>0</y>
       <width>400</width>
       <height>22</height>
      </rect>
     </property>
     <widget class="QMenu" name="menuFile">
      <property name="title">
       <string>File</string>
      </property>
      <addaction name="actionOpen"/>
      <addaction name="actionSave"/>
     </widget>
     <addaction name="menuFile"/>
    </widget>
    <widget class="QToolBar" name="mainToolBar">
     <attribute name="toolBarArea">
      <enum>TopToolBarArea</enum>
     </attribute>
     <attribute name="toolBarBreak">
      <bool>false</bool>
     </attribute>
    </widget>
    <widget class="QStatusBar" name="statusBar"/>
    <action name="actionOpen">
     <property name="text">
      <string>Open</string>
     </property>
    </action>
    <action name="actionSave">
     <property name="text">
      <string>Save</string>
     </property>
    </action>
   </widget>
Qt Designer adds the private slots on_actionOpen_triggered() and on_actionSave_triggered() to notepad.h and the private functions Notepad::on_actionOpen_triggered() and Notepad::on_actionSave_triggered() to notepad.cpp.
In the following sections, we complement the code to load and save files. When a menu item is clicked, the item triggers the action, and the respective slot is invoked.
Opening Files
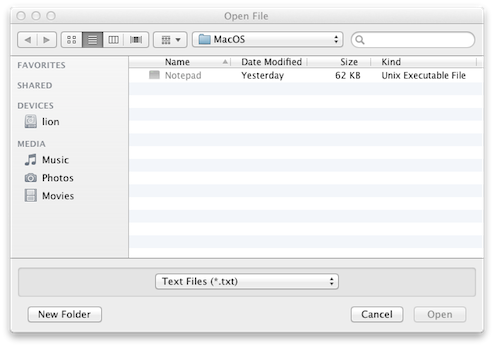
In this section, we implement the functionality of the on_actionOpen_triggered() slot. The first step is asking the user for the name of the file to open. Qt comes with QFileDialog, which is a dialog from which the user can select a file. The appearance of the dialog depends on the desktop platform that you run the application on. The following image shows the dialog on macOS:
We complement the code generated by Qt Designer in notepad.cpp, as follows:
  void Notepad::on_actionOpen_triggered()
  {
      QString fileName = QFileDialog::getOpenFileName(this, tr("Open File"), QString(),
              tr("Text Files (*.txt);;C++ Files (*.cpp *.h)"));

      if (!fileName.isEmpty()) {
          QFile file(fileName);
          if (!file.open(QIODevice::ReadOnly)) {
              QMessageBox::critical(this, tr("Error"), tr("Could not open file"));
              return;
          }
          QTextStream in(&file);
          ui->textEdit->setText(in.readAll());
          file.close();
      }
  }
The static getOpenFileName() function displays a modal file dialog. It returns the file path of the file selected, or an empty string if the user canceled the dialog.
If we have a file name, we try to open the file with open(), which returns true if the file could be opened. We will not go into error handling here, but you can follow the links from the learn more section. If the file could not be opened, we use QMessageBox to display a dialog with an error message (see the QMessageBox class description for further details).
Actually reading in the data is trivial using the QTextStream class, which wraps the QFile object. The readAll() function returns the contents of the file as a QString. The contents can then be displayed in the text edit. We then close() the file to return the file descriptor back to the operating system.
We now use the function tr() around our user visible strings. This function is necessary when you want to provide your application in more than one language (for example, English and Chinese). We will not go into details here, but you can follow the Qt Linguist link from the learn more table.
To use QFileDialog, QFile, QMessageBox, and QTextStream, add the following includes to notepad.cpp:
  #include <QFileDialog>
  #include <QFile>
  #include <QMessageBox>
  #include <QTextStream>
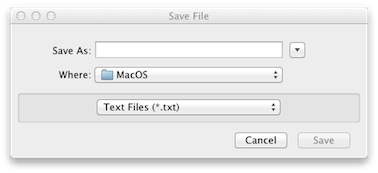
Saving Files
Now, let us move on to the on_actionSave_triggered() slot, which also uses QFileDialog to create a dialog in which the user can save a file with the specified name in the specified location.
We complement the code generated by Qt Designer in notepad.cpp, as follows:
  void Notepad::on_actionSave_triggered()
  {
      QString fileName = QFileDialog::getSaveFileName(this, tr("Save File"), QString(),
              tr("Text Files (*.txt);;C++ Files (*.cpp *.h)"));

      if (!fileName.isEmpty()) {
          QFile file(fileName);
          if (!file.open(QIODevice::WriteOnly)) {
              // error message
          } else {
              QTextStream stream(&file);
              stream << ui->textEdit->toPlainText();
              stream.flush();
              file.close();
          }
      }
  }
When we write the contents of the text edit to the file, we use the QTextStream class again. QTextStream can also write QStrings to the file with the << operator.
Learn More
| About | Here |
|---|---|
| MDI applications | QMdiArea, MDI Example |
| Files and I/O devices | QFile, QIODevice |
| tr() and internationalization | Qt Linguist Manual, Writing Source Code for Translation, Internationalization with Qt |
Building and Running Notepad
Now that you have all the necessary files, select Build > Build Project Notepad to build and run the application. Qt Creator uses qmake and make to create an executable in the directory specified in the build settings of the project and runs it.
Building and Running from the Command Line
To build the application from the command line, switch to the directory in which you have the .cpp file of the application and add the project file (suffixed .pro) described earlier. The following shell commands then build the application:
  qmake
  make (or nmake on Windows)
The commands create an executable in the project directory. The qmake tool reads the project file and produces a Makefile with instructions on how to build the application. The make tool (or the nmake tool) then reads the Makefile and produces the executable binary.