Essential Python Tools

Interactive environments and debugging
Ipython
IPython (Interactive Python) is a command shell for interactive computing in python, originally developed to make python easy and interactive, it offers introspection, rich media, shell syntax, tab completion, and history.
You can install Ipython via pip( pip install ipython ) but we suggest installing IPython using the Python Anaconda distribution.
Anaconda is an open-source Python distribution which provides us with many python tools. When installed, Anaconda includes: core Python language, IPython, Jupyter Notebook and many data-science packages.
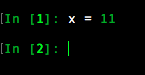
To use Ipython
$ ipython
IPython has more features than python like Syntax highlighting, Proper Intendation, tab-completion, documentation
Syntax highlighting
Tab-completion
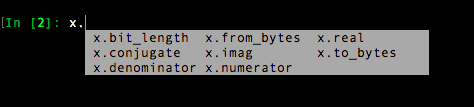
Documentation can be viewed by putting a ? after the command.

Jupyter
Jupyter Notebook是一个用于编写和共享代码和文本的开源应用程序。 它是python中流行的数据科学工具之一。
它取代了IPython Notebook,后者最初仅支持python,但后来开始支持多种语言。 开始使用IPython笔记本使python的工作变得轻松和交互式。 IPython为Jupyter提供python后端(也称为内核)
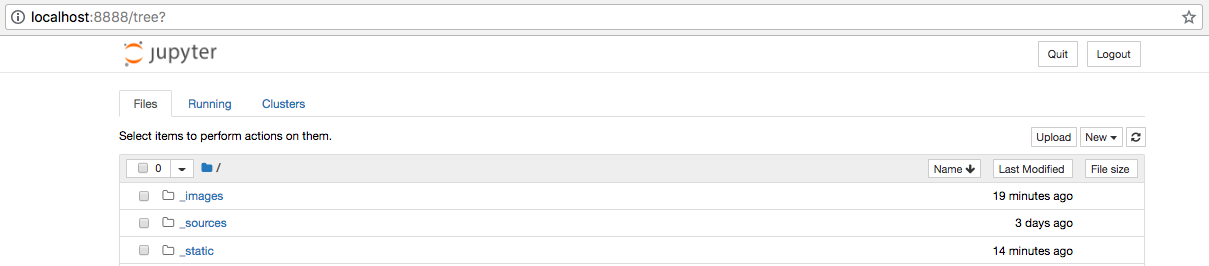
如果您使用Anaconda安装了Python,那么您已经安装了Jupyter Notebook。 To start the notebook
$ jupyter notebook
启动Jupyter笔记本电脑后,我们会注意到将在打开的网络浏览器中打开一个标签页。 它将在本地端口(例如http:// localhost:8888)上运行Jupyter Notebook。 它将以目录格式列出系统的内容。 要创建新的“笔记本”,只需单击“New”,然后选择python版本。
使用Jupyter Notebook,我们可以创建可共享文件,这些文件可以支持实时代码,图表,图形,数学,不同形式的标记(Markdown等)以及更多内容。
To know more about ‘Jupyter Notebook’ check - http://jupyter-notebook.readthedocs.io/en/stable/
pdb and ipdb
pdb
pdb是调试工具,是python标准库的一部分。 它是用于Python程序的交互式源代码调试器。
使用pdb,我们可以在程序的任何位置设置breakpoints [断点]来停止它,并检查错误或正在运行的程序的状态。
与在各处使用简单的print()语句相比,pbd帮助加快了调试过程。
使用pdb的最简单方法是在您正在使用的代码中调用它。
import pdb; pdb.set_trace()
As soon as the interpreter reaches this line, we’ll receive a command prompt on the terminal where we’re running the program. 这是Python的常规提示,但带有一些新命令。
- l (list) - Display 11 lines around the current line.
- r (return) - Continue execution until the current function returns.
- b (break) - Set a breakpoint (depending on the argument provided).
- n (next) - Continue execution until the next line in the current function is reached.
- s (step) - Execute the current line, stop at the first possible occasion.
- j (jump) - Jump to the next line to be executed.
- c (continue) - Creates a breakpoint in the program execution.
for more commands check
如果要从调试器运行应用程序并设置断点而不对源代码进行任何更改,则需要使用调试器执行应用程序,请使用以下命令
$ python -m pdb hello.py
ipdb
ipdb,具有Ipython功能的python调试器,具有所有pdb的功能,并为交互式外壳添加了ipython支持,例如制表符完成,颜色支持,魔术函数等。 我们可以像使用pdb一样使用ipdb。
Linters and formatters
PEP8
PEP8是python的官方样式指南。 如果您想成为python-community的一部分,那么了解样式指南非常重要。
- PEP8 coding conventions are:
- 空格是首选的缩进方法。
- 每个缩进级别使用4个空格。
- 限制所有行最多79个字符。
- 用两个空行分隔顶级函数和类定义。
- 类内部的方法定义由单个空白行包围。
- 导入应按以下顺序分组:
- 标准库导入。
- 相关第三方进口。
- 本地应用程序/库特定的导入。
- 每组进口之间的空白行。
pycodestyle
Pycodestyle(以前为PEP8)是官方的linter工具,用于根据PEP8 python的样式约定检查python代码。
To install it:
pip install pycodestyle.
让我们以一个小的示例脚本来测试pycodestyle
我们将创建一个测试脚本文件test_script.py并将其用作 all the linters的示例。
from __future__ import print_function
import os, sys
import logging
from .. import views

class DoSomething(SomeCommand) :

    def __init__(self):
        for i in range(1,11):
            if self.number == i:
                print("matched")
            else:
                print('not matched')

    def check_user(self):
        if self.user: return True
        else  : return False
If we run pycodestyle:
$ pycodestyle {source_file_or_directory}
$ pycodestyle test_script.py
test_script.py:2:10: E401 multiple imports on one line
test_script.py:6:1: E302 expected 2 blank lines, found 1
test_script.py:6:31: E203 whitespace before ':'
test_script.py:9:25: E231 missing whitespace after ','
test_script.py:13:37: W291 trailing whitespace
test_script.py:16:21: E701 multiple statements on one line (colon)
test_script.py:16:34: W291 trailing whitespace
test_script.py:17:13: E271 multiple spaces after keyword
test_script.py:17:14: E203 whitespace before ':'
test_script.py:17:15: E701 multiple statements on one line (colon)
test_script.py:17:29: W291 trailing whitespace
To see the summary, use --statistics -qq
$ pycodestyle --statistics -qq {source_file_or_directory}
$ pycodestyle --statistics -qq test_script.py
    2       E203 whitespace before ':'
    1       E231 missing whitespace after ','
    1       E271 multiple spaces after keyword
    1       E302 expected 2 blank lines, found 1
    1       E401 multiple imports on one line
    2       E701 multiple statements on one line (colon)
    3       W291 trailing whitespace
We can also make pycodestyle show the error and the description of how to solve the error by using --show-source --show-pep8
$ pycodestyle --show-source --show-pep8 {source_file_or_directory}
$ pycodestyle --show-source --show-pep8  test_script.py
test_script.py:2:10: E401 multiple imports on one line
import os, sys
        ^
    Place imports on separate lines.
    ...
    ...
    ...
要自定义pycodestyle,我们可以在项目级别或用户级别进行配置。 最好在项目级别进行配置,因为样式通常随每个项目而变化。
To configure a project’s pycodestyle create a tox.ini Or a setup.cfg
And add
[pycodestyle]
ignore = E501, W291
max-line-length = 88
statistics = True
- In the above file ,
[pycodestyle]告诉这是pycodestyle部分- 我们告诉您忽略错误E501(这是行长度错误)和警告W291(尾随空白警告)。
- 提到最大线长为88。
- and to show the statistics with every check
| Error/ Warning | Meaning |
|---|---|
| Starting with E… | Errors |
| Starting with W… | Warnings |
| 100 type … | Indentation |
| 200 type … | Whitespace |
| 300 type … | Blank lines |
| 400 type … | Imports |
| 500 type … | Line length |
| 600 type … | Deprecation |
| 700 type … | Statements |
| 900 type … | Syntax errors |
pylint
Pylint是一个python linter,它检查源代码,还充当bug和质量检查器。 它不仅具有PEP8(Python样式指南),还具有更多的验证检查和选项。
这是在python中最常用的linting工具。
- It includes the following features:
- 检查每行的长度
- 检查变量名称是否符合项目的编码标准
- 检查声明的接口是否真正实现。
To install it:
pip install pylint.
Usage:
pylint {source_file_or_directory}
Using the file test_script.py as an example
$ pylint test_script.py
No config file found, using default configuration
************* Module test_script
C:  6, 0: No space allowed before :
class DoSomething(SomeCommand) :
                            ^ (bad-whitespace)
C:  9, 0: Exactly one space required after comma
        for i in range(1,11):
                        ^ (bad-whitespace)
C: 13, 0: Trailing whitespace (trailing-whitespace)
C: 16, 0: Trailing whitespace (trailing-whitespace)
C: 17, 0: Final newline missing (missing-final-newline)
C: 17, 0: No space allowed before :
        else  : return False
            ^ (bad-whitespace)
C:  1, 0: Missing module docstring (missing-docstring)
C:  2, 0: Multiple imports on one line (os, sys) (multiple-imports)
E:  4, 0: Attempted relative import beyond top-level package (relative-beyond-top-level)
C:  6, 0: Missing class docstring (missing-docstring)
E:  6,18: Undefined variable 'SomeCommand' (undefined-variable)
C: 15, 4: Missing method docstring (missing-docstring)
R: 16, 8: The if statement can be replaced with 'return bool(test)' (simplifiable-if-statement)
R: 16, 8: Unnecessary "else" after "return" (no-else-return)
C: 16,22: More than one statement on a single line (multiple-statements)
R:  6, 0: Too few public methods (1/2) (too-few-public-methods)
W:  2, 0: Unused import sys (unused-import)
W:  2, 0: Unused import os (unused-import)
W:  3, 0: Unused import logging (unused-import)
W:  4, 0: Unused import views (unused-import)

----------------------------------------------------------------------
Your code has been rated at -10.00/10 (previous run: -10.00/10, +0.00)
As we can see pylint has more error/warning checks and options than pep8. And it is more descriptive.
To customise pylint we can configure it at the project-level, user-level or global-level .
- create a
/etc/pylintrcfor default global configuration - create a
~/pylintrcfor default user configuration - Or create a
pylintrcfile
To create a pylintrc file pylint --generate-rcfile > pylintrc , which creates a template pylintrc(with comments) which can be customised as required.
For example if we want the max line lenght to be 88, then we have to set the max-line-length to 88 .
pyflakes
pyflakes是一个验证工具(线性),用于检查Python文件是否存在错误。 Pyflakes doesn’t verify the style at all but it verifies only logistic errors like the syntax tree of each file individually.
To install it:
pip install pyflakes.
Let us take the same example script to test pyflakes
Usage:
pyflakes {source_file_or_directory}
Using the file test_script.py as an example
$ pyflakes test_script.py
test_script.py:2: 'sys' imported but unused
test_script.py:2: 'os' imported but unused
test_script.py:3: 'logging' imported but unused
test_script.py:4: '..views' imported but unused
test_script.py:6: undefined name 'SomeCommand'
It detected newly “library imported but unused” and “Undefined name”, it doesn’t verify the style but verify only logistic error.
If we like Pyflakes but also want stylistic checks, we can use flake8, which combines Pyflakes with style checks against PEP 8
flake8
Flake8只是对pyflakes,pycodestyle和McCabe脚本(循环复杂度检查器)(用于检测复杂代码)。
如果我们喜欢Pyflakes但又希望进行样式检查,则可以使用flake8,它结合了Pyflakes和针对PEP 8的样式检查
To install it:
pip install flake8.
Usage:
flake8 {source_file_or_directory}
To get statics also
flake8 {source_file_or_directory} --statistics
Using the file test_script.py as an example
$ flake8 test_script.py --statistics
test_script.py:2:1: F401 'os' imported but unused
test_script.py:2:1: F401 'sys' imported but unused
test_script.py:2:10: E401 multiple imports on one line
test_script.py:3:1: F401 'logging' imported but unused
test_script.py:4:1: F401 '..views' imported but unused
test_script.py:6:1: E302 expected 2 blank lines, found 1
test_script.py:6:19: F821 undefined name 'SomeCommand'
test_script.py:6:31: E203 whitespace before ':'
test_script.py:9:25: E231 missing whitespace after ','test_script.py:13:37: W291 trailing whitespace
test_script.py:16:21: E701 multiple statements on one line (colon)
test_script.py:16:34: W291 trailing whitespace
test_script.py:17:13: E271 multiple spaces after keyword
test_script.py:17:14: E203 whitespace before ':'
test_script.py:17:15: E701 multiple statements on one line (colon)test_script.py:17:29: W291 trailing whitespace
2     E203 whitespace before ':'
1     E231 missing whitespace after ','
1     E271 multiple spaces after keyword
1     E302 expected 2 blank lines, found 1
1     E401 multiple imports on one line
2     E701 multiple statements on one line (colon)
4     F401 'os' imported but unused
1     F821 undefined name 'SomeCommand'
3     W291 trailing whitespace
The output is formatted as:
file path : line number : column number : error code : short description
By adding the --show-source option, it’ll be easier to find out what parts of the source code need to be revised.
$ flake8 test_script.py  --show-source
test_script.py:2:1: F401 'os' imported but unused
import os, sys
^
test_script.py:2:1: F401 'sys' imported but unused
import os, sys
^
test_script.py:2:10: E401 multiple imports on one line
import os, sys
        ^
test_script.py:3:1: F401 'logging' imported but unused
import logging
^
...
...
...
We can see the result of pep8 (error code is Exxx and Wxxx) and pyflakes (error code is Fxxx) are output together.
Flake8 Error code meaning
The error code of flake8 are :
- E***/W***: Errors and warnings of pep8
- F***: Detections of PyFlakes
- C9**: Detections of circulate complexity by McCabe-script
Flake8 can be customised/configured in :
- Toplevel User directory, in
~/.config/flake8Or - In a project folder by one of
setup.cfg,tox.ini, or.flake8.
To customize flake8
[flake8]
ignore = D203
exclude = .git,__pycache__,docs/source/conf.py,old,build,dist, *migrations*
max-complexity = 10
This is same as the below one line command
$ flake8 --ignore D203 \
     --exclude .git,__pycache__,docs/source/conf.py,old,build,dist \
     --max-complexity 10
black
black是python代码自动格式化程序。 Black重新格式化整个文件的格式,并格式化字符串以使其具有双qoutes。
Black不可配置(行长除外)。
To install it:
pip install black.
Usage:
black {source_file_or_directory}
当我们做black test_script.py时得到的响应是

以文件test_script.py为例
And the formatted code is
from __future__ import print_function
import os, sys
import logging
from .. import views


class DoSomething(SomeCommand):
    def __init__(self):
        for i in range(1, 11):
            if self.number == i:
                print("matched")
            else:
                print("not matched")

    def check_user(self):
        if self.user:
            return True
        else:
            return False
要自定义black,我们必须在pyproject.toml中添加此部分
[tool.black]
line-length = 90
py36 = true
include = '\.pyi?$'
exclude = '''
/(
    \.git
| \.mypy_cache
| \.tox
| \.venv
| _build
| buck-out
| build
| dist
)/
'''
在上一节中,我们将line-lenght修改为90,并将python版本指定为3.6
autopep8
autopep8自动将Python代码格式化为PEP8样式。 它修复了pycodestyle报告的大多数格式问题。
To install it:
pip install autopep8
Usage(to format a file):
autopep8 --in-place {file_name}
此处--in-place是对文件进行更改。
Using the file test_script.py as an example
This is the formatted code.
from __future__ import print_function
import os
import sys
import logging
from .. import views


class DoSomething(SomeCommand):

    def __init__(self):
        for i in range(1, 11):
            if self.number == i:
                print("matched")
            else:
                print('not matched')

    def check_user(self):
        if self.user:
            return True
        else:
            return False
To configure autopep8 we have to add this section [pep8] in setup.cfg :
[pep8]
ignore = E226,E302,E41
max-line-length = 160
yapf
另一个Python格式化程序是由Google维护的另一个自动格式化程序。 yapf是高度可配置的,并且具有不同的基本配置,例如pep8,Google和Facebook。
To install it:
pip install yapf
Usage:
yapf -i {source_file_or_directory}
here -i is to make changes to files in place.
This is the formatted code.
from __future__ import print_function
import os, sys
import logging
from .. import views


class DoSomething(SomeCommand):
    def __init__(self):
        for i in range(1, 11):
            if self.number == i:
                print("matched")
            else:
                print('not matched')

    def check_user(self):
        if self.user: return True
        else: return False
To configure yapf we have to add this section [yapf] in setup.cfg :
[yapf]
ignore = E226,E302
max-line-length = 96
Environment Management
virtualenv and virtualenvwrapper
virtualenv
virtualenv是一种流行的工具,可用于创建隔离的python环境而不影响其他项目。
如果您一次有多个项目,这将非常有帮助,这样项目的软件包之间就不会发生版本冲突。 例如,如果您想为一个项目使用更多的python2.7,为另一个项目使用python3.5,则virtualenv解决了这个目的。
它创建了一个具有自己隔离的安装目录的环境,该目录不与其他virtualenv环境共享库。
We have to install it globally:
[sudo] pip install virtualenv
安装virtualenv后,必须为virtualenv mkdir 〜/ virtualenvironment创建目录
virtualenvwrapper
virtualenvwrapper类似于virtualenv的扩展,它简化了命令的使用和管理。
- To install it:
[sudo] pip install virtualenvwrapper
After installing, Add these lines to your shell startup file (.bashrc, .profile, etc.)
export WORKON_HOME=$HOME/.virtualenvs
export PROJECT_HOME=$HOME/Devel
source /usr/local/bin/virtualenvwrapper.sh
After editing the file, reload the startup file (e.g., run source ~/.bashrc).
We tell the startup file to set the location where the virtual environments should live, the location of your development project directories, and the location of the script installed with this package:
Next, we can create the virtualenv with command mkvirtualenv
This command creates the virtualenv and automatically loads it for us.
$ mkvirtualenv testEnv
New python executable in /Users/anmol/.virtualenvs/testEnv/bin/python2.7
Also creating executable in /Users/anmol/.virtualenvs/testEnv/bin/python
Installing setuptools, pip, wheel...done.
virtualenvwrapper.user_scripts creating /Users/anmol/.virtualenvs/testEnv/bin/predeactivate
virtualenvwrapper.user_scripts creating /Users/anmol/.virtualenvs/testEnv/bin/postdeactivate
virtualenvwrapper.user_scripts creating /Users/anmol/.virtualenvs/testEnv/bin/preactivate
virtualenvwrapper.user_scripts creating /Users/anmol/.virtualenvs/testEnv/bin/postactivate
virtualenvwrapper.user_scripts creating /Users/anmol/.virtualenvs/testEnv/bin/get_env_details
(testEnv) $
To come out of the virtualenv use command $ deactivate
If you want to create a virtualenv with a different version of python like python3(which should be globally installed) then specify the python version using -p python3
My system created the virtualenv with my default python which is python2.7.
If you also have python3 installed in your system and you want to create the virtualenv with python3 then create the virtualenv with this command mkvirtualenv testEnv -p python3
$ mkvirtualenv testEnv -p python3
Running virtualenv with interpreter /usr/local/bin/python3
Using base prefix '/usr/local/Cellar/python3/3.6.4_2/Frameworks/Python.framework/Versions/3.6'
New python executable in /Users/anmol/.virtualenvs/testEnv/bin/python3
Installing setuptools, pip, wheel...done.
(testEnv) $ python -V
Python 3.6.4
(testEnv) $
To list all virtualenvs present in the system run command: $ workon
workon lists all the virtualenvs present in the system.
To start working in a virtualenv: $ workon <name_of_virtualenv>
To remove/delete a virtualenv: $ rmvirtualenv <name_of_virtualenv>
pipenv
Pipenv是用于创建单独的/隔离的工作环境的工具,该工作环境管理依赖项版本。 它为项目文件夹中的每个项目创建virtualenv。
- To install it:
[sudo] pip install pipenv
接下来,要为项目创建pipenv,请转到项目目录并键入
$ pipenv install <package> // like pipenv install requests
$ pipenv install -r requirements.txt   // if our dependencies are listed in a file

$ pipenv --python python3 install  <package>  // with different version of python like python3
创建pipenv后,将创建2个文件Pipfile和Pipfile.lock,其中列出了我们的所有软件包,并且在我们安装/更新/删除任何软件包时,这些文件都会更新。
如果我们要添加仅用于开发/测试的软件包,则使用:code:` pipenv install -d`
To activate this project’s virtualenv, run pipenv shell
And to run a command inside the virtualenv with pipenv run . example pipenv run python hello.py
And to exit the virtualenv run exit
pip, requirement.txt and pipfile
Pip(Python的软件包管理器)是一个软件包管理系统,用于安装和管理以Python编写的软件包。
- To check pip version:
pip -V
To get pip:
First download pip
curl https://bootstrap.pypa.io/get-pip.py -o get-pip.py
Then run this command
python get-pip.py
- List all packages installed :
pip freeze
To install/unistall a package using pip:
pip install <pacakge>   // install
pip install <pacakge>==1.2.2   // install a specific version
pip uninstall <pacakge>   // uninstall
Requirement.txt is a text file which stores the list of all the pip packages with versions which are required to run the project.
To create a requirements.txt file do pip freeze > requirements.txt
A sample requirements.txt file
Django==2.0.3
djangorestframework==3.7.7
django-rest-swagger==2.1.2
coreapi==2.3.3
Pipfile只是对require.txt文件的替代。 使用pipenv时会生成pipfile。
Pipfile lists all the packages by separating the development/testing packages from the main packages used and also mentions the python version it uses.
A sample Pipfile
[[source]]
url = "https://pypi.python.org/simple"
verify_ssl = true
name = "pypi"

[packages]
coverage = "*"
requests = "*"

[dev-packages]
pylint = "*"

[requires]
python_version = "3.6"
poetry
Pocketry是用于Python中的依赖项管理和打包的工具。 它使我们能够声明您的项目所依赖的库,并将为我们管理(安装/更新)它们。
Poetry can be installed using pip, but the recommended way to install is
curl -sSL https://raw.githubusercontent.com/sdispater/poetry/master/get-poetry.py | python
To use poetry run this command:
poetry init
This command will help you create a pyproject.toml file interactively by prompting you to provide basic information about your package.
pyproject.toml is the main file which manages all the dependencies.
pyproject.toml file contains all the details of the project. It mentions the dependencies/dev-dependencies and also other details like name, description, author, version etc of project.
A sample pyproject.toml
[tool.poetry]
name = "base-ing"
version = "0.1.0"
description = ""
authors = ["anmol <anmol@agiliq.com>"]

[tool.poetry.dependencies]
python = "*"

[tool.poetry.dev-dependencies]
To add/remove a package :
poetry add <package>
poetry remove <package>
To add a package as a development-dependency:
poetry add <package> --dev
To run a command in poetry
poetry run python hello.py
Source code management
git
Git是一个版本控制系统,用于跟踪计算机文件或文件夹中的更改并协调多人之间对这些文件的工作。
Git/Version Control System is the basic tool in software development.
The main purpose of Git is to manage software development projects and its files, as they are changing over time. It stores the information in a repository.
To install git check this .
To learn git check official-tutorial and github-tutorial
github
GitHub is a web-based hosting service for version control using Git. It provides access control and several collaboration features such as issue tracking, feature requests, documentation, and wikis for every project.
With git, we can collaborate with other developers, track all our work via commits, and revert to any previous version of our code even if we accidentally delete something.
GitHub projects can be public or private and every publicly shared code is freely open to everyone. We can have private projects as well, though, they require a paid GitHub plan. Public repositories on Github are often used to share Open Source Software
It is the most-widely used web-based hosting service, and it has the largest number of open-source projects.
gitlab
GitLab是基于Web和基于自身的托管服务,用于使用Git进行版本控制。 Gitlab is free and open-source.
Gitlab offers unlimited free public/private repositories, where as Github offers unlimited public repositories only(private repositories require a paid plan)
GitLab offers all the features of Github plus builtin CI/CD service (Continuous Integration & Continuous Delivery), and more authentication levels.
Gitlab(Community Edition) is open-source and can be installed in private servers.
Continous Integration
Continuous Integration (CI) is a development practice which automates the build and testing process of the code. Continuous Integration automates the build and testing processes. The main objective of CI is to test code for every push made to the repository. We need to have a testing framework for the test in CI.
Each push is verified by an automated build and tests, individual changes are immediately tested and reported on when they are added to a repository, allowing developers to detect problems early.
CI encourages developers to integrate their code into a main branch of a shared repository. Instead of building out features in isolation and integrating them at the end of a development cycle, code is integrated with the shared repository by each developer multiple times throughout the day.
CI makes code integration a simple, fast process that is part of the everyday development workflow in order to reduce integration costs and respond to defects early.
gitlab-ci
Gitlab持续集成(CI)是gitlab中包含的开源CI服务,可用于gitlab中的所有项目。
To use GitLab CI, you first need to add a .gitlab-ci.yml file to the root directory of your repository, as well as configure your GitLab project to use a Runner. Afterwards, every commit or push will trigger the CI pipeline that has three stages: build, test and deploy.
To set up .gitlab-ci.yml file follow this official doc
circleci
Circleci is a cloud-based continuous integration server. It supports containers, OSX, Linux and can run within a private cloud or our own data center. that supports any language that builds on Linux or macOS.
It is available in both cloud-based and self-hosted.
- Setting up CircleCI:
- Sign-in to circleci.com and link your project.
- After that activate the service hook to that repo in the profile page of cirlceci .
- Add circle.yml to the project
To set up .circle-ci.yml file follow this official doc and for python apps - config circleci for python apps
Travis CI
Travis CI is a hosted continous integration service used to build and test the projects hosted at github.com. It is free for all open-source projects hosted on Github.com .
Travis CI builds and runs the tests every time we push the code to the github repo or put a pull request to the repo.
To use travis-ci we must add a file .travis.yml to our repository. And link our github account with travis-ci by logging in to travis-ci website
Sample .travis.yml file
language: python
python:
- 2.7
- 3.6

# command to install dependencies
install:
- pip install -r requirements.txt

# command to run tests
script:
- pytest # or py.test To test for Python versions 3.5 and below

branches:
- master
- dev
This file will get our project tested on all the listed Python versions by running the given script, and it will build the master and dev branch only.
The CI Environment uses separate virtualenv instances for each Python version.
By default Travis CI uses pip to manage Python dependencies. If you have a requirements.txt file, Travis CI runs pip install -r requirements.txt during the install phase of the build.
Python projects need to provide the script key in their .travis.yml to specify what command to run tests with.
Documentation Tools
Markdown (.md)
Markdown是最广泛使用的标记语言,通常用于格式化自述文件。
Text written in markdown are easy to read and can be easily converted to HTML.
There are different versions of markdown used , and github suggested one is the most popular.
Restructured Text (.rst)
reStructuredText是一个易于阅读的纯文本标记语法和解析器系统。
When compared reStructuredText is more formalised and powerful than markdown.
It is useful for in-line program documentation (such as Python docstrings), for quickly creating simple web pages, and for standalone documents.
reStructuredText is designed for extensibility for specific application domains.
何时使用markdown和reStructuredText 
- If you want to write a gist or a single page readme then it is better to use markdown.
- It you want to a write a documentation consisting of many in-line programs and tables then it is better to use reStructuredText.
- So, which one to use ?
- Generally it is - For small documentation use markdown otherwise use reStructuredText.
Deployment
Docker
- Docker是用于使用容器创建,部署和运行应用程序的开源工具。
- 容器使开发人员可以将应用程序与所需的所有部分(如库和其他依赖项)打包在一起,并将其全部打包为一个软件包。
通过使用容器,该应用程序将在任何计算机上运行,而与计算机用于编写和测试代码的计算机不同的任何自定义设置都可以运行。
容器化是一种将应用程序或服务,其依赖项及其配置(抽象为部署清单文件)打包为容器映像的方法。
容器化的应用程序可以作为一个单元进行测试,并且可以作为容器映像实例部署到主机操作系统(OS)。
Docker是用于自动化应用程序部署的开源工具。
Docker Compose
Compose是用于运行多容器应用程序的工具,例如带有数据库的容器和应用程序。 我们可以使用单个命令撰写来启动/停止多种服务。
我们可以创建多个撰写文件,每个用于生产,登台,开发,测试以及CI,并且每个文件将相互隔离。
To use compose
- 创建一个
Dockerfile,其中提到了我们所有的环境配置和初始软件包。 - 创建一个文件
docker-compose.yml,并提及我们将要使用的所有服务。 - 最后运行
docker-compose up。
Dockerfile
FROM python:3.4-alpine                      # 1
ADD . /code             #2
WORKDIR /code        #3
ADD requirements.txt /code/         #4
RUN pip install -r requirements.txt       #5
In the above file we
- In
#1we are building an image starting with the Python 3.4 image - In
#2and#3we are adding directory :code:` . ` into the path/codein the image and making it the working directory. - In
#4and#5we adding the requirements file to the/code/directory and installing all requirements.
docker-compose.yml
version: '3'           # 1

services:            # 2
    web:
        build: .        # 3
        command: python3 manage.py runserver 0.0.0.0:8000   #4
        volumes:                                    # 5
        - .:/code
        ports:                          #6
        - "8000:8000"
        depends_on:                #7
        - db
    db:
        image: postgres
In
#1we mention the docker version (which is 3)#2defines two services, web and db.- The
webservice uses an image that’s built from the Dockerfile - The
dbservice uses a public Postgres image pulled from the Docker Hub registry.
- The
#3tells to find the the dockerfile in the current directory#4is a command to run the service .#5tells the host paths for that service.#6forwards the exposed port 8000 on the container to port 8000 on the host machine.#7mentions the dependency between services
To use the docker compose , we use commands
$ docker-compose up          # to create and start the containers

$ docker-compose build        #to build or rebuild services

$ docker-compose up --build        # build the services and start the containers
We write different `docker-compose` files for each Development, Testing, & Production.
Fabric
Fabric是一个高级Python(2.7,3.4+)库,旨在通过SSH远程执行Shell命令以进行应用程序部署。
它提供了用于执行本地或远程Shell命令(通常或通过sudo)以及上载/下载文件的基本操作套件,以及诸如提示正在运行的用户进行输入或中止执行等辅助功能。
我们可以通过SSH执行shell命令,因此我们只需要在远程计算机上运行SSH。 它与我们指定的远程计算机进行交互,就好像它们是本地计算机一样。
Fabric可以用于许多用途,包括部署,重新启动服务器,停止和重新启动进程。
To install fabric pip install fabric
Fabric提供了一个命令行实用程序fab,用于查找fabfile.py,该文件是包含Python代码的文件。
example fabfile:
from fabric.api import run
def diskspace():
    run('df')
上面的示例提供了一个检查可用磁盘空间的功能,run命令在具有用户级别权限的所有特定主机上执行远程命令。
fabfile应该在我们运行Fabric工具的目录中。 我们将所有功能,角色,配置等写在fabfile中。
Ansible
Ansible是用于部署我们的应用程序的自动化工具。 它使我们能够通过一个通用框架可靠,一致地部署多层应用程序。
Ansible是一种配置管理和配置工具,用于通过SSH自动执行部署任务。
Ansible helps to automate :
- Application deployment: Make DevOps easier by automating the deployment of internally developed applications to our production systems.
- Configuration management: Change the configuration of an application, OS, or device; start and stop services; install or update applications; implement a security policy; or perform a wide variety of other configuration tasks.
- Set up the various servers needed in our infrastructure.
Google Cloud Platform
Google Cloud Platform(GCP) is a suite of cloud computing services offered by Google.
The platform includes a range of hosted services for compute, storage and application development that run on Google hardware. Google Cloud Platform services can be accessed by software developers, cloud administrators and other enterprise IT professionals over the public internet or through a dedicated network connection.
The core cloud computing products in Google Cloud Platform include:
- Google Compute Engine, is an infrastructure-as-a-service (IaaS) offering that provides users with virtual machine instances for workload hosting.
- Google App Engine, is a platform-as-a-service (PaaS) offering that gives software developers access to Google’s scalable hosting. Developers can also use a software developer kit (SDK) to develop software products that run on App Engine.
- Google Cloud Storage, is a cloud storage platform designed to store large, unstructured data sets. Google also offers database storage options, including Cloud Datastore for NoSQL nonrelational storage, Cloud SQL for MySQL fully relational storage and Google’s native Cloud Bigtable database.
- Google Kubernetes Engine, is a managed, production-ready orchestrated environment for deploying containerized applications that run within Google’s public cloud. It brings our latest innovations in developer productivity, resource efficiency, automated operations, and open source flexibility to accelerate your time to market.
Let us see an example tutorial below which deploys a django application on GCP using Kubernetes
This tutorial should help to deploy a django application on a Kubernetes Cluster. Before starting this tutorial, the user is expected to have basic knowledge of GKE, Django, PostgreSQL and Docker
Understanding Kubernetes
在进入本教程之前,让我们对kubernetes是什么以及对我们如何部署django应用程序有什么帮助有一个基本的了解。
What is Kubernetes?
Kubernetes在其基本级别上是一个用于运行的系统 它是一个平台,旨在使用提供可预测性,可伸缩性和高可用性的方法来完全管理容器化应用程序和服务的生命周期。
要了解有关kubernetes的更多信息,请访问此处
Moving on, as a part of this tutorial we’ll be deploying Polls API, from here
Local Deployment of Polls API
让我们首先从中克隆示例django应用程序
git clone https://github.com/yvsssantosh/django-polls-rest.git
为了确保我们在master分支上,请运行命令git checkout master
要在本地测试应用程序,我们创建一个虚拟环境并测试服务器
# Creating a virtual environment
mkvirtualenv pollsapi

# Installing current project requirements
pip install -r requirements.txt

# Connect to postgres
export POSTGRES_USER=pollsdb
export POSTGRES_DB=polls_admin
export POSTGRES_PASSWORD=polls_password
export POLLSAPI_PG_HOST=127.0.0.1

# Running migrations
python manage.py migrate

# Start the local server
python manage.py runserver 0.0.0.0:8000
现在我们已经在本地服务器上进行了测试,让我们创建一个新的kubernetes集群并在其上部署我们的应用程序。
Setting up Google Cloud SDK
有关设置Google Cloud SDK的说明,请导航至https://cloud.google.com/sdk
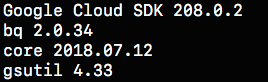
Read the installation instructions and setup accordingly. Once done, check the installation status by running the command
$ gcloud -v
It should show an output similar to this:
Setting up kubectl command line
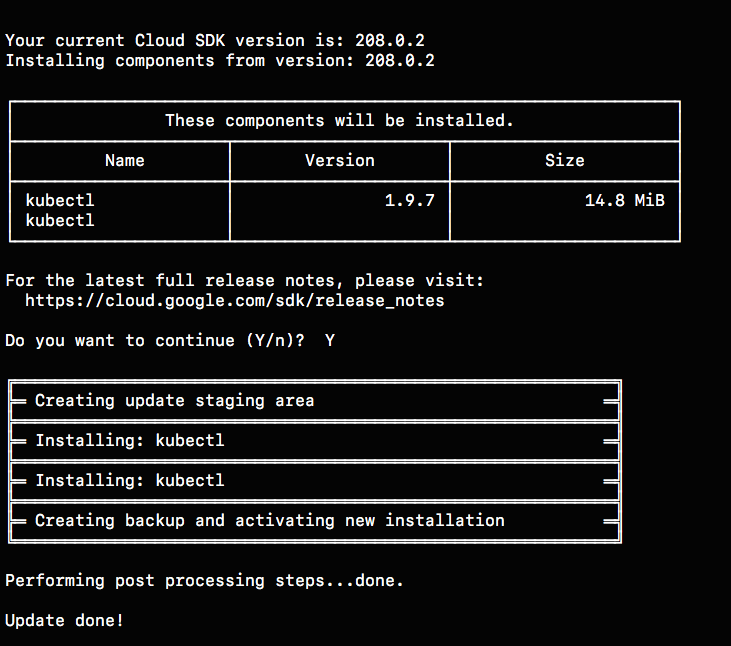
To manage and maintain a kubernetes cluster from our desktop/laptop we need to setup kubectl command line. It can be done using the command
gcloud components install kubectl
Once the installation finishes, we should see something like this:
Creating a kubernetes cluster
Navigate to https://console.cloud.google.com. Select an existing
project or create a new one, based on requirement.
Then click on Kubernetes Engine from the navigate menu which would result in the following page
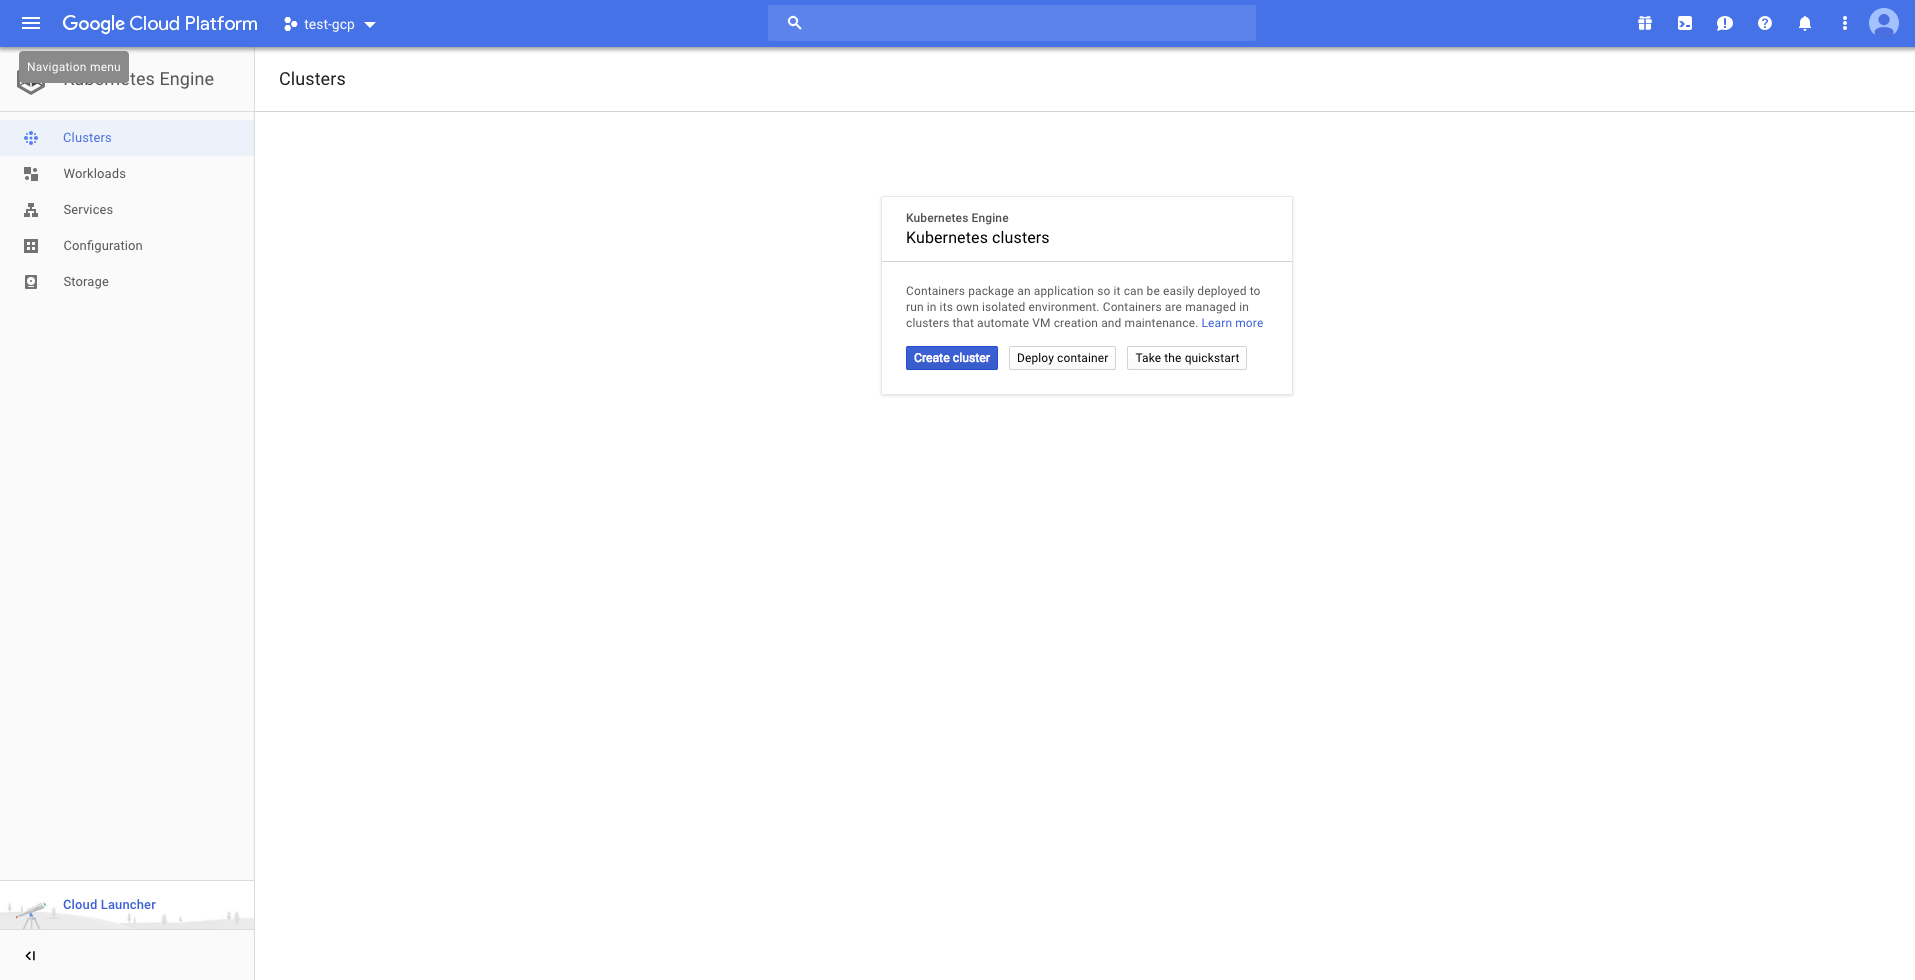
Create a new cluster. I’ve created a cluster based on the following settings
Cluster name        :   pollsapi
Location            :   Zonal
Zone                :   asia-south1-a
Cluster Version     :   1.9.7-gke.3 (default)
Machine Type        :   Small (1 shared CPU with 1.7GB Memory)
Node Image          :   Core OS (cos)
Size                :   2
Boot Disk Size      :   20GB per Node

#######################################################################################
## Only for testing purposes as preemptible nodes are NOT recommended for Production ##
#######################################################################################

Preemptible Nodes   :   Yes
Please be patient as it takes some time to create the cluster
Once the cluster is created, we’ll be able to see a tick mark beside the name of the cluster.
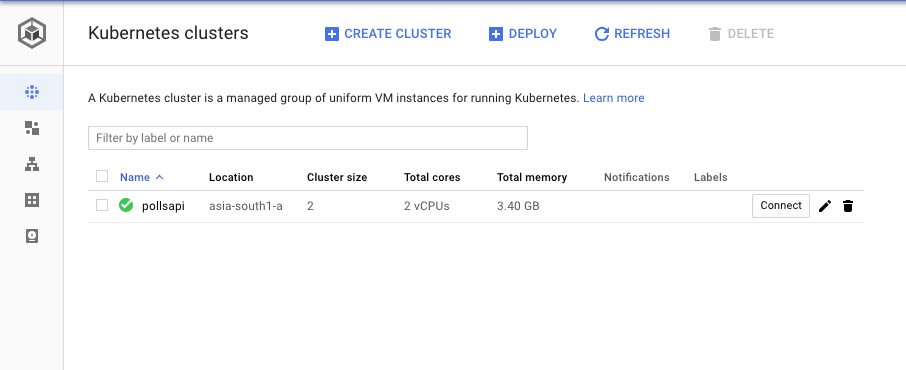
Now click on Connect and copy the command shown, and paste it in
terminal.

Once connected run the command kubectl get all.

Now that the cluster is up and running, lets package our application into a containerized one using docker.
Setting up Google Container Registry using Docker
Configuring docker with gcloud:
gcloud auth config-docker

Once docker is configured, we are ready to build the image.
# Build the image
# Common format to push an image to google container registry is gcr.io/$PROJECT_ID/$IMAGE_NAME:$TAG

export PROJECT_ID=YOUR_PROJECT_ID_HERE
export IMAGE_NAME=YOUR_IMAGE_NAME_HERE
export TAG=YOUR_IMAGE_TAG (optional, default is `latest`)

# In my case, giving the tag as v1.0.0 (default is latest)
docker build -t gcr.io/test-gcp-208915/pollsapi:v1.0.0 .
# (Note the . in the end)

# Push the image
docker push gcr.io/test-gcp-208915/pollsapi:v1.0.0
Once the image has been pushed, paste the push URL in browser. It will ask you to sign in into google account which has been used to configure this cluster (if not already signed in).
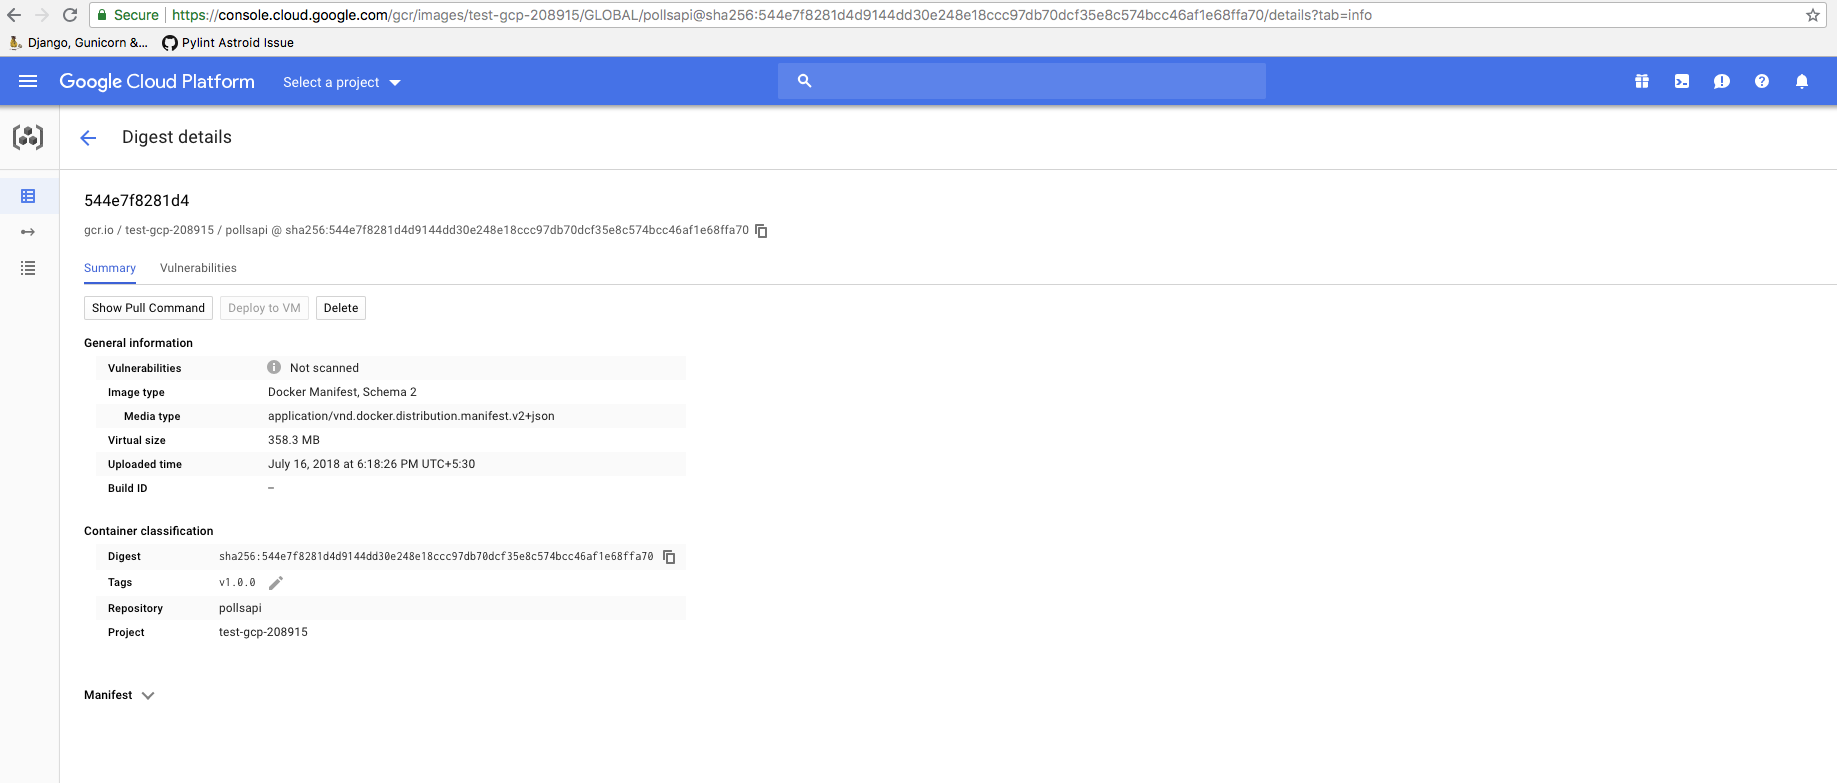
Since our image has been uploaded sucessfully, we need to setup the database next.
Setting up Helm Package Manager
The simplest way of setting up PostgreSQL on kubernetes is with the help of Helm Package Manager
For mac users, the command to install helm (using brew) is:
# Install Helm
brew install kubernetes-helm

# Setup Helm
helm init
Note: Often during package installation i.e.,helm install --name MY_RELEASE stable/PACKAGE_NAMEa common error is generated explaining tiller not having access to create cluster role bindings. This usually happens if the user logged inside Google Cloud SDK doesn’t have proper access to create role bindings or issues with helm installation.
If that error occurs, then run the following commands:
# Completely uninstall helm
helm reset --force

# Remove directories created by helm
sudo rm -r ~/.helm
Once helm is completely removed, create a clusterrolebinding and a serviceaccount for helm using the code below
rbac-config.yaml
apiVersion: v1
kind: ServiceAccount
metadata:
  name: tiller
  namespace: kube-system
---
apiVersion: rbac.authorization.k8s.io/v1beta1
kind: ClusterRoleBinding
metadata:
  name: tiller
roleRef:
  apiGroup: rbac.authorization.k8s.io
  kind: ClusterRole
  name: cluster-admin
subjects:
  - kind: ServiceAccount
    name: tiller
    namespace: kube-system
Create a file named rbac-config.yaml and run the following using kubectl command line
# Creating Service Account and ClusterRoleBinding Tiller
kubectl create -f rbac-config.yaml
Once this is sucessfully done, initialize helm using
helm init --service-account tiller
And then run the command to install Postgresql in our cluster, as previously mentioned.
Setting up PostgreSQL
Before we setup PostgreSQL, lets create a namespace databases
# Why create namespace databases?
# This command is totally optional, but this is prefered this because I place all the
# databases created in a single namespace so that they'll be easy to access.
kubectl create namespace databases

# Before creating PostgreSQL using helm, lets understand few basics.

# Default command of creation enables Persistent Volume Claim (PVC)
# Instead of default postgres username, we are setting custom user.
# So replace YOUR_POSTGRES_USER with desired username, in my case polls_admin &
# MY_RELEASE_NAME, which in my case is pollsdb &
# MY_DATABASE_NAME, which in my case is pollsdb

# helm install --name MY_RELEASE_NAME stable/postgresql --set postgresUser=YOUR_POSTGRES_USER,postgresDatabase=MY_DATABASE_NAME --namespace databases

helm install --name pollsdb stable/postgresql --set postgresUser=polls_admin,postgresDatabase=pollsdb --namespace databases

# If user wishes not to have a separate namespace then just ignore the last two words
# i.e. --namespace databases
For more options on customizing postgres with custom parameters, see here
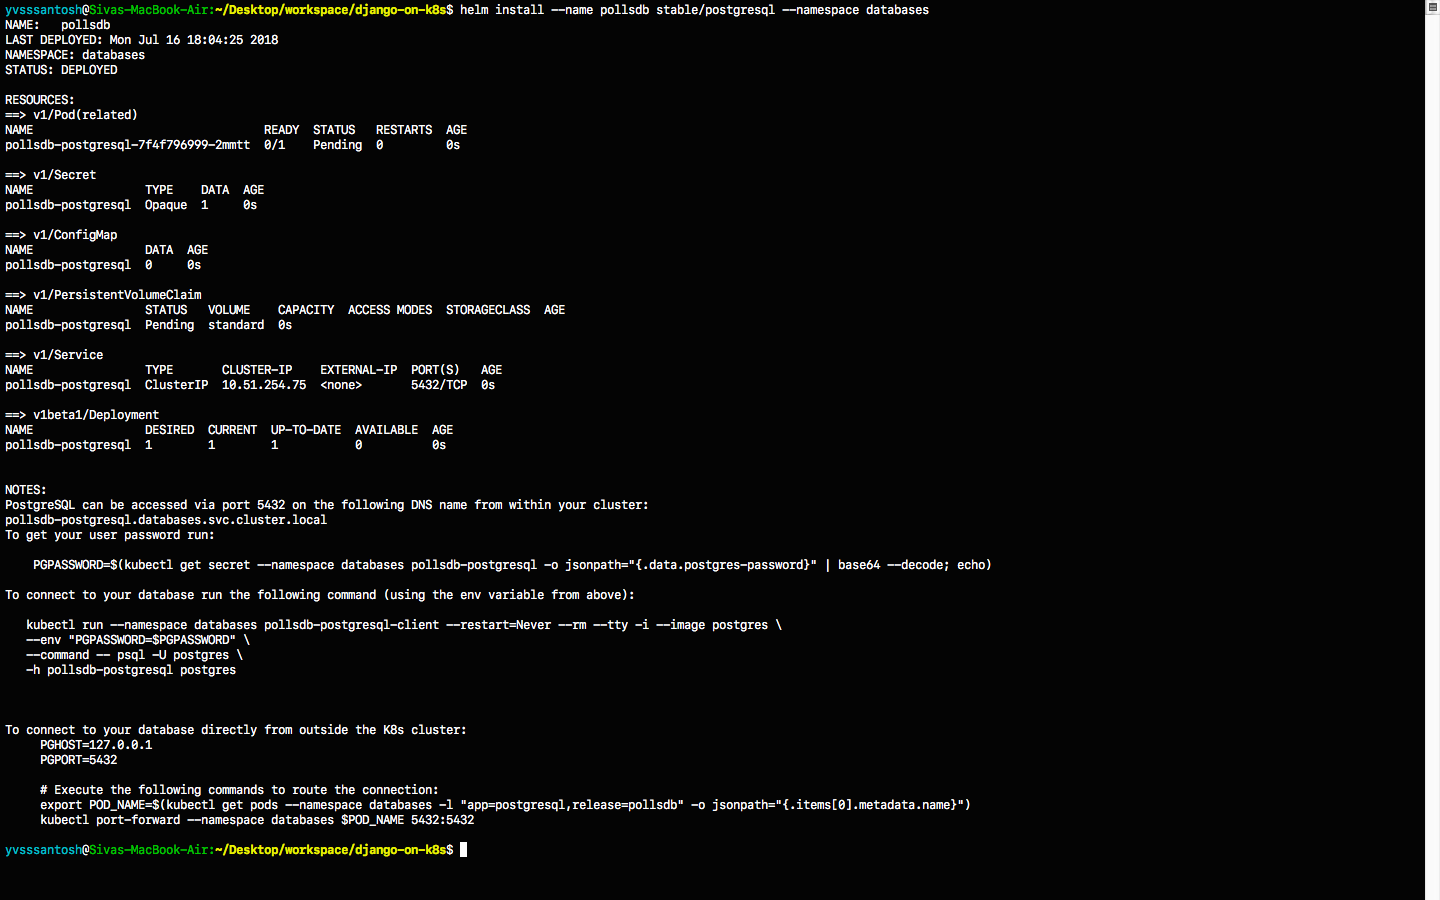 DO NOT FORGET to take a note of PGPASSWORD as seen in the
NOTES section (above image) once postgres has been created
DO NOT FORGET to take a note of PGPASSWORD as seen in the
NOTES section (above image) once postgres has been created
# Saving password of PostgreSQL into environemt varialble $PGPASSWORD
PGPASSWORD=$(kubectl get secret --namespace databases pollsdb-postgresql -o jsonpath="{.data.postgres-password}" | base64 --decode; echo)

# Why save the password?
# Since we have created a separate namespace for databases, secrets from one namespaces cannot be accessed from another
# So in order to access the postgres password in the default namespace, we must create a new secret
# Let's first convert our password into base64 encoding.

echo -n $PGPASSWORD | base64

# MUST DO : Copy the generated value and replace it with `YOUR_ENCODED_PASSWORD` in the `polls-password-secret.yml`. Then create the secret.

kubectl create -f pollsdb-password-secret.yml

# Now that the secret has been setup, lets migrate the data.
kubectl create -f polls-migration.yml

# Wait for a minute and check the status of the migration using folling commands.
kubectl get jobs

# In order to check the logs, identify the pod running the pod running migration.
kubectl get pods --show-all

# Check the logs of the pod
# kubectl logs POD_NAME
kubectl logs polls-migration-5tf8z

# Since the jobs have passed, there is no need for them to exist.
# We can just delete the jobs using
kubectl delete -f polls-migration.yml

Serving Static Files
Now that we have the database up and running with our migrations, lets setup our static files. Rather than setting up a separate NGINX server to serve static files, it’d be much simpler, secure & faster to use Google Cloud Storage as a provider to serve static files.
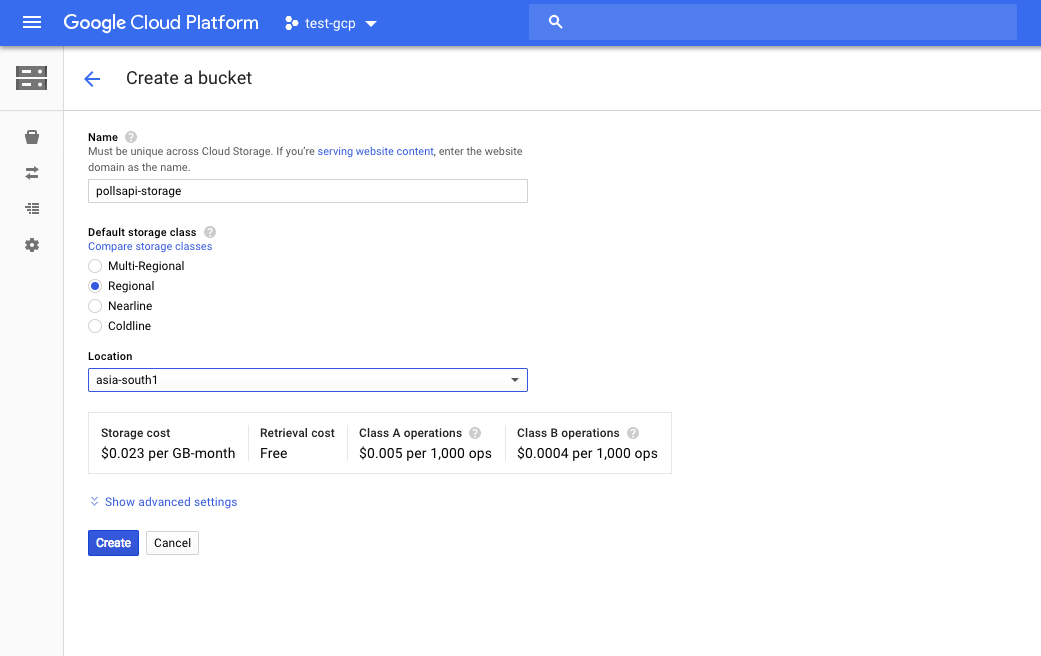
Let’s first create a bucket in Google Cloud Storage. Visit https://console.cloud.google.com/storage
Make sure to the check if the right project is selected.
I’ve created a bucket using the following settings:
Name of Bucket          :   pollsapi-storage
Default Storage Class   :   Regional
Location                :   asia-south1 (Closest to my location)
Once the bucket is created, navigate to the settings icon as shown below

In the interoperability tab, create a new key. This key is required to let our django application send static files to our bucket.

Now that we have ACCESS_KEY, ACCESS_SECRET and BUCKET_NAME, lets create a secrets file in kubernetes, so that we can directly use these as environment variables in our django application.
# Lets first encode our secrets into base64 format

echo -n 'YOUR_SECRET_ACCESS_KEY_ID_HERE' | base64

## Repeat the same for SECRET_ACCESS_KEY and BUCKET_NAME
Once we have the three generated values, replace them in
cloud-storage-secrets.yml. After replacing the values with
appropriate ones, lets create our secret in kubernetes.
# Creating cloud storage secret
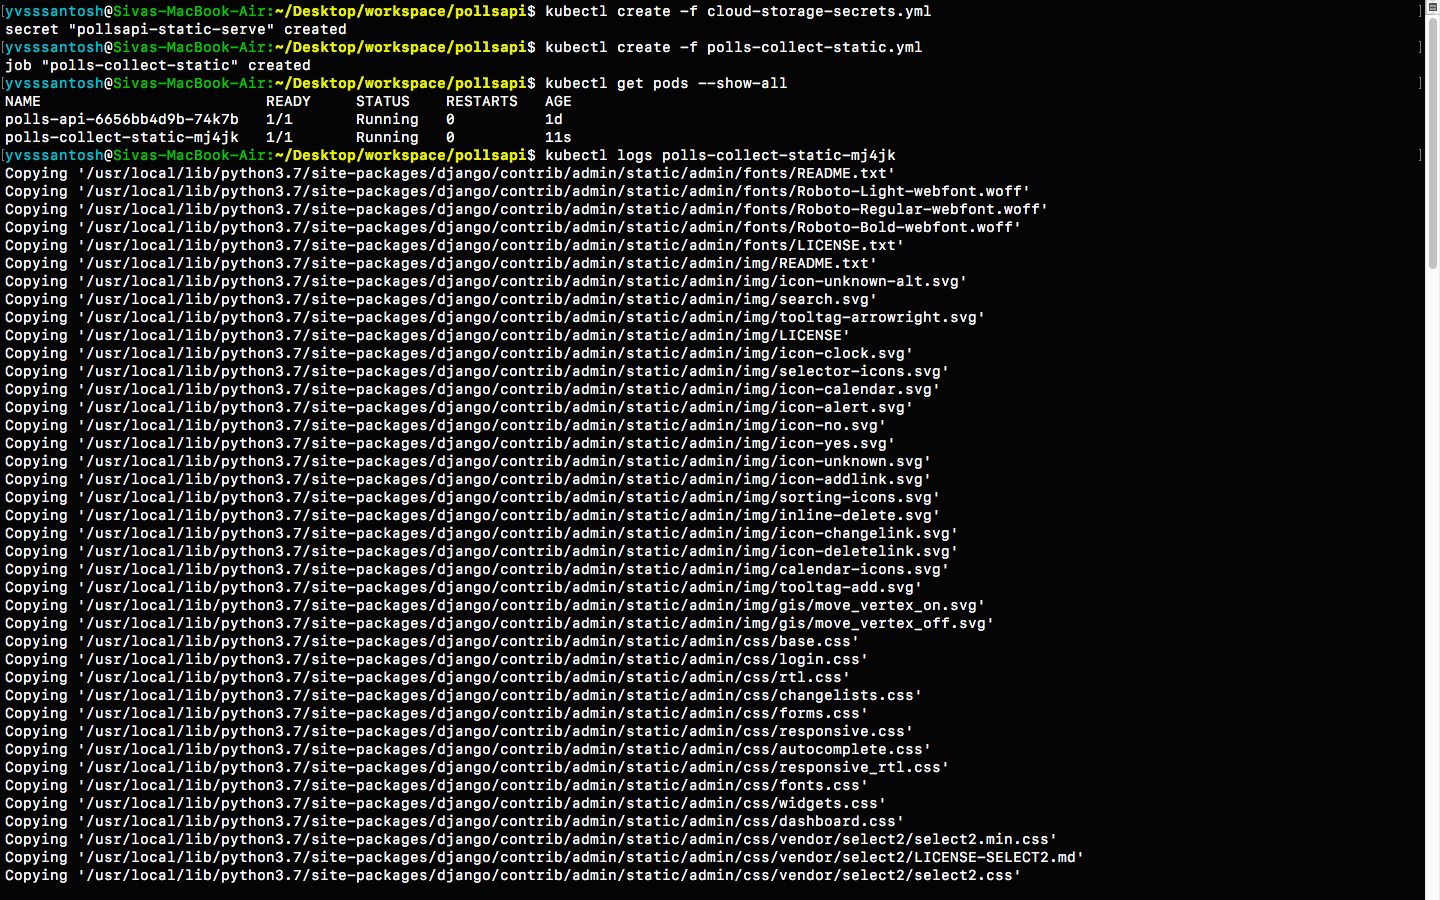
kubectl create -f cloud-storage-secrets.yml
Now that the secrets are setup sucessfully, lets run the Job
polls-collect-static.yml in order to collect static files.
kubectl create -f polls-collect-static.yml

# Note : It will take some time to collect the static files, as they are being uploaded
# to our bucket from the batch job which we created just now.
# We can just check the status of static files by either checking the logs
# or by checking the job status itself

We have sucessfully setup static files in our application. But the major question is:
How are the static files being served?
To answer that question, lets see a small code snippet below
# First, the packages Boto & Django Storages are required. Lets install them
# These packages help us to connect to Google Cloud Storage
pip install boto django-storages

# Check the following snippet now (from settings.py file under the STATIC_FILES_SETTINGS)
DEFAULT_FILE_STORAGE = 'storages.backends.gs.GSBotoStorage'
STATICFILES_STORAGE = 'storages.backends.gs.GSBotoStorage'

GS_ACCESS_KEY_ID = os.environ.get('GS_ACCESS_KEY_ID', None)
GS_SECRET_ACCESS_KEY = os.environ.get('GS_SECRET_ACCESS_KEY', None)
GS_BUCKET_NAME = os.environ.get('GS_BUCKET_NAME', None)

# Here we are configuring Google Cloud Storage as our default storage provider.
# So whenever we run python manage.py collectstatic, all the static files
# will be uploaded/updated in our Google Cloud Storage.
# This also makes sure that all the static files (when required), will be served
# from the location specified.

# GS_ACCESS_KEY_ID, GS_SECRET_ACCESS_KEY and GS_BUCKET_NAME are the environment
# variables which were created in `cloud-storage-secrets.yml` and are passed to our
# application when the yaml file has been created.
Setting up Django Application
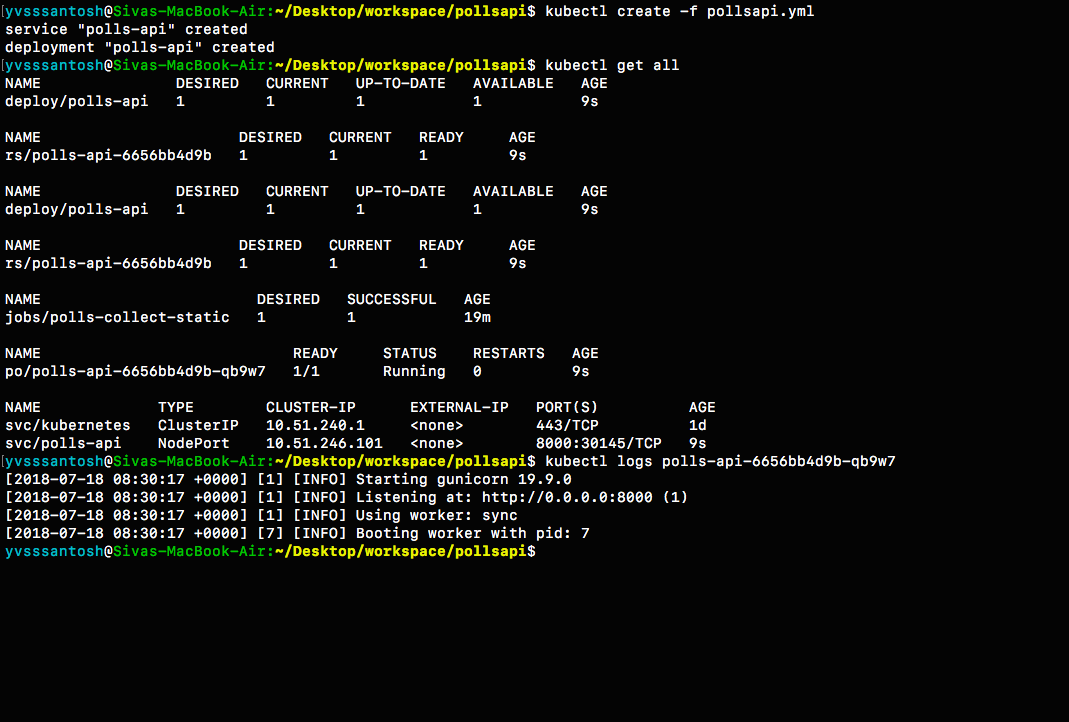
Now that we have the database ready with migrations, collected staticfiles, lets start our application.
# Start application
kubectl create -f pollsapi.yml
Note: 1. Usually, we run the server using
python manage.py runserver. This is NOT RECOMMENDED for
production purposes because of security concerns and extra memory usage.
More on this can be found
here
Keeping that in mind, this tutorial uses gunicorn server to run the
application.
- The service type is NodePort for our application, which means that we’ll be able to access our application once we expose it using an Ingress.
Exposing our Application
Lets create an Ingress to expose our application.
kubectl create -f pollsapi-ingress.yml
Note that creating an ingress may take atleast 5 minutes, or sometimes even more. Please be patient while an ingress is being created
To check the status of the ingress, see below 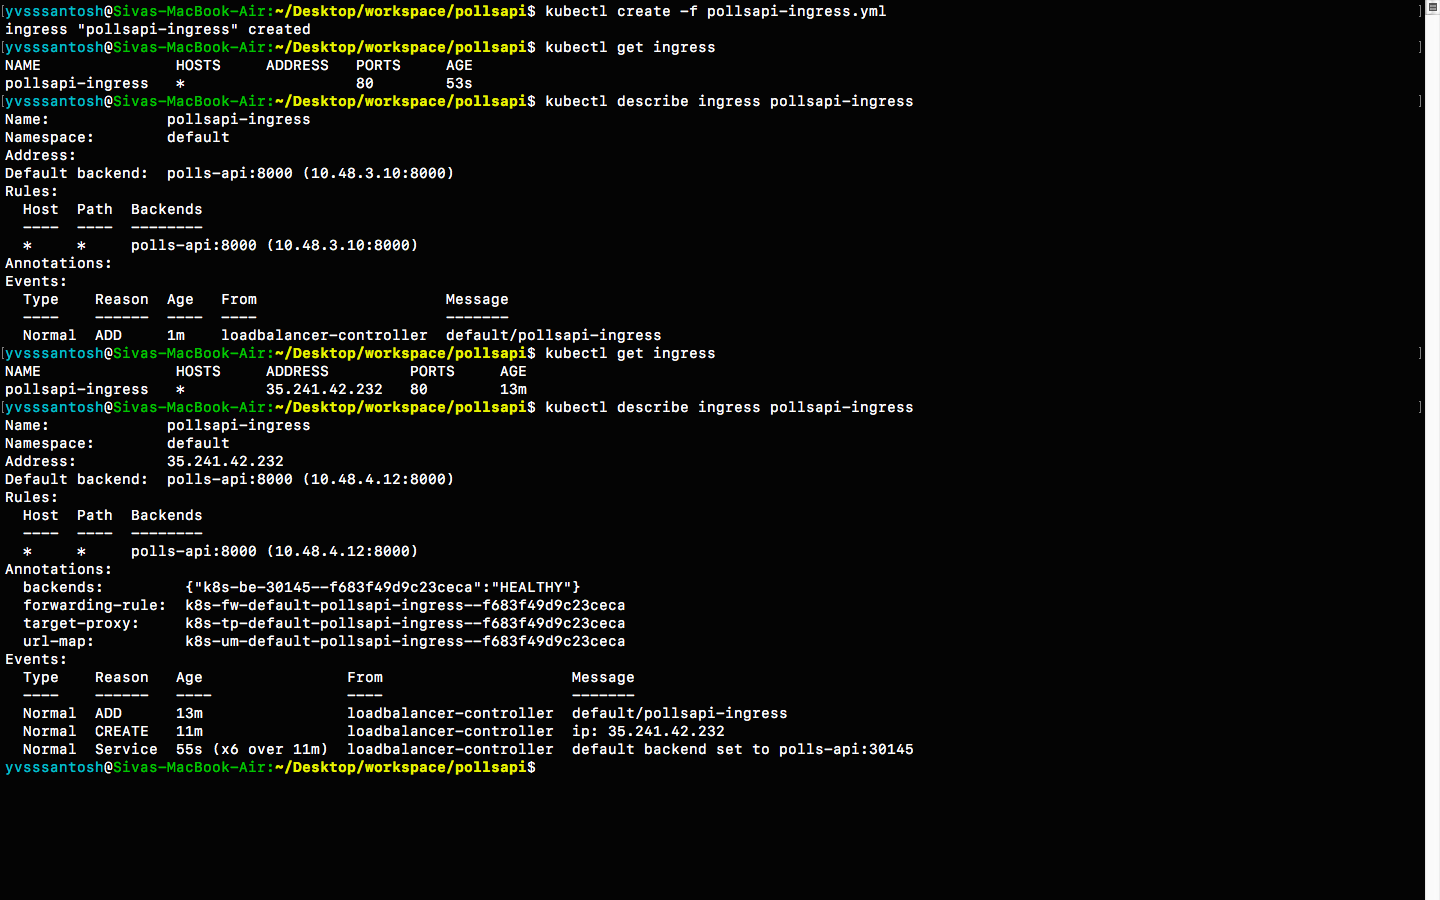
As expected, it took around 10 minutes for the ingress to setup
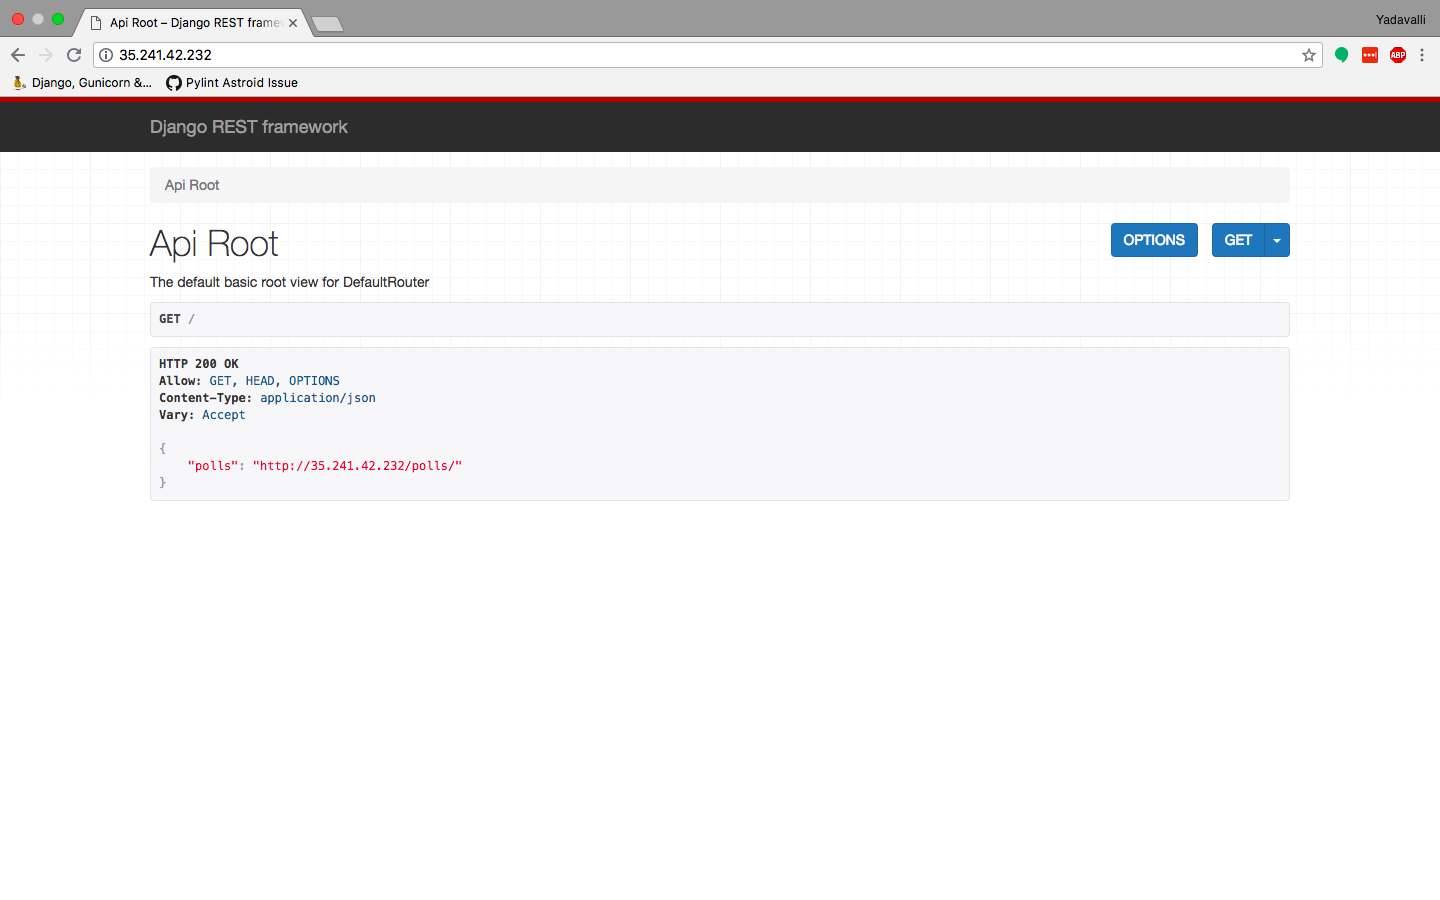
properly. Navigate to the ingress address generated i.e.
http://35.241.42.232/ in order to access our application.

Amazon Web Services
AWS is a cloud platform service from amazon, used to create and deploy any type of application in the cloud.
AWS is a Cloud platform service offering compute power, data storage, and a wide array of other IT solutions and utilities for modern organizations. AWS was launched in 2006, and has since become one of the most popular cloud platforms currently available.
We should have an account in AWS to use aws services. It offers many featured services for compute, storage, networking, analytics, application services, deployment, identity and access management, directory services, security and many more cloud services.
To use AWS for python, check https://aws.amazon.com/developer/language/python/
We can use Boto3 (python package) which provides interfaces to Amazon Web Services, it makes us easy to integrate our Python application, library, or script with AWS services
Boto3 is the Amazon Web Services (AWS) Software Development Kit (SDK) for Python, which allows Python developers to write software that makes use of services like Amazon S3(Simple storage service) and Amazon EC2(Elastic Compute Cloud).
Amazon Elastic Cloud Compute (EC2)
Amazon Elastic Compute Cloud (Amazon EC2) is a web service that provides resizeable computing capacity.
We use Amazon EC2 to launch a virtual servers and also configure security , networking, and manage storage. It enables us to scale up or down depending the requirement.
- It provides virtual computing environments called as instances
- Various configurations of CPU, memory, storage, and networking capacity are available for our instances, known as instance types.
Amazon Elastic Beanstalk
AWS Elastic Beanstalk is a service for deploying and scaling web applications and services. Elastic Beanstalk will also run instances (Computing environments) EC2, and it has some additional components like Elastic Load Balancer, Auto-Scaling Group, Security Group.
We pay only for the EC2 instances or S3 buckets and aws-DB we use and the other features like Elastic Load Balancer, Auto-Scaling Group, Security Group in Elastic Beanstalk do not cost anything.
Amazon Lambda
Amazon Lambda is a computing service which automatically manages the server. AWS Lambda executes our code only when needed and scales automatically, from a few requests per day to thousands per second.
We only pay for the compute time we comsume , and there will be no charge if the code is not running.
The initial purpose of lambda is to simplify building on-demand applications that are responsive to events. AWS starts a Lambda instance within milliseconds of an event.
Deployment in AWS services:
Once we connect with the server using ssh , then the deployment will be same for all services. Which is same as in the example mentioned in the next chapter
Deploying a Django application
This chapter tells the basics of deploying a django application using gunicorn, nginx and supervisord.
Prerequisites
Knowledge
- Django basics
- (Optional) finish the book about django-rest-apis .
Resources
A Unix server for deploying the app , connected with a SSH(preferred).
Django is a free and open source web application framework, written in Python. Django has a lot of inbuilt set of components that helps you to develop websites faster and easier.
Gunicorn is a simple, light-weight Python WSGI HTTP Server for UNIX. WSGI is the Web Server Gateway Interface. It is a specification that describes how a web server communicates with web applications, and how web applications can be chained together to process one request.
Nginx is a high-performance HTTP server, reverse proxy, load balancer and static files loader.
Supervisord is a process-control system which allows us to monitor and control a number of processes on UNIX operating system.
Let’s start with our server
Once we create our server and let’s login to the server via SSH,
$ ssh root@IP_ADDRESS_OF_SERVER
Now we have to install the prerequisites, run these commands
$ sudo apt-get update
$ sudo apt-get install git python-pip python-dev virtualenv virtualenvwrapper
$ sudo apt-get install postgresql postgresql-contrib
$ pip install --upgrade pip
Now let’s configure the virtual-env wrapper
After setting-up the virtualenvwrapper, create a virtualenv
$ mkvirtualenv env-name
From within our virtual-env, install:
(env-name) $ pip install django gunicorn psycopg2
Let’s clone the repo in home folder, pull the application from Git, we use this repo https://github.com/anmolakhilesh/django-polls-rest
$ cd ~
$ git clone https://github.com/anmolakhilesh/django-polls-rest
Now we have to add permissions to the manage.py file
$ cd /django-polls-rest/
$ chmod 755 manage.py
Now install the requirements
(env-name) $ pip install -r requirements.txt
Now set up PostgreSQL
Create a file .env and add these lines in that
$ export POSTGRES_DB = pollsdb
$ export POSTGRES_USER = polls_admin
$ export POSTGRES_PASSWORD = polls_password
$ export POLLSAPI_PG_HOST = 127.0.0.1
Create a postgres Database
$ sudo -u postgres psql
After running the above command, we will be logged inside PostgreSQL terminal, now lets create our db and user
> CREATE DATABASE pollsdb;
> CREATE USER polls_admin WITH PASSWORD 'polls_password';
> ALTER ROLE polls_admin SET client_encoding TO 'utf8';
> ALTER ROLE polls_admin SET default_transaction_isolation TO 'read committed';
> ALTER ROLE polls_admin SET timezone TO 'UTC';
> ALTER USER polls_admin CREATEDB;
> GRANT ALL PRIVILEGES ON DATABASE pollsdb TO polls_admin;

> \q   # to quit the shell
Make sure that these details match the details in the .env file. Exit the PostgreSQL shell by typing \q .
Now as the DB is ready , we can run migrations command inside the repo folder.
# migrations
(env-name) $ python manage.py migrate

# Create a supervisor, let's
(env-name) $ python manage.py createsuperuser
Now postgres-db is setted, now we have to set up the server
Using gunicorn
(env-name) $ pip install gunicorn
After installing gunicorn , now run it
# starts the server
(env-name) $ gunicorn polls_rest.wsgi
It will run the app , we can check IP_ADDRESS_OF_SERVER:8000 , IP_ADDRESS_OF_SERVER:8000/admin .
It will not have any css , as the gunicorn only serves the application. We will be serving static files using nginx .
To exit it press Ctrl+C .
# starts the server by binding it to a specific port
(env-name) $ gunicorn --bind 0.0.0.0:8888 polls_rest.wsgi

# running with a config file
(env-name) $ gunicorn -c /path/to/config/file polls_rest.wsgi

# running in daemon mode
(env-name) $ gunicorn --daemon polls_rest.wsgi
If it is in daemon-mode, then exit it with pkill gunicorn , which will kill the gunicorn process.
To have a gunicorn config file for gunicorn , we write the config file in a .py .
Using nginx
By using gunicorn, we were able to run the application, but without styles as the gunicorn only runs the application and does not serve the static files django does not serve static file except in development.
We will use nginx to serve the static files , nginx will first get the request, and it will send it to gunicorn.
To install nginx
$ sudo apt-get install nginx
let’s configure nginx
So, create a file /etc/nginx/sites-available/pollsapp and add the following
server {
    listen 80;   #L1
    server_name SERVER_DOMAIN_OR_IP_ADDRESS_OF_SERVER;   #L2

    location = /favicon.ico { access_log off; log_not_found off; }   #L3

    location /static/ {                  #L4
            root /home/django-polls-rest;
    }

    location / {                        #l5
            include proxy_params;
            proxy_pass http://unix:/home/django-polls-rest/polls_rest.sock;
    }
}
- #L1 and #L2 lines defines where our nginx server should run.
- #L3 line ignores any errors related to the favicon.
- #L4 block
location /static/defines the location of static files. - #L5 block
location /tells the socket(gunicorn socket) to communicate.
After this, we have to enable this config file by linking with the sites-enabled folder.
$ ln -s /etc/nginx/sites-available/pollsapp /etc/nginx/sites-enabled
We link the above file to sites-enabled , so that it will be included in the main nginx settings file /etc/nginx/nginx.conf
After enabling the config file , we can check nginx configuration by
$ sudo nginx -t
If the configuration file is correct , then we should see this

Now we have to mention the static files directory of our app in settings.py file . So add this line in settings.py
STATIC_ROOT = os.path.join(BASE_DIR, 'static/')
After adding this line, we have to perform run collectstatic command
(env-name) $ python manage.py collectstatic
Let’s run the app
(env-name) $ gunicorn --daemon --workers 3 --bind unix:/home/django-polls-rest/polls_rest.sock polls_rest.wsgi
The /home/django-polls-rest/polls_rest.sock file is a unix-socket file which will be created automatically.
And this file will enable Gunicorn and Nginx to communicate with each other.
Now Restart Nginx for changes to take effect.
$ sudo service nginx restart
This will run our app in the http://IP_ADDRESS
Point to remember , checkALLOWED_HOSTSinsettings.pyto have you host name or ip address of server.
Configuring Gunicorn with Supervisord
Supervisor is a process monitoring tool, which can restart any process if the process dies or gets killed for some reason.
At present we are manually starting gunicorn in daemon to run our app, Suppose if this gunicorn process closes or gets killed due to some reason then we have to manually start it again. To monitor our processes we use Supervisord, So that supervisor controls the gunicorn process.
To install supervisord
$ sudo apt-get install supervisor
Let’s add a configuration file pollsapi.conf for our application in /etc/supervisor/conf.d/ folder,
the conf.d folder will have all our config files.
[program:pollsapi]   #L1
directory=/home/django-polls-rest/polls_rest     #L2
command=/home/.virtualenvs/demo-polls-1/bin/gunicorn --workers 3 --bind unix:/home/django-polls-rest/polls_rest.sock polls_rest.wsgi      #L3
autostart=true       #L4
autorestart=true     #L5
stderr_logfile=/var/log/pollsapi.err.log      #L6
stdout_logfile=/var/log/pollsapi.out.log      #L7
Let’s understand the config file we have written,
- #L1 line
[program:pollsapi]names the program( or process ) as pollsapi, which can be used as
$ sudo supervisorctl start pollsapi
- #L2 line
directoryis the path to our project. - #L3 line
commandis the command to start our project - #L4 lines
autostarttells the script to start on system boot. - #L5 line
autorestarttells the script to restart when it closes for some reason - #L6
stderr_logfilewhich will store the error logs & #L7stdout_logfilewill store the non-error logs.
Now lets save this file and update supervisor
$ sudo supervisorctl reread
$ sudo supervisorctl update
$ sudo supervisorctl reload
Check the supervisor status .
$ sudo supervisorctl status
This will show

To check gunicorn processes
$ ps ax | grep gunicorn
This command lists all the processes running with gunicorn
To check if the app is running , let’s do curl
$ curl 0.0.0.0:8000
After configuring gunicorn with supervisor, let’s restart our nginx
$ systemctl restart nginx
Now our app should be running on http://IP_ADDRESS_OF_SERVER