Chapter 7. Recurrent Neural Networks and LSTM

Reviewing what we know about the more traditional neural networks models, we observe that the train and prediction phases are normally expressed in a static manner, where an input is feed, and we get an output, but we don't just take in account the sequence in which the events occur. Unlike the prediction models reviewed so far, recurrent neural networks predictions depends on the current input vector and also the values of previous ones.

The topics we will cover in this chapter are as follow:

Recurrent neural networks

Knowledge doesn't normally appear from a void. Many new ideas are born as a combination of previous knowledge, and so that's a useful behaviour to emulate. Traditional neural networks don't include any mechanism translating previous seen elements to the current state.

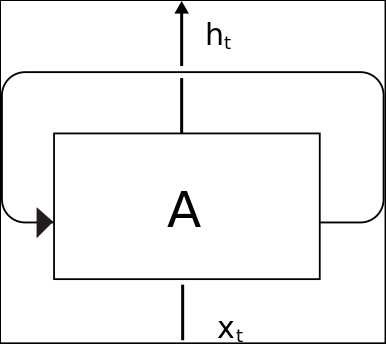
Trying to implement this concepts, we have recurrent neural networks, or RNN. Recurrent neural networks can be defined a sequential model of neural networks, which have the property of reusing information already given. One of their main assumptions is that the current information has a dependency on previous data. In the following figure, we observe a simplified diagram of a RNN basic element, called Cell:

Recurrent neural networks

The main information elements of a cell are the input (Xt), an state, and an output (ht). But as we said before, cells have not an independent state, so it stores also state information. In the following figure we will show an "unrolled" RNN cell, showing how it goes from the initial state, to outputting the final hn value, with some intermediate states in between.

Recurrent neural networks

Once we define the dynamics of the cell, the next objective would be to investigate the contents of what makes or defines an RNN cell. In the most common case of standard RNN, there is simply a neural network layer, which takes the input, and the previous state as inputs, applies the tanh operation, and outputs the new state h(t+1).

Recurrent neural networks

This simple setup is able to sum up information as the epochs pass, but further experimentation showed that for complex knowledge, the sequence distance makes difficult to relate some contexts (For example, The architect knows about designing beautiful buildings) seems like a simple structure to remember, but the context needed for them for being associated, requires an increasing sequence to be able to relate both concepts. This also brings the associated issue of exploding and vanishing gradients.

Exploding and vanishing gradients

One of the main problems of recurrent neural networks happens in the back propagation stages, given its recurrent nature, the number of steps that the back propagation of the errors has is one corresponding to a very deep network. This cascade of gradient calculations could lead to a very non significant value on the last stages, or in the contrary, to ever increasing and unbounded parameter. Those phenomena receive the name of vanishing and exploding gradients. This is one of the reasons for which LSTM architecture was created.

LSTM neural networks

The Long Short—Term Memory (LSTM) is a specific RNN architecture whose special architecture allows them to represent long term dependencies. Moreover, they are specifically designed to remember information patterns and information over long periods of time.

The gate operation - a fundamental component

In order to better understand the building blocks of the internal of the lstm cell, we will describe the main operational block of the LSTM: the gate operation.

This operation basically has a multivariate input, and in this block we decide to let some of the inputs go trough, and block the other. We can think of it as an information filter, and contributes mainly to allow for getting and remembering the needed information elements.

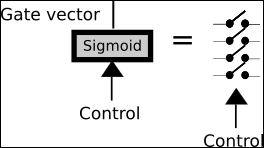
In order to implement this function, we take a multivariate control vector (marked with an arrow), which is connected with a neural network layer with a sigmoid activation function. Applying the control vector and passing through the sigmoid function, we will get a binary like vector.

We will represent this function with many switch signs:

The gate operation - a fundamental component

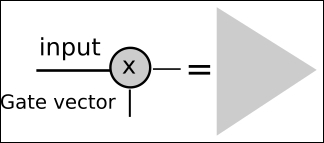
After defining that binary vector, we will multiply the input function with the vector so we will filter it, letting only parts of the information to get through. We will represent this operation with a triangle, pointing in the direction to which the information goes.

The gate operation - a fundamental component

General LSTM cell structure

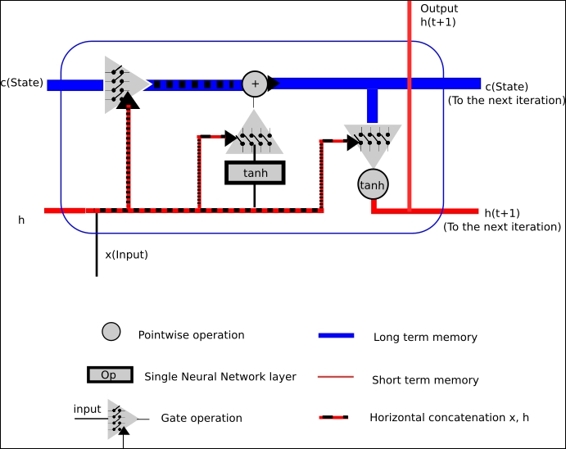
In the following picture, we represent the general structure of a LSTM Cell. It mainly consist of three of the the mentioned gate operations, to protect and control the cell state.

This operation will allow both discard (Hopefully not important) low state data, and incorporate (Hopefully important) new data to the state.

The gate operation - a fundamental component

The previous figure tries to show all concepts going on on the operation of one LSTM Cell.

As the inputs we have:

  • The cell state, which will store long term information, because it carries on the optimized weights from the starting coming from the origin of the cell training, and
  • The short term state, h(t), which will be used directly combined with the current input on each iteration, and so it will have a much bigger influence from the latest values of the inputs

And as outputs, we have, the result of combining the application of all the gate operations.

Operation steps

In this section we will describe a generalization of all the different substeps that the information will do for each loop steps of its operation.

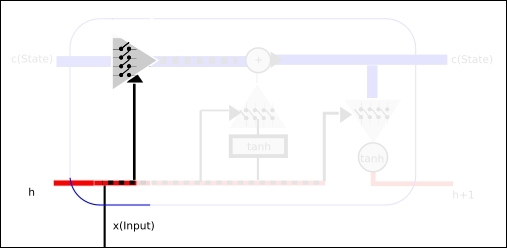
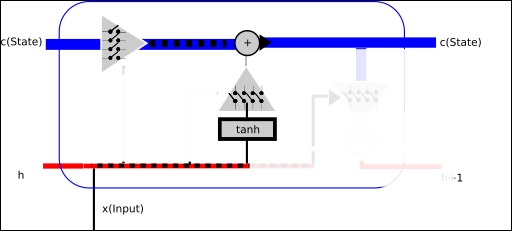
Part 1 - set values to forget (input gate)

In this section, we will take the values coming from the short term, combined with the input itself, and this values will set the values for a binary fuction, represented by a multivariable sigmoid. Depending on the input and short term memory values, the sigmoid output will allow or restrict some of the previous Knowledge or weights contained on the cell state.

Part 1 - set values to forget (input gate)

Part 2 - set values to keep, change state

Then is time to set the filter which will allow or reject the incorporation of new and short term memory to the cell semi-permanent state.

So in this stage, we will determine how much of the new and semi-new information will be incorporated in the new cell state. Additionally, we will finally pass through the information filter we have been configuring, and as a result, we will have an updated long term state.

In order to normalize the new and short term information, we pass the new and short term info via a neural network with tanh activation, this will allow to feed the new information in a normalized (-1,1) range.

Part 2 - set values to keep, change state

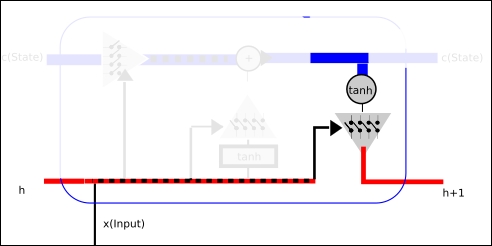
Part 3 - output filtered cell state

Now its the turn of the short term state. It will also use the new and previous short term state to allow new information to pass, but the input will be the long term status, dot multiplied multiplied by a tanh function, again to normalize the input to a (-1,1) range.

Part 3 - output filtered cell state

Other RNN architectures

In this chapter in general, and assuming the field of RNN is much more general that the we will be focusing on the LSTM type of recurrent neural network cells. There are also other variations of the RNN that are being employed and add advantages to the field, for example.

  • LSTM with peepholes: In this networks the cell gates are connected to the cell state
  • Gate Recurring Unit: It's a simpler model which combines the forget and input gates, merges the state and hidden state of the cell, and so simplifies a lot the training of the net

TensorFlow LSTM useful classes and methods

In this section, we will review the main classes and methods that we can use to build a LSTM layer, which we will use in the examples of the book.

class tf.nn.rnn_cell.BasicLSTMCell

This class basic LSTM recurrent network cell, with a forget bias, and no fancy characteristics of other related types, like peep-holes, that allow the cell to take a look on the cell state even on stages where it's not supposed to have an influence on the results.

The following are the main parameters:

  • num_units: Int, the number of units of the LSTM cell
  • forget_bias: Float, This bias (default 1) is added to the forget gates in order to allow the first iterations to reduce the loss of information for the initial training steps.
  • activation: Is the activation function of the inner states (The default is the standard tanh)

class MultiRNNCell(RNNCell)

In the architectures we will be using for this particular example, we won't be using a single cell to take in account the historical values. In this case we will be using a stack of connected cells. For this reason we will be instantiating the MultiRNNCell class.

MultiRNNCell(cells, state_is_tuple=False)

Thisis the constructor for the multiRNNCell, the main argument of this method is cells, which will be an instance of RNNCells we want to stack.

class MultiRNNCell(RNNCell)

learn.ops.split_squeeze(dim, num_split, tensor_in)

This function split the input on a dimension, and then it squeezes the previous dimension the splitted tensor belonged. It takes the dimension to cut, the number of ways to split, and then tensor to split. It return the same tensor but with one dimension reduced.

Example 1 - univariate time series prediction with energy consumption data

In this example, we will be solving a problem of the domain of regression. The dataset we will be working on is a compendium of many measurements of power consumption of one home, throughout a period of time. As we could infer, this kind of behaviour can easily follow patterns (It increases when the persons uses the microwave to prepare breakfast, and computers after the wake up hour, can decrease a bit in the afternoon, and then increase at night with all the lights, decreasing to zero starting from midnight until next wake up hour).

So let's try to model for this behavior in a sample case.

Dataset description and loading

In this example we will be using the Electricity Load Diagrams Data Sets, from Artur Trindade (site: https://archive.ics.uci.edu/ml/datasets/ElectricityLoadDiagrams20112014).

This is the description of the original dataset:

Data set has no missing values. Values are in kW of each 15 min. To convert values in kWh values must be divided by 4. Each column represent one client. Some clients were created after 2011. In these cases consumption were considered zero. All time labels report to Portuguese hour. However all days present 96 measures (24*15). Every year in March time change day (which has only 23 hours) the values between 1:00 am and 2:00 am are zero for all points. Every year in October time change day (which has 25 hours) the values between 1:00 am and 2:00 am aggregate the consumption of two hours.

In order to simplify our model description, we took just one client complete measurements, and converted its format to standard CSV. It is located on the data subfolder of this chapter code folder

With this code lines, we will open and represent the client's data:

import pandas as pd 
from matplotlib import pyplot as plt
df = pd.read_csv("data/elec_load.csv", error_bad_lines=False)
plt.subplot()
plot_test, = plt.plot(df.values[:1500], label='Load')
plt.legend(handles=[plot_test])

Dataset description and loading

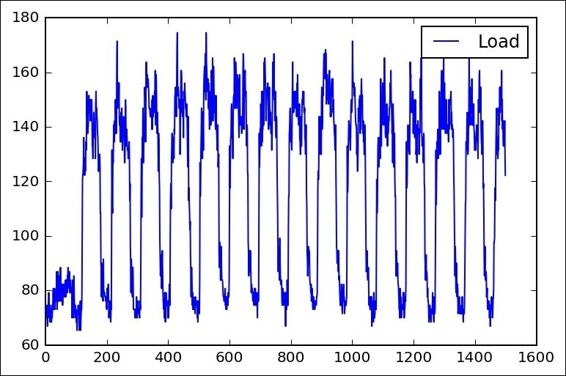
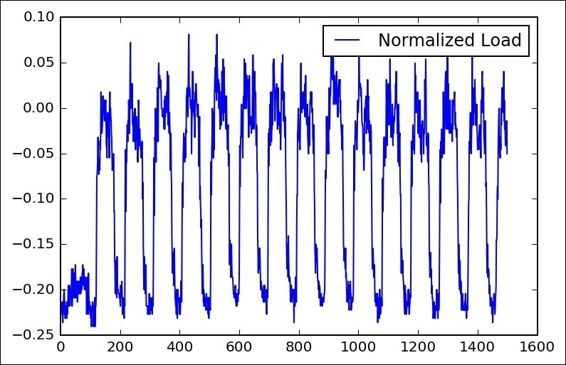
I we take a look at this representation (We look to the first 1500 samples) we see an initial transient state, probable when the measurements were put in place, and then we see a really clear cycle of high and low consumption levels.

From simple observation we also see that the cicles are more or less of 100 samples, pretty close to the 96 samples per day this dataset has.

Dataset preprocessing

In order to assure a better convergency of the back propagation methods, we should try to normalize the input data.

So we will be applying the classic scale and centering technique, substracting the mean value, and scaling by the floor of the maximum value.

To get the needed values, we use the pandas the describe() method.

                Load 
count  140256.000000 
mean      145.332503 
std        48.477976 
min         0.000000 
25%       106.850998 
50%       151.428571 
75%       177.557604 
max       338.218126 
 

Dataset preprocessing

Modelling architecture

Here we will succinctly describe the architecture that will try to model the variations on electricity consumption:

The resulting architecture basically consists on a 10 member serial connected LSTM multicell, which has a linear regress or variable at the end, which will transform the results of the output of the linear array of cells, to a final real number, for a given history of values (in this case we have to input the last 5 values to predict the next one).

def lstm_model(time_steps, rnn_layers, dense_layers=None): 
    def lstm_cells(layers): 
        return [tf.nn.rnn_cell.BasicLSTMCell(layer['steps'],state_is_tuple=True) 
                for layer in layers] 
 
    def dnn_layers(input_layers, layers): 
            return input_layers 
 
    def _lstm_model(X, y): 
        stacked_lstm = tf.nn.rnn_cell.MultiRNNCell(lstm_cells(rnn_layers), state_is_tuple=True) 
        x_ = learn.ops.split_squeeze(1, time_steps, X) 
        output, layers = tf.nn.rnn(stacked_lstm, x_, dtype=dtypes.float32) 
        output = dnn_layers(output[-1], dense_layers) 
        return learn.models.linear_regression(output, y) 
 
    return _lstm_model 
 

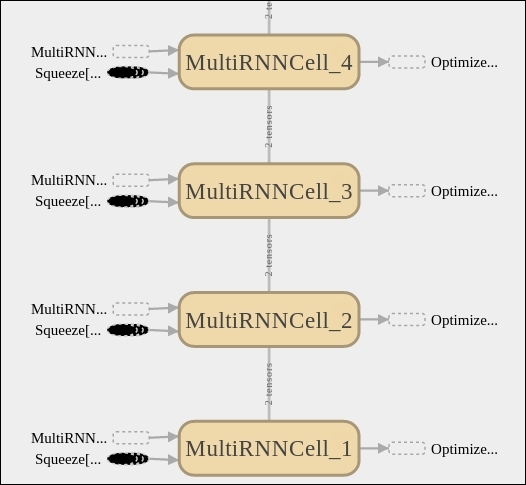
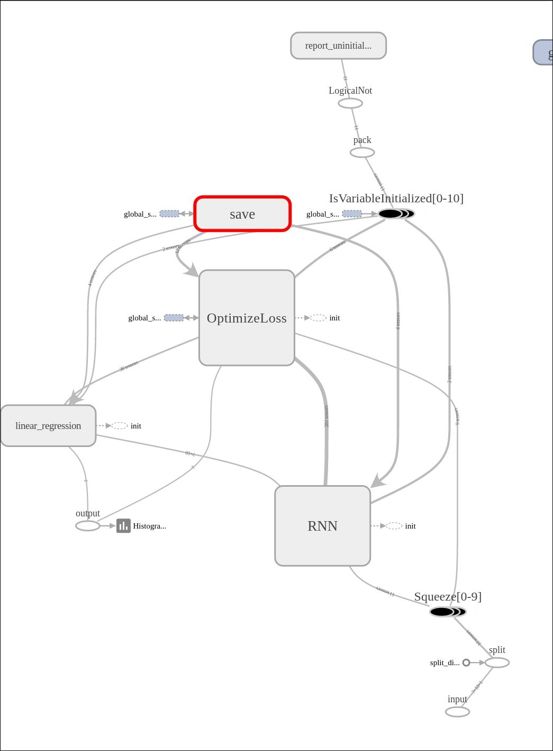
The following figure shows the main blocks, complemented later by the learn module, there you can see the RNN stage, the optimizer, and the final linear regression before the output.

Modelling architecture

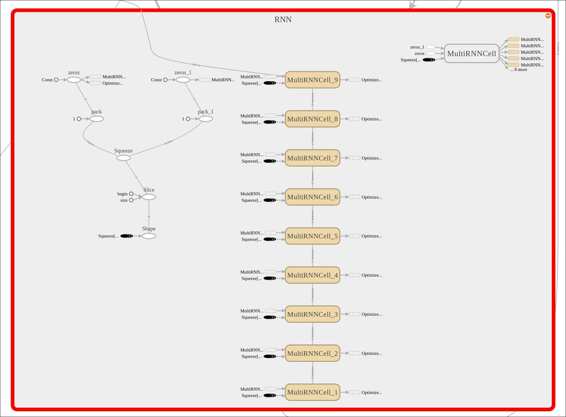
In this picture we take a look at the RNN stage, there we can observe the cascade of individual LSTM cells, with the input squeeze, and all the complementary operations that the learn package adds.

Modelling architecture

And then we will complete the definition of the model with the regressor:

regressor = learn.TensorFlowEstimator(model_fn=lstm_model( 
                                    TIMESTEPS, RNN_LAYERS, DENSE_LAYERS), n_classes=0, 
                                      verbose=2,  steps=TRAINING_STEPS, optimizer='Adagrad', 
                                      learning_rate=0.03, batch_size=BATCH_SIZE) 

Loss function description

For the loss function, the classical regression parameter mean squared error will do:

rmse = np.sqrt(((predicted - y['test']) ** 2).mean(axis=0))

Convergency test

Here we will run the fit function for the current model:

regressor.fit(X['train'], y['train'], monitors=[validation_monitor], logdir=LOG_DIR) 

And will obtain the following (Very good)! error rates. One exercise we could do is to avoid normalizing the data, and see if the mean error is the same (NB: It's not, its much worse)

This is the simple console output we will get:

MSE: 0.001139 

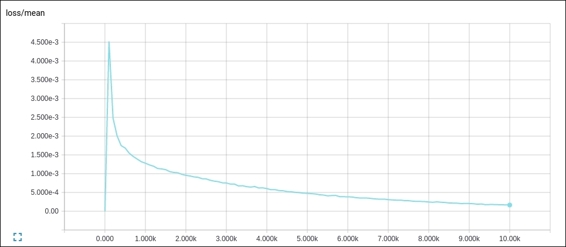
And this is the generated loss/mean graphic that tells us how the error is decaying with every iteration:

Convergency test

Results description

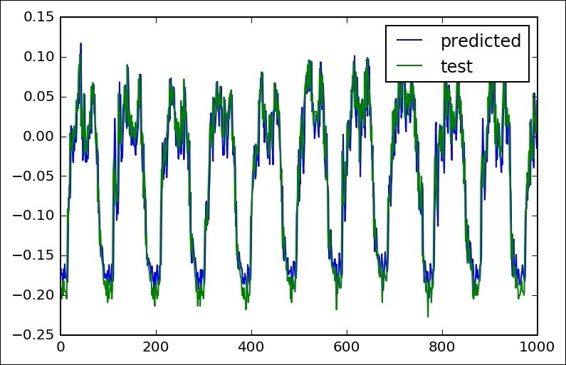
Now we can get a graphic of the real test values, and the predicted one, where we see that the mean error indicates a very good predicting capabilities of our recurrent model:

Results description

Full source code

The following is the complete source code:

 
import numpy as np 
import pandas as pd 
import tensorflow as tf 
from matplotlib import pyplot as plt 
 
 
from tensorflow.python.framework import dtypes 
from tensorflow.contrib import learn 
 
import logging 
logging.basicConfig(level=logging.INFO) 
 
 
from tensorflow.contrib import learn 
from sklearn.metrics import mean_squared_error 
 
LOG_DIR = './ops_logs' 
TIMESTEPS = 5 
RNN_LAYERS = [{'steps': TIMESTEPS}] 
DENSE_LAYERS = None 
TRAINING_STEPS = 10000 
BATCH_SIZE = 100 
PRINT_STEPS = TRAINING_STEPS / 100 
 
def lstm_model(time_steps, rnn_layers, dense_layers=None): 
    def lstm_cells(layers): 
        return [tf.nn.rnn_cell.BasicLSTMCell(layer['steps'],state_is_tuple=True) 
                for layer in layers] 
 
    def dnn_layers(input_layers, layers): 
            return input_layers 
 
    def _lstm_model(X, y): 
        stacked_lstm = tf.nn.rnn_cell.MultiRNNCell(lstm_cells(rnn_layers), state_is_tuple=True) 
        x_ = learn.ops.split_squeeze(1, time_steps, X) 
        output, layers = tf.nn.rnn(stacked_lstm, x_, dtype=dtypes.float32) 
        output = dnn_layers(output[-1], dense_layers) 
        return learn.models.linear_regression(output, y) 
 
    return _lstm_model 
 
 
regressor = learn.TensorFlowEstimator(model_fn=lstm_model(TIMESTEPS, RNN_LAYERS, DENSE_LAYERS), n_classes=0, 
                                      verbose=2,  steps=TRAINING_STEPS, optimizer='Adagrad', 
                                      learning_rate=0.03, batch_size=BATCH_SIZE) 
 
df = pd.read_csv("data/elec_load.csv", error_bad_lines=False) 
plt.subplot() 
plot_test, = plt.plot(df.values[:1500], label='Load') 
plt.legend(handles=[plot_test]) 
 
 
print df.describe() 
array=(df.values- 147.0) /339.0 
plt.subplot() 
plot_test, = plt.plot(array[:1500], label='Normalized Load') 
plt.legend(handles=[plot_test]) 
 
 
listX = [] 
listy = [] 
X={} 
y={} 
 
for i in range(0,len(array)-6): 
    listX.append(array[i:i+5].reshape([5,1])) 
    listy.append(array[i+6]) 
 
arrayX=np.array(listX) 
arrayy=np.array(listy) 
 
 
X['train']=arrayX[0:12000] 
X['test']=arrayX[12000:13000] 
X['val']=arrayX[13000:14000] 
 
y['train']=arrayy[0:12000] 
y['test']=arrayy[12000:13000] 
y['val']=arrayy[13000:14000] 
 
 
# print y['test'][0] 
# print y2['test'][0] 
 
 
#X1, y2 = generate_data(np.sin, np.linspace(0, 100, 10000), TIMESTEPS, seperate=False) 
# create a lstm instance and validation monitor 
validation_monitor = learn.monitors.ValidationMonitor(X['val'], y['val'], 
                                                      every_n_steps=PRINT_STEPS, 
                                                      early_stopping_rounds=1000) 
 
regressor.fit(X['train'], y['train'], monitors=[validation_monitor], logdir=LOG_DIR) 
 
predicted = regressor.predict(X['test']) 
rmse = np.sqrt(((predicted - y['test']) ** 2).mean(axis=0)) 
score = mean_squared_error(predicted, y['test']) 
print ("MSE: %f" % score) 
 
#plot_predicted, = plt.plot(array[:1000], label='predicted') 
 
plt.subplot() 
plot_predicted, = plt.plot(predicted, label='predicted') 
 
plot_test, = plt.plot(y['test'], label='test') 
plt.legend(handles=[plot_predicted, plot_test]) 


Example 2 - writing music "a la" Bach

In this example, we will work with a recurrent neural network specialized in character sequences, or the char RNN model.

We will feed this neural network with a series of musical tunes, the Bach Goldberg Variations, expressed in a character based format, and write a sample piece of music based on the learned structures.

Note

Note that this examples owes many ideas and concepts to the paper Visualizing and Understanding Recurrent Networks (https://arxiv.org/abs/1506.02078) and the article titled The Unreasonable Effectiveness of recurrent neural networks, available at (http://karpathy.github.io/2015/05/21/rnn-effectiveness/).

Character level models

As we previously saw, Char RNN models work with character sequences. This category of inputs can represent a vast array of possible languages. The following, are a few examples:

  • Programming code
  • Different human languages (modeling of the writing style of certain author)
  • Scientific papers (tex) and so on

Character sequences and probability representation

The input contents of an RNN need a clear and straightforward way of representation. For this reason, the one hot representation is chosen, which is convenient to use directly for the characterization of an output of a limited quantity of possible outcomes (the number of limited characters is finite and in tens), and use it to directly compare with a Sotmax function value.

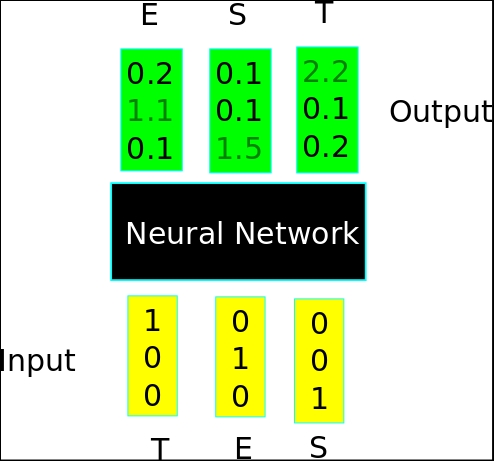
So the input of the model is a sequence of characters, and the output of the model will be a sequence of an array per instance. The length of the array will be the same as the vocabulary size, so each of the array positions will represent the probability of the current character being in this sequence position, given the previously entered sequence characters.

In the following figure, we observe a very simplified model of the setup, with the encoded input word and the model predicting the word TEST as the expected output:

Character sequences and probability representation

Encoding music as characters - the ABC music format

When searching for a format to represent the input data, it is important to choose the one that is more simple but structurally homogeneous, if possible.

Regarding music representation, the ABC format is a suitable candidate because it has a very simple structure and uses a limited number of characters, and it is a subset of the ASCII charset.

ABC format data organization

An ABC format page has mainly two components: a header and the notes.

  • Header: A header contains some key: value rows, such as X:[Reference number], T:[Title], M:[Meter], K:[Key], C[Composer].
  • Notes: The notes start after the K header key and list the different notes of each bar, separated by the | character.

There are other elements, but with the following example, you will have an idea of how the format works, even with no music training:

The original sample is as follows:

X:1 
T:Notes 
M:C 
L:1/4 
K:C 
C, D, E, F,|G, A, B, C|D E F G|A B c d|e f g a|b c' d' e'|f' g' a' b'|] 
 

The final representation is as follows:

ABC format data organization

Bach Goldberg variations:

The Bach Goldberg variations is a set of an original aria and 30 works based on it, named after a Bach disciple, Johann Gottlieb Goldberg, who was probably its main interpreter.

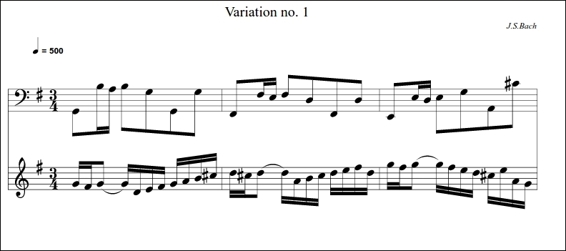
In the next listing and figure, we will represent the first part of the variation Nr 1 so you have an idea of the document structure we will try to emulate:

X:1  
T:Variation no. 1  
C:J.S.Bach  
M:3/4  
L:1/16  
Q:500  
V:2 bass  
K:G  
[V:1]GFG2- GDEF GAB^c |d^cd2- dABc defd |gfg2- gfed ^ceAG|  
[V:2]G,,2B,A, B,2G,2G,,2G,2 |F,,2F,E, F,2D,2F,,2D,2 |E,,2E,D, E,2G,2A,,2^C2|  
%  (More parts with V:1 and V:2) 

ABC format data organization

Useful libraries and methods

In this section, we will learn the new functionalities we will be using in this example.

Saving and restoring variables and models

One very important feature for real world applications is the ability to save and retrieve whole models. TensorFlow provides this ability through the tf.train.Saver object.

The main methods of this object are the following:

  • tf.train.Saver(args): This is the constructor. This is a list of the main parameters:
    • var_list: This is a list containing the list of all variables to save. For example, {firstvar: var1, secondvar: var2}. If none, save all the objects.
    • max_to_keep: This denotes the maximum number of checkpoints to maintain.
    • write_version: This is the file format version, actually only 1 is valid.

  • tf.train.Saver.save: This method runs the ops added by the constructor for saving variables. This requires a current session and all variables to have been initialized. The main parameters are as follows:
    • session: This is a session to save the variables
    • save_path: This is the path to the checkpoint filename
    • global_step: This is a unique step identifier

This methods returns the path where the checkpoint was saved.

  • tf.train.Saver.restore: This method restores the previously saved variables. The main parameters are as follows:
    • session: The session is where the variables are to be restored
    • save_path: This is a variable previously returned by the save method, a call to the latest_checkpoint(), or a provided one

Loading and saving pseudocode

Here, we will build with some sample code a minimal structure for saving and retrieving two sample variables.

Variable saving

The following is the code to create variables:

# Create some variables.simplevar = tf.Variable(..., name="simple")anothervar = tf.Variable(..., name="another")...# Add ops to save and restore all the variables.saver = tf.train.Saver()# Later, launch the model, initialize the variables, do some work, save the# variables to disk.with tf.Session() as sess:  sess.run(tf.initialize_all_variables())  # Do some work with the model.  ..  # Save the variables to disk.  save_path = saver.save(sess, "/tmp/model.ckpt")

Variable restoring

The following is the code for restoring the variables:

saver = tf.train.Saver()
# Later, launch the model, use the saver to restore variables from disk, and
# do some work with the model.
with tf.Session() as sess:
#Work with the restored model....

Dataset description and loading

For this dataset, we start with the 30 works, and then we generate a list of 1000 instances of theirs, randomly distributed:

import random 
input = open('input.txt', 'r').read().split('X:') 
for i in range (1,1000): 
    print "X:" + input[random.randint(1,30)] + "\n_____________________________________\n" 

 Network Training

The original material for the network training will be the 30 works in the ABC format.

Note

Note that the original ABC file was located at http://www.barfly.dial.pipex.com/Goldbergs.abc.

Then we use this little program ().

For this dataset, we start with the 30 works, and then we generate a list of 1000 instances of theirs, randomly distributed:

import random 
input = open('original.txt', 'r').read().split('X:') 
for i in range (1,1000): 
    print "X:" + input[random.randint(1,30)] + "\n_____________________________________\n" 
 

And then we execute the following to get the data set:

python generate_dataset.py > input.txt 

Dataset preprocessing

The generated dataset needs a bit of information before being useful. First, it needs the definition of the vocabulary.

Vocabulary definition

The first step in the process is to find all the different characters that can be found in the original text in order to be able to dimension and fill the one-hot encoded inputs later.

In the following figure, we represent the different characters found in the ABC music format. Here you can see what's represented in the standard, with normal and special punctuation characters:

Vocabulary definition

Modelling architecture

The model for this RNN is described in the following lines, and it is a multilayer LSTM with initial zero state:

        cell_fn = rnn_cell.BasicLSTMCell  
        cell = cell_fn(args.rnn_size, state_is_tuple=True) 
        self.cell = cell = rnn_cell.MultiRNNCell([cell] * args.num_layers, state_is_tuple=True) 
        self.input_data = tf.placeholder(tf.int32, [args.batch_size, args.seq_length]) 
        self.targets = tf.placeholder(tf.int32, [args.batch_size, args.seq_length]) 
        self.initial_state = cell.zero_state(args.batch_size, tf.float32) 
        with tf.variable_scope('rnnlm'): 
            softmax_w = tf.get_variable("softmax_w", [args.rnn_size, args.vocab_size])  
            softmax_b = tf.get_variable("softmax_b", [args.vocab_size])   
            with tf.device("/cpu:0"): 
                embedding = tf.get_variable("embedding", [args.vocab_size, args.rnn_size]) 
                inputs = tf.split(1, args.seq_length, tf.nn.embedding_lookup(embedding, self.input_data)) 
                inputs = [tf.squeeze(input_, [1]) for input_ in inputs] 
        def loop(prev, _): 
            prev = tf.matmul(prev, softmax_w) + softmax_b 
            prev_symbol = tf.stop_gradient(tf.argmax(prev, 1)) 
            return tf.nn.embedding_lookup(embedding, prev_symbol) 
        outputs, last_state = seq2seq.rnn_decoder(inputs, self.initial_state, cell, loop_function=loop if infer else None, scope='rnnlm') 
        output = tf.reshape(tf.concat(1, outputs), [-1, args.rnn_size]) 

Loss function description

The loss function is defined by the losss_by_example function. This is based on a measure called perplexity, which measures how well a probability distribution predicts a sample. This measure is used extensively in language models:

        self.logits = tf.matmul(output, softmax_w) + softmax_b 
        self.probs = tf.nn.softmax(self.logits) 
        loss = seq2seq.sequence_loss_by_example([self.logits], 
                [tf.reshape(self.targets, [-1])], 
                [tf.ones([args.batch_size * args.seq_length])], 
                args.vocab_size) 
        self.cost = tf.reduce_sum(loss) / args.batch_size / args.seq_length 

Stop condition

The program will iterate until the number of epochs and the batch number is reached. Here is the condition block:

if (e==args.num_epochs-1 and b == data_loader.num_batches-1) 

Results description

In order to run the program, first you run the training script using the following code:

python train.py 

Then you run the sample program with the following code:

python sample.py 

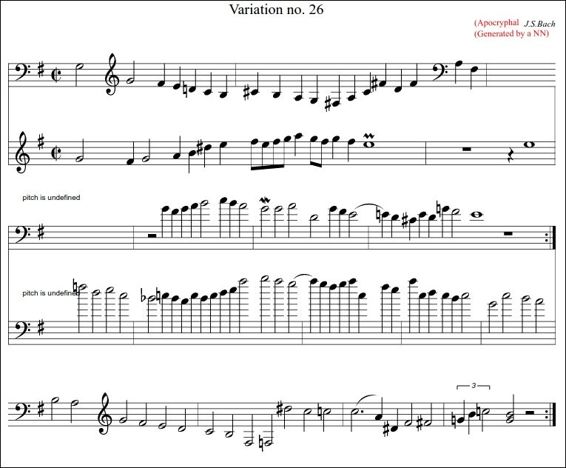
Configuring a prime of X:1\n, which is a plausible initialization character sequence, we obtain, depending on the depth (recommended 3) and the length (recommended 512) of the RNN, almost an recognizable complete composition.

The following music sheet was obtained copying the resulting character sequence at http://www.drawthedots.com/ and applying simple character corrections, based on on-site diagnostics:

Results description

Full source code

The following is the complete source code(train.py):

from __future__ import print_function 
import numpy as np 
import tensorflow as tf 
 
import argparse 
import time 
import os 
from six.moves import cPickle 
from utils import TextLoader 
from model import Model 
class arguments: 
    def __init__(self): 
        return 
def main(): 
    args = arguments()     
    train(args) 
def train(args): 
    args.data_dir='data/'; args.save_dir='save'; args.rnn_size =64; 
    args.num_layers=1;  args.batch_size=50;args.seq_length=50 
    args.num_epochs=5;args.save_every=1000; args.grad_clip=5. 
    args.learning_rate=0.002; args.decay_rate=0.97 
    data_loader = TextLoader(args.data_dir, args.batch_size, args.seq_length) 
    args.vocab_size = data_loader.vocab_size 
    with open(os.path.join(args.save_dir, 'config.pkl'), 'wb') as f: 
        cPickle.dump(args, f) 
    with open(os.path.join(args.save_dir, 'chars_vocab.pkl'), 'wb') as f: 
        cPickle.dump((data_loader.chars, data_loader.vocab), f) 
    model = Model(args) 
    with tf.Session() as sess: 
        tf.initialize_all_variables().run() 
        saver = tf.train.Saver(tf.all_variables()) 
        for e in range(args.num_epochs): 
            sess.run(tf.assign(model.lr, args.learning_rate * (args.decay_rate ** e))) 
            data_loader.reset_batch_pointer() 
            state = sess.run(model.initial_state) 
            for b in range(data_loader.num_batches): 
                start = time.time() 
                x, y = data_loader.next_batch() 
                feed = {model.input_data: x, model.targets: y} 
                for i, (c, h) in enumerate(model.initial_state): 
                    feed[c] = state[i].c 
                    feed[h] = state[i].h 
                train_loss, state, _ = sess.run([model.cost, model.final_state, model.train_op], feed) 
                end = time.time() 
                print("{}/{} (epoch {}), train_loss = {:.3f}, time/batch = {:.3f}" \ 
                    .format(e * data_loader.num_batches + b, 
                            args.num_epochs * data_loader.num_batches, 
                            e, train_loss, end - start)) 
                if (e==args.num_epochs-1 and b == data_loader.num_batches-1): # save for the last result 
                    checkpoint_path = os.path.join(args.save_dir, 'model.ckpt') 
                    saver.save(sess, checkpoint_path, global_step = e * data_loader.num_batches + b) 
                    print("model saved to {}".format(checkpoint_path)) 
 
if __name__ == '__main__': 
    main() 
 

The following is the complete source code (model.py):

import tensorflow as tf
from tensorflow.python.ops import rnn_cell
from tensorflow.python.ops import seq2seq
import numpy as np

class Model():
    def __init__(self, args, infer=False):
        self.args = args
        if infer: #When we sample, the batch and sequence lenght are = 1
            args.batch_size = 1
            args.seq_length = 1
        cell_fn = rnn_cell.BasicLSTMCell #Define the internal cell structure
        cell = cell_fn(args.rnn_size, state_is_tuple=True)
        self.cell = cell = rnn_cell.MultiRNNCell([cell] * args.num_layers, state_is_tuple=True)
        #Build the inputs and outputs placeholders, and start with a zero internal values
        self.input_data = tf.placeholder(tf.int32, [args.batch_size, args.seq_length])
        self.targets = tf.placeholder(tf.int32, [args.batch_size, args.seq_length])
        self.initial_state = cell.zero_state(args.batch_size, tf.float32)
        with tf.variable_scope('rnnlm'):
            softmax_w = tf.get_variable("softmax_w", [args.rnn_size, args.vocab_size]) #Final w
            softmax_b = tf.get_variable("softmax_b", [args.vocab_size]) #Final bias
            with tf.device("/cpu:0"):
                embedding = tf.get_variable("embedding", [args.vocab_size, args.rnn_size])
                inputs = tf.split(1, args.seq_length, tf.nn.embedding_lookup(embedding, self.input_data))
                inputs = [tf.squeeze(input_, [1]) for input_ in inputs]
        def loop(prev, _):
            prev = tf.matmul(prev, softmax_w) + softmax_b
            prev_symbol = tf.stop_gradient(tf.argmax(prev, 1))
            return tf.nn.embedding_lookup(embedding, prev_symbol)
        outputs, last_state = seq2seq.rnn_decoder(inputs, self.initial_state, cell, loop_function=loop if infer else None, scope='rnnlm')
        output = tf.reshape(tf.concat(1, outputs), [-1, args.rnn_size])
        self.logits = tf.matmul(output, softmax_w) + softmax_b
        self.probs = tf.nn.softmax(self.logits)
        loss = seq2seq.sequence_loss_by_example([self.logits],
            [tf.reshape(self.targets, [-1])],
            [tf.ones([args.batch_size * args.seq_length])],
            args.vocab_size)
        self.cost = tf.reduce_sum(loss) / args.batch_size / args.seq_length
        self.final_state = last_state
        self.lr = tf.Variable(0.0, trainable=False)
        tvars = tf.trainable_variables()
        grads, _ = tf.clip_by_global_norm(tf.gradients(self.cost,        tvars),
        args.grad_clip)
        optimizer = tf.train.AdamOptimizer(self.lr)
        self.train_op = optimizer.apply_gradients(zip(grads, tvars))
    def sample(self, sess, chars, vocab, num=200, prime='START', sampling_type=1):
        state = sess.run(self.cell.zero_state(1, tf.float32))
        for char in prime[:-1]:
            x = np.zeros((1, 1))
            x[0, 0] = vocab[char]
            feed = {self.input_data: x, self.initial_state:state}
            [state] = sess.run([self.final_state], feed)
        def weighted_pick(weights):
            t = np.cumsum(weights)
            s = np.sum(weights)
            return(int(np.searchsorted(t, np.random.rand(1)*s)))
        ret = prime
        char = prime[-1]
        for n in range(num):
            x = np.zeros((1, 1))
            x[0, 0] = vocab[char]
            feed = {self.input_data: x, self.initial_state:state}
            [probs, state] = sess.run([self.probs, self.final_state], feed)
            p = probs[0]
            sample = weighted_pick(p)
            pred = chars[sample]
            ret += pred
            char = pred
        return ret

The following is the complete source code(sample.py):

from __future__ import print_function

import numpy as np
import tensorflow as tf
import time
import os
from six.moves import cPickle
from utils import TextLoader
from model import Model
from six import text_type

class arguments: #Generate the arguments class
    save_dir= 'save'
    n=1000
    prime='x:1\n'
    sample=1 

def main():
    args = arguments()
    sample(args)   #Pass the argument object

def sample(args):
    with open(os.path.join(args.save_dir, 'config.pkl'), 'rb') as f:
        saved_args = cPickle.load(f) #Load the config from the standard file
    with open(os.path.join(args.save_dir, 'chars_vocab.pkl'), 'rb') as f:

        chars, vocab = cPickle.load(f) #Load the vocabulary
    model = Model(saved_args, True) #Rebuild the model
    with tf.Session() as sess:
        tf.initialize_all_variables().run() 
        saver = tf.train.Saver(tf.all_variables())   
        ckpt = tf.train.get_checkpoint_state(args.save_dir) #Retrieve the chkpoint
        if ckpt and ckpt.model_checkpoint_path:
            saver.restore(sess, ckpt.model_checkpoint_path) #Restore the model
            print(model.sample(sess, chars, vocab, args.n, args.prime, args.sample))
            #Execute the model, generating a n char sequence
            #starting with the prime sequence
if __name__ == '__main__':
    main()

The following is the complete source code(utils.py):

import codecs
import os
import collections
from six.moves import cPickle
import numpy as np

class TextLoader():
    def __init__(self, data_dir, batch_size, seq_length, encoding='utf-8'):
        self.data_dir = data_dir
        self.batch_size = batch_size
        self.seq_length = seq_length
        self.encoding = encoding

        input_file = os.path.join(data_dir, "input.txt")
        vocab_file = os.path.join(data_dir, "vocab.pkl")
        tensor_file = os.path.join(data_dir, "data.npy")

        if not (os.path.exists(vocab_file) and os.path.exists(tensor_file)):
            print("reading text file")
            self.preprocess(input_file, vocab_file, tensor_file)
        else:
            print("loading preprocessed files")
            self.load_preprocessed(vocab_file, tensor_file)
        self.create_batches()
        self.reset_batch_pointer()

    def preprocess(self, input_file, vocab_file, tensor_file):
        with codecs.open(input_file, "r", encoding=self.encoding) as f:
            data = f.read()
        counter = collections.Counter(data)
        count_pairs = sorted(counter.items(), key=lambda x: -x[1])
        self.chars, _ = zip(*count_pairs)
        self.vocab_size = len(self.chars)
        self.vocab = dict(zip(self.chars, range(len(self.chars))))
        with open(vocab_file, 'wb') as f:
            cPickle.dump(self.chars, f)
        self.tensor = np.array(list(map(self.vocab.get, data)))
        np.save(tensor_file, self.tensor)

    def load_preprocessed(self, vocab_file, tensor_file):
        with open(vocab_file, 'rb') as f:
            self.chars = cPickle.load(f)
        self.vocab_size = len(self.chars)
        self.vocab = dict(zip(self.chars, range(len(self.chars))))
        self.tensor = np.load(tensor_file)
        self.num_batches = int(self.tensor.size / (self.batch_size *
                                                   self.seq_length))

    def create_batches(self):
        self.num_batches = int(self.tensor.size / (self.batch_size *
                                                   self.seq_length))

        self.tensor = self.tensor[:self.num_batches * self.batch_size * self.seq_length]
        xdata = self.tensor
        ydata = np.copy(self.tensor)
        ydata[:-1] = xdata[1:]
        ydata[-1] = xdata[0]
        self.x_batches = np.split(xdata.reshape(self.batch_size, -1), self.num_batches, 1)
        self.y_batches = np.split(ydata.reshape(self.batch_size, -1), self.num_batches, 1)


    def next_batch(self):
        x, y = self.x_batches[self.pointer], self.y_batches[self.pointer]
        self.pointer += 1
        return x, y

    def reset_batch_pointer(self):
        self.pointer = 0
Summary

In this chapter, we reviewed one of the most recent neural networks architectures, recurrent neural networks, completing the panorama of the mainstream approaches in the machine learning field.

In the following chapter, we will research the different neural network layer type combinations appearing in state of the art implementations and cover some new interesting experimental models.