快速入门
迫不及待要开始了吗?本页提供了一个很好的Flask介绍。它假定你已经安装好了Flask。If you do not, head over to the Installation section.
一个最小的应用
A minimal Flask application looks something like this:
from flask import Flask
app = Flask(__name__)

@app.route('/')
def hello_world():
    return 'Hello, World!'
So what did that code do?
- First we imported the
Flaskclass. An instance of this class will be our WSGI application. - 接下来,我们创建一个该类的实例。第一个参数是应用模块或者包的名称。如果你使用单一的模块(如本例),你应该使用
__name__,因为模块的名称将会因其作为单独应用启动还是作为模块导入而有不同( 也即是'__main__'或实际的导入名)。This is needed so that Flask knows where to look for templates, static files, and so on. 详细信息请见Flask的文档。 - We then use the
route()decorator to tell Flask what URL should trigger our function. - The function is given a name which is also used to generate URLs for that particular function, and returns the message we want to display in the user’s browser.
把它保存为hello.py(或是类似的)。确保你的应用文件名不是flask.py ,因为这将与Flask本身冲突。
你可以使用flask命令或者Python的-m开关来运行这个应用程序。在此之前,你需要通过export环境变量FLASK_APP告诉你的终端来运行这个应用程序︰
$ export FLASK_APP=hello.py
$ flask run
 * Running on http://127.0.0.1:5000/
如果在Windows上,你需要使用set代替export。
另外一种方式,你可以使用python -m flask:
$ export FLASK_APP=hello.py
$ python -m flask run
 * Running on http://127.0.0.1:5000/
这将启动一个非常简单的内置服务器,足够用于测试,但你可能不想在生产环境中使用。有关部署选项请参见部署选项。
Now head over to http://127.0.0.1:5000/, and you should see your hello world greeting.
Externally Visible Server
If you run the server you will notice that the server is only accessible from your own computer, not from any other in the network. 这是默认的行为,因为在调试模式下,用户可以在你的计算机上执行任意Python代码。
如果你禁用了 debug 或信任你所在网络的用户,你可以简单地通过添加--host=0.0.0.0到命令行使你的服务器公开可用:
flask run --host=0.0.0.0
This tells your operating system to listen on all public IPs.
如果服务器没起来怎么办
对于python -m flask失败或flask不存在的情况,有很多种原因。首先,你需要看看错误消息。
老版本的Flask
0.11版本之前的Flask启动的方式有所不同。简单地讲,以前不存在flask和python -m flask命令。如果是这样,你有两个选择:升级到最新版本的Flask,或者查看开发服务器文档中运行服务器的其它方法。
不合法的导入名称
FLASK_APP环境变量是flask run时导入的模块名称。如果模块的名称不正确,在启动的时候你会遇到一个导入错误(如果启用debug模式,你将在浏览应用的时候遇到)。它会告诉你试图导入的模块以及为什么失败。
最常见的原因是笔误,或者实际上没有创建一个 app对象。
调试模式
(只想打印错误和回溯栈?参见Application Errors)
flask脚本对于启动一个本地的开发环境很友好,但是在每次代码改动之后,你必须手动重启它。这样并不够优雅,而且Flask可以做到更好。If you enable debug support the server will reload itself on code changes, and it will also provide you with a helpful debugger if things go wrong.
你可以在运行服务器之前export环境变量FLASK_DEBUG来启用调试模式:
$ export FLASK_DEBUG=1
$ flask run
(在Windows上,你需要使用set来代替export)。
它完成以下几件事情:
- 激活调试器
- 激活自动加载器
- 启用Flask应用上的调试模式
还有更多参数,它们在开发服务器的文档中有解释。
Attention
Even though the interactive debugger does not work in forking environments (which makes it nearly impossible to use on production servers), it still allows the execution of arbitrary code. This makes it a major security risk and therefore it must never be used on production machines.
Screenshot of the debugger in action:
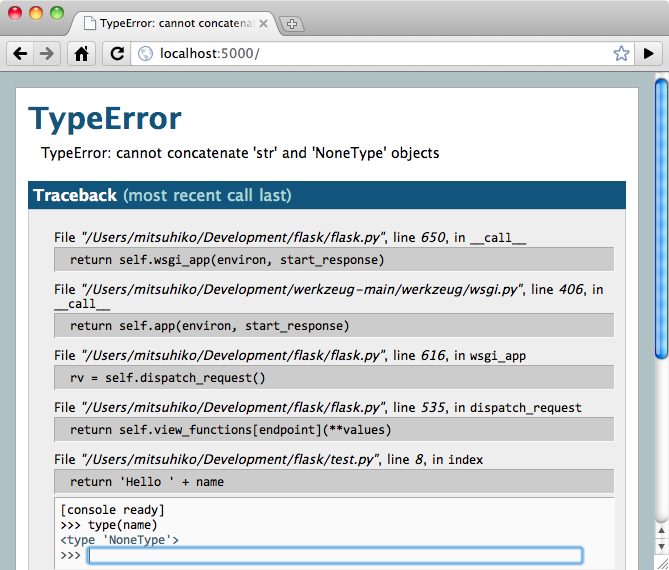
Have another debugger in mind? See Working with Debuggers.
路由
现代Web应用的URL十分优雅。它帮助人们记住这些URL,这一点对于那些面向使 用低速网络连接移动设备访问的应用特别有用。If the user can directly go to the desired page without having to hit the index page it is more likely they will like the page and come back next time.
As you have seen above, the route() decorator is used to bind a function to a URL. Here are some basic examples:
@app.route('/')
def index():
    return 'Index Page'

@app.route('/hello')
def hello():
    return 'Hello, World'
但是,不仅如此!你可以构造含有动态部分的 URL,也可以在一个函数上附着 多个规则。
变量规则
要给 URL 添加变量部分,你可以把这些特殊的字段标记为 <variable_name>。这个部分将会作为命名参数传递到你的函数。Optionally a converter can be used by specifying a rule with <converter:variable_name>. Here are some nice examples:
@app.route('/user/<username>')
def show_user_profile(username):
    # show the user profile for that user
    return 'User %s' % username

@app.route('/post/<int:post_id>')
def show_post(post_id):
    # show the post with the given id, the id is an integer
    return 'Post %d' % post_id
The following converters exist:
| string | accepts any text without a slash (the default) |
| int | accepts integers |
| float | 类似int,但是接受浮点值 |
| path | 和默认的string一样,但是接受斜线 |
| any | 匹配提供的项目中的任意一个 |
| uuid | accepts UUID strings |
Unique URLs / Redirection Behavior
Flask’s URL rules are based on Werkzeug’s routing module. The idea behind that module is to ensure beautiful and unique URLs based on precedents laid down by Apache and earlier HTTP servers.
Take these two rules:
@app.route('/projects/')
def projects():
    return 'The project page'

@app.route('/about')
def about():
    return 'The about page'
Though they look rather similar, they differ in their use of the trailing slash in the URL definition. 第一种情况中,指向projects的规范URL尾端有一个斜线。In that sense, it is similar to a folder on a filesystem. Accessing it without a trailing slash will cause Flask to redirect to the canonical URL with the trailing slash.
In the second case, however, the URL is defined without a trailing slash, rather like the pathname of a file on UNIX-like systems. Accessing the URL with a trailing slash will produce a 404 “Not Found” error.
This behavior allows relative URLs to continue working even if the trailing slash is omitted, consistent with how Apache and other servers work. Also, the URLs will stay unique, which helps search engines avoid indexing the same page twice.
构造URL
If it can match URLs, can Flask also generate them? Of course it can. To build a URL to a specific function you can use the url_for() function. It accepts the name of the function as first argument and a number of keyword arguments, each corresponding to the variable part of the URL rule. Unknown variable parts are appended to the URL as query parameters. Here are some examples:
>>> from flask import Flask, url_for
>>> app = Flask(__name__)
>>> @app.route('/')
... def index(): pass
...
>>> @app.route('/login')
... def login(): pass
...
>>> @app.route('/user/<username>')
... def profile(username): pass
...
>>> with app.test_request_context():
...  print url_for('index')
...  print url_for('login')
...  print url_for('login', next='/')
...  print url_for('profile', username='John Doe')
...
/
/login
/login?next=/
/user/John%20Doe
(This also uses the test_request_context() method, explained below. It tells Flask to behave as though it is handling a request, even though we are interacting with it through a Python shell. Have a look at the explanation below. Context Locals)。
为什么你要使用URL反查函数url_for()来构建URL而非在模板中硬编码?There are three good reasons for this:
- 反查通常比硬编码的描述性更好。More importantly, it allows you to change URLs in one go, without having to remember to change URLs all over the place.
- URL building will handle escaping of special characters and Unicode data transparently for you, so you don’t have to deal with them.
- If your application is placed outside the URL root - say, in
/myapplicationinstead of/-url_for()will handle that properly for you.
HTTP方法
HTTP (the protocol web applications are speaking) knows different methods for accessing URLs. 默认情况下,路由只回应GET请求,但是通过route()装饰器传递methods 参数可以改变这个行为。Here are some examples:
from flask import request

@app.route('/login', methods=['GET', 'POST'])
def login():
    if request.method == 'POST':
        do_the_login()
    else:
        show_the_login_form()
如果存在GET ,那么也会替你自动地添加HEAD,无需干预。你无需干预。它会确保遵照HTTP RFC(描述HTTP协议的文档)处理HEAD请求,所以你可以完全忽略这部分的HTTP规范。同样,自从Flask 0.6起, 也实现了OPTIONS的自动处理。
You have no idea what an HTTP method is? Worry not, here is a quick introduction to HTTP methods and why they matter:
The HTTP method (also often called “the verb”) tells the server what the client wants to do with the requested page. The following methods are very common:
GET- The browser tells the server to just get the information stored on that page and send it. This is probably the most common method.
HEAD- The browser tells the server to get the information, but it is only interested in the headers, not the content of the page. 应用应像处理
GET请求一样来处理它,但是不分发实际内容。在Flask中你完全无需人工干预,底层的Werkzeug库已经替你打点好了。 POST- 浏览器告诉服务器,想在URL上发布新信息,而且服务器必须确保会存储数据且仅存储一次。This is how HTML forms usually transmit data to the server.
PUT- 类似
POST,但是服务器可能触发了存储过程多次,多次覆盖掉旧值。Now you might be asking why this is useful, but there are some good reasons to do it this way. Consider that the connection is lost during transmission: in this situation a system between the browser and the server might receive the request safely a second time without breaking things. 因为POST它只触发一次,所以它是不可能的。 DELETE- Remove the information at the given location.
OPTIONS- Provides a quick way for a client to figure out which methods are supported by this URL. Starting with Flask 0.6, this is implemented for you automatically.
有趣的是,在 HTML4和XHTML1中,表单只能以GET 和POST方法提交到服务器。But with JavaScript and future HTML standards you can use the other methods as well. Furthermore HTTP has become quite popular lately and browsers are no longer the only clients that are using HTTP. For instance, many revision control systems use it.
静态文件
动态web应用也会需要静态文件。通常是CSS和JavaScript文件。Ideally your web server is configured to serve them for you, but during development Flask can do that as well. 只要在你的包中或是模块的所在目录中创建一个名为static的文件夹,在应用中使用/static 即可访问。
To generate URLs for static files, use the special 'static' endpoint name:
url_for('static', filename='style.css')
这个文件必须在文件系统上存储为static/style.css。
模板渲染
Generating HTML from within Python is not fun, and actually pretty cumbersome because you have to do the HTML escaping on your own to keep the application secure. 为此,Flask自动为你配备了Jinja2模板引擎。
To render a template you can use the render_template() method. All you have to do is provide the name of the template and the variables you want to pass to the template engine as keyword arguments. Here’s a simple example of how to render a template:
from flask import render_template

@app.route('/hello/')
@app.route('/hello/<name>')
def hello(name=None):
    return render_template('hello.html', name=name)
Flask将在templates目录下查找模板。So if your application is a module, this folder is next to that module, if it’s a package it’s actually inside your package:
Case 1: a module:
/application.py
/templates
    /hello.html
Case 2: a package:
/application
    /__init__.py
    /templates
        /hello.html
For templates you can use the full power of Jinja2 templates. 更多信息请见官方的Jinja2 模板文档。
Here is an example template:
<!doctype html>
<title>Hello from Flask</title>
{% if name %}
  <h1>Hello {{ name }}!</h1>
{% else %}
  <h1>Hello, World!</h1>
{% endif %}
在模板里,你也可以访问request 、session和g [1]对象, 以及get_flashed_messages()函数。
Templates are especially useful if inheritance is used. If you want to know how that works, head over to the Template Inheritance pattern documentation. Basically template inheritance makes it possible to keep certain elements on each page (like header, navigation and footer).
自动转义功能默认是开启的,所以如果name包含 HTML ,它将会被自动转义。如果你能信任一个变量,并且你知道它是安全的(例如一个模块把 Wiki 标记转换为 HTML),你可以用Markup类或|safe过滤器在模板中把它标记为安全的。更多示例请见Jinja2的文档。
这里是一个Markup类如何工作的简单介绍:
>>> from flask import Markup
>>> Markup('<strong>Hello %s!</strong>') % '<blink>hacker</blink>'
Markup(u'<strong>Hello <blink>hacker</blink>!</strong>')
>>> Markup.escape('<blink>hacker</blink>')
Markup(u'<blink>hacker</blink>')
>>> Markup('<em>Marked up</em> » HTML').striptags()
u'Marked up \xbb HTML'
Changed in version 0.5: Autoescaping is no longer enabled for all templates. The following extensions for templates trigger autoescaping: .html, .htm, .xml, .xhtml. Templates loaded from a string will have autoescaping disabled.
| [1] | Unsure what that g object is? It’s something in which you can store information for your own needs, check the documentation of that object (g) and the Using SQLite 3 with Flask for more information. |
访问请求数据
对于 Web 应用,与客户端发送给服务器的数据交互至关重要。In Flask this information is provided by the global request object. If you have some experience with Python you might be wondering how that object can be global and how Flask manages to still be threadsafe. 答案是上下文局部变量:
上下文局部变量
Insider Information
If you want to understand how that works and how you can implement tests with context locals, read this section, otherwise just skip it.
Flask 里某些全局对象不是我们通常理解上的那种。这些全局对象实际上直接指向本地上下文的本地变量。太拗口了。这实际上很好理解。
想象一下上下文就是正在处理的线程。A request comes in and the web server decides to spawn a new thread (or something else, the underlying object is capable of dealing with concurrency systems other than threads). When Flask starts its internal request handling it figures out that the current thread is the active context and binds the current application and the WSGI environments to that context (thread). It does that in an intelligent way so that one application can invoke another application without breaking.
So what does this mean to you? 基本上你可以完全忽略这个情况,除非你做单元测试。You will notice that code which depends on a request object will suddenly break because there is no request object. The solution is creating a request object yourself and binding it to the context. The easiest solution for unit testing is to use the test_request_context() context manager. 结合with语句,绑定一个测试请求,这样你才能与之交互。Here is an example:
from flask import request

with app.test_request_context('/hello', method='POST'):
    # now you can do something with the request until the
    # end of the with block, such as basic assertions:
    assert request.path == '/hello'
    assert request.method == 'POST'
The other possibility is passing a whole WSGI environment to the request_context() method:
from flask import request

with app.request_context(environ):
    assert request.method == 'POST'
Request对象
API章节对Request对象作了详尽阐述(参见request),因此这里不会赘述。Here is a broad overview of some of the most common operations. 首先,你必须从flask模块里导入它:
from flask import request
The current request method is available by using the method attribute. 通过form 属性来访问表单数据(POST或 PUT请求提交的数据)。Here is a full example of the two attributes mentioned above:
@app.route('/login', methods=['POST', 'GET'])
def login():
    error = None
    if request.method == 'POST':
        if valid_login(request.form['username'],
                       request.form['password']):
            return log_the_user_in(request.form['username'])
        else:
            error = 'Invalid username/password'
    # the code below is executed if the request method
    # was GET or the credentials were invalid
    return render_template('login.html', error=error)
如果form属性中键不存在会发生什么?在这种情况,会抛出一个特殊的KeyError异常。你可以像捕获标准的KeyError一样来捕获它,但是如果你不这么做,它会显示一个HTTP 400 Bad Request错误页面。So for many situations you don’t have to deal with that problem.
To access parameters submitted in the URL (?key=value) you can use the args attribute:
searchword = request.args.get('key', '')
我们推荐用get来访问URL参数或捕获KeyError,因为用户可能会修改URL,在这种情况下向他们展现一个400 bad request页面会影响用户体验。
For a full list of methods and attributes of the request object, head over to the request documentation.
文件上传
You can handle uploaded files with Flask easily. Just make sure not to forget to set the enctype="multipart/form-data" attribute on your HTML form, otherwise the browser will not transmit your files at all.
Uploaded files are stored in memory or at a temporary location on the filesystem. You can access those files by looking at the files attribute on the request object. 每个上传的文件都会存储在这个字典里。它表现近乎为一个标准的Python file对象,但它还有一个save()方法,这个方法允许你把文件保存到服务器的文件系统上。Here is a simple example showing how that works:
from flask import request

@app.route('/upload', methods=['GET', 'POST'])
def upload_file():
    if request.method == 'POST':
        f = request.files['the_file']
        f.save('/var/www/uploads/uploaded_file.txt')
    ...
如果你想知道上传前文件在客户端的文件名是什么,你可以访问filename属性。However please keep in mind that this value can be forged so never ever trust that value. 如果你要把文件按客户端提供的文件名存储在服务器上,那么请把它传递给Werkzeug提供的secure_filename()函数:
from flask import request
from werkzeug.utils import secure_filename

@app.route('/upload', methods=['GET', 'POST'])
def upload_file():
    if request.method == 'POST':
        f = request.files['the_file']
        f.save('/var/www/uploads/' + secure_filename(f.filename))
    ...
For some better examples, checkout the Uploading Files pattern.
Cookies
你可以通过cookies属性来访问Cookies。你可以用response对象的set_cookie方法来设置Cookies。请求对象的cookies属性是一个内容为客户端提交的所有Cookies的字典。如果你想使用会话,请不要直接使用Cookies,相反请使用Flask中Sessions,它为你在Cookies上添加了一些安全考虑。
Reading cookies:
from flask import request

@app.route('/')
def index():
    username = request.cookies.get('username')
    # use cookies.get(key) instead of cookies[key] to not get a
    # KeyError if the cookie is missing.
Storing cookies:
from flask import make_response

@app.route('/')
def index():
    resp = make_response(render_template(...))
    resp.set_cookie('username', 'the username')
    return resp
Note that cookies are set on response objects. Since you normally just return strings from the view functions Flask will convert them into response objects for you. If you explicitly want to do that you can use the make_response() function and then modify it.
有时候你想设置 Cookie,但响应对象还未存在。This is possible by utilizing the Deferred Request Callbacks pattern.
For this also see About Responses.
重定向和错误
你可以用redirect()函数把用户重定向到其它地方;放弃请求并返回错误代码,用abort()函数:
from flask import abort, redirect, url_for

@app.route('/')
def index():
    return redirect(url_for('login'))

@app.route('/login')
def login():
    abort(401)
    this_is_never_executed()
This is a rather pointless example because a user will be redirected from the index to a page they cannot access (401 means access denied) but it shows how that works.
By default a black and white error page is shown for each error code. If you want to customize the error page, you can use the errorhandler() decorator:
from flask import render_template

@app.errorhandler(404)
def page_not_found(error):
    return render_template('page_not_found.html'), 404
Note the 404 after the render_template() call. This tells Flask that the status code of that page should be 404 which means not found. By default 200 is assumed which translates to: all went well.
更多细节请参见错误处理。
关于Responses
The return value from a view function is automatically converted into a response object for you. 如果返回值是一个字符串,它将被转换为一个响应对象,其中字符串为响应的正文、状态码为200 OK、 MIME类型为text/html。The logic that Flask applies to converting return values into response objects is as follows:
- If a response object of the correct type is returned it’s directly returned from the view.
- If it’s a string, a response object is created with that data and the default parameters.
- If a tuple is returned the items in the tuple can provide extra information. 这样的元组必须是
(response, status, headers)或者(response, headers)的形式,其中至少包含一个元素。status值会覆盖状态代码,headers可以是一个列表或字典,作为额外的消息标头值。 - If none of that works, Flask will assume the return value is a valid WSGI application and convert that into a response object.
If you want to get hold of the resulting response object inside the view you can use the make_response() function.
Imagine you have a view like this:
@app.errorhandler(404)
def not_found(error):
    return render_template('error.html'), 404
You just need to wrap the return expression with make_response() and get the response object to modify it, then return it:
@app.errorhandler(404)
def not_found(error):
    resp = make_response(render_template('error.html'), 404)
    resp.headers['X-Something'] = 'A value'
    return resp
Sessions
除请求对象之外,还有第二个对象叫做session,它允许你在不同请求间存储特定用户的信息。它是在Cookies的基础上实现的,并且对Cookies进行密钥签名。What this means is that the user could look at the contents of your cookie but not modify it, unless they know the secret key used for signing.
要使用会话,你需要设置一个密钥。Here is how sessions work:
from flask import Flask, session, redirect, url_for, escape, request

app = Flask(__name__)

@app.route('/')
def index():
    if 'username' in session:
        return 'Logged in as %s' % escape(session['username'])
    return 'You are not logged in'

@app.route('/login', methods=['GET', 'POST'])
def login():
    if request.method == 'POST':
        session['username'] = request.form['username']
        return redirect(url_for('index'))
    return '''
        <form method="post">
            <p><input type=text name=username>
            <p><input type=submit value=Login>
        </form>
    '''

@app.route('/logout')
def logout():
    # remove the username from the session if it's there
    session.pop('username', None)
    return redirect(url_for('index'))

# set the secret key.  keep this really secret:
app.secret_key = 'A0Zr98j/3yX R~XHH!jmN]LWX/,?RT'
The escape() mentioned here does escaping for you if you are not using the template engine (as in this example).
How to generate good secret keys
The problem with random is that it’s hard to judge what is truly random. And a secret key should be as random as possible. Your operating system has ways to generate pretty random stuff based on a cryptographic random generator which can be used to get such a key:
>>> import os
>>> os.urandom(24)
'\xfd{H\xe5<\x95\xf9\xe3\x96.5\xd1\x01O<!\xd5\xa2\xa0\x9fR"\xa1\xa8'

Just take that thing and copy/paste it into your code and you're done.
A note on cookie-based sessions: Flask will take the values you put into the session object and serialize them into a cookie. If you are finding some values do not persist across requests, cookies are indeed enabled, and you are not getting a clear error message, check the size of the cookie in your page responses compared to the size supported by web browsers.
除了默认的基于客户端的session,如果你想在服务器段处理session,有几个Flask可以扩展支持。
Message Flashing
Good applications and user interfaces are all about feedback. If the user does not get enough feedback they will probably end up hating the application. Flask provides a really simple way to give feedback to a user with the flashing system. The flashing system basically makes it possible to record a message at the end of a request and access it on the next (and only the next) request. This is usually combined with a layout template to expose the message.
使用flash()方法可以闪现一条消息,要操作消息本身,请使用get_flashed_messages()函数,并且在模板中也可以使用。完整的例子见Message Flashing部分。
Logging
New in version 0.3.
Sometimes you might be in a situation where you deal with data that should be correct, but actually is not. For example you may have some client-side code that sends an HTTP request to the server but it’s obviously malformed. This might be caused by a user tampering with the data, or the client code failing. Most of the time it’s okay to reply with 400 Bad Request in that situation, but sometimes that won’t do and the code has to continue working.
You may still want to log that something fishy happened. This is where loggers come in handy. 从Flask 0.3 开始,Flask就已经预置了日志系统。
这里有一些调用日志记录的例子:
app.logger.debug('A value for debugging')
app.logger.warning('A warning occurred (%d apples)', 42)
app.logger.error('An error occurred')
附带的logger是一个标准日志类Logger ,所以更多信息请查阅官方的logging文档。
更多信息请阅读Application Errors。
整合WSGI中间件
If you want to add a WSGI middleware to your application you can wrap the internal WSGI application. For example if you want to use one of the middlewares from the Werkzeug package to work around bugs in lighttpd, you can do it like this:
from werkzeug.contrib.fixers import LighttpdCGIRootFix
app.wsgi_app = LighttpdCGIRootFix(app.wsgi_app)