Scrapy 1.5 文档
这篇文档包含了所有你需要了解的关于Scrapy的知识。
获得帮助
遇到麻烦? 我们能提供帮助!
- 试试常见问题解答 - 它有一些常见问题的答案。
- 寻找具体信息? 试试索引或模块索引。
- 使用scrapy标记在StackOverflow中询问或搜索问题。
- 在Scrapy subreddit中询问或搜索问题。
- 搜索scrapy-users邮件列表的存档问题。
- 在#scrapy IRC channel中提问
- 在我们的问题跟踪器中用Scrapy报告错误。
第一步
初窥Scrapy
Scrapy是一种用于抓取网站和提取结构化数据的应用程序框架,可用于广泛的有用应用程序,如数据挖掘,信息处理或历史存档。
尽管Scrapy最初是为web scraping设计的,但它也可以用于使用API(如Amazon Associates Web Services)提取数据或用作通用目的的网页抓取工具。
Spider示例演示
为了向您展示Scrapy带来的东西,我们将通过一个Scrapy爬虫示例来向您演示运行Spider的最简单方式。
这里是一个爬虫的代码,它可以在分页之后从网站http://quotes.toscrape.com中抓取名人名言。
import scrapy


class QuotesSpider(scrapy.Spider):
    name = "quotes"
    start_urls = [
        'http://quotes.toscrape.com/tag/humor/',
    ]

    def parse(self, response):
        for quote in response.css('div.quote'):
            yield {
                'text': quote.css('span.text::text').extract_first(),
                'author': quote.xpath('span/small/text()').extract_first(),
            }

        next_page = response.css('li.next a::attr("href")').extract_first()
        if next_page is not None:
            yield response.follow(next_page, self.parse)
把它放在一个文本文件中,命名为quotes_spider.py,然后使用runspider命令运行Spider:
scrapy runspider quotes_spider.py -o quotes.json
完成后,您将得到包含了文本和作者的JSON格式引号列表的quotes.json文件,看起来像这样(为了更好的可读性在这里重新格式化):
[{
    "author": "Jane Austen",
    "text": "\u201cThe person, be it gentleman or lady, who has not pleasure in a good novel, must be intolerably stupid.\u201d"
},
{
    "author": "Groucho Marx",
    "text": "\u201cOutside of a dog, a book is man's best friend. Inside of a dog it's too dark to read.\u201d"
},
{
    "author": "Steve Martin",
    "text": "\u201cA day without sunshine is like, you know, night.\u201d"
},
...]
刚刚发生了什么?
当您运行scrapy runspider quotes_spider.py命令时,Scrapy会从内部查找Spider的定义并通过它的爬虫引擎运行Spider。
爬虫通过向start_urls属性中定义的URL发送请求(本例中,仅在humor类别中引用的URL),然后调用默认回调方法 parse,将响应对象作为参数传递。 在parse回调中,我们CSS选择器循环引用元素,产生一个被提取引用的文本和作者的Python字典,查找下一页的链接并对另一个请求使用同样的parse方法作为回调。
在这里您会注意到Scrapy的一个主要优势:请求被scheduled and processed asynchronously。 这意味着Scrapy不需要等待请求处理完成,它可以同时发送另一个请求或做其他事情。 这也意味着即使某些请求失败或处理时发生错误也可以继续执行其他请求。
这不仅使您能够快速执行爬取(在容错方式下同时发送多个并发请求),Scrapy还可以使你通过a few settings来优雅的控制爬虫。 您可以执行诸如在每个请求之间设置下载延迟,限制每个域或每个IP的并发请求数量,甚至using an auto-throttling extension尝试自动调节这些延迟。
Note
这里使用了feed exports生成JSON文件,您可以轻易更改导出格式(例如XML或CSV)或存储后端(例如FTP或Amazon S3)。 您还可以编写item pipeline将项目存储在数据库中。
还有什么?
您已经看过如何使用Scrapy从网站中提取和存储信息,但这只是表面。 Scrapy提供了许多强大的功能,可以使抓取变得简单高效,例如:
- 内置支持使用扩展CSS选择器和XPath表达式从HTML/XML源selecting and extracting数据,使用正则表达式作为辅助方法进行提取。
- 一个交互式shell控制台(IPython软件)用于尝试使用CSS和XPath表达式来抓取数据,这在编写或调试蜘蛛程序时非常有用。
- 内置支持导出多种格式(JSON,CSV,XML),也可将它们存储在多种后端(FTP,S3,本地文件系统)。
- 强大的编码支持和自动检测,用于处理外部的,非标准的和破损的编码声明。
- 强大的可扩展性支持,允许您使用signals和定义良好的API(middlewares,extensions和pipelines)。
- 广泛的内置扩展和中间件处理:
- cookies和会话处理
- HTTP特性,如压缩,认证,缓存
- 用户代理欺骗
- robots.txt
- 爬行深度限制
- 更多
- 一个Telnet控制台,用于连接Scrapy进程中运行的Python控制台,以反编译和调试您的爬虫程序
- 还有其他有用的东西,如可重复使用的用于抓取站点地图和XML/CSV中网站的spider,与抓取的信息关联的自动下载图片(或任何其他媒体)的媒体管道,缓存DNS解析器,等等!
安装指南
安装Scrapy 
Scrapy在Python 2.7和Python 3.4以上运行,在CPython(默认Python实现)和PyPy(从PyPy 5.9开始)下运行。
如果您使用Anaconda或Miniconda,可以从conda-forge渠道安装软件包,该软件包具有最新的软件包适用于Linux,Windows和OS X.
要使用conda安装Scrapy,请运行:
conda install -c conda-forge scrapy
或者,如果您已经熟悉Python包的安装,则可以使用PyPI安装Scrapy及其依赖项:
pip install Scrapy
请注意,有时这可能需要根据您的操作系统解决某些Scrapy依赖项的编译问题,因此请务必检查平台特定安装说明。
我们强烈建议您在专用的virtualenv中安装Scrapy,以避免与系统软件包冲突。
有关更详细的平台特定说明,请继续阅读。
有用的知识
Scrapy是用纯Python编写的,并且依赖于几个关键的Python包:
- lxml,一种高效的XML和HTML解析器
- parsel,一个基于lxml的HTML/XML数据提取库
- w3lib,一款用于处理网址和网页编码的多用途帮手
- twisted,一个异步网络框架
- cryptography和pyOpenSSL,用来处理各种网络级安全需求
已测试过Scrapy的最低版本是:
- Twisted 14.0
- lxml 3.4
- pyOpenSSL 0.14
Scrapy可能会使用这些软件包的旧版本,但不能保证它会继续工作,因为它没有经过测试。
其中一些软件包本身依赖于非Python包,这可能需要额外的安装步骤,具体取决于您的平台。 请查阅平台特性指南。
如果出现依赖关系相关的任何问题,请参阅其各自的安装说明:
使用虚拟环境(推荐)
TL; DR:我们建议将Scrapy安装在所有平台的虚拟环境中。
Python软件包既可以全局安装(也可以是系统范围),也可以安装在用户空间中。 我们不建议在系统范围安装scrapy。
相反,我们建议您在所谓的“虚拟环境”(virtualenv)中安装scrapy。
Virtualenvs可以使Scrapy不会与已安装的Python系统软件包发生冲突(这可能会破坏您的一些系统工具和脚本),仍然可以正常使用pip(不需要sudo等)。
为从虚拟环境开始,参照虚拟环境指南. 要全局安装它(全局安装在这里实际上有帮助),将会被运行:
$ [sudo] pip install virtualenv
请查看用户指南了解如何创建您的virtualenv。
Note
如果您使用Linux或OS X,virtoalenvwrapper是创建virtualenvs的便利工具。
一旦你创建了一个virtualenv,你就可以像安装任何其他Python包一样,通过pip安装scrapy。
(您可能需要事先安装非Python依赖关系,请参阅下面的平台特定指南)。
创建Python virtualenvs可以使用Python 2或Python 3作为默认。
- 如果你想用Python 3安装scrapy,请在Python 3 virtualenv中安装scrapy。
- 如果你想用Python 2安装scrapy,请在Python 2 virtualenv中安装scrapy。
平台特定的安装说明
Windows
尽管可以使用pip在Windows上安装Scrapy,但我们建议您安装Anaconda或Miniconda,并使用conda-forge渠道中的软件包,这将避免大多数安装问题。
当你安装Anaconda或Miniconda完成之后,安装Scrapy:
conda install -c conda-forge scrapy
Ubuntu 14.04或更高版本
Scrapy 目前在测试最新版本的lxml,twisted和pyOpenSSL,并且在与最新的Ubuntu发行版本兼容 同时也支持老版本的Ubuntu,比如Ubuntu 14.04,尽管TLS有潜在问题
不要 使用 python-scrapy 提供自Ubuntu, 太老同时速度太慢,无法赶上最新的Scrapy
为了安装scrapy在Ubuntu或者基于Ubuntu的系统,你需要安装以下依赖包
sudo apt-get install python-dev python-pip libxml2-dev libxslt1-dev zlib1g-dev libffi-dev libssl-dev
python-dev,zlib1g-dev,libxml2-dev和libxslt1-dev依赖于lxmllibssl-dev和libffi-dev要求安装cryptography
如果你想在python 3上安装scrapy,你同时需要安装python 3
sudo apt-get install python3 python3-dev
在 虚拟环境中:virtualenv, 你可以用以下 pip 安装Scrapy:
pip install scrapy
Note
同样无python依赖包可被用于安装Scrapy在Debian Jessie8.0及更高版本
Mac OS X
构建Scrapy的依赖需要存在C编译器和开发头文件。 在OS X上,这通常由Apple的Xcode开发工具提供。 要安装Xcode命令行工具,请打开一个终端窗口并运行:
xcode-select --install
已知问题可能会阻止pip更新系统包。 必须解决这个问题才能成功安装Scrapy及其依赖项。 以下是一些建议的解决方案
(推荐) 不要使用系统python,安装一个不会与系统其余部分冲突的新的更新版本。 下面介绍了如何使用 homebrew 软件包管理器:
按照https://brew.sh/中的说明安装homebrew
更新你的
PATH变量,应该在系统包之前声明homebrew包(如果你使用 zsh作为默认shell,将.bashrc改为.zshrc):echo "export PATH=/usr/local/bin:/usr/local/sbin:$PATH" >> ~/.bashrc
重新加载
.bashrc以确保更改发生:source ~/.bashrc
安装python:
brew install pythonPython的最新版本已经捆绑了
pip,所以你不需要单独安装它。 如果情况并非如此,请升级python:brew update; brew upgrade python
(可选)在隔离的python环境中安装Scrapy。
此方法是上述OS X问题的一种解决方法,也是管理依赖关系的良好实践,可以作为第一种方法的补充。
virtualenv是一个可用于在python中创建虚拟环境的工具。 我们建议阅读http://docs.python-guide.org/en/latest/dev/virtualenvs/这个教程入门。
在以上任一方法完成后,您应该能够安装Scrapy:
pip install Scrapy
PyPy
我们建议使用最新的PyPy版本。 测试版本是5.9.0。 对于PyPy3,仅测试了Linux安装。
大多数scrapy依赖现在都有用于CPython的二进制转义,但不适用于PyPy。
这意味着这些依赖将在安装过程中建立。
在OS X上,您可能会遇到构建密码依赖性的问题,此问题的解决方案在这里描述,即brew install openssl,然后导出此命令推荐的标志(仅在安装scrapy时需要)。 除了安装构建依赖关系之外,在Linux上安装没有特殊问题。
在Windows上使用PyPy安装scrapy未经测试。
你可以通过运行以下指令来检查scrapy是否安装 scrapy bench.
如果这条指令给与以下错误
TypeError: ... got 2 unexpected keyword arguments,这意味着安装工具不能获取 PyPy-specific依赖包。
为解决此问题,运行以下指令pip install 'PyPyDispatcher>=2.1.0'.
Scrapy教程
在本教程中,我们假定您的系统上已经安装了Scrapy。 如果不是这种情况,请参阅安装指南。
我们将爬取quota.toscrape.com,一个列出著名作家语录的网站。
本教程将引导您完成这些任务:
- 创建一个新的Scrapy项目
- 编写一个spider来抓取网站并提取数据
- 使用命令行导出爬取的数据
- 更改spider递归地跟随链接
- 使用spider参数
Scrapy是用Python编写的。 如果您对语言很陌生,您可能想先了解语言是什么样子,以充分利用Scrapy。
如果您已经熟悉其他语言,希望快速学习Python,我们建议您阅读Dive Into Python 3。 或者,您可以按照Python教程进行操作。
如果您是编程新手,想从Python开始,那么在线书籍Learn Python The Hard Way将对您非常有用。 你也可以看看非程序员的Python资源列表。
创建一个项目
在开始抓取之前,您不得不建立一个新的Scrapy项目。 进入您想要存储代码并运行的目录:
scrapy startproject tutorial
这将创建一个包含以下内容的tutorial目录:
tutorial/
    scrapy.cfg            # 部署配置文件

    tutorial/             # 项目的Python模块,你将在这里输入你的代码
        __init__.py

        items.py          # 项目的items定义文件

        middlewares.py    # 项目中间件文件

        pipelines.py      # 项目管道文件

        settings.py       # 项目设置文件

        spiders/          # 稍后放置spider的文件夹
            __init__.py
我们的第一个Spider
Spider是你定义的类,并且Scrapy用它从网站(或一组网站)爬取信息。 它们继承自scrapy.Spider,定义初始请求,可选择如何跟随页面中的链接,以及如何解析下载的页面内容以提取数据。
这是我们第一个Spider的代码。 将它保存在项目中tutorial/spiders目录下名为quotes_spider.py的文件中:
import scrapy


class QuotesSpider(scrapy.Spider):
    name = "quotes"

    def start_requests(self):
        urls = [
            'http://quotes.toscrape.com/page/1/',
            'http://quotes.toscrape.com/page/2/',
        ]
        for url in urls:
            yield scrapy.Request(url=url, callback=self.parse)

    def parse(self, response):
        page = response.url.split("/")[-2]
        filename = 'quotes-%s.html' % page
        with open(filename, 'wb') as f:
            f.write(response.body)
        self.log('Saved file %s' % filename)
正如你所看到的,我们的Spider继承自scrapy.Spider,定义了一些属性和方法:
name:标识Spider。 它在项目中必须是唯一的,也就是说,不能为不同的Spider设置相同的名称。start_requests():必须提供一个Spider开始抓取的迭代请求(你可以返回一个请求列表或者编写一个生成器函数)。 随后的请求将从这些初始请求中接连生成。parse():一个用来处理每个请求下载的响应的方法。 response参数是TextResponse的一个实例,它包含了页面内容以便进一步处理。parse()方法通常会解析response,将抓到的数据提取为字典,同时找出接下来新的URL创建新的请求(Request)。
如何运行我们的spider
为了让我们的spider工作,请转到项目的顶层目录并运行:
scrapy crawl quotes
这个命令运行我们刚刚添加名为quotes的spider,它将发送一些针对quotes.toscrape.com域的请求。 你会得到类似于这样的输出:
... (omitted for brevity)
2016-12-16 21:24:05 [scrapy.core.engine] INFO: Spider opened
2016-12-16 21:24:05 [scrapy.extensions.logstats] INFO: Crawled 0 pages (at 0 pages/min), scraped 0 items (at 0 items/min)
2016-12-16 21:24:05 [scrapy.extensions.telnet] DEBUG: Telnet console listening on 127.0.0.1:6023
2016-12-16 21:24:05 [scrapy.core.engine] DEBUG: Crawled (404) <GET http://quotes.toscrape.com/robots.txt> (referer: None)
2016-12-16 21:24:05 [scrapy.core.engine] DEBUG: Crawled (200) <GET http://quotes.toscrape.com/page/1/> (referer: None)
2016-12-16 21:24:05 [scrapy.core.engine] DEBUG: Crawled (200) <GET http://quotes.toscrape.com/page/2/> (referer: None)
2016-12-16 21:24:05 [quotes] DEBUG: Saved file quotes-1.html
2016-12-16 21:24:05 [quotes] DEBUG: Saved file quotes-2.html
2016-12-16 21:24:05 [scrapy.core.engine] INFO: Closing spider (finished)
...
现在,检查当前目录中的文件。 您应该注意到创建了两个新文件:quotes-1.html和quotes-2.html,其中包含各个网址的内容,就像parse方法指示的那样。
Note
如果您想知道为什么我们还没有解析HTML,请坚持下去,我们很快就会涉及。
发生了什么?
Scrapy调度Spider的start_requests方法返回的scrapy.Request对象。 在收到每个响应后,它会实例化Response对象并调用与请求相关的回调方法(本例中为parse方法)将响应作为参数传递。
start_requests方法的快捷方式
除了实现从网址生成scrapy.Request对象的start_requests()方法外,您还可以定义一个包含网址列表的start_urls类属性。 这个列表将被默认的start_requests()用来为你的spider创建初始请求:
import scrapy


class QuotesSpider(scrapy.Spider):
    name = "quotes"
    start_urls = [
        'http://quotes.toscrape.com/page/1/',
        'http://quotes.toscrape.com/page/2/',
    ]

    def parse(self, response):
        page = response.url.split("/")[-2]
        filename = 'quotes-%s.html' % page
        with open(filename, 'wb') as f:
            f.write(response.body)
parse()方法将会被调用来处理这些URL的每个请求,即使我们没有明确告诉Scrapy这样做。 发生这种情况是因为在没有为request明确分配回调方法时,parse()是Scrapy的默认回调方法。
提取数据
学习如何使用Scrapy提取数据的最佳方式是尝试使用shell选择器Scrapy shell。 运行:
scrapy shell 'http://quotes.toscrape.com/page/1/'
注意
请记住,从命令行运行Scrapy shell时应该将url用引号括起来,否则包含参数的url(例如 & 字符) 将出现问题。
在Windows上,请使用双引号:
scrapy shell "http://quotes.toscrape.com/page/1/"
你会看到类似于:
[ ... Scrapy log here ... ]
2016-09-19 12:09:27 [scrapy.core.engine] DEBUG: Crawled (200) <GET http://quotes.toscrape.com/page/1/> (referer: None)
[s] Available Scrapy objects:
[s]   scrapy     scrapy module (contains scrapy.Request, scrapy.Selector, etc)
[s]   crawler    <scrapy.crawler.Crawler object at 0x7fa91d888c90>
[s]   item       {}
[s]   request    <GET http://quotes.toscrape.com/page/1/>
[s]   response   <200 http://quotes.toscrape.com/page/1/>
[s]   settings   <scrapy.settings.Settings object at 0x7fa91d888c10>
[s]   spider     <DefaultSpider 'default' at 0x7fa91c8af990>
[s] Useful shortcuts:
[s]   shelp()           Shell help (print this help)
[s]   fetch(req_or_url) Fetch request (or URL) and update local objects
[s]   view(response)    View response in a browser
>>>
使用shell,您可以在响应对象中使用CSS选择元素:
>>> response.css('title')
[<Selector xpath='descendant-or-self::title' data='<title>Quotes to Scrape</title>'>]
运行response.css('title')的结果是一个名为SelectorList的列表对象,它表示一个包裹着XML/HTML元素的Selector对象的列表,并允许您运行更多查询来细化选择或提取数据。
要从上述title中提取文本,您可以执行以下操作:
>>> response.css('title::text').extract()
['Quotes to Scrape']
这里需要注意两点:其一是我们已经向CSS查询添加了:: text,这意味着我们只想直接在<title>中选择text元素。 如果我们不指定:: text,我们会得到完整的标题元素,包括它的标签:
>>> response.css('title').extract()
['<title>Quotes to Scrape</title>']
另一件事是调用.extract()的结果是一个列表,因为我们正在处理SelectorList的实例。 如果你只是想要第一个结果,在这种情况下,你可以这样做:
>>> response.css('title::text').extract_first()
'Quotes to Scrape'
或者,你可以这样写:
>>> response.css('title::text')[0].extract()
'Quotes to Scrape'
但是,如果找不到与选择匹配的任何元素,使用.extract_first()可避免发生IndexError并返回None。
这里有一个教训:对于大多数爬虫代码,你希望它能够适应在页面上找不到的东西而产生的错误,所以即使某些部分没有被爬取,你至少可以得到一部分数据。
除了extract()和extract_first()方法之外,还可以使用re()方法应用正则表达式提取:
>>> response.css('title::text').re(r'Quotes.*')
['Quotes to Scrape']
>>> response.css('title::text').re(r'Q\w+')
['Quotes']
>>> response.css('title::text').re(r'(\w+) to (\w+)')
['Quotes', 'Scrape']
为了找到合适的CSS选择器来使用,你可能会发现在你的web浏览器的shell中使用view(response)打开响应页面很有用。
您可以使用浏览器开发工具或Firebug扩展(请参阅使用Firebug进行爬取和使用Firefox进行爬取部分)。
选择器小工具也是一个很好的工具,可以快速查找可视化选定元素的CSS选择器,它可以在许多浏览器中使用。
XPath:简要介绍
>>> response.xpath('//title')
[<Selector xpath='//title' data='<title>Quotes to Scrape</title>'>]
>>> response.xpath('//title/text()').extract_first()
'Quotes to Scrape'
XPath表达式非常强大,是Scrapy选择器的基础。 实际上,CSS选择器在底层被转换为XPath。 如果仔细阅读shell中选择器对象的文本表示形式,你可以发现这一点。
尽管XPath表达式可能不如CSS选择器那么受欢迎,但它提供了更加强大的功能,除了浏览结构之外,它还可以查看内容。 使用XPath,您可以像这样选择内容:选择包含文本“下一页”的链接。 这使得XPath非常适合抓取任务,并且即使您已经知道如何构建CSS选择器,我们也鼓励您学习XPath,这会使抓取更容易。
我们在这里不会涉及很多XPath,但您可以阅读有关使用XPath和Scrapy选择器的更多信息。 想要了解更多XPath的信息,我们建议通过示例学习XPath和学习“如何用XPath思考”。
提取语录和作者
现在您已经了解了一些关于选择和提取的内容,让我们通过编写代码来从网页中提取语录来完成我们的spider。
http://quotes.toscrape.com中的每个语录都是由HTML元素表示的,如下所示:
<div class="quote">
    <span class="text">“The world as we have created it is a process of our
    thinking. It cannot be changed without changing our thinking.”</span>
    <span>
        by <small class="author">Albert Einstein</small>
        <a href="/author/Albert-Einstein">(about)</a>
    </span>
    <div class="tags">
        Tags:
        <a class="tag" href="/tag/change/page/1/">change</a>
        <a class="tag" href="/tag/deep-thoughts/page/1/">deep-thoughts</a>
        <a class="tag" href="/tag/thinking/page/1/">thinking</a>
        <a class="tag" href="/tag/world/page/1/">world</a>
    </div>
</div>
让我们打开scrapy shell,试着提取我们想要的数据:
$ scrapy shell 'http://quotes.toscrape.com'
我们通过以下方式获得语录HTML元素的选择器列表:
>>> response.css("div.quote")
上述查询返回的每个选择器都允许我们对其子元素运行更多查询。 让我们将第一个选择器分配给一个变量,以便我们可以直接在特定的语录上运行我们的CSS选择器:
>>> quote = response.css("div.quote")[0]
现在,我们从刚刚创建的quote对象中提取title,author和tags
>>> title = quote.css("span.text::text").extract_first()
>>> title
'“The world as we have created it is a process of our thinking. It cannot be changed without changing our thinking.”'
>>> author = quote.css("small.author::text").extract_first()
>>> author
'Albert Einstein'
鉴于标签是一个字符串列表,我们可以使用.extract()方法来获取所有这些标签:
>>> tags = quote.css("div.tags a.tag::text").extract()
>>> tags
['change', 'deep-thoughts', 'thinking', 'world']
在弄清楚了如何提取每一个数据之后,我们现在可以遍历所有语录元素,将它们放在一起形成一个Python字典:
>>> for quote in response.css("div.quote"):
...     text = quote.css("span.text::text").extract_first()
...     author = quote.css("small.author::text").extract_first()
...     tags = quote.css("div.tags a.tag::text").extract()
...     print(dict(text=text, author=author, tags=tags))
{'tags': ['change', 'deep-thoughts', 'thinking', 'world'], 'author': 'Albert Einstein', 'text': '“The world as we have created it is a process of our thinking. It cannot be changed without changing our thinking.”'}
{'tags': ['abilities', 'choices'], 'author': 'J.K. Rowling', 'text': '“It is our choices, Harry, that show what we truly are, far more than our abilities.”'}
    ... a few more of these, omitted for brevity
>>>
在我们的spider中提取数据
让我们回到我们的spider。 直到现在,它并没有特别提取任何数据,只是将整个HTML页面保存到本地文件中。 让我们将提取逻辑整合到我们的spider中。
Scrapy spider通常会生成许多包含从页面提取的数据的字典。 为此,我们在回调中使用yield Python关键字,如下所示:
import scrapy


class QuotesSpider(scrapy.Spider):
    name = "quotes"
    start_urls = [
        'http://quotes.toscrape.com/page/1/',
        'http://quotes.toscrape.com/page/2/',
    ]

    def parse(self, response):
        for quote in response.css('div.quote'):
            yield {
                'text': quote.css('span.text::text').extract_first(),
                'author': quote.css('small.author::text').extract_first(),
                'tags': quote.css('div.tags a.tag::text').extract(),
            }
如果你运行这个spider,它会输出提取的数据和日志:
2016-09-19 18:57:19 [scrapy.core.scraper] DEBUG: Scraped from <200 http://quotes.toscrape.com/page/1/>
{'tags': ['life', 'love'], 'author': 'André Gide', 'text': '“It is better to be hated for what you are than to be loved for what you are not.”'}
2016-09-19 18:57:19 [scrapy.core.scraper] DEBUG: Scraped from <200 http://quotes.toscrape.com/page/1/>
{'tags': ['edison', 'failure', 'inspirational', 'paraphrased'], 'author': 'Thomas A. Edison', 'text': "“I have not failed. I've just found 10,000 ways that won't work.”"}
存储抓取的数据
存储抓取数据的最简单方法是应用Feed exports,使用以下命令:
scrapy crawl quotes -o quotes.json
这将生成一个quotes.json文件,其中包含所有序列化为JSON的已抓取项目。
由于历史原因,Scrapy附加到给定文件而不是覆盖其内容。 如果您执行该命令两次在第二次执行前未移除该文件,则会生成一个损坏的JSON文件。
您也可以使用其他格式,如JSON:
scrapy crawl quotes -o quotes.jl
JSON行格式非常有用,因为它类似于流,您可以轻松地向其添加新记录。 当您运行两次时,它不会发生和JSON相同的问题。 另外,由于每条记录都是一条独立的行,因此可以处理大文件而不必将所有内容都放在内存中,因此有些工具(如JQ)可帮助在命令行执行此操作。
在小型项目中(如本教程中的),应该足够了。
但是,如果您想使用爬虫项目执行更复杂的事情,可以编写Item Pipeline。 项目创建时,已经为您设置了Item Pipelines的预留文件,位于tutorial/pipelines.py中。 尽管如果你只是想存储抓取的数据,你不需要实现任何的item pipeline。
找到下个链接
比方说,您不需要从http://quotes.toscrape.com中的前两个页面中抓取内容,而是需要来自网站中所有页面的格言。
现在您已经知道如何从网页中提取数据,我们来看看如何从它们中找到链接。
首先要提取我们想要继续处理的页面的链接。 检视我们的页面,我们可以看到有一个带有标记的下一页的链接:
<ul class="pager">
<li class="next">
<a href="/page/2/">Next <span aria-hidden="true">→</span></a>
</li>
</ul>
我们可以尝试在shell中提取它:
>>> response.css('li.next a').extract_first()
'<a href="/page/2/">Next <span aria-hidden="true">→</span></a>'
这会获取锚点元素,但我们需要属性href。 为此,Scrapy支持一个CSS扩展,让您选择属性内容,如下所示:
>>> response.css('li.next a::attr(href)').extract_first()
'/page/2/'
现在让我们看看将Spider修改为递归地follow到下一页的链接,从中提取数据:
import scrapy


class QuotesSpider(scrapy.Spider):
    name = "quotes"
    start_urls = [
        'http://quotes.toscrape.com/page/1/',
    ]

    def parse(self, response):
        for quote in response.css('div.quote'):
            yield {
                'text': quote.css('span.text::text').extract_first(),
                'author': quote.css('small.author::text').extract_first(),
                'tags': quote.css('div.tags a.tag::text').extract(),
            }

        next_page = response.css('li.next a::attr(href)').extract_first()
        if next_page is not None:
            next_page = response.urljoin(next_page)
            yield scrapy.Request(next_page, callback=self.parse)
现在,在提取数据后,parse()方法查找到下一页的链接,使用urljoin()方法构建完整的绝对URL(因为链接可以是相对的),并产生一个新的请求到下一个页面,将自己作为回调函数来处理下一页的数据提取,并保持遍历所有页面的抓取。
在这里您将看到Scrapy的跟随链接机制:当您在回调方法中产生请求时,Scrapy会安排发送请求并注册一个回调方法,以便在请求结束时执行。
使用这种方法,您可以根据您定义的规则构建复杂的抓取工具,并根据所访问的页面提取不同类型的数据。
在我们的例子中,它创建了一个循环,找下一页的所有链接,直到它找不到。这种做法对于抓取分页的博客,论坛和其他网站的链接是很方便的。
创建请求的快捷方式
您可以使用response.follow作为创建Request对象的快捷方式:
import scrapy


class QuotesSpider(scrapy.Spider):
    name = "quotes"
    start_urls = [
        'http://quotes.toscrape.com/page/1/',
    ]

    def parse(self, response):
        for quote in response.css('div.quote'):
            yield {
                'text': quote.css('span.text::text').extract_first(),
                'author': quote.css('span small::text').extract_first(),
                'tags': quote.css('div.tags a.tag::text').extract(),
            }

        next_page = response.css('li.next a::attr(href)').extract_first()
        if next_page is not None:
            yield response.follow(next_page, callback=self.parse)
与scrapy.Request不同,response.follow直接支持相对URL - 无需调用urljoin。 请注意,response.follow只是返回一个Request实例;你仍然需要产生这个请求。
您也可以将选择器传递给response.follow代替字符串;该选择器应该提取必要的属性:
for href in response.css('li.next a::attr(href)'):
    yield response.follow(href, callback=self.parse)
对于<a>元素有一个快捷方式:response.follow会自动使用它们的href属性。 因此代码可以进一步缩短:
for a in response.css('li.next a'):
    yield response.follow(a, callback=self.parse)
注意
response.follow(response.css('li.next a'))无效,因为response.css返回一个包含所有结果选择器的类似列表的对象,而不是单个选择器。 如上例所示的for循环,或response.follow(response.css('li.nexta')[0])是可以的。
更多的例子和模式
这有另一个spider,它演示了回调和跟随链接,这次是为了抓取作者信息:
import scrapy


class AuthorSpider(scrapy.Spider):
    name = 'author'

    start_urls = ['http://quotes.toscrape.com/']

    def parse(self, response):
        # follow links to author pages
        for href in response.css('.author + a::attr(href)'):
            yield response.follow(href, self.parse_author)

        # follow pagination links
        for href in response.css('li.next a::attr(href)'):
            yield response.follow(href, self.parse)

    def parse_author(self, response):
        def extract_with_css(query):
            return response.css(query).extract_first().strip()

        yield {
            'name': extract_with_css('h3.author-title::text'),
            'birthdate': extract_with_css('.author-born-date::text'),
            'bio': extract_with_css('.author-description::text'),
        }
这个spider将从主页面开始,它将follow所有作者页面的链接,对每个页面调用parse_author回调函数,同时也像我们之前看到的那样对页面链接使用parse回调。
在这里,我们将回调传递给response.follow作为位置参数以缩短代码长度;也可以使用scrapy.Request。
parse_author回调函数定义了一个从CSS查询中提取和清除数据的辅助函数,生成带有作者数据的Python字典。
这个spider演示的另一个有趣的事情是,即使多个语录有同一作者,我们也不必担心多次访问相同的作者页面。 默认情况下,Scrapy会将重复的请求过滤到已访问的URL中,避免因同一编程错误而导致服务器遇到过多的重复问题。 这可以通过设置DUPEFILTER_CLASS进行配置。
希望现在您已经对如何使用Scrapy的follow链接和回调机制有了足够的了解。
作为利用follow链接机制的另一个示例spider,请查看CrawlSpider类,以获得一个实现了简单规则引擎的通用蜘蛛,您可以在其上编写爬虫程序。
此外,常见模式是使用将附加数据传递到回调函数的技巧,对多个页面构建一个包含数据的item。
使用spider参数
您可以在命令行运行spider时使用-a选项提供参数:
scrapy crawl quotes -o quotes-humor.json -a tag=humor
这些参数被传递给Spider的__init__方法,并默认成为spider的属性。
在此示例中,为tag参数提供的值可通过self.tag获得。 你可以使用它来让你的spider获取带有特定标签的语录,根据参数构建URL:
import scrapy


class QuotesSpider(scrapy.Spider):
    name = "quotes"

    def start_requests(self):
        url = 'http://quotes.toscrape.com/'
        tag = getattr(self, 'tag', None)
        if tag is not None:
            url = url + 'tag/' + tag
        yield scrapy.Request(url, self.parse)

    def parse(self, response):
        for quote in response.css('div.quote'):
            yield {
                'text': quote.css('span.text::text').extract_first(),
                'author': quote.css('small.author::text').extract_first(),
            }

        next_page = response.css('li.next a::attr(href)').extract_first()
        if next_page is not None:
            yield response.follow(next_page, self.parse)
如果您将tag=humor参数传递给spider,您会注意到它只会访问humor标记中的网址,例如http//quotes.toscrape.com/tag/humor 。
您可以详细了解如何处理spider参数。
示例
学习的最好方法是使用示例,Scrapy也不例外。 出于这个原因,这里有名为quotesbot的Scrapy项目的例子,您可以使用它来玩和学习更多关于Scrapy的知识。 它包含两个http://quotes.toscrape.com的spider,一个使用CSS选择器,另一个使用XPath表达式。
quotesbot项目位于:https://github.com/scrapy/quotesbot。 您可以在项目的README中找到更多关于它的信息。
如果你熟悉git,你可以签出代码。 否则,您可以通过单击此处下载该项目的zip文件。
基本概念
命令行工具
0.10版本中的新功能。
Scrapy通过scrapy命令行工具进行控制,在这里被称为“Scrapy工具”,以区别于我们称之为“命令”或“Scrapy命令”的子命令。
Scrapy工具提供了多种命令,用于多种目的,并且每个命令都接受一组不同的参数和选项。
(scrapy deploy命令已在1.0版中被移除,变为独立的scrapyd-deploy。 请参阅部署项目。)
配置设置
Scrapy将在标准位置的ini类型scrapy.cfg文件中查找配置参数:
/etc/scrapy.cfg或c:\scrapy\scrapy.cfg(系统范围),〜/.config/scrapy.cfg($XDG_CONFIG_HOME)和〜/ .scrapy.cfg($HOME)用于全局(用户范围)设置和scrapy.cfg在scrapy项目的根目录中(请参阅下一节)。
这些文件中的设置按所列出的优先顺序进行合并:用户定义的值具有比系统范围内的默认值更高的优先级,并且在定义时,项目范围的设置将覆盖所有其他文件。
Scrapy也可以通过一些环境变量进行配置。 目前可设置:
SCRAPY_SETTINGS_MODULE(请参阅指定设置)SCRAPY_PROJECTSCRAPY_PYTHON_SHELL(请参阅Scrapy shell)
Scrapy项目的默认结构
在深入研究命令行工具及其子命令之前,我们先来了解Scrapy项目的目录结构。
虽然可以修改,但所有Scrapy项目默认具有相同的文件结构,与此类似:
scrapy.cfg
myproject/
    __init__.py
    items.py
    middlewares.py
    pipelines.py
    settings.py
    spiders/
        __init__.py
        spider1.py
        spider2.py
        ...
scrapy.cfg文件所在的目录称为项目根目录。 该文件包含定义项目设置的python模块的名称。 这里是一个例子:
[settings]
default = myproject.settings
使用scrapy工具
您可以在开始时运行不带参数的Scrapy工具,它将打印一些使用帮助和可用的命令:
Scrapy X.Y - no active project

Usage:
  scrapy <command> [options] [args]

Available commands:
  crawl         Run a spider
  fetch         Fetch a URL using the Scrapy downloader
[...]
如果您在Scrapy项目中,则第一行将打印当前活动的项目。 在这个例子中,它是在一个项目之外运行的。 如果在一个项目中运行,它会打印出如下所示的内容:
Scrapy X.Y - project: myproject

Usage:
  scrapy <command> [options] [args]

[...]
创建项目
您通常使用scrapy工具做的第一件事是创建您的Scrapy项目:
scrapy startproject myproject [project_dir]
这将在project_dir目录下创建一个Scrapy项目。
如果未指定project_dir,则project_dir将与myproject相同。
接下来,进入新的项目目录:
cd project_dir
您可以使用scrapy命令管理和控制您的项目。
可用的工具命令
本节包含可用内置命令的列表及说明和一些使用示例。 请记住,您始终可以通过运行以下命令获取有关每个命令的更多信息:
scrapy <command> -h
你可以看到所有可用的命令:
scrapy -h
有两种类型的命令,一些只能在Scrapy项目中使用的命令(特定于项目的命令);另外一些可以在没有活动的Scrapy项目的情况下使用(全局命令),尽管它们在项目中运行时可能略有不同因为他们会使用项目重写设置)。
全局命令:
仅限项目的命令:
startproject命令
- 语法:
scrapy startproject <project_name> [project_dir] - 需要项目:不需要
在project_dir目录下创建一个名为project_name的新Scrapy项目。
如果未指定project_dir,project_dir将与project_name相同。
用法示例:
$ scrapy startproject myproject
genspider
- 语法:
scrapy genspider [-t template] <name> <domain> - 需要项目:不需要
如果在项目中调用,则在当前文件夹或当前项目的spiders文件夹中创建一个新Spider。 <name> 参数用来设置Spider的 name, <domain>设置allowed_domains 和 start_urls .
用法示例:
$ scrapy genspider -l
Available templates:
  basic
  crawl
  csvfeed
  xmlfeed

$ scrapy genspider example example.com
Created spider 'example' using template 'basic'

$ scrapy genspider -t crawl scrapyorg scrapy.org
Created spider 'scrapyorg' using template 'crawl'
这只是一个用预定义模板创建Spider的快捷命令,并不是创建Spider的唯一方法。 您可以自己创建Spider源代码文件,不使用此命令。
crawl
- 语法:
scrapy crawl <spider> - 需要项目:需要
开始使用Spider爬取。
用法示例:
$ scrapy crawl myspider
[ ... myspider starts crawling ... ]
check
- 语法:
scrapy check [-l] <spider> - 需要项目:需要
运行约定检查。
用法示例:
$ scrapy check -l
first_spider
  * parse
  * parse_item
second_spider
  * parse
  * parse_item

$ scrapy check
[FAILED] first_spider:parse_item
>>> 'RetailPricex' field is missing

[FAILED] first_spider:parse
>>> Returned 92 requests, expected 0..4
edit
- 语法:
scrapy edit <spider> - 需要项目:需要
使用EDITOR环境变量中定义的编辑器编辑给定的蜘蛛,或者(如果未设置)编辑EDITOR设置。
此命令仅作为最常见情况的便捷快捷方式提供,开发人员可以自由选择任何工具或IDE来编写和调试spider。
用法示例:
$ scrapy edit spider1
fetch
- 语法:
scrapy fetch <url> - 需要项目:不需要
使用Scrapy下载器下载给定的URL并将内容写到标准输出。
这个命令的有趣之处在于它抓取页面Spider如何下载它。 例如,如果Spider具有覆盖用户代理的USER_AGENT属性,它将使用该属性。
所以这个命令可以用来“看”你的spider如何获取某个页面。
如果在项目之外使用,则不会应用特定Spider的行为,它将使用默认的Scrapy下载器设置。
支持的选项:
--spider=SPIDER:绕过spider自动检测并强制使用特定的spider--headers:打印响应的HTTP headers而不是响应的正文--no-redirect:不follow HTTP 3xx重定向(默认是follow它们)
用法示例:
$ scrapy fetch --nolog http://www.example.com/some/page.html
[ ... html content here ... ]

$ scrapy fetch --nolog --headers http://www.example.com/
{'Accept-Ranges': ['bytes'],
 'Age': ['1263   '],
 'Connection': ['close     '],
 'Content-Length': ['596'],
 'Content-Type': ['text/html; charset=UTF-8'],
 'Date': ['Wed, 18 Aug 2010 23:59:46 GMT'],
 'Etag': ['"573c1-254-48c9c87349680"'],
 'Last-Modified': ['Fri, 30 Jul 2010 15:30:18 GMT'],
 'Server': ['Apache/2.2.3 (CentOS)']}
view
- 语法:
scrapy view <url> - 需要项目:需要
在浏览器中打开给定的URL,就像Scrapy Spider“看到”的那样。 有时候,Spider看到的网页与普通用户不同,所以这可以用来检查Spider“看到”了什么,并确认它是否是你期望的。
支持的选项:
--spider=SPIDER:绕过Spider自动检测并强制使用特定的Spider--no-redirect:不follow HTTP 3xx重定向(默认是follow它们)
用法示例:
$ scrapy view http://www.example.com/some/page.html
[ ... browser starts ... ]
shell
- 语法:
scrapy shell [url] - 需要项目:不需要
为指定的URL(如果给定)启动Scrapy shell,如果没有给出URL,则为空。 还支持UNIX风格的本地文件路径,./或../前缀的相对路径或绝对路径。
有关更多信息,请参阅Scrapy shell。
支持的选项:
--spider=SPIDER:绕过Spider自动检测并强制使用特定的Spider-c code:获取shell中的代码,打印结果并退出--no-redirect:不follow HTTP 3xx重定向(默认是follow它们);这只会影响您在命令行上作为参数传递的URL;在shell运行时,fetch(url)默认仍然会follow HTTP重定向。
用法示例:
$ scrapy shell http://www.example.com/some/page.html
[ ... scrapy shell starts ... ]

$ scrapy shell --nolog http://www.example.com/ -c '(response.status, response.url)'
(200, 'http://www.example.com/')

# shell follows HTTP redirects by default
$ scrapy shell --nolog http://httpbin.org/redirect-to?url=http%3A%2F%2Fexample.com%2F -c '(response.status, response.url)'
(200, 'http://example.com/')

# you can disable this with --no-redirect
# (only for the URL passed as command line argument)
$ scrapy shell --no-redirect --nolog http://httpbin.org/redirect-to?url=http%3A%2F%2Fexample.com%2F -c '(response.status, response.url)'
(302, 'http://httpbin.org/redirect-to?url=http%3A%2F%2Fexample.com%2F')
parse
- 语法:
scrapy parse <url> [options] - 需要项目:需要
获取给定的URL,Spider使用--callback选项传递的方法或parse处理它。
支持的选项:
--spider=SPIDER:绕过spider自动检测并强制使用特定的spider--a NAME=VALUE:设置spider参数(可以重复)--callback或-c:用作spider解析响应的回调方法--meta或-m:通过回调请求传回附加请求元标签。 这必须是有效的json字符串。 例如:-meta ='{“foo”:“bar”}'--pipelines:通过pipeline处理item--rules或-r:使用CrawlSpider规则来发现用于解析响应的回调(即spider方法)--noitems:不显示被抓到的item--nolinks:不显示提取的链接--nocolour:避免使用pygments对输出着色--depth或-d:递归请求后的深度级别(默认值:1)--verbose或-v:显示每个深度级别的信息
用法示例:
$ scrapy parse http://www.example.com/ -c parse_item
[ ... scrapy log lines crawling example.com spider ... ]

>>> STATUS DEPTH LEVEL 1 <<<
# Scraped Items  ------------------------------------------------------------
[{'name': u'Example item',
 'category': u'Furniture',
 'length': u'12 cm'}]

# Requests  -----------------------------------------------------------------
[]
settings
- 语法:
scrapy settings [options] - 需要项目:需要
获取Scrapy设置值。
如果在项目中使用,它将显示项目设置值,否则将显示默认Scrapy设置值。
用法示例:
$ scrapy settings --get BOT_NAME
scrapybot
$ scrapy settings --get DOWNLOAD_DELAY
0
runspider
- 语法:
scrapy runspider <spider_file.py> - 需要项目:不需要
运行一个包含在Python文件中的Spider,而不必创建一个项目。
用法示例:
$ scrapy runspider myspider.py
[ ... spider starts crawling ... ]
version
- 语法:
scrapy version [-v] - 需要项目:需要
打印Scrapy版本。 如果与-v一起使用,它还会打印Python,Twisted和Platform信息,这对于错误报告很有用。
自定义项目命令
您还可以使用COMMANDS_MODULE设置来添加自定义项目命令。 有关如何实现自定义命令的示例,请参阅scrapy/commands中的Scrapy命令。
COMMANDS_MODULE
默认:''(空字符串)
用于查找自定义Scrapy命令的模块。 这用于为您的Scrapy项目添加自定义命令。
例:
COMMANDS_MODULE = 'mybot.commands'
通过setup.py入口点注册命令
注意
这是一个实验性功能,请谨慎使用。
您还可以通过在setup.py库文件的入口点添加scrapy.commands部分,从外部库添加Scrapy命令。
以下示例添加了my_command命令:
from setuptools import setup, find_packages

setup(name='scrapy-mymodule',
  entry_points={
    'scrapy.commands': [
      'my_command=my_scrapy_module.commands:MyCommand',
    ],
  },
 )
Spiders
Spider是定义了如何抓取某个站点(或一组站点)的类,包括如何执行爬取(即follow链接)以及如何从其页面中提取结构化数据(即抓取item)。 换句话说,Spider是您定义的为抓取和解析特定网站(在某些情况下是一组网站)页面的自定义行为的地方。
对于蜘蛛来说,抓取周期会经历这样一些事情:
首先生成抓取第一个URL的初始请求,为这些请求下载的响应来调用指定回调函数。
通过调用
start_requests()方法来获得第一个执行请求,该方法默认为start_urls中指定的URL生成Request,parse方法作为请求的回调函数。在回调函数中,解析响应(网页)并返回带有提取数据的字典,
Item对象,Request对象或这些对象的迭代。 这些请求还将包含一个回调(可能是相同的),然后由Scrapy下载,通过指定的回调处理它们的响应。在回调函数中,通常使用Selectors(您也可以使用BeautifulSoup,lxml或您喜欢的任何机制)解析页面内容,并使用解析的数据生成Item。
最后,从spider返回的Item通常会被持久化到数据库(在某些Item Pipeline中)或使用Feed exports写入文件。
尽管这个周期适用于(或多或少)任何类型的Spider,但为了不同的目的,有不同类型的默认Spider捆绑到Scrapy中。 我们将在这里讨论这些类型。
scrapy.Spider
-
class
scrapy.spiders.Spider¶ 这是最简单的Spider,也是其他Spider必须继承的(包括与Scrapy捆绑在一起的Spider,以及自己写的Spider)。 它不提供任何特殊功能。 它只是提供一个默认的
start_requests()实现,从start_urlsspider属性发送请求,并为每个结果响应调用spider的parse方法。-
name¶ 一个字符串,它定义了这个Spider的名字。 Scrapy通过Spider名称定位(并实例化)Spider,因此它必须是唯一的。 然而,没有什么能够阻止你实例化同一个蜘蛛的多个实例。 这是最重要的Spider属性,它是必需的。
如果Spider爬取单独一个域名,通常的做法是使用域名命名Spider,无论是否使用TLD。 因此,例如,抓取
mywebsite.com的Spider通常会被命名为mywebsite。注意
在Python 2中,这只能是ASCII。
-
allowed_domains¶ 包含允许Spider抓取域的可选字符串列表。 如果启用了
OffsiteMiddleware,则不会follow不属于此列表中指定的域名(或其子域)的URL的请求。假设您的目标网址为
https://www.example.com/1.html,然后将'example.com'添加到列表中。
-
start_urls¶ 当没有特别指定的网址时,Spider将从哪个网址开始抓取的网址列表。 所以,下载的第一个页面将在这里列出。 随后的URL将从包含在起始URL中的数据中连续生成。
-
crawler¶ 该属性在初始化类后由
from_crawler()类方法设置,并链接到此spider实例绑定的Crawler对象。Crawler在项目中封装了大量组件,以便进行单一入口访问(例如扩展,中间件,信号管理器等)。 请参阅Crawler API以了解更多关于它们的信息。
-
from_crawler(crawler, *args, **kwargs)¶ 这是Scrapy用来创建Spider的类方法。
您可能不需要直接覆盖它,因为它默认实现是充当
__init__()方法的代理,用给定参数args和命名参数 kwargs 。尽管如此,该方法会在新实例中设置
crawler和settings属性,以便稍后可以在Spider代码中访问它们。Parameters:
-
start_requests()¶ 此方法必须为Spider返回可迭代的初始请求。 当Spider开始抓取时它会被Scrapy调用。 Scrapy只调用它一次,所以将
start_requests()作为发生器是安全的。默认实现为
start_urls中的每个网址生成Request(url, dont_filter=True)。如果您想更改用于开始抓取域的请求,需要覆盖此方法。 例如,如果您需要使用POST请求登录,则可以执行以下操作:
class MySpider(scrapy.Spider):
    name = 'myspider'

    def start_requests(self):
        return [scrapy.FormRequest("http://www.example.com/login",
                                   formdata={'user': 'john', 'pass': 'secret'},
                                   callback=self.logged_in)]

    def logged_in(self, response):
        # 在这里你用另外一个回调函数提取follow的链接
        # 并返回每个请求
        pass
-
parse(response)¶ 这是Scrapy用来处理下载响应的默认回调,当请求没有指定回调时。
parse方法负责处理响应并返回抓取的数据和/或更多的URL。 其他请求回调与Spider类具有相同的要求。该方法以及任何其他Request回调一样,必须返回一个可迭代的
Request和/或字典或Item对象。Parameters: response ( response) - 解析的响应
-
log(message[, level, component])¶ 通过Spider的
logger发送日志消息的包装器,保持向后兼容性。 有关更多信息,请参阅Spider日志记录。
-
closed(reason)¶ 当Spider关闭时调用。 此方法为
spider_closed信号提供了signals.connect()的快捷方式。
-
我们来看一个例子:
import scrapy


class MySpider(scrapy.Spider):
    name = 'example.com'
    allowed_domains = ['example.com']
    start_urls = [
        'http://www.example.com/1.html',
        'http://www.example.com/2.html',
        'http://www.example.com/3.html',
    ]

    def parse(self, response):
        self.logger.info('A response from %s just arrived!', response.url)
从单个回调中返回多个请求和Item:
import scrapy

class MySpider(scrapy.Spider):
    name = 'example.com'
    allowed_domains = ['example.com']
    start_urls = [
        'http://www.example.com/1.html',
        'http://www.example.com/2.html',
        'http://www.example.com/3.html',
    ]

    def parse(self, response):
        for h3 in response.xpath('//h3').extract():
            yield {"title": h3}

        for url in response.xpath('//a/@href').extract():
            yield scrapy.Request(url, callback=self.parse)
您可以直接使用start_requests()来代替start_urls; 如果想为数据提供更多结构,您可以使用Item:
import scrapy
from myproject.items import MyItem

class MySpider(scrapy.Spider):
    name = 'example.com'
    allowed_domains = ['example.com']

    def start_requests(self):
        yield scrapy.Request('http://www.example.com/1.html', self.parse)
        yield scrapy.Request('http://www.example.com/2.html', self.parse)
        yield scrapy.Request('http://www.example.com/3.html', self.parse)

    def parse(self, response):
        for h3 in response.xpath('//h3').extract():
            yield MyItem(title=h3)

        for url in response.xpath('//a/@href').extract():
            yield scrapy.Request(url, callback=self.parse)
Spider参数
Spider可以接收修改其行为的参数。 Spider参数的一些常见用途是定义起始URL或将爬虫限制到站点的某些部分,但它们可用于配置Spider的任何功能。
使用crawl命令-a选项传递Spider参数。 例如:
scrapy crawl myspider -a category=electronics
Spider可以在它的__init__方法中访问参数:
import scrapy

class MySpider(scrapy.Spider):
    name = 'myspider'

    def __init__(self, category=None, *args, **kwargs):
        super(MySpider, self).__init__(*args, **kwargs)
        self.start_urls = ['http://www.example.com/categories/%s' % category]
        # ...
默认的__init__方法将获取所有Spider参数并将其作为属性复制到Spider中。 上面的例子也可以写成如下:
import scrapy

class MySpider(scrapy.Spider):
    name = 'myspider'

    def start_requests(self):
        yield scrapy.Request('http://www.example.com/categories/%s' % self.category)
请注意,Spider参数只能是字符串。 Spider不会自行解析。 如果要从命令行设置start_urls属性,则必须使用类似ast.literal_eval或json.loads的方式将它解析为列表然后将其设置为属性。 否则,将导致迭代start_urls字符串(一个非常常见的python陷阱),使每个字符被视为一个单独的url。
有效的用例是设置由HttpAuthMiddleware使用的http认证凭证或由UserAgentMiddleware使用的用户代理:
scrapy crawl myspider -a http_user=myuser -a http_pass=mypassword -a user_agent=mybot
Spider参数也可以通过Scrapyd的schedule.json API传递。
参见Scrapyd文档。
通用Spider
Scrapy附带了一些有用的通用Spider,您可以继承它们。 它们的目标是为一些常见的抓取案例提供方便的功能,例如以特定规则follow网站上的所有链接,从Sitemaps抓取或解析XML/CSV feed。
对于以下蜘蛛中使用的示例,我们假设您有一个项目,其中包含在myproject.items模块中声明的TestItem:
import scrapy

class TestItem(scrapy.Item):
    id = scrapy.Field()
    name = scrapy.Field()
    description = scrapy.Field()
CrawlSpider
-
class
scrapy.spiders.CrawlSpider¶ 这是抓取常规网站最常用的Spider,因为它提供了一个通过定义一组规则来follow链接的便捷机制。 它可能不是最适合您的特定网站或项目的,但它对于多种情况是足够通用的,所以您可以从它开始并根据需要覆盖它以获得更多自定义功能,或者只是实现您自己的Spider。
除了从Spider继承的属性(必须指定)之外,该类还支持一个新的属性:
这个Spider也暴露了一个可覆盖的方法:
抓取规则
-
class
scrapy.spiders.Rule(link_extractor, callback=None, cb_kwargs=None, follow=None, process_links=None, process_request=None)¶ link_extractor是一个链接提取器对象,它定义了如何从每个已爬网页中提取链接。callback是可调用的或字符串(在这种情况下,将使用具有该名称的Spider对象的方法)被使用指定的link_extractor提取的链接调用。 这个回调接收一个响应作为它的第一个参数,并且必须返回一个包含Item和/或Request对象(或者它们的任何子类)的列表。警告
编写爬虫rule时,避免使用
parse作为回调,因为CrawlSpider使用parse方法来实现其逻辑。 因此,如果您重写parse方法,抓取Spider将不再起作用。cb_kwargs是一个包含要传递给回调函数的关键字参数字典。follow是一个布尔值,它指定是否应该使用此规则提取的每个响应follow链接。 如果callback为None,follow默认为True,否则follow默认为False。process_links是可调用的或字符串(在这种情况下,将使用具有该名称的spider对象的方法),将被使用指定的link_extractor的响应提取到的链接调用。 这主要用于过滤目的。process_request是一个可调用的或一个字符串(在这种情况下,将使用具有该名称的spider对象的方法),这个方法将被该规则提取的每个请求调用,并且必须返回一个请求或None(用于过滤请求)。
CrawlSpider示例
现在我们来看一个带有规则的示例CrawlSpider:
import scrapy
from scrapy.spiders import CrawlSpider, Rule
from scrapy.linkextractors import LinkExtractor

class MySpider(CrawlSpider):
    name = 'example.com'
    allowed_domains = ['example.com']
    start_urls = ['http://www.example.com']

    rules = (
        # 提取匹配'category.php'的链接(但不匹配'subsection.php')
        # 然后follow这些链接(因为没有callback参数意味着默认follow=True)
        Rule(LinkExtractor(allow=('category\.php', ), deny=('subsection\.php', ))),

        # 提取匹配'item.php'的链接,然后用Spider的parse_item解析它们
        Rule(LinkExtractor(allow=('item\.php', )), callback='parse_item'),
    )

    def parse_item(self, response):
        self.logger.info('Hi, this is an item page! %s', response.url)
        item = scrapy.Item()
        item['id'] = response.xpath('//td[@id="item_id"]/text()').re(r'ID: (\d+)')
        item['name'] = response.xpath('//td[@id="item_name"]/text()').extract()
        item['description'] = response.xpath('//td[@id="item_description"]/text()').extract()
        return item
这个Spider将开始抓取example.com的主页,收集category链接和item链接,用parse_item方法解析后者。 对于每个Item响应,将使用XPath从HTML中提取一些数据填充Item。
XMLFeedSpider
-
class
scrapy.spiders.XMLFeedSpider¶ XMLFeedSpider旨在通过遍历特定节点名称来解析XML提要。 迭代器可以从
iternodes,xml和html中选择。 出于性能原因,建议使用iternodes迭代器,因为xml和html迭代器会一次生成整个DOM以解析它。 但是,使用html作为迭代器时,可能会在解析具有错误标记的XML时很有用。要设置迭代器和标签名称,您必须定义以下类属性:
-
iterator¶ 一个定义要使用的迭代器的字符串。 它可以是:
默认为:
'iternodes'。
-
itertag¶ 一个字符串,其中包含要迭代的节点(或元素)的名称。 例:
itertag = 'product'
-
namespaces¶ 定义spider将要处理的文档中可用命名空间的
(prefix, uri)元组列表。prefix和uri将用于使用register_namespace()方法自动注册名称空间。然后可以在
itertag属性中指定具有名称空间的节点。例:
class YourSpider(XMLFeedSpider):

    namespaces = [('n', 'http://www.sitemaps.org/schemas/sitemap/0.9')]
    itertag = 'n:url'
    # ...
除了这些新的属性外,这个Spider还有以下可覆盖的方法:
-
adapt_response(response)¶ 在Spider开始分析它之前,一旦收到响应就传到Spider中间件中。 它可以用来在解析响应之前修改响应主体。 这个方法接收一个响应,并返回一个响应(它可能是相同的或另一个)。
-
parse_node(response, selector)¶ 对于与提供的标签名称匹配的节点(
itertag),将调用此方法。 接收每个节点的响应和Selector。 覆盖此方法是强制性的。 否则,你的Spider将无法工作。 该方法必须返回一个Item对象或一个Request对象或包含它们的迭代器。
-
process_results(response, results)¶ 该方法针对Spider所返回的每个结果(Item或请求)进行调用,并且它在将结果返回给框架核心之前执行所需的最后一次处理,例如设置Item ID。 它接收结果列表和这些结果的源响应。 它必须返回结果列表(Item或请求)。
-
XMLFeedSpider示例
这些Spider很容易使用,让我们来看一个例子:
from scrapy.spiders import XMLFeedSpider
from myproject.items import TestItem

class MySpider(XMLFeedSpider):
    name = 'example.com'
    allowed_domains = ['example.com']
    start_urls = ['http://www.example.com/feed.xml']
    iterator = 'iternodes'  # 实际上这个是非必须的,因为iternodes是默认值
    itertag = 'item'

    def parse_node(self, response, node):
        self.logger.info('Hi, this is a <%s> node!: %s', self.itertag, ''.join(node.extract()))

        item = TestItem()
        item['id'] = node.xpath('@id').extract()
        item['name'] = node.xpath('name').extract()
        item['description'] = node.xpath('description').extract()
        return item
基本上我们做的是创建一个Spider,它从给定的start_urls下载一个feed,然后迭代它的每个item标签,打印出来并存储一些随机数据到Item中。
CSVFeedSpider
-
class
scrapy.spiders.CSVFeedSpider¶ 这个Spider与XMLFeedSpider非常相似,只是它遍历行而不是节点。 每次迭代调用的方法是
parse_row()。-
delimiter¶ 包含CSV文件中每个字段的分隔符的字符串,默认为
','(逗号)。
-
quotechar¶ 包含CSV文件中每个字段的外围字符的字符串,默认为
'“'(引号)。
-
headers¶ CSV文件中列名称的列表。
-
parse_row(response, row)¶ 接收一个响应和一个以被提供(或被检测)的CSV文件头作为关键字的字典(代表每行)。 这个Spider还有机会覆盖用于预处理和后置处理目的的
adapt_response和process_results方法。
-
CSVFeedSpider示例
我们来看一个与前一个类似的例子,但是使用CSVFeedSpider:
from scrapy.spiders import CSVFeedSpider
from myproject.items import TestItem

class MySpider(CSVFeedSpider):
    name = 'example.com'
    allowed_domains = ['example.com']
    start_urls = ['http://www.example.com/feed.csv']
    delimiter = ';'
    quotechar = "'"
    headers = ['id', 'name', 'description']

    def parse_row(self, response, row):
        self.logger.info('Hi, this is a row!: %r', row)

        item = TestItem()
        item['id'] = row['id']
        item['name'] = row['name']
        item['description'] = row['description']
        return item
SitemapSpider
-
class
scrapy.spiders.SitemapSpider¶ SitemapSpider允许您通过使用Sitemaps发现网址来抓取网站。
它支持嵌套站点地图并从robots.txt中发现站点地图网址。
-
sitemap_urls¶ 指向您要抓取的网址的站点地图的网址列表。
您也可以指向一个robots.txt,将其解析并从中提取站点地图网址。
-
sitemap_rules¶ 一个元组列表
(regex, callback),其中:regex是一个正则表达式,用于匹配从站点地图提取的网址。regex可以是字符串或编译的正则表达式对象。- callback 是用于处理匹配正则表达式的url的回调。
callback可以是一个字符串(指定spider的方法名)或可调用的。
例如:
sitemap_rules = [('/product/', 'parse_product')]规则按顺序应用,只有第一个匹配的将被使用。
如果你省略了这个属性,所有在站点地图中找到的URL都会用
parse回调进行处理。
-
sitemap_alternate_links¶ 指定是否应该follow一个
url的备用链接。 这些是在同一个url块中传递的另一种语言的同一网站的链接。例如:
<url>
    <loc>http://example.com/</loc>
    <xhtml:link rel="alternate" hreflang="de" href="http://example.com/de"/>
</url>
通过设置
sitemap_alternate_links,将检索两个网址。 禁用sitemap_alternate_links时,只会检索http://example.com/。sitemap_alternate_links默认禁用。
-
SitemapSpider示例
最简单的例子:使用parse回调处理通过站点地图发现的所有网址:
from scrapy.spiders import SitemapSpider

class MySpider(SitemapSpider):
    sitemap_urls = ['http://www.example.com/sitemap.xml']

    def parse(self, response):
        pass # ... scrape item here ...
使用指定的回调处理某些URL,对其他URL使用不同的回调:
from scrapy.spiders import SitemapSpider

class MySpider(SitemapSpider):
    sitemap_urls = ['http://www.example.com/sitemap.xml']
    sitemap_rules = [
        ('/product/', 'parse_product'),
        ('/category/', 'parse_category'),
    ]

    def parse_product(self, response):
        pass # ... scrape product ...

    def parse_category(self, response):
        pass # ... scrape category ...
followrobots.txt文件中定义的站点地图,并且只follow链接中包含/ sitemap_shop的站点地图:
from scrapy.spiders import SitemapSpider

class MySpider(SitemapSpider):
    sitemap_urls = ['http://www.example.com/robots.txt']
    sitemap_rules = [
        ('/shop/', 'parse_shop'),
    ]
    sitemap_follow = ['/sitemap_shops']

    def parse_shop(self, response):
        pass # ... scrape shop here ...
将SitemapSpider与其他网址来源相结合:
from scrapy.spiders import SitemapSpider

class MySpider(SitemapSpider):
    sitemap_urls = ['http://www.example.com/robots.txt']
    sitemap_rules = [
        ('/shop/', 'parse_shop'),
    ]

    other_urls = ['http://www.example.com/about']

    def start_requests(self):
        requests = list(super(MySpider, self).start_requests())
        requests += [scrapy.Request(x, self.parse_other) for x in self.other_urls]
        return requests

    def parse_shop(self, response):
        pass # ... scrape shop here ...

    def parse_other(self, response):
        pass # ... scrape other here ...
选择器
在抓取网页时,需要执行的最常见任务是从HTML源中提取数据。 有几个库可以实现这一点:
- BeautifulSoup是Python程序员中非常流行的网络抓取库,它基于HTML代码的结构构建Python对象,还能适当地处理损坏的标记,但它有一个缺点:速度很慢。
- lxml是一个基于ElementTree的pythonic API的XML解析库(它也解析HTML)。 (lxml不是Python标准库的一部分。)
Scrapy自带提取数据的机制。 它们被称为选择器,因为它们“选择”由XPath或CSS表达式指定的HTML文档的某些部分。
XPath是用于选择XML文档中的节点的语言,也可以用于HTML。 CSS是一种将样式应用于HTML文档的语言。 它定义选择器将这些样式与特定的HTML元素相关联。
Scrapy选择器是建立在lxml库上的,这意味着它们在速度和解析精度上非常相似。
这个页面解释了选择器是如何工作的,并描述了它们小且简单的API,不像lxml API那样大,因为lxml库除了选择标记文件还可以用于许多其他任务,。
有关选择器API的完整参考,请参阅选择器参考
使用选择器
构造选择器
Scrapy选择器是被构造用来传递text或TextResponse对象的Selector类的实例。 它会根据输入类型(XML vs HTML)自动选择最佳的解析规则:
>>> from scrapy.selector import Selector
>>> from scrapy.http import HtmlResponse
从文本构建:
>>> body = '<html><body><span>good</span></body></html>'
>>> Selector(text=body).xpath('//span/text()').extract()
[u'good']
从响应构建:
>>> response = HtmlResponse(url='http://example.com', body=body)
>>> Selector(response=response).xpath('//span/text()').extract()
[u'good']
为方便起见,响应对象在.selector属性上显示选择器,完全可以在可能的情况下使用此快捷方式:
>>> response.selector.xpath('//span/text()').extract()
[u'good']
使用选择器
为了解释如何使用选择器,我们将使用Scrapy文档服务器中的Scrapy shell(提供交互式测试)和一个示例页面:
这是它的HTML代码:
<html>
 <head>
  <base href='http://example.com/' />
  <title>Example website</title>
 </head>
 <body>
  <div id='images'>
   <a href='image1.html'>Name: My image 1 <br /><img src='image1_thumb.jpg' /></a>
   <a href='image2.html'>Name: My image 2 <br /><img src='image2_thumb.jpg' /></a>
   <a href='image3.html'>Name: My image 3 <br /><img src='image3_thumb.jpg' /></a>
   <a href='image4.html'>Name: My image 4 <br /><img src='image4_thumb.jpg' /></a>
   <a href='image5.html'>Name: My image 5 <br /><img src='image5_thumb.jpg' /></a>
  </div>
 </body>
</html>
首先,我们打开shell:
scrapy shell https://doc.scrapy.org/en/latest/_static/selectors-sample1.html
然后,在加载shell之后,您得到的响应将成为response shell变量,响应附加的选择器为response.selector属性。
由于我们正在处理HTML,选择器将自动使用HTML解析器。
因此,通过查看该页面的HTML代码,我们构建一个用于选择标题标签内的文本的XPath:
>>> response.selector.xpath('//title/text()')
[<Selector (text) xpath=//title/text()>]
使用XPath和CSS查询响应非常常见,以至于响应包含两个快捷途径:response.xpath()和response.css():
>>> response.xpath('//title/text()')
[<Selector (text) xpath=//title/text()>]
>>> response.css('title::text')
[<Selector (text) xpath=//title/text()>]
如您所见,.xpath()和.css()方法返回一个SelectorList实例,该实例是新选择器的列表。 该API可用于快速选择嵌套数据:
>>> response.css('img').xpath('@src').extract()
[u'image1_thumb.jpg',
 u'image2_thumb.jpg',
 u'image3_thumb.jpg',
 u'image4_thumb.jpg',
 u'image5_thumb.jpg']
要实际提取文本数据,您必须调用选择器.extract()方法,如下所示:
>>> response.xpath('//title/text()').extract()
[u'Example website']
如果你只想提取第一个匹配的元素,你可以调用选择器.extract_first()
>>> response.xpath('//div[@id="images"]/a/text()').extract_first()
u'Name: My image 1 '
如果找不到元素,它将返回None:
>>> response.xpath('//div[@id="not-exists"]/text()').extract_first() is None
True
默认返回值可以作为参数提供,用来代替None:
>>> response.xpath('//div[@id="not-exists"]/text()').extract_first(default='not-found')
'not-found'
请注意,CSS选择器可以使用CSS3伪元素选择文本或属性节点:
>>> response.css('title::text').extract()
[u'Example website']
现在我们要获取基本URL和一些图像链接:
>>> response.xpath('//base/@href').extract()
[u'http://example.com/']

>>> response.css('base::attr(href)').extract()
[u'http://example.com/']

>>> response.xpath('//a[contains(@href, "image")]/@href').extract()
[u'image1.html',
 u'image2.html',
 u'image3.html',
 u'image4.html',
 u'image5.html']

>>> response.css('a[href*=image]::attr(href)').extract()
[u'image1.html',
 u'image2.html',
 u'image3.html',
 u'image4.html',
 u'image5.html']

>>> response.xpath('//a[contains(@href, "image")]/img/@src').extract()
[u'image1_thumb.jpg',
 u'image2_thumb.jpg',
 u'image3_thumb.jpg',
 u'image4_thumb.jpg',
 u'image5_thumb.jpg']

>>> response.css('a[href*=image] img::attr(src)').extract()
[u'image1_thumb.jpg',
 u'image2_thumb.jpg',
 u'image3_thumb.jpg',
 u'image4_thumb.jpg',
 u'image5_thumb.jpg']
嵌套选择器
选择方法(.xpath()或.css())会返回相同类型的选择器列表,因此您也可以对这些选择器调用选择方法。 这是一个例子:
>>> links = response.xpath('//a[contains(@href, "image")]')
>>> links.extract()
[u'<a href="image1.html">Name: My image 1 <br><img src="image1_thumb.jpg"></a>',
 u'<a href="image2.html">Name: My image 2 <br><img src="image2_thumb.jpg"></a>',
 u'<a href="image3.html">Name: My image 3 <br><img src="image3_thumb.jpg"></a>',
 u'<a href="image4.html">Name: My image 4 <br><img src="image4_thumb.jpg"></a>',
 u'<a href="image5.html">Name: My image 5 <br><img src="image5_thumb.jpg"></a>']

>>> for index, link in enumerate(links):
...     args = (index, link.xpath('@href').extract(), link.xpath('img/@src').extract())
...     print 'Link number %d points to url %s and image %s' % args

Link number 0 points to url [u'image1.html'] and image [u'image1_thumb.jpg']
Link number 1 points to url [u'image2.html'] and image [u'image2_thumb.jpg']
Link number 2 points to url [u'image3.html'] and image [u'image3_thumb.jpg']
Link number 3 points to url [u'image4.html'] and image [u'image4_thumb.jpg']
Link number 4 points to url [u'image5.html'] and image [u'image5_thumb.jpg']
使用具有正则表达式的选择器
Selector也有一个使用正则表达式提取数据的.re()方法。 然而,与.xpath()或.css()方法不同,.re()返回unicode字符串列表。 所以你不能构造嵌套的.re()调用。
以下是一个用于从HTML代码中提取图像名称的示例:
>>> response.xpath('//a[contains(@href, "image")]/text()').re(r'Name:\s*(.*)')
[u'My image 1',
 u'My image 2',
 u'My image 3',
 u'My image 4',
 u'My image 5']
.re()有一个额外的类似.extract_first()辅助,名为.re_first()。 使用它只提取第一个匹配的字符串:
>>> response.xpath('//a[contains(@href, "image")]/text()').re_first(r'Name:\s*(.*)')
u'My image 1'
使用相对XPaths 
请记住,如果您正在嵌套选择器并使用以/开头的XPath,则该XPath对文档是绝对的,而不是相对于它来自的Selector。
例如,假设你想提取<div>中所有的<p> 元素。 首先,你获取所有的<div>元素:
>>> divs = response.xpath('//div')
起初,您可能会尝试使用以下方法,这是错误的,因为它实际上会提取文件中所有<p>,不只是<div>元素中的。
>>> for p in divs.xpath('//p'):  # 这是错的 - 获取整个文件的<p>
...     print p.extract()
这是做到这一点的正确方法(注意.//p XPath的点前缀):
>>> for p in divs.xpath('.//p'):  # 提取内部所有的<p>
...     print p.extract()
另一个常见的情况是提取所有直接的<p>子节点:
>>> for p in divs.xpath('p'):
...     print p.extract()
有关相对XPath的更多详细信息,请参阅XPath规范中的位置路径部分。
XPath表达式中的变量
XPath允许使用$ somevariable语法引用XPath表达式中的变量。 这有些类似于SQL中的参数化查询或预先声明,您可以用占位符替换查询中的某些参数像是 ?,然后用查询传递的值替换它们。
下面是一个基于其“id”属性值匹配元素的示例,不用对其进行硬编码(预先给定):
>>> # `$val` 用在表达式中, `val`参数需要被传递
>>> response.xpath('//div[@id=$val]/a/text()', val='images').extract_first()
u'Name: My image 1 '
这里有另一个例子,找到有5个<a>子元素的<div>元素的“id”属性(在这里我们传递一个整数值5):
>>> response.xpath('//div[count(a)=$cnt]/@id', cnt=5).extract_first()
u'images'
调用.xpath()时,所有变量引用都必须具有绑定值(否则您将得到 ValueError: XPath error: 异常)。
这是通过根据需要传递许多命名参数来完成的。
使用EXSLT扩展名
构建在lxml之上,Scrapy选择器还支持一些EXSLT扩展,并附带这些预先注册的名称空间以用于XPath表达式中:
| prefix | namespace | usage |
|---|---|---|
| re | http://exslt.org/regular-expressions | regular expressions |
| set | http://exslt.org/sets | set manipulation |
正则表达式
例如,当XPath的starts-with()或contains()功能不足时,test()函数可能非常有用。
使用以数字结尾的“class”属性选择列表项中链接的示例:
>>> from scrapy import Selector
>>> doc = """
... <div>
...     <ul>
...         <li class="item-0"><a href="link1.html">first item</a></li>
...         <li class="item-1"><a href="link2.html">second item</a></li>
...         <li class="item-inactive"><a href="link3.html">third item</a></li>
...         <li class="item-1"><a href="link4.html">fourth item</a></li>
...         <li class="item-0"><a href="link5.html">fifth item</a></li>
...     </ul>
... </div>
... """
>>> sel = Selector(text=doc, type="html")
>>> sel.xpath('//li//@href').extract()
[u'link1.html', u'link2.html', u'link3.html', u'link4.html', u'link5.html']
>>> sel.xpath('//li[re:test(@class, "item-\d$")]//@href').extract()
[u'link1.html', u'link2.html', u'link4.html', u'link5.html']
>>>
警告
C语言库libxslt本身不支持EXSLT正则表达式,所以lxml实现时对Python的re模块使用了钩子。
因此,在XPath表达式中使用正则表达式函数可能会增加一点性能损失。
设置操作
例如,在提取文本元素之前,这些操作可以方便地排除文档树的部分内容。
使用itemscopes组和相应的itemprops提取微数据(从http://schema.org/Product取得的样本内容)示例:
>>> doc = """
... <div itemscope itemtype="http://schema.org/Product">
...   <span itemprop="name">Kenmore White 17" Microwave</span>
...   <img src="kenmore-microwave-17in.jpg" alt='Kenmore 17" Microwave' />
...   <div itemprop="aggregateRating"
...     itemscope itemtype="http://schema.org/AggregateRating">
...    Rated <span itemprop="ratingValue">3.5</span>/5
...    based on <span itemprop="reviewCount">11</span> customer reviews
...   </div>
...
...   <div itemprop="offers" itemscope itemtype="http://schema.org/Offer">
...     <span itemprop="price">$55.00</span>
...     <link itemprop="availability" href="http://schema.org/InStock" />In stock
...   </div>
...
...   Product description:
...   <span itemprop="description">0.7 cubic feet countertop microwave.
...   Has six preset cooking categories and convenience features like
...   Add-A-Minute and Child Lock.</span>
...
...   Customer reviews:
...
...   <div itemprop="review" itemscope itemtype="http://schema.org/Review">
...     <span itemprop="name">Not a happy camper</span> -
...     by <span itemprop="author">Ellie</span>,
...     <meta itemprop="datePublished" content="2011-04-01">April 1, 2011
...     <div itemprop="reviewRating" itemscope itemtype="http://schema.org/Rating">
...       <meta itemprop="worstRating" content = "1">
...       <span itemprop="ratingValue">1</span>/
...       <span itemprop="bestRating">5</span>stars
...     </div>
...     <span itemprop="description">The lamp burned out and now I have to replace
...     it. </span>
...   </div>
...
...   <div itemprop="review" itemscope itemtype="http://schema.org/Review">
...     <span itemprop="name">Value purchase</span> -
...     by <span itemprop="author">Lucas</span>,
...     <meta itemprop="datePublished" content="2011-03-25">March 25, 2011
...     <div itemprop="reviewRating" itemscope itemtype="http://schema.org/Rating">
...       <meta itemprop="worstRating" content = "1"/>
...       <span itemprop="ratingValue">4</span>/
...       <span itemprop="bestRating">5</span>stars
...     </div>
...     <span itemprop="description">Great microwave for the price. It is small and
...     fits in my apartment.</span>
...   </div>
...   ...
... </div>
... """
>>> sel = Selector(text=doc, type="html")
>>> for scope in sel.xpath('//div[@itemscope]'):
...     print "current scope:", scope.xpath('@itemtype').extract()
...     props = scope.xpath('''
...                 set:difference(./descendant::*/@itemprop,
...                                .//*[@itemscope]/*/@itemprop)''')
...     print "    properties:", props.extract()
...     print

current scope: [u'http://schema.org/Product']
    properties: [u'name', u'aggregateRating', u'offers', u'description', u'review', u'review']

current scope: [u'http://schema.org/AggregateRating']
    properties: [u'ratingValue', u'reviewCount']

current scope: [u'http://schema.org/Offer']
    properties: [u'price', u'availability']

current scope: [u'http://schema.org/Review']
    properties: [u'name', u'author', u'datePublished', u'reviewRating', u'description']

current scope: [u'http://schema.org/Rating']
    properties: [u'worstRating', u'ratingValue', u'bestRating']

current scope: [u'http://schema.org/Review']
    properties: [u'name', u'author', u'datePublished', u'reviewRating', u'description']

current scope: [u'http://schema.org/Rating']
    properties: [u'worstRating', u'ratingValue', u'bestRating']

>>>
在这里,我们首先迭代itemscope元素,在每个元素中查找所有itemprops元素并排除那些位于另一个itemscope内的元素。
一些XPath提示
这里有一些在Scrapy选择器中使用XPath时可能会有用的提示,这些提示基于ScrapingHub博客的帖子。 如果您还不太熟悉XPath,那么您可能需要先看看这个XPath教程。
在条件中使用文本节点
当您需要将文本内容用作XPath字符串函数的参数时,请避免使用.//text()并仅使用 . 代替。
这是因为表达式.//text()会产生一组文本元素 - 节点集。
当一个节点集被转换成一个字符串,作为参数传递给一个字符串函数如contains()或starts-with()时,返回结果将是文本的第一个元素。
例:
>>> from scrapy import Selector
>>> sel = Selector(text='<a href="#">Click here to go to the <strong>Next Page</strong></a>')
将节点集转换为字符串:
>>> sel.xpath('//a//text()').extract() # take a peek at the node-set
[u'Click here to go to the ', u'Next Page']
>>> sel.xpath("string(//a[1]//text())").extract() # convert it to string
[u'Click here to go to the ']
然而,将一个节点转换为一个字符串,将会获得它自身加上所有后代的文本:
>>> sel.xpath("//a[1]").extract() # select the first node
[u'<a href="#">Click here to go to the <strong>Next Page</strong></a>']
>>> sel.xpath("string(//a[1])").extract() # convert it to string
[u'Click here to go to the Next Page']
因此,在这种情况下,使用.//text()节点集不会选择任何内容:
>>> sel.xpath("//a[contains(.//text(), 'Next Page')]").extract()
[]
但使用 . 代表节点是可行的:
>>> sel.xpath("//a[contains(., 'Next Page')]").extract()
[u'<a href="#">Click here to go to the <strong>Next Page</strong></a>']
注意//node[1]和(//node)[1]之间的区别
//node[1] 选择所有在它们各自父项下第一个节点。
(// node)[1]选择文档中的所有节点,然后仅获取它们中的第一个节点。
例:
>>> from scrapy import Selector
>>> sel = Selector(text="""
....:     <ul class="list">
....:         <li>1</li>
....:         <li>2</li>
....:         <li>3</li>
....:     </ul>
....:     <ul class="list">
....:         <li>4</li>
....:         <li>5</li>
....:         <li>6</li>
....:     </ul>""")
>>> xp = lambda x: sel.xpath(x).extract()
获取所有的第一个<li>,无论它们的父母是什么:
>>> xp("//li[1]")
[u'<li>1</li>', u'<li>4</li>']
获取整个文档的<li>元素:
>>> xp("(//li)[1]")
[u'<li>1</li>']
获取所有<ul>元素中的第一个<li>子元素:
>>> xp("//ul/li[1]")
[u'<li>1</li>', u'<li>4</li>']
这将得到整个文档中第一个在<ul>父元素中的<li>元素:
>>> xp("(//ul/li)[1]")
[u'<li>1</li>']
按类查询时,请考虑使用CSS 
由于一个元素可以包含多个CSS类,因此按类选择元素的XPath方法相当冗长:
*[contains(concat(' ', normalize-space(@class), ' '), ' someclass ')]
如果你使用@class='someclass',你最终可能会丢失具有其他类的元素,如果你只是使用contains(@class, 'someclass')来弥补这一点,那么当它们有不同的类名称来共享字符串someclass时,您可能会得到比你想要的更多的元素。
事实证明,Scrapy选择器允许您链接选择器,所以大多数情况下,您可以使用CSS按类选择,然后在需要时切换到XPath:
>>> from scrapy import Selector
>>> sel = Selector(text='<div class="hero shout"><time datetime="2014-07-23 19:00">Special date</time></div>')
>>> sel.css('.shout').xpath('./time/@datetime').extract()
[u'2014-07-23 19:00']
这比使用上面使用的冗长的XPath技巧更清晰。 记得使用 . 在随后的XPath表达式中。
内置选择器参考
选择器对象
-
class
scrapy.selector.Selector(response=None, text=None, type=None)¶ Selector的实例是选择对响应内容某一部分的封装。response是将被用于选择和提取数据的HtmlResponse或XmlResponse对象.text是unicode字符串或utf-8编码文本,当response不可用时使用。 同时使用text和response是未定义的行为。type定义了选择器类型,它可以是“html”,“xml”或None(默认)。如果
type是None,那么选择器将自动根据response类型选择最佳类型(请参见下文),如果与text一起使用则默认为“html “。如果
type为None且传递了response,则从响应类型推断选择器类型关系如下:"html"forHtmlResponsetype"xml"forXmlResponsetype"html"for anything else
否则,如果设置了
type,则选择器类型将被强制且不会进行检测。-
xpath(query)¶ 找到与xpath
query匹配的节点,并将结果作为带有所有展平元素的SelectorList实例返回. 列表元素也实现Selector接口。query是一个包含要应用的XPATH查询的字符串。注意
为方便起见,此方法可写成
response.xpath()
-
css(query)¶ 应用给定的CSS选择器并返回一个
SelectorList实例。query是一个包含要应用的CSS选择器的字符串。在后台,会使用cssselect库将CSS查询转换为XPath查询并运行
.xpath()方法。注意
为了方便起见,这个方法可以写成
response.css()
-
extract()¶ 序列化并返回匹配的节点作为unicode字符串列表。 Percent encoded content is unquoted.
-
re(regex)¶ 应用给定的正则表达式并返回匹配到的unicode字符串列表。
regex可以是编译的正则表达式,也可以是使用re.compile(egex)编译为正则表达式的字符串注意
请注意,
re()和re_first()都解码HTML实体(除了<和&)
-
remove_namespaces()¶ 删除所有名称空间,允许使用不含名称空间的xpaths来遍历文档。 见下面的例子。
SelectorList objects
-
class
scrapy.selector.SelectorList¶ SelectorList类是内置的list类的一个子类,它提供了一些额外的方法。-
xpath(query)¶ 为此列表中的每个元素调用
.xpath()方法,并将其结果展平为另一个SelectorList。query与Selector.xpath()中的参数相同
-
css(query)¶ 对此列表中每个元素调用
.css()方法,并将其结果展平为另一个SelectorList。query与Selector.css()中的参数相同
-
extract()¶ 为此列表中的每个元素调用
.extract()方法,并将其结果展平,作为unicode字符串列表。
-
re()¶ 对此列表中每个元素调用
.re()方法,并将其结果展平,作为unicode字符串列表。
-
HTML响应选择器示例
这里有几个Selector的例子用来说明几个概念。
在所有情况下,我们都假设已经有一个Selector用HtmlResponse对象实例化,如下所示:
sel = Selector(html_response)
从HTML响应主体中选择全部
<h1>元素,返回一个Selector对象列表(即 一个SelectorList对象):sel.xpath("//h1")
从HTML响应主体中提取所有
<h1>文本,返回一个Unicode字符串列表:sel.xpath("//h1").extract() # this includes the h1 tag sel.xpath("//h1/text()").extract() # this excludes the h1 tag
遍历所有
<p>标签,打印出他们的类属性:for node in sel.xpath("//p"): print node.xpath("@class").extract()
XML响应选择器示例
这里有几个例子来说明几个概念。 在这两种情况下,我们都假定已经有一个Selector用XmlResponse对象实例化,如下所示:
sel = Selector(xml_response)
从XML响应主体中选择全部
<product>元素,返回一个Selector对象列表,(即 一个SelectorList对象):sel.xpath("//product")
从Google Base XML Feed中提取所有的价格需要注册命名空间:
sel.register_namespace("g", "http://base.google.com/ns/1.0")
sel.xpath("//g:price").extract()
删除命名空间
在处理抓取项目时,通常完全摆脱名称空间并仅使用元素名称来编写更简单/便捷的XPath非常方便。 您可以使用Selector.remove_namespaces()方法做到这点。
我们来看一个用GitHub博客atom feed来说明的例子。
首先,用我们想要抓取的url打开shell:
$ scrapy shell https://github.com/blog.atom
一旦进入shell,我们可以尝试选择所有的<link> 对象,发现它不工作(因为这个Atom XML命名空间使节点模糊)
>>> response.xpath("//link")
[]
但是一旦我们调用了Selector.remove_namespaces()方法,所有节点都可以直接通过它们的名字来访问:
>>> response.selector.remove_namespaces()
>>> response.xpath("//link")
[<Selector xpath='//link' data=u'<link xmlns="http://www.w3.org/2005/Atom'>,
 <Selector xpath='//link' data=u'<link xmlns="http://www.w3.org/2005/Atom'>,
 ...
如果您想知道为什么命名空间删除过程并不总是被默认调用从而而不必手动调用它,这是因为两个原因,按照相关性顺序,这两个原因是:
- 删除名称空间需要迭代和修改文档中的所有节点,这对于Scrapy搜索的所有文档来说是相当昂贵的操作
- 在某些情况下,实际上需要使用名称空间,以防某些元素名称在名称空间之间发生冲突。 虽然这种情况非常罕见。
Items
抓取的主要目标是从非结构化来源(通常是网页)中提取结构化数据。 Scrapy Spider可以将提取的数据作为Python字典返回。 虽然方便且常见,但Python字典缺乏结构:很容易发生字段名拼写错误或返回不一致数据,尤其是在包含许多Spider的大型项目中。
为定义公共输出数据格式,Scrapy提供了Item类。
Item对象是用于收集抓取数据的简单容器。
它们提供了一个带有便捷语法的类似字典API,用于声明其可用字段。
各种Scrapy组件使用Items提供的额外信息:exporter查看已声明的字段以确定要导出的列,序列化可以使用Item字段元数据定制,trackref跟踪Item实例以帮助查找内存泄漏(请参阅使用trackref调试内存泄漏),等等。
声明Item
使用简单的类定义语法和Field对象声明Item。 这里是一个例子:
import scrapy

class Product(scrapy.Item):
    name = scrapy.Field()
    price = scrapy.Field()
    stock = scrapy.Field()
    last_updated = scrapy.Field(serializer=str)
注意
熟悉Django的人会注意到Scrapy Item的声明与Django Models相似,只是Scrapy项目更简单,因为没有不同字段类型的概念。
Item字段
Field对象用于为每个字段指定元数据。 例如,上例中所示的last_updated字段的串行器函数说明。
您可以为每个字段指定任何类型的元数据。 对Field对象接受的值没有限制。 出于同样的原因,没有所有可用元数据键的参考列表。 在Field对象中定义的每个键都可以由不同的组件使用,只有那些组件才知道它。 您也可以在您的项目中定义和使用任何其他Field键,以满足您的需要。 Field对象的主要目标是提供一种在一个地方定义所有字段元数据的方法。 通常,那些行为依赖于每个字段的组件使用特定的字段键来配置该行为。 您必须参考他们的文档以查看每个组件使用哪些元数据键。
请注意,用于声明Item的Field对象不会保留为类属性。 相反,它们可以通过Item.fields属性进行访问。
使用Item
这是使用上面声明的ProductItem展现对Item执行的常见任务的一些示例。 您会注意到API与dict API非常相似。
创建Item
>>> product = Product(name='Desktop PC', price=1000)
>>> print product
Product(name='Desktop PC', price=1000)
获取字段值
>>> product['name']
Desktop PC
>>> product.get('name')
Desktop PC

>>> product['price']
1000

>>> product['last_updated']
Traceback (most recent call last):
    ...
KeyError: 'last_updated'

>>> product.get('last_updated', 'not set')
not set

>>> product['lala'] # 获取未知字段
Traceback (most recent call last):
    ...
KeyError: 'lala'

>>> product.get('lala', 'unknown field')
'unknown field'

>>> 'name' in product  # is name field populated?
True

>>> 'last_updated' in product  # is last_updated populated?
False

>>> 'last_updated' in product.fields  # is last_updated a declared field?
True

>>> 'lala' in product.fields  # is lala a declared field?
False
设置字段值
>>> product['last_updated'] = 'today'
>>> product['last_updated']
today

>>> product['lala'] = 'test' # 设置未知字段
Traceback (most recent call last):
    ...
KeyError: 'Product does not support field: lala'
访问所有填充值
要访问所有填充值,只需使用典型的dict API:
>>> product.keys()
['price', 'name']

>>> product.items()
[('price', 1000), ('name', 'Desktop PC')]
其他常见任务
复制Item:
>>> product2 = Product(product)
>>> print product2
Product(name='Desktop PC', price=1000)

>>> product3 = product2.copy()
>>> print product3
Product(name='Desktop PC', price=1000)
从Item创建字典:
>>> dict(product) # 用所有填充值创建一个字典
{'price': 1000, 'name': 'Desktop PC'}
从字典创建Item:
>>> Product({'name': 'Laptop PC', 'price': 1500})
Product(price=1500, name='Laptop PC')

>>> Product({'name': 'Laptop PC', 'lala': 1500}) # 警告: 字典中未知字段
Traceback (most recent call last):
    ...
KeyError: 'Product does not support field: lala'
扩展Item
您可以通过声明原始Item的子类来扩展Item(以添加更多字段或更改某些字段的某些元数据)。
例如:
class DiscountedProduct(Product):
    discount_percent = scrapy.Field(serializer=str)
    discount_expiration_date = scrapy.Field()
您还可以对以前的字段元数据并附加更多值或更改现有值来扩展字段元数据,如下所示:
class SpecificProduct(Product):
    name = scrapy.Field(Product.fields['name'], serializer=my_serializer)
它为name字段添加(或替换)serializer元数据键,保留所有先前存在的元数据值。
Item对象
Item加载器
Item加载器提供了一种便捷的机制来填充已被抓取的Items。 虽然Item可以使用自己的字典API来填充,Item加载器在抓取进程中提供了更便利的API填充它们,通过自动操作一些常见的任务类似在指定它之前解析原始数据。
换句话说,Items提供了抓取数据的容器,而Item Loaders提供了填充该容器的机制。
Item加载器旨在提供一种灵活,高效且简单的机制来扩展和覆盖不同的字段解析规则,无论是通过Spider还是通过源格式(HTML,XML等),不会成为维护的噩梦。
使用Item加载器填充Item
要使用Item加载器,你必须首先实例化它。 您可以使用类似字典的对象实例化它(例如 Item或dict)或者什么也不用,在这种情况下,Item会在Item Loader构造函数中使用ItemLoader.default_item_class属性中指定的Item类自动实例化。
然后,您开始将值收集到Item Loader中,通常使用选择器。 您可以将多个值添加到相同的Item字段; Item Loader将知道如何使用适当的处理函数“加入”这些值。
这是Spider中典型Item Loader用法,使用Item章节中声明的Product item:
from scrapy.loader import ItemLoader
from myproject.items import Product

def parse(self, response):
    l = ItemLoader(item=Product(), response=response)
    l.add_xpath('name', '//div[@class="product_name"]')
    l.add_xpath('name', '//div[@class="product_title"]')
    l.add_xpath('price', '//p[@id="price"]')
    l.add_css('stock', 'p#stock]')
    l.add_value('last_updated', 'today') # 你也可以使用文本值
    return l.load_item()
通过快速查看代码,我们可以看到name字段是从页面中两个不同的XPath位置提取的:
//div[@class="product_name"]//div[@class="product_title"]
换句话说,通过使用add_xpath()方法从两个XPath位置提取来收集数据。 这是稍后将分配给name字段的数据。
之后,类似的调用用于price和stock字段(后者使用CSS选择器和add_css()方法),最后last_update字段使用不同的方法直接填充文本值(today):add_value()。
最后,当收集到所有数据时,将调用ItemLoader.load_item()方法,该方法实际上会返回填充了之前使用add_xpath(),add_css()和add_value()提取和收集的数据Item。
输入和输出处理器
Item加载器为每个(Item)字段提供了一个输入处理器和一个输出处理器。 输入处理器一收到(通过add_xpath(),add_css()或add_value()方法)提取的数据就立即处理,输入处理器的结果被收集并保存在ItemLoader中。 收集完所有数据后,调用ItemLoader.load_item()方法来填充并获取填充的Item对象。 这是在输出处理器被调用之前收集数据(并使用输入处理器处理)的情况。 输出处理器的结果是分配给Item的最终值。
我们来看一个例子来说明如何为指定字段调用输入和输出处理器(这同样适用于其他字段):
l = ItemLoader(Product(), some_selector)
l.add_xpath('name', xpath1) # (1)
l.add_xpath('name', xpath2) # (2)
l.add_css('name', css) # (3)
l.add_value('name', 'test') # (4)
return l.load_item() # (5)
将会发生:
- 来自
xpath1的数据被提取并通过name字段的输入处理器传递。 输入处理器的结果被收集并保存在Item Loader中(但尚未分配给Item)。 - 来自
xpath2的数据被提取,并通过(1)中使用的相同的输入处理器传递。 输入处理器的结果附加到(1)中收集的数据(如果有的话)。 - 除了使用CSS选择器从
css提取数据,这种情况与之前的类似,通过使用与(1)和(2)中相同输入处理器。 输入处理器的结果附加到(1)和(2)中收集的数据(如果有的话)。 - 这种情况也类似于以前的情况,不同之处在于要收集的值是直接分配的,而不是从XPath表达式或CSS选择器中提取。 但是,该值仍然通过输入处理器传递。 在这种情况下,由于该值不可迭代,在将其传递给输入处理器之前将其转换为单个元素的迭代器,因为输入处理器总是接收迭代器。
- 在步骤(1),(2),(3)和(4)中收集的数据通过
name字段的输出处理器传递。 输出处理器的结果被分配给Item中的name字段的值。
值得注意的是,处理器仅仅是可调用的对象,它们被调用以解析数据,并返回一个解析的值。 所以你可以使用任何方法作为输入或输出处理器。 唯一的要求是它们必须接受一个(且只有一个)位置参数,它将是一个迭代器。
注意
输入和输出处理器都必须接收迭代器作为它们的第一个参数。 这些函数的输出可以是任何东西。 输入处理器的结果将被附加到包含收集值(对于该字段)的内部列表(在加载器中)。 输出处理器的结果是最终将分配给该Item的值。
另外需要注意的是输入处理器返回的值在内部收集(以列表形式),然后传递给输出处理器以填充字段。
最后但同样重要的是,Scrapy附带了一些内置的常用处理器以方便使用。
声明Item加载器
声明Item加载器与声明Item类似,都是通过使用类定义语法。 这里是一个例子:
from scrapy.loader import ItemLoader
from scrapy.loader.processors import TakeFirst, MapCompose, Join

class ProductLoader(ItemLoader):

    default_output_processor = TakeFirst()

    name_in = MapCompose(unicode.title)
    name_out = Join()

    price_in = MapCompose(unicode.strip)

    # ...
如您所见,输入处理器是使用_in后缀声明的,而输出处理器是使用_out后缀声明的。 您还可以使用ItemLoader.default_input_processor和ItemLoader.default_output_processor属性声明默认的输入/输出处理器。
声明输入和输出处理器
如前一节所述,可以在Item Loader定义中声明输入和输出处理器,以这种方式声明输入处理器是很常见的。 您还可以在 Item字段元数据中指定要使用的输入和输出处理器。 这里是一个例子:
import scrapy
from scrapy.loader.processors import Join, MapCompose, TakeFirst
from w3lib.html import remove_tags

def filter_price(value):
    if value.isdigit():
        return value

class Product(scrapy.Item):
    name = scrapy.Field(
        input_processor=MapCompose(remove_tags),
        output_processor=Join(),
    )
    price = scrapy.Field(
        input_processor=MapCompose(remove_tags, filter_price),
        output_processor=TakeFirst(),
    )
>>> from scrapy.loader import ItemLoader
>>> il = ItemLoader(item=Product())
>>> il.add_value('name', [u'Welcome to my', u'<strong>website</strong>'])
>>> il.add_value('price', [u'€', u'<span>1000</span>'])
>>> il.load_item()
{'name': u'Welcome to my website', 'price': u'1000'}
输入和输出处理器的优先顺序如下:
- Item加载器字段特定的属性:
field_in和field_out(最优先) - 字段元数据(
input_processor和output_processor键) - Item加载器默认值:
ItemLoader.default_input_processor()和ItemLoader.default_output_processor()(最低优先级)
另见:重用和扩展Item加载器。
Item加载器上下文
Item加载器上下文是Item加载器中所有输入和输出处理器共享的任意键/值的字典。 它可以在声明,实例化或使用Item加载器时传递。 它们用于修改输入/输出处理器的行为。
例如,假设您有一个函数parse_length,它接收一个文本值并从中提取文本长度:
def parse_length(text, loader_context):
    unit = loader_context.get('unit', 'm')
    # ... length parsing code goes here ...
    return parsed_length
通过接受一个loader_context参数,该函数明确告诉Item加载器它能够接收Item加载器上下文,因此Item加载器在调用它时传递当前活动的上下文,以便处理器函数(本例中为 parse_length)可以使用它们。
有几种方法可以修改Item加载器上下文值:
通过修改当前活动的Item加载器上下文(
context属性):loader = ItemLoader(product) loader.context['unit'] = 'cm'
在Item Loader实例化时(Item加载器构造函数的关键字参数存储在Item Loader上下文中):
loader = ItemLoader(product, unit='cm')在Item Loader声明中,对于那些支持用Item Loader上下文实例化的输入/输出处理器。
MapCompose就是其中之一:class ProductLoader(ItemLoader): length_out = MapCompose(parse_length, unit='cm')
ItemLoader对象
-
class
scrapy.loader.ItemLoader([item, selector, response, ]**kwargs)¶ 返回一个新的Item Loader来填充给定的Item。 如果没有给出Item,则使用
default_item_class中的类自动实例化。当使用selector或response参数实例化时,
ItemLoader类提供了使用selectors从网页中提取数据的方便机制。参数: - item(
Item对象) - 填入Item实例随后调用add_xpath(),add_css()或add_value()。 - selector(
Selector对象) - 提取数据的选择器,使用add_xpath()(或add_css())或replace_xpath()(或replace_css())方法。 - response(
Response对象) - response使用default_selector_class构造选择器,当selector参数给定时,response参数被忽略。
Item,Selector,Response和其余关键字参数被分配给Loader上下文(可通过
context属性访问)。ItemLoader实例具有以下方法:-
get_value(value, *processors, **kwargs)¶ 通过给定的
processors和关键字参数处理给定的value。可用关键字参数:
参数: re (str 或 已编译的正则表达式) - 一个正则表达式,用于在处理器之前应用 extract_regex()方法从给定值中提取数据示例:
>>> from scrapy.loader.processors import TakeFirst
>>> loader.get_value(u'name: foo', TakeFirst(), unicode.upper, re='name: (.+)')
'FOO`
-
add_value(field_name, value, *processors, **kwargs)¶ 处理,然后为给定字段添加给定的
value。value首先通过
get_value()传递给processors和kwargs,然后通过field input processor传递,结果附加到字段收集的数据中。 如果该字段已包含收集的数据,则添加新数据。给定的
field_name可以是None,在这种情况下,可以添加多个字段的值。 处理后的值应该是一个带有field_name映射值的字典。示例:
loader.add_value('name', u'Color TV')
loader.add_value('colours', [u'white', u'blue'])
loader.add_value('length', u'100')
loader.add_value('name', u'name: foo', TakeFirst(), re='name: (.+)')
loader.add_value(None, {'name': u'foo', 'sex': u'male'})
-
replace_value(field_name, value, *processors, **kwargs)¶ 与
add_value()类似,但用新值替换收集的数据,而不是添加它。
-
get_xpath(xpath, *processors, **kwargs)¶ 与
ItemLoader.get_value()类似,但接收XPath而不是value,该Xpath用于从与ItemLoader关联的选择器中提取unicode字符串列表。Parameters: - xpath(str) - 提取数据的XPath
- re (str 或 已编译的正则表达式) - 从选定的XPath区域提取数据的正则表达式
示例:
# HTML snippet: <p class="product-name">Color TV</p>
loader.get_xpath('//p[@class="product-name"]')
# HTML snippet: <p id="price">the price is $1200</p>
loader.get_xpath('//p[@id="price"]', TakeFirst(), re='the price is (.*)')
-
add_xpath(field_name, xpath, *processors, **kwargs)¶ 与
ItemLoader.add_value()类似,但接收XPath而不是value,Xpath用于从与ItemLoader关联的选择器中提取unicode字符串列表。参考
get_xpath()为获取kwargs.Parameters: xpath (str) – 为提取数据的XPath 例子:
# HTML 片段: <p class="product-name">Color TV</p>
loader.add_xpath('name', '//p[@class="product-name"]')
# HTML 片段: <p id="price">the price is $1200</p>
loader.add_xpath('price', '//p[@id="price"]', re='the price is (.*)')
-
replace_xpath(field_name, xpath, *processors, **kwargs)¶ 类似
add_xpath()但是会替换数据而非添加
-
get_css(css, *processors, **kwargs)¶ 类似
ItemLoader.get_value()接受一个可从列表中选择unicode字符串的css选择器替代特定的值ItemLoader.Parameters: - css (str) – 用于提取数据的CSS选择器
- re (str or compiled regex) – 用于从所选CSS区域提取数据的正则表达式
Examples:
# HTML snippet: <p class="product-name">Color TV</p>
loader.get_css('p.product-name')
# HTML snippet: <p id="price">the price is $1200</p>
loader.get_css('p#price', TakeFirst(), re='the price is (.*)')
-
add_css(field_name, css, *processors, **kwargs)¶ 类似
ItemLoader.add_value()但是获取CSS选择器,代替一个用于提取从选择器连接的ItemLoaderunicode字符串列表的值See
get_css()forkwargs.Parameters: css (str) – the CSS selector to extract data from Examples:
# HTML snippet: <p class="product-name">Color TV</p>
loader.add_css('name', 'p.product-name')
# HTML snippet: <p id="price">the price is $1200</p>
loader.add_css('price', 'p#price', re='the price is (.*)')
-
load_item()¶ 用目前收集的数据填充项目,然后返回。 收集到的数据首先通过output processors传递给每个项目字段以获取最终值。
-
nested_xpath(xpath)¶ 用xpath选择器创建一个嵌套的Loader。 提供的选择器与
ItemLoader关联的选择器应用是相对的。 嵌套的Loader与父ItemLoader共享Item,所以调用add_xpath(),add_value()replace_value()等将正常工作。
-
nested_css(css)¶ 用css选择器创建一个嵌套的Loader。 提供的选择器与
ItemLoader关联的选择器应用是相对的。 嵌套的Loader与父ItemLoader共享Item,所以调用add_xpath(),add_value()replace_value()等将正常工作。
-
get_collected_values(field_name)¶ 返回给定字段的收集值。
-
get_output_value(field_name)¶ 对于给定的字段,返回使用输出处理器分析的收集值。 此方法不能填充或修改Item。
-
get_input_processor(field_name)¶ 返回给定字段的输入处理器。
-
get_output_processor(field_name)¶ 返回给定字段的输出处理器。
ItemLoader实例具有以下属性:-
default_item_class¶ Item类(或工厂),用于在构造函数中未给出Item时,实例化Item。
-
default_input_processor¶ 默认输入处理器,用于没有指定输入处理器的字段。
-
default_output_processor¶ 默认输出处理器,用于那些没有指定输出处理器的字段。
-
default_selector_class¶ 如果在构造函数中只给出response,则该类用于构造
ItemLoader的selector。 如果在构造函数中给出了选择器,则忽略此属性。 该属性有时在子类中被覆盖。
-
selector¶ 要从中提取数据的
Selector对象。 它可以是构造函数中给出的,也可以是有response的构造函数使用default_selector_class创建的选择器。 该属性是只读的。
- item(
嵌套Loader
从文档的子部分解析相关值时,创建嵌套的Loader可能很有用。 想象一下,您正在从页面的页脚中提取详细信息,如下所示:
例:
<footer>
    <a class="social" href="https://facebook.com/whatever">Like Us</a>
    <a class="social" href="https://twitter.com/whatever">Follow Us</a>
    <a class="email" href="mailto:whatever@example.com">Email Us</a>
</footer>
没有嵌套的Loader,你需要为你想要提取的每个值指定完整的xpath(或css)。
例:
loader = ItemLoader(item=Item())
# load stuff not in the footer
loader.add_xpath('social', '//footer/a[@class = "social"]/@href')
loader.add_xpath('email', '//footer/a[@class = "email"]/@href')
loader.load_item()
或者,您可以使用页脚选择器创建一个嵌套的Loader,然后添加页脚的相对值。 功能相同,但您可以避免重复页脚选择器。
例:
loader = ItemLoader(item=Item())
# load stuff not in the footer
footer_loader = loader.nested_xpath('//footer')
footer_loader.add_xpath('social', 'a[@class = "social"]/@href')
footer_loader.add_xpath('email', 'a[@class = "email"]/@href')
# no need to call footer_loader.load_item()
loader.load_item()
您可以使用xpath或css选择器任意嵌套Loader。 一般来说,当使用嵌套加载器可以使您的代码变得更简单时使用它们,但不要过度嵌套,否则解析器会变得难以阅读。
重用和扩展Item Loader
随着项目越来越大并且获得越来越多的Spider,维护成为一个基本问题,尤其是当你必须处理每个Spider的许多不同解析规则和大量的异常处理情况,但同时也想重复使用通用处理器。
Item Loader旨在减轻解析规则的维护负担,不失灵活性,同时还提供了扩展和覆盖它们的便利机制。 出于这个原因, Item Loader支持传统的Python类继承来处理特定的Spider(或Spider组)的差异。
例如,假设一些特定的网站用三个破折号(例如---Plasma TV---)封装其产品名称,而您不想在最终产品名称中取得这些破折号。
您可以通过重用和扩展默认Product Item Loader(ProductLoader)来删除这些破折号:
from scrapy.loader.processors import MapCompose
from myproject.ItemLoaders import ProductLoader

def strip_dashes(x):
    return x.strip('-')

class SiteSpecificLoader(ProductLoader):
    name_in = MapCompose(strip_dashes, ProductLoader.name_in)
另一种扩展项目加载器的情况会非常有用,那就是当你有多种源格式时,例如XML和HTML。 在XML版本中,您可能需要删除CDATA事件。 以下是如何执行此操作的示例:
from scrapy.loader.processors import MapCompose
from myproject.ItemLoaders import ProductLoader
from myproject.utils.xml import remove_cdata

class XmlProductLoader(ProductLoader):
    name_in = MapCompose(remove_cdata, ProductLoader.name_in)
这就是典型的扩展输入处理器的方法。
至于输出处理器,在字段元数据中声明它们更为常见,因为它们通常仅取决于字段,而不取决于每个特定的站点解析规则(如输入处理器所做的那样)。 另见:声明输入和输出处理器。
还有很多其他可能的方式来扩展,继承和覆盖您的Item Loader,而不同的Item Loader层次结构可能适合不同的项目。 Scrapy只提供机制;它不会对您的Loaders集合实施任何特定的组织 - 这取决于您和您的项目需求。
可用的内置处理器
尽管您可以使用任何可调用的函数作为输入和输出处理器,但Scrapy提供了一些常用的处理器,下面将对其进行介绍。 其中一些,如MapCompose(通常用作输入处理器)生成顺序执行的几个函数的输出,以产生最终解析值。
以下是所有内置处理器的列表:
-
class
scrapy.loader.processors.Identity¶ 最简单的处理器,它什么都不做。 它返回原始值不做任何改变。 它不接收任何构造函数参数,也不接受Loader上下文。
例:
>>> from scrapy.loader.processors import Identity
>>> proc = Identity()
>>> proc(['one', 'two', 'three'])
['one', 'two', 'three']
-
class
scrapy.loader.processors.TakeFirst¶ 从接收到的值中返回第一个非空值,因此它通常用作单值字段的输出处理器。 它不接收任何构造函数参数,也不接受Loader上下文。
例:
>>> from scrapy.loader.processors import TakeFirst
>>> proc = TakeFirst()
>>> proc(['', 'one', 'two', 'three'])
'one'
-
class
scrapy.loader.processors.Join(separator=u' ')¶ 返回使用构造函数中给出的分隔符连接后的值,默认值为
u' '。 它不接受Loader上下文。当使用默认的分隔符时,这个处理器相当于下面的函数:
u' '.join例:
>>> from scrapy.loader.processors import Join
>>> proc = Join()
>>> proc(['one', 'two', 'three'])
u'one two three'
>>> proc = Join('<br>')
>>> proc(['one', 'two', 'three'])
u'one<br>two<br>three'
-
class
scrapy.loader.processors.Compose(*functions, **default_loader_context)¶ 由给定函数的组合构成的处理器。 这意味着该处理器的每个输入值都被传递给第一个函数,并且该函数的结果被传递给第二个函数,依此类推,直到最后一个函数返回该处理器的输出值。
默认情况下,处理器遇到
None值停止。 这种行为可以通过传递关键字参数stop_on_none=False来改变。例:
>>> from scrapy.loader.processors import Compose
>>> proc = Compose(lambda v: v[0], str.upper)
>>> proc(['hello', 'world'])
'HELLO'
每个函数都可以选择接收一个
loader_context参数。 处理器将通过该参数传递当前活动的Loader context。传给构造函数的关键字参数作为传递给每个函数调用的默认Loader context值。 但是,通过
ItemLoader.context()属性可以访问当前活动的Loader context,从而将传递给函数的最后的Loader context值覆盖。
-
class
scrapy.loader.processors.MapCompose(*functions, **default_loader_context)¶ 由给定函数的组合构成的处理器,类似于
Compose处理器。 不同之处在于内部结果在各个函数之间传递的方式,如下所示:该处理器的输入值是迭代的,第一个函数被应用于每个元素。 这些函数调用的结果(每个元素一个)被连接起来构成一个新的迭代器,然后传递给第二个函数,依此类推,直到最后一个函数被应用到所收集的值列表中的每个值为止。 最后一个函数的输出值被连接在一起产生该处理器的输出。
每个特定的函数都可以返回一个值或一个值列表,同一个函数不同的输入值返回的值列表是一致的。 这些函数也可以返回
None,在这种情况下,该函数的输出将被忽略,以便通过链进一步处理。该处理器提供了一种便捷的方式来组合仅使用单个值(而不是迭代)的函数。 出于这个原因,
MapCompose处理器通常用作输入处理器,因为通常使用 selectors的extract()方法提取数据,该方法返回一个unicode字符串列表。下面的例子将说明它的工作原理:
>>> def filter_world(x):
...     return None if x == 'world' else x
...
>>> from scrapy.loader.processors import MapCompose
>>> proc = MapCompose(filter_world, unicode.upper)
>>> proc([u'hello', u'world', u'this', u'is', u'scrapy'])
[u'HELLO, u'THIS', u'IS', u'SCRAPY']
与Compose处理器一样,函数可以接收Loader context,并将构造函数关键字参数用作默认context值。 有关更多信息,请参阅
Compose处理器。
-
class
scrapy.loader.processors.SelectJmes(json_path)¶ 使用提供给构造函数的json路径查询该值并返回输出。 需要运行jmespath(https://github.com/jmespath/jmespath.py)。 该处理器一次只有一个输入。
Example:
>>> from scrapy.loader.processors import SelectJmes, Compose, MapCompose
>>> proc = SelectJmes("foo") #for direct use on lists and dictionaries
>>> proc({'foo': 'bar'})
'bar'
>>> proc({'foo': {'bar': 'baz'}})
{'bar': 'baz'}
使用Json:
>>> import json
>>> proc_single_json_str = Compose(json.loads, SelectJmes("foo"))
>>> proc_single_json_str('{"foo": "bar"}')
u'bar'
>>> proc_json_list = Compose(json.loads, MapCompose(SelectJmes('foo')))
>>> proc_json_list('[{"foo":"bar"}, {"baz":"tar"}]')
[u'bar']
Scrapy shell
Scrapy shell是一个交互式shell,您可以非常快速地尝试并调试您的抓取代码,而无需运行Spider。 它旨在用于测试数据提取代码,但实际上它可以用于测试任何类型的代码,因为它也是一个常规的Python shell。
该shell用于测试XPath或CSS表达式,查看它们的工作方式以及从您试图抓取的网页中提取到的数据。 它可以让你在写Spider时交互地测试你的表达式,而不必运行Spider来测试每一个变化。
一旦熟悉Scrapy shell,您会发现它是开发和调试您的Spider的宝贵工具。
配置shell 
如果安装了IPython,Scrapy shell将使用它(而不是标准的Python控制台)。 IPython控制台功能更强大,并提供了智能自动完成和彩色输出等功能。
我们强烈建议您安装IPython,特别是如果您在Unix系统上工作(IPython擅长平台)。 有关更多信息,请参阅IPython安装指南。
Scrapy还支持bpython,并会在IPython不可用的情况下尝试使用它。
通过scrapy的设置,不管安装哪个,您都可以将其配置为使用ipython,bpython或标准python shell中的任何一个。 这是通过设置SCRAPY_PYTHON_SHELL环境变量完成的;或者通过在scrapy.cfg中定义它:
[settings]
shell = bpython
启动shell 
要启动Scrapy shell,你可以像这样使用shell命令:
scrapy shell <url>
这个<url>是你想要抓取的链接.
shell也适用于本地文件。 如果你想抓取一个网页的本地副本,这可以很方便。 shell支持本地文件的以下语法:
# UNIX-style
scrapy shell ./path/to/file.html
scrapy shell ../other/path/to/file.html
scrapy shell /absolute/path/to/file.html

# File URI
scrapy shell file:///absolute/path/to/file.html
注意
在使用相对文件路径时,应明确指定它们,并在相关时用./(或../)作为前缀。
scrapy shell index.html不会像预期的那样工作(这是设计而非错误)。
由于shell支持HTTP URL超过File URI,而index.html在语法上与example.com类似,shell会将index.html视为域名从而引发DNS查找错误:
$ scrapy shell index.html
[ ... scrapy shell starts ... ]
[ ... traceback ... ]
twisted.internet.error.DNSLookupError: DNS lookup failed:
address 'index.html' not found: [Errno -5] No address associated with hostname.
shell不会事先测试当前目录中是否存在名为index.html的文件。 请再次确认。
使用shell 
Scrapy shell只是一个普通的Python控制台(如果IPython可用的话,就是IPython控制台),它提供了一些额外的快捷方式功方便使用。
shell会话示例
以下是一个典型的shell会话示例,我们首先通过抓取https://scrapy.org页面开始,然后继续抓取https://reddit.com页面。 最后,我们将(Reddit)请求方法修改为POST并重新获取将会发生错误。 我们通过键入Ctrl-D(在Unix系统中)或Ctrl-Z(在Windows中)来结束会话。
请注意,这里提取的数据在你尝试时可能不尽相同,因为这些页面不是静态的,在测试时可能会发生变化。 这个例子的唯一目的是让你熟悉Scrapy shell的工作原理。
首先,我们启动shell:
scrapy shell 'https://scrapy.org' --nolog
然后,shell获取URL(使用Scrapy下载器)并打印可用对象列表和快捷方式(您会注意到这些行都以[s]前缀开头):
[s] Available Scrapy objects:
[s]   scrapy     scrapy module (contains scrapy.Request, scrapy.Selector, etc)
[s]   crawler    <scrapy.crawler.Crawler object at 0x7f07395dd690>
[s]   item       {}
[s]   request    <GET https://scrapy.org>
[s]   response   <200 https://scrapy.org/>
[s]   settings   <scrapy.settings.Settings object at 0x7f07395dd710>
[s]   spider     <DefaultSpider 'default' at 0x7f0735891690>
[s] Useful shortcuts:
[s]   fetch(url[, redirect=True]) Fetch URL and update local objects (by default, redirects are followed)
[s]   fetch(req)                  Fetch a scrapy.Request and update local objects
[s]   shelp()           Shell help (print this help)
[s]   view(response)    View response in a browser

>>>
之后,我们可以开始尝试使用对象:
>>> response.xpath('//title/text()').extract_first()
'Scrapy | A Fast and Powerful Scraping and Web Crawling Framework'

>>> fetch("https://reddit.com")

>>> response.xpath('//title/text()').extract()
['reddit: the front page of the internet']

>>> request = request.replace(method="POST")

>>> fetch(request)

>>> response.status
404

>>> from pprint import pprint

>>> pprint(response.headers)
{'Accept-Ranges': ['bytes'],
 'Cache-Control': ['max-age=0, must-revalidate'],
 'Content-Type': ['text/html; charset=UTF-8'],
 'Date': ['Thu, 08 Dec 2016 16:21:19 GMT'],
 'Server': ['snooserv'],
 'Set-Cookie': ['loid=KqNLou0V9SKMX4qb4n; Domain=reddit.com; Max-Age=63071999; Path=/; expires=Sat, 08-Dec-2018 16:21:19 GMT; secure',
                'loidcreated=2016-12-08T16%3A21%3A19.445Z; Domain=reddit.com; Max-Age=63071999; Path=/; expires=Sat, 08-Dec-2018 16:21:19 GMT; secure',
                'loid=vi0ZVe4NkxNWdlH7r7; Domain=reddit.com; Max-Age=63071999; Path=/; expires=Sat, 08-Dec-2018 16:21:19 GMT; secure',
                'loidcreated=2016-12-08T16%3A21%3A19.459Z; Domain=reddit.com; Max-Age=63071999; Path=/; expires=Sat, 08-Dec-2018 16:21:19 GMT; secure'],
 'Vary': ['accept-encoding'],
 'Via': ['1.1 varnish'],
 'X-Cache': ['MISS'],
 'X-Cache-Hits': ['0'],
 'X-Content-Type-Options': ['nosniff'],
 'X-Frame-Options': ['SAMEORIGIN'],
 'X-Moose': ['majestic'],
 'X-Served-By': ['cache-cdg8730-CDG'],
 'X-Timer': ['S1481214079.394283,VS0,VE159'],
 'X-Ua-Compatible': ['IE=edge'],
 'X-Xss-Protection': ['1; mode=block']}
>>>
在Spider中调用shell来检查响应
有时候你想检查一下Spider某一点正在处理的响应,想要知道到达那里是否符合你的预期。
这可以通过使用scrapy.shell.inspect_response函数来实现。
以下是您如何在您的Spider中调用它的示例:
import scrapy


class MySpider(scrapy.Spider):
    name = "myspider"
    start_urls = [
        "http://example.com",
        "http://example.org",
        "http://example.net",
    ]

    def parse(self, response):
        # We want to inspect one specific response.
        if ".org" in response.url:
            from scrapy.shell import inspect_response
            inspect_response(response, self)

        # Rest of parsing code.
当你运行Spider时,你会得到类似于这样的东西:
2014-01-23 17:48:31-0400 [scrapy.core.engine] DEBUG: Crawled (200) <GET http://example.com> (referer: None)
2014-01-23 17:48:31-0400 [scrapy.core.engine] DEBUG: Crawled (200) <GET http://example.org> (referer: None)
[s] Available Scrapy objects:
[s]   crawler    <scrapy.crawler.Crawler object at 0x1e16b50>
...

>>> response.url
'http://example.org'
然后,你可以检查提取代码是否工作:
>>> response.xpath('//h1[@class="fn"]')
[]
它没有正常工作, 因此,您可以在Web浏览器中打开响应,看看它是否是您期望的响应:
>>> view(response)
True
最后,您按Ctrl-D(或Windows中的Ctrl-Z)以退出shell并继续爬取:
>>> ^D
2014-01-23 17:50:03-0400 [scrapy.core.engine] DEBUG: Crawled (200) <GET http://example.net> (referer: None)
...
请注意,由于Scrapy引擎被shell阻塞,因此您不能在此处使用fetch快捷方式。 但是,在离开shell后,Spider将继续爬取,如上所示。
Item管道
Item被Spider抓取后,它被发送到Item管道,Item管道通过顺序执行的多个组件处理它。
每个Item管道组件(有时简称为“Item管道”)是一个执行简单方法的Python类。 他们接收一个Item对其执行操作,并决定该Item是否应该继续通过管道或是被丢弃并不再处理。
Item管道的典型用途是:
- 清理HTML数据
- 验证抓取的数据(检查Item是否包含某些字段)
- 检查重复项(并丢弃它们)
- 将抓取的Item存储在数据库中
编写自己的Item管道
每个Item管道组件都是一个Python类,它必须实现以下方法:
-
process_item(self, item, spider)¶ 每个Item管道组件都会调用此方法。
process_item()必须满足其中一条:返回一个带数据的字典,返回一个Item(或任何后代类)对象,返回一个Twisted Deferred或抛出DropItem异常。 被丢弃的Item不会被进一步的Item组件处理。参数:
另外,它们还可以实现以下方法:
Item管道示例
价格验证并丢弃没有价格的Item
我们来看看下面的假设管道,它调整那些不包含增值税(price_excludes_vat属性)的Item的price属性,并删除那些不包含价格的Item:
from scrapy.exceptions import DropItem

class PricePipeline(object):

    vat_factor = 1.15

    def process_item(self, item, spider):
        if item['price']:
            if item['price_excludes_vat']:
                item['price'] = item['price'] * self.vat_factor
            return item
        else:
            raise DropItem("Missing price in %s" % item)
将Item写入JSON文件
下面的管道将所有抓取的Item(来自所有Spider)存储到单独的items.jl文件中,每行包含一个以JSON格式序列化的Item:
import json

class JsonWriterPipeline(object):

    def open_spider(self, spider):
        self.file = open('items.jl', 'w')

    def close_spider(self, spider):
        self.file.close()

    def process_item(self, item, spider):
        line = json.dumps(dict(item)) + "\n"
        self.file.write(line)
        return item
注意
JsonWriterPipeline的目的只是介绍如何编写Item管道。 如果你真的想把所有被抓取的Item存储到一个JSON文件中,你应该使用Feed exports。
将Item写入MongoDB 
在这个例子中,我们将使用pymongo将Item写入MongoDB。 MongoDB地址和数据库名称在Scrapy设置中指定; MongoDB集合以item类命名。
这个例子的要点是展示如何使用from_crawler()方法以及如何正确地清理资源。:
import pymongo

class MongoPipeline(object):

    collection_name = 'scrapy_items'

    def __init__(self, mongo_uri, mongo_db):
        self.mongo_uri = mongo_uri
        self.mongo_db = mongo_db

    @classmethod
    def from_crawler(cls, crawler):
        return cls(
            mongo_uri=crawler.settings.get('MONGO_URI'),
            mongo_db=crawler.settings.get('MONGO_DATABASE', 'items')
        )

    def open_spider(self, spider):
        self.client = pymongo.MongoClient(self.mongo_uri)
        self.db = self.client[self.mongo_db]

    def close_spider(self, spider):
        self.client.close()

    def process_item(self, item, spider):
        self.db[self.collection_name].insert_one(dict(item))
        return item
获取Item截图
本示例演示如何从process_item()方法返回Deferred。
它使用Splash呈现Item url的屏幕截图。 管道请求本地运行的Splash实例。 下载请求并回调Deferred后,它将Item保存到一个文件并将文件名添加到Item。
import scrapy
import hashlib
from urllib.parse import quote


class ScreenshotPipeline(object):
    """Pipeline that uses Splash to render screenshot of
    every Scrapy item."""

    SPLASH_URL = "http://localhost:8050/render.png?url={}"

    def process_item(self, item, spider):
        encoded_item_url = quote(item["url"])
        screenshot_url = self.SPLASH_URL.format(encoded_item_url)
        request = scrapy.Request(screenshot_url)
        dfd = spider.crawler.engine.download(request, spider)
        dfd.addBoth(self.return_item, item)
        return dfd

    def return_item(self, response, item):
        if response.status != 200:
            # Error happened, return item.
            return item

        # Save screenshot to file, filename will be hash of url.
        url = item["url"]
        url_hash = hashlib.md5(url.encode("utf8")).hexdigest()
        filename = "{}.png".format(url_hash)
        with open(filename, "wb") as f:
            f.write(response.body)

        # Store filename in item.
        item["screenshot_filename"] = filename
        return item
重复过滤器
过滤器查找重复的Item,并删除已处理的重复Item。 假设我们的Item具有唯一的ID,但我们的Spider会使用相同的ID返回多个Item:
from scrapy.exceptions import DropItem

class DuplicatesPipeline(object):

    def __init__(self):
        self.ids_seen = set()

    def process_item(self, item, spider):
        if item['id'] in self.ids_seen:
            raise DropItem("Duplicate item found: %s" % item)
        else:
            self.ids_seen.add(item['id'])
            return item
激活Item管道组件
要激活Item Pipeline组件,必须将其类添加到ITEM_PIPELINES设置中,如下例所示:
ITEM_PIPELINES = {
    'myproject.pipelines.PricePipeline': 300,
    'myproject.pipelines.JsonWriterPipeline': 800,
}
您在此设置中分配给类的整数值决定了它们的运行顺序:Item从较低值类到较高值类。 通常在0-1000范围内定义这些数字。
导出文件
0.10版本中的新功能。
在实现爬虫时最常用的功能之一是能够正确存储抓取的数据,而且通常这意味着生成一个带有抓取数据的“输出文件”(通常称为“导出文件”),以供其他系统使用。
Scrapy通过Feed Export提供了这种功能,它允许您使用多个序列化格式和存储后端生成一个包含抓取的Item的文件。
序列化格式
为了序列化抓取的数据,导出文件使用Item exporters。 这些格式支持开箱即用:
您也可以通过FEED_EXPORTERS设置扩展支持的格式。
JSON
FEED_FORMAT:json- 使用的导出器:
JsonItemExporter- 如果您在对大型文件流使用JSON,请参阅警告。
JSON lines
FEED_FORMAT:jsonlines- 使用的导出器:
JsonLinesItemExporter
CSV
FEED_FORMAT:csv- 使用的导出器:
CsvItemExporter- 要指定要导出的列及其顺序,请使用
FEED_EXPORT_FIELDS。 其他文件导出器也可以使用此选项,但它对CSV很重要,因为与许多其他导出格式不同,CSV使用固定标题。
XML
FEED_FORMAT:xml- 使用的导出器:
XmlItemExporter
Pickle
FEED_FORMAT:pickle- 使用的导出器:
PickleItemExporter
Marshal
FEED_FORMAT:marshal- 使用的导出器:
MarshalItemExporter
存储器
使用导出文件时,您可以使用URI(通过 FEED_URI设置)定义存储文件的位置。 文件导出支持由URI方案定义的多个存储后端类型。
支持的存储后端是:
- Local filesystem
- FTP
- S3 (requires botocore or boto)
- Standard output
如果所需的外部库不存在,某些存储后端可能不可用。 例如,只有安装了botocore或boto库(Scrapy仅支持Python 2上的boto)时,S3后端才可用。
存储URI参数
存储URI还可以包含在创建文件时被替换的参数。 这些参数是:
%(time)s- 在创建文件时替换时间戳%(name)s- 替换Spider名
任何其他命名参数将被相同名称的spider属性替换。 例如,在文件被创建的那一刻,%(site_id)s将被替换为spider.site_id属性。
以下是一些例子来说明:
- 每个Spider使用单独一个目录存储在FTP中:
ftp://user:password@ftp.example.com/scraping/feeds/%(name)s/%(time)s.json- 每个Spider使用单独一个目录在S3中存储:
s3://mybucket/scraping/feeds/%(name)s/%(time)s.json
存储后端
本地文件系统
将文件存储在本地文件系统中。
- URI方案:
file- 示例URI:
file:///tmp/export.csv- 所需的外部库:无
请注意,对于本地文件系统存储(仅限于),如果您指定像/tmp/export.csv这样的绝对路径,则可以省略该方案。 但这只适用于Unix系统。
设置
这些是用于配置文件输出的设置:
FEED_EXPORT_ENCODING
默认值:None
要用于文件的编码。
如果未设置或设置为None(默认),则对于除JSON输出外的所有内容都使用UTF-8,因为历史原因,该输出使用安全数字编码(\ uXXXX转义字符)。
如果您还想为JSON使用UTF-8,请使用utf-8。
FEED_EXPORT_FIELDS
默认值:None
要导出的字段列表,可选。
示例:FEED_EXPORT_FIELDS = ["foo", "bar", "baz"].
使用FEED_EXPORT_FIELDS选项来定义要导出的字段及其顺序。
当FEED_EXPORT_FIELDS为空或None(默认值)时,Scrapy使用字典中定义的字段或Spider产生的Item子类。
如果导出器需要一组固定的字段(这是CSV导出格式的情况),并且FEED_EXPORT_FIELDS为空或None,则Scrapy会尝试从导出的数据中推断字段名称 - 目前它使用第一个Item的字段名称。
FEED_EXPORT_INDENT
默认值:0
每一级缩进输出的空格数。 如果FEED_EXPORT_INDENT是一个非负整数,则数组元素和对象成员将与该缩进级别相匹配。 缩进级别0(默认值)或负值会将每个Item放在新行中。 None选择最紧凑的表示。
目前仅通过JsonItemExporter和XmlItemExporter实现,即当您导出到.json或.xml时。
FEED_STORAGES_BASE
默认:
{
    '': 'scrapy.extensions.feedexport.FileFeedStorage',
    'file': 'scrapy.extensions.feedexport.FileFeedStorage',
    'stdout': 'scrapy.extensions.feedexport.StdoutFeedStorage',
    's3': 'scrapy.extensions.feedexport.S3FeedStorage',
    'ftp': 'scrapy.extensions.feedexport.FTPFeedStorage',
}
包含Scrapy支持的内置文件存储后端的字典。 您可以通过在FEED_STORAGES中为其URI方案分配None来禁用这些后端中的任何一个。 例如,要禁用内置FTP存储后端(无需替换),请将它放在settings.py中:
FEED_STORAGES = {
    'ftp': None,
}
FEED_EXPORTERS_BASE
默认:
{
    'json': 'scrapy.exporters.JsonItemExporter',
    'jsonlines': 'scrapy.exporters.JsonLinesItemExporter',
    'jl': 'scrapy.exporters.JsonLinesItemExporter',
    'csv': 'scrapy.exporters.CsvItemExporter',
    'xml': 'scrapy.exporters.XmlItemExporter',
    'marshal': 'scrapy.exporters.MarshalItemExporter',
    'pickle': 'scrapy.exporters.PickleItemExporter',
}
包含Scrapy支持的内置文件导出器的字典。 您可以通过在FEED_EXPORTERS中将None分配给它们的序列化格式来禁用这些导出器中的任何一个。 例如,要禁用内置的CSV导出器(无需替换),请将它放在settings.py中:
FEED_EXPORTERS = {
    'csv': None,
}
请求和响应
Scrapy使用Request和Response对象来抓取网站。
通常,在Spider中生成Request对象,跨系统传递直到它们到达Downloader,Downloader执行请求并返回一个Response对象给发出请求的Spider。
Request和Response类都有子类,它们添加了基类中非必需的功能。 这些在请求子类和响应子类中描述。
请求对象
-
class
scrapy.http.Request(url[, callback, method='GET', headers, body, cookies, meta, encoding='utf-8', priority=0, dont_filter=False, errback, flags])¶ 一个
Request对象表示一个HTTP请求,它通常在Spider中生成并由Downloader执行,从而生成一个Response。参数: - url (string) – 请求的网址
- callback (callable) - 将此请求的响应(下载完成后)作为其第一个参数调用的函数。 有关更多信息,请参阅下面的将附加数据传递给回调函数。
如果请求没有指定回调,则将使用Spider的
parse()方法。 请注意,如果在处理期间引发异常,则会调用errback。 - method (string) – 请求的HTTP方法. 默认为
'GET'. - meta (dict) –
Request.meta属性的初始值. 如果给出,在此参数中传递的字典将被浅拷贝。 - body (str or unicode) - 请求正文。 如果传递了一个
unicode,那么它将被编码为相应的(默认为utf-8)str。 如果未给出body,则会存储空字符串。 无论此参数的类型如何,存储的最终值都将是str(不会是unicode或None)。 - headers (dict) - 请求的头文件。 字典值可以是字符串(对于单值标题)或列表(对于多值标题)。 如果将
None作为值传递,则不会发送HTTP头文件。 - cookies (dict or list) –
请求的cookies。 可以以两种形式发送。
- 使用字典:
request_with_cookies = Request(url="http://www.example.com",
                               cookies={'currency': 'USD', 'country': 'UY'})
- 使用字典列表:
request_with_cookies = Request(url="http://www.example.com",
                               cookies=[{'name': 'currency',
                                        'value': 'USD',
                                        'domain': 'example.com',
                                        'path': '/currency'}])
后一种形式允许定制cookie的
domain和path属性。 这仅在cookie被保存用于以后的请求时才有用。当某个站点返回(在响应中)cookie时,这些cookie将存储在该域的cookie中,并将在未来的请求中再次发送。 这是任何常规Web浏览器的典型行为。 但是,如果出于某种原因想要避免与现有Cookie合并,可以通过在
Request.meta中将dont_merge_cookies键设置为True来指示Scrapy执行此操作。不合并Cookie的请求示例:
request_with_cookies = Request(url="http://www.example.com",
                               cookies={'currency': 'USD', 'country': 'UY'},
                               meta={'dont_merge_cookies': True})
有关更多信息,请参阅CookiesMiddleware。
- 使用字典:
- encoding (string) - 请求的编码(默认为
'utf-8')。 该编码将用于对URL进行百分比编码并将主体转换为str(如果以unicode的形式给出)。 - priority (int) – 请求的优先级(默认为
0). 调度程序使用优先级来定义处理请求的顺序。 具有较高优先级值的请求将更早执行。 允许用负值表示相对低的优先级。 - dont_filter (boolean) - 表示此请求不应被调度程序过滤。 当您想多次执行相同的请求时使用此选项以忽略重复过滤器。 小心使用它,否则你将进入爬取循环。 默认为
False. - errback (callable) - 如果在处理请求时引发异常,将会调用该函数。 这包括404 HTTP错误等失败的页面。 它接受一个Twisted Failure实例作为第一个参数。 有关更多信息,请参阅下面的使用errbacks捕获请求处理中的异常。
- flags (list) - 发送到请求的标志,可用于日志记录或类似目的。
-
method¶ 表示请求中的HTTP方法的字符串。 确保它是大写的。 例:
"GET","POST","PUT"等
-
headers¶ 一个包含请求头文件的类似字典的对象。
-
meta¶ 包含此请求的任意元数据的字典。 对于新的请求这个字典是空的,通常由不同的Scrapy组件(扩展,中间件等)填充。 因此,此字典中包含的数据取决于您启用的扩展。
有关由Scrapy识别的特殊元键列表,请参阅Request.meta特殊键。
当使用
copy()或replace()方法克隆请求时,该字典被浅拷贝,同时也可以在您的Spider中通过response.meta属性访问。
-
copy()¶ 返回一个新请求,它是此请求的副本。 另请参阅:将其他数据传递给回调函数。
-
replace([url, method, headers, body, cookies, meta, encoding, dont_filter, callback, errback])¶ 使用相同的成员返回Request对象,但通过指定关键字参数给予新值的成员除外。 属性
Request.meta默认复制(除非在meta参数中给出新值)。 另请参阅将其他数据传递给回调函数。
将其他数据传递给回调函数
请求的回调函数将在该请求的响应下载完成时调用。 回调函数将以下载的Response对象作为第一个参数进行调用。
例:
def parse_page1(self, response):
    return scrapy.Request("http://www.example.com/some_page.html",
                          callback=self.parse_page2)

def parse_page2(self, response):
    # this would log http://www.example.com/some_page.html
    self.logger.info("Visited %s", response.url)
在某些情况下,您可能有兴趣将参数传递给这些回调函数,以便稍后在第二个回调函数中接收参数。 您可以使用Request.meta属性。
以下是如何使用此机制传递Item以填充不同页面的不同字段的示例:
def parse_page1(self, response):
    item = MyItem()
    item['main_url'] = response.url
    request = scrapy.Request("http://www.example.com/some_page.html",
                             callback=self.parse_page2)
    request.meta['item'] = item
    yield request

def parse_page2(self, response):
    item = response.meta['item']
    item['other_url'] = response.url
    yield item
使用errbacks在请求处理中捕获异常
errback是当处理请求发生异常时调用的函数。
它收到一个Twisted Failure实例作为第一个参数,可用于跟踪连接建立超时,DNS错误等。
以下是一个Spider日志记录所有错误并在需要时捕获一些特定错误的示例:
import scrapy

from scrapy.spidermiddlewares.httperror import HttpError
from twisted.internet.error import DNSLookupError
from twisted.internet.error import TimeoutError, TCPTimedOutError

class ErrbackSpider(scrapy.Spider):
    name = "errback_example"
    start_urls = [
        "http://www.httpbin.org/",              # HTTP 200 expected
        "http://www.httpbin.org/status/404",    # Not found error
        "http://www.httpbin.org/status/500",    # server issue
        "http://www.httpbin.org:12345/",        # non-responding host, timeout expected
        "http://www.httphttpbinbin.org/",       # DNS error expected
    ]

    def start_requests(self):
        for u in self.start_urls:
            yield scrapy.Request(u, callback=self.parse_httpbin,
                                    errback=self.errback_httpbin,
                                    dont_filter=True)

    def parse_httpbin(self, response):
        self.logger.info('Got successful response from {}'.format(response.url))
        # do something useful here...

    def errback_httpbin(self, failure):
        # log all failures
        self.logger.error(repr(failure))

        # in case you want to do something special for some errors,
        # you may need the failure's type:

        if failure.check(HttpError):
            # these exceptions come from HttpError spider middleware
            # you can get the non-200 response
            response = failure.value.response
            self.logger.error('HttpError on %s', response.url)

        elif failure.check(DNSLookupError):
            # this is the original request
            request = failure.request
            self.logger.error('DNSLookupError on %s', request.url)

        elif failure.check(TimeoutError, TCPTimedOutError):
            request = failure.request
            self.logger.error('TimeoutError on %s', request.url)
Request.meta特殊键
Request.meta属性可以包含任何数据,但Scrapy及其内置扩展可识别一些特殊的键。
那些是:
dont_redirectdont_retryhandle_httpstatus_listhandle_httpstatus_alldont_merge_cookies(seecookiesparameter ofRequestconstructor)cookiejardont_cacheredirect_urlsbindaddressdont_obey_robotstxtdownload_timeoutdownload_maxsizedownload_latencydownload_fail_on_datalossproxyftp_user(更多信息参见FTP_USER)ftp_password(有关更多信息,请参阅FTP_PASSWORD)referrer_policymax_retry_times
bindaddress
用于执行请求的传出IP地址的IP。
download_timeout
下载器在超时之前等待的时间(以秒为单位)。
另请参阅:DOWNLOAD_TIMEOUT。
download_latency
从请求开始以来(即通过网络发送HTTP消息)获取响应所花费的时间量。 这个元键只有在响应被下载后才可用。 虽然大多数其他元键用于控制Scrapy行为,但它是只读的。
download_fail_on_dataloss
响应是否失败。 请参阅:DOWNLOAD_FAIL_ON_DATALOSS。
max_retry_times
这个元键用于设置每个请求的重试次数。 初始化时,max_retry_times元键优先于RETRY_TIMES设置。
请求子类
这里是内置Request子类的列表。 您也可以将其子类化以实现您的自定义功能。
FormRequest对象
FormRequest类在Request基础上扩展了处理HTML表单的功能。 它使用lxml.html表单预先填充来自Response对象的表单数据的表单字段。
-
class
scrapy.http.FormRequest(url[, formdata, ...])¶ FormRequest类的构造函数添加了一个新参数。 其余的参数与Request类相同,这里不再说明。参数: formdata (字典 或 元组的迭代) - 是一个包含HTML表单数据的字典(或可迭代的(键,值)元组),这些数据将被url编码并分配给请求的主体。 除了标准的
Request方法外,FormRequest对象还支持以下类方法:-
classmethod
from_response(response[, formname=None, formid=None, formnumber=0, formdata=None, formxpath=None, formcss=None, clickdata=None, dont_click=False, ...])¶ 返回一个新的
FormRequest对象,它的表单字段值预先填充在给定响应包含的HTML<form>元素中。 有关示例,请参阅使用FormRequest.from_response()模拟用户登录。默认情况下会自动模拟任何可点击的窗体控件上的点击,如
<input type="submit">. 尽管这很方便,而且通常是所需的行为,但有时它可能会导致难以调试的问题。 例如,处理使用javascript填充和/或提交的表单时,默认的from_response()行为可能不是最合适的。 要禁用此行为,可以将dont_click参数设置为True。 另外,如果要更改点击的控件(而不是禁用它),还可以使用clickdata参数。警告
由于lxml中的BUG,在选项值中具有前导空白或尾随空白的select元素使用此方法将不起作用,这将在lxml 3.8及更高版本中修复。
参数: - response (
Responseobject) - 包含将用于预填充表单字段的HTML表单的响应 - formname (string) - 如果给定,将使用name属性为给定值的表单
- formid (string) – 如果给定,将使用id属性为给定值的表单
- formxpath (string) – 如果给定, 将使用xpath匹配的第一个表单
- formcss (string) – 如果给定,将使用css选择器匹配的第一个表单
- formnumber (integer) - 当响应包含多个表单时要使用的表单编号. 第一个(也是默认值)是
0 - formdata (dict) - 要在表单数据中覆盖的字段。 如果一个字段已经存在于响应
<form>元素中,这个字段的值将被参数传递的值覆盖. 如果在此参数中传递的值是None,则该字段将不会被包含在请求中,即使它存在于响应的<form>元素中 - clickdata (dict) - 用于查找被点击控件的属性。 如果没有给出,表单数据将被模拟点击第一个可点击的元素提交。 除了html属性之外,还可以使用
nr属性通过相对于表单内其他可提交输入控件从零开始的索引来标识控件。 - dont_click (boolean) - 如果为True,将不点击任何控件提交表单数据。
这个类方法的其他参数直接传递给
FormRequest构造函数。版本0.10.3中的新增内容:
formname参数。版本0.17中的新增内容:
formxpath参数。版本1.1.0中的新增内容:
formcss参数。版本1.1.0中的新增内容:
formid参数。- response (
-
classmethod
请求使用示例
使用FormRequest通过HTTP POST发送数据
如果你想在Spider中模拟一个HTML表单POST并发送一些键值字段,你可以像这样返回一个FormRequest对象(从你的Spider中):
return [FormRequest(url="http://www.example.com/post/action",
                    formdata={'name': 'John Doe', 'age': '27'},
                    callback=self.after_post)]
使用FormRequest.from_response()模拟用户登录
网站通常通过<input type="hidden">元素提供预先填写的表单字段,例如与会话相关的数据或身份验证令牌(用于登录页). 在抓取时,您想要自动预填这些字段,仅覆盖其中的几个字段,例如用户名和密码。 您可以使用FormRequest.from_response()方法达到这一目的。 这是一个使用它的Spider示例:
import scrapy

class LoginSpider(scrapy.Spider):
    name = 'example.com'
    start_urls = ['http://www.example.com/users/login.php']

    def parse(self, response):
        return scrapy.FormRequest.from_response(
            response,
            formdata={'username': 'john', 'password': 'secret'},
            callback=self.after_login
        )

    def after_login(self, response):
        # check login succeed before going on
        if "authentication failed" in response.body:
            self.logger.error("Login failed")
            return

        # continue scraping with authenticated session...
响应对象
-
class
scrapy.http.Response(url[, status=200, headers=None, body=b'', flags=None, request=None])¶ 一个
Response对象表示一个HTTP响应,它通常被下载(由下载器)并且被馈送给Spider进行处理。参数: - url (string) - 此响应的网址
- status (integer) - 响应的HTTP状态。 默认为
200。 - headers (dict) - 此响应的头文件。 字典值可以是字符串(对于单值头文件)或列表(对于多值头文件)。
- body (bytes) - 响应正文。 要以str(Python 2中的unicode)的形式访问解码后的文本,可以使用自适应编码的Response子类的
response.text,例如TextResponse。 - flags(list) - 是包含
Response.flags属性初始值的列表。 如果给出,列表将被浅拷贝。 - request (
Request对象) -Response.request属性的初始值。 这表示生成此响应的Request。
-
status¶ 表示响应的HTTP状态的整数。 例如:
200,404。
-
headers¶ 一个包含响应头文件的类似字典的对象。 可以使用
get()返回具有指定名称的第一个头文件值或getlist()返回具有指定名称的所有头文件值。 例如,这个调用会给你头文件中的所有Cookie:response.headers.getlist('Set-Cookie')
-
body¶ 这个响应的主体。 请注意,Response.body始终是一个字节对象。 如果您想要unicode版本可以使用
TextResponse.text(仅在TextResponse和子类中可用)。该属性是只读的。 要更改Response的主体,请使用
replace()。
-
request¶ 生成此响应的
Request对象。 当响应和请求已经通过所有Downloader Middlewares之后,在Scrapy引擎中分配此属性。 特别是,这意味着:- HTTP重定向会将原始请求(重定向前的URL)分配给重定向的响应(重定向后使用最终的URL)。
- Response.request.url并不总是等于Response.url
- 该属性仅在spider代码和Spider Middlewares中可用,但不能在Downloader Middleware中(尽管您可以通过其他方式获得请求)和
response_downloaded信号处理程序中使用.
-
meta¶ Response.request对象的Request.meta属性的快捷方式(即self.request.meta).与
Response.request属性不同,Response.meta属性在重定向和重试之间传递,因此你将获得你的Spider发送的原始Request.meta数据。也可以看看
-
flags¶ 包含此响应标识的列表。 标识是用于标记响应的标签。 例如:'cached'、'redirected’等。它们(被用在)显示Response的字符串表示形式(__str__ 方法)上,由logging引擎用于日志记录。
-
copy()¶ 返回一个新的Response,它是Response的副本。
-
replace([url, status, headers, body, request, flags, cls])¶ 使用相同的成员返回一个Response对象,除了那些由指定的关键字参数赋予新值的成员。 属性
Response.meta默认被复制。
-
urljoin(url)¶ 通过将响应的
url与可能的相对网址结合,构建绝对网址。这是 urlparse.urljoin的一个包装,它仅仅是一个用于进行此调用的别名:
urlparse.urljoin(response.url, url)
-
follow(url, callback=None, method='GET', headers=None, body=None, cookies=None, meta=None, encoding='utf-8', priority=0, dont_filter=False, errback=None)¶ 返回一个
Request实例以follow链接url。 它接受与Request .__ init __方法相同的参数,但url不仅仅是绝对URL,还可以是相对URL或scrapy.link.Link对象,。TextResponse提供了一个follow()方法,除了绝对/相对URL和链接对象以外,还支持选择器。
响应子类
以下是可用的内置Response子类的列表。 您也可以继承Response类来实现您自己的功能。
TextResponse对象
-
class
scrapy.http.TextResponse(url[, encoding[, ...]])¶ TextResponse对象为基本Response类添加了编码功能,这意味着该类仅用于二进制数据,如图像,声音或任何媒体文件。TextResponse对象在基础Response对象之上还添加了新的构造函数参数。 其余功能与Response类相同,这里不再赘述。参数: encoding (string) - 是一个包含此响应编码的字符串。 如果使用unicode主体创建一个对象,它将使用此 encoding进行编码(记住body属性始终是一个字符串)。 如果encoding为None(默认值),则将在响应头文件和正文中查找编码。除了标准的
Response对象外,TextResponse对象还支持以下属性:-
text¶ 响应主体,如unicode。
与
response.body.decode(response.encoding)相同,但结果在第一次调用后被缓存,因此您可以多次访问response.text而无需额外的开销。注意
unicode(response.body)不是将响应主体转换为unicode的正确方法:您将使用系统默认编码(通常为ascii)代替响应编码。
-
encoding¶ 一个包含响应编码的字符串。 通过尝试以下机制解决编码问题,顺序如下:
- 传递给构造函数encoding参数的编码
- 在Content-Type HTTP头中声明的编码。 如果此编码无效(即. 未知),它将被被忽略,尝试下一个解决机制。
- 在响应正文中声明的编码。 TextResponse类没有为此提供任何特殊功能。 但是,
HtmlResponse和XmlResponse类可以。 - 通过查看响应主体来推断编码。 这是更脆弱的方法,但也是最后的尝试。
除了标准的
Response之外,TextResponse对象还支持以下方法:-
xpath(query)¶ TextResponse.selector.xpath(query)的快捷方式:response.xpath('//p')
-
css(query)¶ TextResponse.selector.css(query)的快捷方式:response.css('p')
-
follow(url, callback=None, method='GET', headers=None, body=None, cookies=None, meta=None, encoding=None, priority=0, dont_filter=False, errback=None)¶ 返回一个
Request实例以follow链接url。 它接受与Request .__ init __方法相同的参数,但url不仅可以是绝对URL,还可以是- 相对URL;
- scrapy.link.Link对象(例如链接提取器结果);
- 属性选择器(不是选择器列表) - 例如
response.css('a::attr(href)')[0]或response.xpath('//img/@src')[0]。 <a>或<link>元素的选择器,例如response.css('a.my_link')[0].
有关用法示例,请参阅创建请求的快捷方式。
-
HtmlResponse对象
-
class
scrapy.http.HtmlResponse(url[, ...])¶ HtmlResponse类是TextResponse的一个子类,添加了通过查看HTML meta http-equiv属性自动发现支持编码。 参见TextResponse.encoding。
XmlResponse对象
-
class
scrapy.http.XmlResponse(url[, ...])¶ XmlResponse类是TextResponse的一个子类,添加了通过查看XML声明行来自动发现支持编码。 参见TextResponse.encoding。
链接提取器
链接提取器的唯一目的是从网页(scrapy.http.Response对象)提取将要被follow的链接的对象。
Scrapy中提供了scrapy.linkextractors.LinkExtractor,但您可以通过实现简单的接口来创建自定义链接提取器以满足您的需求。
每个链接提取器所具有的唯一公共方法是extract_links,它接收Response对象并返回scrapy.link.Link对象的列表。 这意味着链接提取器只需要被实例化一次,它的extract_links方法被不同的响应多次调用提取要follow的链接。
通过一组规则,链接提取器被用在CrawlSpider类(在Scrapy中可用)中,即使您没有继承CrawlSpider类,您也可以在您的Spider中使用它,因为它的目的非常简单:提取链接。
内置链接提取器参考
scrapy.linkextractors模块提供了与Scrapy捆绑在一起的链接提取器类。
默认链接提取器是LinkExtractor,它与LxmlLinkExtractor相同:
from scrapy.linkextractors import LinkExtractor
以前的Scrapy版本中曾经有其他链接提取器类,但现在已弃用。
LxmlLinkExtractor
-
class
scrapy.linkextractors.lxmlhtml.LxmlLinkExtractor(allow=(), deny=(), allow_domains=(), deny_domains=(), deny_extensions=None, restrict_xpaths=(), restrict_css=(), tags=('a', 'area'), attrs=('href', ), canonicalize=False, unique=True, process_value=None, strip=True)¶ LxmlLinkExtractor是推荐的链接提取器,具有方便的过滤选项。 它使用lxml的健壮HTMLParser实现。
参数: - allow (a regular expression (or list of)) - 与正则表达式(或正则表达式列表)相匹配的(绝对)url才能被提取。 如果没有给出(或空),它将匹配所有链接。
- deny (a regular expression (or 正则的列表)) – 与正则表达式(或正则表达式的列表)相匹配的(绝对)url将被排除(即, 不被提取)。 它优先于
allow参数。 如果没有给出(或空),它不会排除任何链接。 - allow_domains (str or list) - 包含将被考虑用于提取链接的域的单个值或字符串列表
- deny_domains (str or list) - 包含不会被考虑用于提取链接的域的单个值或字符串列表
- deny_extensions (list) - 包含在提取链接时应该忽略的单个值或字符串列表扩展。
如果没有给出,它将默认为scrapy.linkextractors包中定义的
IGNORED_EXTENSIONS列表。 - restrict_xpaths (str or list) - 是一个XPath(或XPath的列表),它定义了应该从中提取链接的响应内区域。 如果给定,只有那些XPath选择的文本才会被扫描查找链接。 详见下面的例子。
- restrict_css (str or list) - 一个CSS选择器(或者选择器列表),它定义了应该从中提取链接的响应内区域。
具有与
restrict_xpaths相同的行为。 - tags (str or list) - 提取链接时要考虑的标记或标记列表。
默认为
('a', 'area')。 - attrs(list) - 查找提取链接时应考虑的属性或属性列表(仅适用于
tags参数中指定的标签)。 默认为('href',) - canonicalize (boolean) - 规范化每个提取的url(使用w3lib.url.canonicalize_url)。 默认为
False. 请注意,canonicalize_url用于重复检查;它可以更改服务器端可见的URL,因此对于使用规范化和原始URL的请求,响应可能会有所不同。 如果您使用LinkExtractor来follow链接,那么保持默认canonicalize=False会使程序更强健。 - 唯一的(布尔值) - 是否应对抓取的链接应用重复筛选。
- process_value (callable) –
用于接收从标签和所扫描的属性中提取的每个值,并可以修改这些值返回一个新值或对于忽略的链接返回
None。 如果没有给出,则process_value默认为lambda x: x.例如,要从此代码中提取链接:
<a href="javascript:goToPage('../other/page.html'); return false">Link text</a>您可以在
process_value中使用以下方法:def process_value(value): m = re.search("javascript:goToPage\('(.*?)'", value) if m: return m.group(1)
- strip (boolean) - 是否从提取的属性中去除空格。
根据HTML5标准,
<a>和<area>的href属性,和其他元素如<img>和<iframe>的src属性等等的前导空白和尾随空白必须去除,因此LinkExtractor默认去除空白字符。 设置strip=False可将其关闭(例如,如果您从允许前/后空格的元素或属性中提取url)。
设置
Scrapy设置允许您自定义所有Scrapy组件的行为,包括核心,扩展,管道和Spider本身。
设置的基础结构提供了代码可用于从中提取配置值的键值映射的全局名称空间。 这些设置可以通过不同的机制进行填充,下面将对此进行介绍。
这些设置也是选择当前活动Scrapy项目的机制(假设你有很多)。
有关可用内置设置的列表,请参阅:内置设置参考。
指定设置
当你使用Scrapy时,你必须告诉它你要使用哪些设置。 您可以通过使用环境变量SCRAPY_SETTINGS_MODULE来完成此操作。
SCRAPY_SETTINGS_MODULE的值应该是Python路径语法,myproject.settings。 请注意,设置模块应该位于Python 导入搜索路径中。
填充设置
可以使用不同的机制来填充设置,每种机制都有不同的优先级。 以下是按优先级降序排列的列表:
- 命令行选项(最优先)
- 每个Spider的设置
- 项目设置模块
- 每个命令的默认设置
- 默认的全局设置(优先级最低)
这些设置源总体在内部得到了处理,但使用API调用可以手动处理。 请参阅设置API主题。
下面更详细地对这些机制进行描述。
1. 命令行选项
命令行提供的参数是最优先的参数,覆盖任何其他选项。 您可以使用-s (或 --set)命令行选项明确地覆盖一个(或多个)设置。
例:
scrapy crawl myspider -s LOG_FILE=scrapy.log
2. 每个Spider的设置 
Spider(请参阅Spider章节以供参考)可以定义它们自己的设置,这将优先考虑并覆盖项目的设置。 他们可以通过设置custom_settings属性来完成此操作:
class MySpider(scrapy.Spider):
    name = 'myspider'

    custom_settings = {
        'SOME_SETTING': 'some value',
    }
3. 项目设置模块
项目设置模块是Scrapy项目的标准配置文件,它是大多数自定义设置将被填充的地方。 对于标准Scrapy项目,这意味着您将添加或更改为您的项目创建的settings.py文件中的设置。
如何访问设置
在Spider中,这些设置可以通过self.settings获得:
class MySpider(scrapy.Spider):
    name = 'myspider'
    start_urls = ['http://example.com']

    def parse(self, response):
        print("Existing settings: %s" % self.settings.attributes.keys())
注意
在spider初始化后,settings属性在基本Spider类中设置。 如果你想在初始化之前使用这些设置(例如,在你的Spider的__init__()方法中),你需要重载from_crawler()方法。
可以通过扩展,中间件和项目管道中传递给from_crawler方法的Crawler的scrapy.crawler.Crawler.settings属性访问设置:
class MyExtension(object):
    def __init__(self, log_is_enabled=False):
        if log_is_enabled:
            print("log is enabled!")

    @classmethod
    def from_crawler(cls, crawler):
        settings = crawler.settings
        return cls(settings.getbool('LOG_ENABLED'))
设置对象可以像字典一样使用(例如settings['LOG_ENABLED']),但通常最好使用Settings提供的API提取您需要的设置格式以避免类型错误。
设置名称的基本原理
设置名称通常以它们配置的组件为前缀。 例如,虚构的robots.txt扩展的正确设置名称将是ROBOTSTXT_ENABLED,ROBOTSTXT_OBEY,ROBOTSTXT_CACHEDIR等。
内置设置参考
以下按字母顺序列出了所有可用的Scrapy设置,以及它们的默认值和应用范围。
范围(如果可用)显示设置的使用位置,是否与任何特定组件绑定。 在这种情况下,将显示该组件的模块,通常是扩展,中间件或管道。 这也意味着必须启用组件才能使设置发挥作用。
BOT_NAME
默认: 'scrapybot'
此Scrapy项目实现的bot的名称(也称为项目名称)。 这将用于默认构建User-Agent,也用于记录。
当您使用startproject命令创建项目时,它会自动填充项目名称。
CONCURRENT_REQUESTS_PER_IP
默认: 0
最大并发(即. 同时)将对任何单个IP执行的请求数。 如果非零,则忽略CONCURRENT_REQUESTS_PER_DOMAIN设置,并使用此设置。 换言之,并发限制将应用于每个IP,而不是每个域。
此设置还会影响DOWNLOAD_DELAY和AutoThrottle扩展:如果CONCURRENT_REQUESTS_PER_IP不为零,则下载延迟会针对每个IP强制执行,而不是每个域强制执行。
DEFAULT_REQUEST_HEADERS
Default:
{
    'Accept': 'text/html,application/xhtml+xml,application/xml;q=0.9,*/*;q=0.8',
    'Accept-Language': 'en',
}
用于Scrapy HTTP请求的默认头文件。 它们被填充到DefaultHeadersMiddleware中。
DEPTH_LIMIT
默认: 0
从属: scrapy.spidermiddlewares.depth.DepthMiddleware
允许对任何站点爬取的最大深度。 如果为0,则不会施加任何限制。
DEPTH_PRIORITY
默认: 0
Scope: scrapy.spidermiddlewares.depth.DepthMiddleware
一个整数,用于根据请求的深度调整其优先级。
- 默认0, 没有优先调整深度:request.priority = request.priority - ( depth * DEPTH_PRIORITY )
- 正值将降低优先级,即稍后将处理更低的深度请求; 这通常在执行广度优先爬取(BFO)时使用;
- 负值将增加优先级,即更快地处理更高深度的请求(即:执行深度优先爬取--DFO);
See also: Does Scrapy crawl in breadth-first or depth-first order? about tuning Scrapy for BFO or DFO.
Note
与其他优先级设置相比,此设置以相反的方式调整REDIRECT_PRIORITY_ADJUST 和RETRY_PRIORITY_ADJUST优先级.
DEPTH_STATS_VERBOSE
Default: False
Scope: scrapy.spidermiddlewares.depth.DepthMiddleware
是否收集详细的深度统计信息。 如果启用此选项,则在统计信息中收集每个深度的请求数。
DOWNLOADER_HTTPCLIENTFACTORY
Default: 'scrapy.core.downloader.webclient.ScrapyHTTPClientFactory'
定义用于HTTP/1.0连接的Twistedprotocol.ClientFactory类(用于HTTP10DownloadHandler).
Note
现在很少使用HTTP/1.0,因此您可以安全地忽略此设置,除非您使用Twisted<11.1,或者如果您确实想使用HTTP/1.0并相应地重写http(s)方案的DOWNLOAD_HANDLERS_BASE ,即'scrapy.core.downloader.handlers.http.HTTP10DownloadHandler'.
DOWNLOADER_CLIENTCONTEXTFACTORY
Default: 'scrapy.core.downloader.contextfactory.ScrapyClientContextFactory'
表示要使用的ContextFactory的类路径。
这里,“ContextFactory”是SSL/TLS上下文的一个Twisted术语,它定义了要使用的TLS/SSL协议版本、是否进行证书验证,甚至启用客户端身份验证(以及其他各种功能)。
Note
Scrapy默认上下文工厂不执行远程服务器证书验证。 这通常很适合于爬网。
如果您确实需要启用远程服务器证书验证,则Scrapy还有另一个上下文工厂类,您可以将其设置为'scrapy.core.downloader.contextfactory.BrowserLikeContextFactory',该类使用平台的证书来验证远程终端点。
仅当您使用Twisted>=14.0时,此选项才可用。
如果确实使用自定义ContextFactory,请确保其__init__方法接受method参数(这是OpenSSL.SSL 方法映射 DOWNLOADER_CLIENT_TLS_METHOD)。
DOWNLOADER_CLIENT_TLS_METHOD
Default: 'TLS'
使用此设置可自定义默认HTTP/1.1下载器使用的TLS/SSL方法。
此设置必须是以下字符串值之一:
'TLS': 映射到OpenSSL的TLS_method()(也称为SSLv23_method()),它允许协议协商,从平台支持的最高值开始;默认值,推荐'TLSv1.0': 此值强制HTTPS连接使用TLS版本1.0; 如果希望Scrapy的行为<1.1,请设置此值'TLSv1.1': forces TLS version 1.1'TLSv1.2': forces TLS version 1.2'SSLv3': forces SSL version 3 (不推荐)
Note
我们建议您使用PyOpenSSL>=0.13 和 Twisted>=0.13 或更高版本(如果可以,Twisted>=14.0).
DOWNLOADER_MIDDLEWARES_BASE
默认:
{
    'scrapy.downloadermiddlewares.robotstxt.RobotsTxtMiddleware': 100,
    'scrapy.downloadermiddlewares.httpauth.HttpAuthMiddleware': 300,
    'scrapy.downloadermiddlewares.downloadtimeout.DownloadTimeoutMiddleware': 350,
    'scrapy.downloadermiddlewares.defaultheaders.DefaultHeadersMiddleware': 400,
    'scrapy.downloadermiddlewares.useragent.UserAgentMiddleware': 500,
    'scrapy.downloadermiddlewares.retry.RetryMiddleware': 550,
    'scrapy.downloadermiddlewares.ajaxcrawl.AjaxCrawlMiddleware': 560,
    'scrapy.downloadermiddlewares.redirect.MetaRefreshMiddleware': 580,
    'scrapy.downloadermiddlewares.httpcompression.HttpCompressionMiddleware': 590,
    'scrapy.downloadermiddlewares.redirect.RedirectMiddleware': 600,
    'scrapy.downloadermiddlewares.cookies.CookiesMiddleware': 700,
    'scrapy.downloadermiddlewares.httpproxy.HttpProxyMiddleware': 750,
    'scrapy.downloadermiddlewares.stats.DownloaderStats': 850,
    'scrapy.downloadermiddlewares.httpcache.HttpCacheMiddleware': 900,
}
包含Scrapy中默认启用的下载器中间件的字典。 低顺序靠近引擎,高顺序靠近下载器。 您不应该在您的项目中修改此设置,而是修改DOWNLOADER_MIDDLEWARES。 有关更多信息,请参阅激活下载中间件。
DOWNLOAD_DELAY
默认值:0
下载器在从同一网站下载连续页面之前应等待的时间(以秒为单位)。 这可以用来限制爬取速度,避免对服务器造成太大的负担。 支持十进制小数。 例:
DOWNLOAD_DELAY = 0.25 # 250 ms of delay
此设置还受到RANDOMIZE_DOWNLOAD_DELAY设置(默认情况下启用)的影响。 默认情况下,Scrapy不会在两次请求之间等待一段固定的时间,而是使用0.5 * DOWNLOAD_DELAY和1.5 * DOWNLOAD_DELAY之间的随机时间间隔。
当CONCURRENT_REQUESTS_PER_IP非零时,延迟按每个IP地址而不是每个域强制执行。
您还可以通过设置spider属性download_delay 来更改每个Spider的此项设置。
DOWNLOAD_HANDLERS_BASE
默认:
{
    'file': 'scrapy.core.downloader.handlers.file.FileDownloadHandler',
    'http': 'scrapy.core.downloader.handlers.http.HTTPDownloadHandler',
    'https': 'scrapy.core.downloader.handlers.http.HTTPDownloadHandler',
    's3': 'scrapy.core.downloader.handlers.s3.S3DownloadHandler',
    'ftp': 'scrapy.core.downloader.handlers.ftp.FTPDownloadHandler',
}
包含Scrapy中默认启用的请求下载处理程序的字典。
您不应该在您的项目中修改此设置,而是修改DOWNLOAD_HANDLERS。
您可以通过在DOWNLOAD_HANDLERS中将None分配给其URI方案来禁用任何这些下载处理程序。 例如,要禁用内置的FTP处理程序(无需替换),请将它放在settings.py中:
DOWNLOAD_HANDLERS = {
    'ftp': None,
}
DOWNLOAD_TIMEOUT
Default: 180
下载器在超时之前等待的时间(以秒为单位)。
Note
此超时可以使用spider属性download_timeout为每个spider设置,也可以使用Request.meta 键的download_timeout为每个请求设置。
DOWNLOAD_MAXSIZE
Default: 1073741824 (1024MB)
下载器将下载的最大响应大小(以字节为单位)。
如果要禁用它,请将其设置为0。
Note
此大小可以使用spider属性download_maxsize 为每个spider设置,也可以使用Request.meta键的download_maxsize 为每个请求设置。
此功能需要Twisted >= 11.1.
DOWNLOAD_WARNSIZE
Default: 33554432 (32MB)
下载器将开始警告的响应大小(以字节为单位)。
如果要禁用它,请将其设置为0。
Note
This size can be set per spider using download_warnsize
spider attribute and per-request using download_warnsize
Request.meta key.
This feature needs Twisted >= 11.1.
DOWNLOAD_FAIL_ON_DATALOSS
Default: True
对于中断的响应是否失败,即声明的内容长度( Content-Length)与服务器发送的内容不匹配,或者分块响应未正确完成。 如果为True, 这些响应将引发ResponseFailed([_DataLoss]) 错误。 如果为False, 则传递这些响应并将 dataloss 标记添加到响应中,即: 'dataloss' 中的 response.flags为True.
可选地,这可以通过使用Request.meta键的download_fail_on_dataloss将每个请求设置为False。
Note
响应中断或数据丢失错误,从服务器错误配置到网络错误再到数据损坏,在多种情况下都可能发生。 考虑到断开的响应可能包含部分或不完整的内容,应由用户决定处理断开的响应是否有意义。
如果RETRY_ENABLED为True,并且此设置也设置为True,则ResponseFailed([_DataLoss]) 会像往常一样重试。
DUPEFILTER_CLASS
Default: 'scrapy.dupefilters.RFPDupeFilter'
用于检测和筛选重复请求的类。
默认(RFPDupeFilter) 使用scrapy.utils.request.request_fingerprint函数根据请求指纹进行筛选。 要想改变检查重复项的方式,可以将RFPDupeFilter子类化,并重写其request_fingerprint方法。 此方法应接受scrapy的Request对象并返回其指纹(一个字符串)。
通过设置DUPEFILTER_CLASS为'scrapy.dupefilters.BaseDupeFilter',可以禁用重复请求的筛选。
不过,要非常小心,因为你可能会陷入爬网死循环。
对于不应该过滤的特定Request对象,通常最好将dont_filter参数设置为True。
DUPEFILTER_DEBUG
Default: False
默认情况下,RFPDupeFilter 只记录第一个重复的请求。
设置DUPEFILTER_DEBUG为True将使它记录所有重复的请求。
EDITOR
Default: vi (on Unix systems) or the IDLE editor (on Windows)
用于使用edit命令来编辑爬虫的编辑器。
此外,如果设置了EDITOR 环境变量,则edit命令将首选它而不是默认设置。
EXTENSIONS_BASE
默认:
{
    'scrapy.extensions.corestats.CoreStats': 0,
    'scrapy.extensions.telnet.TelnetConsole': 0,
    'scrapy.extensions.memusage.MemoryUsage': 0,
    'scrapy.extensions.memdebug.MemoryDebugger': 0,
    'scrapy.extensions.closespider.CloseSpider': 0,
    'scrapy.extensions.feedexport.FeedExporter': 0,
    'scrapy.extensions.logstats.LogStats': 0,
    'scrapy.extensions.spiderstate.SpiderState': 0,
    'scrapy.extensions.throttle.AutoThrottle': 0,
}
包含Scrapy中默认可用扩展名及其顺序的字典。 该设置包含所有稳定(版)的内置扩展。 请注意,其中一些需要通过设置启用。
FEED_TEMPDIR
Feed Temp目录允许您设置一个自定义文件夹,以便在使用FTP feed storage和Amazon S3上传之前保存爬虫临时文件。
FTP_PASSWORD
Default: "guest"
Request元中没有"ftp_password" 时用于FTP连接的密码。
Note
套用RFC 1635的话来说,尽管匿名FTP通常使用密码“guest”或某人的电子邮件地址,但一些FTP服务器明确要求用户的电子邮件地址,并且不允许使用“guest”密码登录。
ITEM_PIPELINES
默认值:{}
包含要使用的Item管道及其顺序的字典。 顺序值是任意的,但习惯上将它们定义在0-1000范围内。 低顺序在高顺序之前处理。
例:
ITEM_PIPELINES = {
    'mybot.pipelines.validate.ValidateMyItem': 300,
    'mybot.pipelines.validate.StoreMyItem': 800,
}
LOG_FORMAT
Default: '%(asctime)s [%(name)s] %(levelname)s: %(message)s'
用于格式化日志消息的字符串。 有关可用占位符的完整列表,请参阅 Python logging documentation
LOG_DATEFORMAT
Default: '%Y-%m-%d %H:%M:%S'
格式化日期/时间的字符串,以LOG_FORMAT扩展%(asctime)s 的占位符。 有关可用占位符的完整列表,请参阅 Python datetime documentation。
LOG_LEVEL
Default: 'DEBUG'
要记录日志的最低级别。 可用级别有:CRITICAL, ERROR, WARNING, INFO, DEBUG。 有关详细信息,请参阅Logging.
MEMDEBUG_NOTIFY
Default: []
启用内存调试时,如果此设置不为空,则会将内存报告发送到指定的地址,否则会将该报告写入日志。
Example:
MEMDEBUG_NOTIFY = ['user@example.com']
MEMUSAGE_ENABLED
Default: True
Scope: scrapy.extensions.memusage
是否启用内存使用扩展。 这个扩展跟踪进程使用的峰值内存(它将其写入stats)。 它还可以选择在超过内存限制时关闭Scrapy进程(请参阅MEMUSAGE_LIMIT_MB),并在发生此情况时通过电子邮件通知(请参阅 MEMUSAGE_NOTIFY_MAIL)。
MEMUSAGE_LIMIT_MB
Default: 0
Scope: scrapy.extensions.memusage
关闭Scrapy之前允许的最大内存量(以MB为单位)(如果MEMUSAGE_ENABLED为True)。 如果此设置为零,则不执行检查。
MEMUSAGE_CHECK_INTERVAL_SECONDS
New in version 1.1.
Default: 60.0
Scope: scrapy.extensions.memusage
Memory usage extension 以固定的时间间隔检查当前内存使用情况,与MEMUSAGE_LIMIT_MB 和MEMUSAGE_WARNING_MB 设置的限制进行比较。
这将设置这些间隔的长度,以秒为单位。
MEMUSAGE_NOTIFY_MAIL
Default: False
Scope: scrapy.extensions.memusage
要通知是否已达到内存限制的电子邮件列表。
Example:
MEMUSAGE_NOTIFY_MAIL = ['user@example.com']
MEMUSAGE_WARNING_MB
Default: 0
Scope: scrapy.extensions.memusage
在发送警告电子邮件通知之前允许的最大内存量(以MB为单位)。 如果为零,则不会产生警告。
NEWSPIDER_MODULE
Default: ''
使用genspider命令创建新爬虫的模块。
Example:
NEWSPIDER_MODULE = 'mybot.spiders_dev'
RANDOMIZE_DOWNLOAD_DELAY
Default: True
如果启用,Scrapy将在从同一网站获取请求时随机等待一段时间(介于0.5 * DOWNLOAD_DELAY和1.5 * DOWNLOAD_DELAY之间)。
这种随机化减少了爬虫程序被分析请求的站点检测到(并随后被阻止)的机会,这些站点在请求之间寻找统计上显著的相似性。
随机化策略与wget --random-wait 选项使用的策略相同。
如果DOWNLOAD_DELAY(默认),则此选项无效。
REACTOR_THREADPOOL_MAXSIZE
Default: 10
Twisted Reactor线程池大小的最大限制。 这是各种Scrapy组件使用的通用多用途线程池。 线程DNS解析器,BlockingFeedStorage,S3FilesStore,等等。 如果遇到阻塞IO不足的问题,请增加此值。
REDIRECT_PRIORITY_ADJUST
Default: +2
Scope: scrapy.downloadermiddlewares.redirect.RedirectMiddleware
调整相对于原始请求的重定向请求优先级:
- 正优先级调整(默认)意味着更高的优先级。
- 负优先级调整意味着低优先级。
RETRY_PRIORITY_ADJUST
Default: -1
Scope: scrapy.downloadermiddlewares.retry.RetryMiddleware
调整相对于原始请求的重试请求优先级:
- a positive priority adjust means higher priority.
- a negative priority adjust (default) means lower priority.
ROBOTSTXT_OBEY
Default: False
Scope: scrapy.downloadermiddlewares.robotstxt
如果启用,Scrapy将遵守robots.txt策略。 有关详细信息,请参阅 RobotsTxtMiddleware.
Note
由于历史原因,默认值为False,但此选项在由scrapy startproject命令生成的settings.py文件中默认启用。
SCHEDULER_DEBUG
Default: False
设置为True将记录有关请求计划程序的调试信息。
如果无法将请求序列化到磁盘,则此操作当前只记录一次。
统计计数器(Stats counter)(scheduler/unserializable)跟踪发生这种情况的次数。
日志中的示例条目:
1956-01-31 00:00:00+0800 [scrapy.core.scheduler] ERROR: Unable to serialize request:
<GET http://example.com> - reason: cannot serialize <Request at 0x9a7c7ec>
(type Request)> - no more unserializable requests will be logged
(see 'scheduler/unserializable' stats counter)
SCHEDULER_DISK_QUEUE
Default: 'scrapy.squeues.PickleLifoDiskQueue'
调度程序将使用的磁盘队列的类型。 其他可用类型是scrapy.squeues.PickleFifoDiskQueue, scrapy.squeues.MarshalFifoDiskQueue, scrapy.squeues.MarshalLifoDiskQueue.
SCHEDULER_MEMORY_QUEUE
Default: 'scrapy.squeues.LifoMemoryQueue'
调度程序使用的内存中队列的类型。 其他可用类型是:scrapy.squeues.FifoMemoryQueue.
SPIDER_CONTRACTS_BASE
Default:
{
    'scrapy.contracts.default.UrlContract' : 1,
    'scrapy.contracts.default.ReturnsContract': 2,
    'scrapy.contracts.default.ScrapesContract': 3,
}
包含在Scrapy中默认启用的Scrapy协定的dict。 您不应该在项目中修改此设置,而应修改 SPIDER_CONTRACTS。 有关详细信息,请参阅Spiders Contracts.
You can disable any of these contracts by assigning None to their class
path in SPIDER_CONTRACTS. E.g., to disable the built-in
ScrapesContract, place this in your settings.py:
SPIDER_CONTRACTS = {
    'scrapy.contracts.default.ScrapesContract': None,
}
SPIDER_LOADER_WARN_ONLY
New in version 1.3.3.
Default: False
默认情况下,当Scrapy尝试从SPIDER_MODULES中导入spider类时,如果出现任何ImportError异常,它将大大地失败。
但是,您可以选择通过设置SPIDER_LOADER_WARN_ONLY = True来消除此异常,并将其转换为一个简单的警告。
Note
有些 scrapy命令 运行时已经将此设置为True(即,它们只发出警告并不会失败),因为它们实际上不需要加载spider类就可以工作: scrapy runspider, scrapy settings, scrapy startproject, scrapy version。
SPIDER_MIDDLEWARES_BASE
默认:
{
    'scrapy.spidermiddlewares.httperror.HttpErrorMiddleware': 50,
    'scrapy.spidermiddlewares.offsite.OffsiteMiddleware': 500,
    'scrapy.spidermiddlewares.referer.RefererMiddleware': 700,
    'scrapy.spidermiddlewares.urllength.UrlLengthMiddleware': 800,
    'scrapy.spidermiddlewares.depth.DepthMiddleware': 900,
}
包含Scrapy中默认启用的Spider中间件及其顺序的字典。 低顺序靠近引擎,高顺序靠近蜘蛛。 有关更多信息,请参阅激活Spider中间件。
SPIDER_MODULES
默认:[]
Scrapy寻找Spider的模块列表。
Example:
SPIDER_MODULES = ['mybot.spiders_prod', 'mybot.spiders_dev']
STATS_CLASS
Default: 'scrapy.statscollectors.MemoryStatsCollector'
用于收集统计信息的类,该类必须实现Stats Collector API。
TELNETCONSOLE_PORT
Default: [6023, 6073]
用于telnet控制台的端口范围。 如果设置为 None或0,则使用动态分配的端口。 有关详细信息,请参阅Telnet Console.
TEMPLATES_DIR
Default: templates dir inside scrapy module
使用命令startproject(创建新项目)和使用命令genspider(创建新爬虫)时查找模板的目录。
项目名称不得与project子目录中自定义文件或目录的名称冲突。
URLLENGTH_LIMIT
Default: 2083
Scope: spidermiddlewares.urllength
允许爬取URL的最大URL长度。 有关此设置的默认值的详细信息,请参见:https://boutell.com/newfaq/misc/urllength.html。
其他地方记录的设置:
以下是其他地方记录的设置,请检查每个特定情况以了解如何启用和使用它们。
- AJAXCRAWL_ENABLED
- AUTOTHROTTLE_DEBUG
- AUTOTHROTTLE_ENABLED
- AUTOTHROTTLE_MAX_DELAY
- AUTOTHROTTLE_START_DELAY
- AUTOTHROTTLE_TARGET_CONCURRENCY
- AWS_ACCESS_KEY_ID
- AWS_SECRET_ACCESS_KEY
- BOT_NAME
- CLOSESPIDER_ERRORCOUNT
- CLOSESPIDER_ITEMCOUNT
- CLOSESPIDER_PAGECOUNT
- CLOSESPIDER_TIMEOUT
- COMMANDS_MODULE
- COMPRESSION_ENABLED
- CONCURRENT_ITEMS
- CONCURRENT_REQUESTS
- CONCURRENT_REQUESTS_PER_DOMAIN
- CONCURRENT_REQUESTS_PER_IP
- COOKIES_DEBUG
- COOKIES_ENABLED
- DEFAULT_ITEM_CLASS
- DEFAULT_REQUEST_HEADERS
- DEPTH_LIMIT
- DEPTH_PRIORITY
- DEPTH_STATS
- DEPTH_STATS_VERBOSE
- DNSCACHE_ENABLED
- DNSCACHE_SIZE
- DNS_TIMEOUT
- DOWNLOADER
- DOWNLOADER_CLIENTCONTEXTFACTORY
- DOWNLOADER_CLIENT_TLS_METHOD
- DOWNLOADER_HTTPCLIENTFACTORY
- DOWNLOADER_MIDDLEWARES
- DOWNLOADER_MIDDLEWARES_BASE
- DOWNLOADER_STATS
- DOWNLOAD_DELAY
- DOWNLOAD_FAIL_ON_DATALOSS
- DOWNLOAD_HANDLERS
- DOWNLOAD_HANDLERS_BASE
- DOWNLOAD_MAXSIZE
- DOWNLOAD_TIMEOUT
- DOWNLOAD_WARNSIZE
- DUPEFILTER_CLASS
- DUPEFILTER_DEBUG
- EDITOR
- EXTENSIONS
- EXTENSIONS_BASE
- FEED_EXPORTERS
- FEED_EXPORTERS_BASE
- FEED_EXPORT_ENCODING
- FEED_EXPORT_FIELDS
- FEED_EXPORT_INDENT
- FEED_FORMAT
- FEED_STORAGES
- FEED_STORAGES_BASE
- FEED_STORE_EMPTY
- FEED_TEMPDIR
- FEED_URI
- FILES_EXPIRES
- FILES_RESULT_FIELD
- FILES_STORE
- FILES_STORE_S3_ACL
- FILES_URLS_FIELD
- FTP_PASSIVE_MODE
- FTP_PASSWORD
- FTP_USER
- GCS_PROJECT_ID
- HTTPCACHE_ALWAYS_STORE
- HTTPCACHE_DBM_MODULE
- HTTPCACHE_DIR
- HTTPCACHE_ENABLED
- HTTPCACHE_EXPIRATION_SECS
- HTTPCACHE_GZIP
- HTTPCACHE_IGNORE_HTTP_CODES
- HTTPCACHE_IGNORE_MISSING
- HTTPCACHE_IGNORE_RESPONSE_CACHE_CONTROLS
- HTTPCACHE_IGNORE_SCHEMES
- HTTPCACHE_POLICY
- HTTPCACHE_STORAGE
- HTTPERROR_ALLOWED_CODES
- HTTPERROR_ALLOW_ALL
- HTTPPROXY_AUTH_ENCODING
- HTTPPROXY_ENABLED
- IMAGES_EXPIRES
- IMAGES_MIN_HEIGHT
- IMAGES_MIN_WIDTH
- IMAGES_RESULT_FIELD
- IMAGES_STORE
- IMAGES_STORE_S3_ACL
- IMAGES_THUMBS
- IMAGES_URLS_FIELD
- ITEM_PIPELINES
- ITEM_PIPELINES_BASE
- LOG_DATEFORMAT
- LOG_ENABLED
- LOG_ENCODING
- LOG_FILE
- LOG_FORMAT
- LOG_LEVEL
- LOG_SHORT_NAMES
- LOG_STDOUT
- MAIL_FROM
- MAIL_HOST
- MAIL_PASS
- MAIL_PORT
- MAIL_SSL
- MAIL_TLS
- MAIL_USER
- MEDIA_ALLOW_REDIRECTS
- MEMDEBUG_ENABLED
- MEMDEBUG_NOTIFY
- MEMUSAGE_CHECK_INTERVAL_SECONDS
- MEMUSAGE_ENABLED
- MEMUSAGE_LIMIT_MB
- MEMUSAGE_NOTIFY_MAIL
- MEMUSAGE_WARNING_MB
- METAREFRESH_ENABLED
- METAREFRESH_MAXDELAY
- NEWSPIDER_MODULE
- RANDOMIZE_DOWNLOAD_DELAY
- REACTOR_THREADPOOL_MAXSIZE
- REDIRECT_ENABLED
- REDIRECT_MAX_TIMES
- REDIRECT_MAX_TIMES
- REDIRECT_PRIORITY_ADJUST
- REFERER_ENABLED
- REFERRER_POLICY
- RETRY_ENABLED
- RETRY_HTTP_CODES
- RETRY_PRIORITY_ADJUST
- RETRY_TIMES
- ROBOTSTXT_OBEY
- SCHEDULER
- SCHEDULER_DEBUG
- SCHEDULER_DISK_QUEUE
- SCHEDULER_MEMORY_QUEUE
- SCHEDULER_PRIORITY_QUEUE
- SPIDER_CONTRACTS
- SPIDER_CONTRACTS_BASE
- SPIDER_LOADER_CLASS
- SPIDER_LOADER_WARN_ONLY
- SPIDER_MIDDLEWARES
- SPIDER_MIDDLEWARES_BASE
- SPIDER_MODULES
- STATSMAILER_RCPTS
- STATS_CLASS
- STATS_DUMP
- TELNETCONSOLE_ENABLED
- TELNETCONSOLE_HOST
- TELNETCONSOLE_PORT
- TELNETCONSOLE_PORT
- TEMPLATES_DIR
- URLLENGTH_LIMIT
- USER_AGENT
异常处理
内置异常处理参考
以下列出了Scrapy中包含的所有异常及其使用情况。
CloseSpider
-
exception
scrapy.exceptions.CloseSpider(reason='cancelled')¶ 这个异常可以从Spider回调中抛出以请求关闭/停止Spider。 支持的参数:
参数: reason (str) – 关闭原因
例如:
def parse_page(self, response):
    if 'Bandwidth exceeded' in response.body:
        raise CloseSpider('bandwidth_exceeded')
DontCloseSpider
-
exception
scrapy.exceptions.DontCloseSpider
这个异常可以在spider_idle信号处理程序中引发,以防止Spider被关闭。
- 命令行工具
- 了解用于管理Scrapy项目的命令行工具。
- Spiders
- 编写规则来抓取您的网站。
- Selectors
- 使用XPath从网页中提取数据。
- Scrapy shell
- 在交互式环境中测试您的提取代码。
- Items
- 定义你想要抓取的数据。
- Item Loaders
- 用提取的数据填充Item。
- Item Pipeline
- 后续处理并存储您的抓取数据。
- Feed exports
- 使用不同的格式和存储输出你的数据。
- Requests and Responses
- 了解用于表示HTTP请求和响应的类。
- Link Extractors
- 用来从页面提取要follow的链接的便捷类。
- Settings
- 了解如何配置Scrapy并查看所有可用设置。
- Exceptions
- 查看所有可用的异常及其含义。
Built-in services
Logging
注意
scrapy.log已被弃用,它支持显式调用Python标准日志记录。 继续阅读以了解更多关于新日志记录系统的信息。
Scrapy使用Python内置日志记录系统进行事件日志记录。 我们将提供一些简单的示例来帮助您开始,但对于更高级的用例,强烈建议您仔细阅读其文档。
日志功能可以直接使用,并且可以使用日志记录设置中列出的Scrapy设置进行一定程度的配置。
在运行命令时,Scrapy调用scrapy.utils.log.configure_logging()设置一些合理的默认值并处理日志记录设置中的设置,如果您从脚本运行Scrapy,建议您按照从脚本运行Scrapy中所述手动调用它。
日志级别
Python的内置日志定义了5个日志等级来表示日志信息的严重程度 ,以下按严重程度列出了这5个等级:
logging.CRITICAL- 严重错误 (最高严重程度)logging.ERROR- 普通错误logging.WARNING- 警告信息logging.INFO- 普通信息logging.DEBUG- 调试信息 (最低严重程度)
如何记录日志
以下是记录日志的一个简单例子,使用了logging.WARNING 等级:
import logging
logging.warning("This is a warning")
在任何标准的5个级别上都有发出日志消息的快捷方式,还有一个通用的logging.log 方法,它以给定的级别作为参数。 如果需要,上一个示例可以重写为:
import logging
logging.log(logging.WARNING, "This is a warning")
除此之外,您还可以创建不同的“记录器”来封装消息。 (例如,一种常见的做法是为每个模块创建不同的记录器)。 这些记录器可以独立配置,并且允许层次结构。
前面的示例在后台使用根记录器,这是一个顶级记录器,所有消息都将传播到该记录器(除非另有指定)。 使用logging 助手只是显式获取根日志记录器的快捷方式,因此这也相当于最后一个片段:
import logging
logger = logging.getLogger()
logger.warning("This is a warning")
You can use a different logger just by getting its name with the
logging.getLogger function:
import logging
logger = logging.getLogger('mycustomlogger')
logger.warning("This is a warning")
最后,您可以使用当前模块路径填充的__name__ 变量,确保为正在处理的任何模块提供自定义记录器:
import logging
logger = logging.getLogger(__name__)
logger.warning("This is a warning")
Logging from Spiders
Scrapy在每个Spider实例中提供了一个logger,可以这样访问和使用:
import scrapy

class MySpider(scrapy.Spider):

    name = 'myspider'
    start_urls = ['https://scrapinghub.com']

    def parse(self, response):
        self.logger.info('Parse function called on %s', response.url)
该记录器是使用Spider的name创建的,但是您可以使用任何想要的自定义Python记录器。 For example:
import logging
import scrapy

logger = logging.getLogger('mycustomlogger')

class MySpider(scrapy.Spider):

    name = 'myspider'
    start_urls = ['https://scrapinghub.com']

    def parse(self, response):
        logger.info('Parse function called on %s', response.url)
Logging configuration
记录器自己无法管理通过它们发送的消息的显示方式。 对于此任务,可以将不同的“处理程序”附加到任何记录器实例,它们会将这些消息重定向到适当的目标,例如标准输出、文件、电子邮件等。
默认情况下,Scrapy根据以下设置,设置并配置根记录器的处理程序。
Logging settings
这些设置可用于配置日志记录:
前两个设置定义日志消息的目标。 如果设置了LOG_FILE,则通过根日志记录器发送的消息将重定向到名为LOG_FILE、使用编码LOG_ENCODING的文件。 如果没有设置并且LOG_ENABLED为True,则在标准错误(standard error)上显示日志消息。 最后,如果LOG_ENABLED为False,则不会有任何可见的日志输出。
LOG_LEVEL确定要显示的最低严重性级别,严重性较低的消息将被过滤掉。 它涵盖了Log levels中列出的可能级别。
LOG_FORMAT和LOG_DATEFORMAT指定用作所有消息布局的格式字符串。 这些字符串可以包含由logging’s logrecord attributes docs和datetime’s strftime and strptime directives 列出的任何占位符。
如果设置了LOG_SHORT_NAMES,打印日志时将不会显示日志的Scrapy组件。 默认情况下是未设置的,因此日志包含负责该日志输出的Scrapy组件。
Command-line options
有一些命令行参数可用于所有命令,您可以使用这些参数来覆盖Scrapy中有关于日志记录的设置。
--logfile FILE- Overrides
LOG_FILE
--loglevel/-L LEVEL- Overrides
LOG_LEVEL
--nolog- Sets
LOG_ENABLEDtoFalse
See also
- Module logging.handlers
- 可用处理程序的进一步文档
高级定制
因为Scrapy使用stdlib日志模块,您可以使用所有的stdlib日志功能来自定义日志。
例如,假设您正在抓取一个返回许多HTTP 404和500响应的网站,并且您希望隐藏以下所有消息:
2016-12-16 22:00:06 [scrapy.spidermiddlewares.httperror] INFO: Ignoring
response <500 http://quotes.toscrape.com/page/1-34/>: HTTP status code
is not handled or not allowed
首先要注意的是一个logger名称 - 它在方括号中:[scrapy.spidermiddlewares.httperror]. 如果您只得到[scrapy],那么LOG_SHORT_NAMES很可能被设置为True;将它设置为False并重新运行爬取。
接下来,我们可以看到消息具有INFO级别。 要隐藏它,我们应该将scrapy.spidermiddlewares.httperror的日志级别设置为高于INFO;INFO之后的下一个级别是WARNING。 可以用spider的__init__方法来实现:
import logging
import scrapy


class MySpider(scrapy.Spider):
    # ...
    def __init__(self, *args, **kwargs):
        logger = logging.getLogger('scrapy.spidermiddlewares.httperror')
        logger.setLevel(logging.WARNING)
        super().__init__(*args, **kwargs)
如果再次运行此爬虫,则来自scrapy.spidermiddlewares.httperror logger 的INFO消息将消失。
scrapy.utils.log module
-
scrapy.utils.log.configure_logging(settings=None, install_root_handler=True)¶ Initialize logging defaults for Scrapy.
Parameters: - settings (dict,
Settingsobject orNone) – 用于为根记录器创建和配置处理程序的设置(默认值:None)。 - install_root_handler (bool) – 是否安装根日志处理程序(默认值:True)
此函数执行:
- 通过Python标准日志记录路由警告和twisted日志记录。
- 分别为Scrapy和Twisted记录器分配DEBUG和ERROR级别。
- 如果LOG_STDOUT设置为True,则将stdout路由到log。
当
install_root_handler为True(默认值)时,此函数还会根据给定的设置(请参阅 Logging settings)。 您可以使用settings参数覆盖默认选项。 当settings为空或None时,使用默认值。使用Scrapy命令时会自动调用
configure_logging,但在运行自定义脚本时需要显式调用。 在这种情况下,不要求使用它但建议使用。如果仍建议您自己配置处理程序,请调用此函数,并传递install_root_handler=False。 请记住,在这种情况下,默认设置不会有任何日志输出。
如果您要手动配置日志记录的输出,可以使用logging.basicConfig()设置基本的根处理程序。 这是一个关于如何将
INFO或更高级别的消息重定向到文件的示例:import logging from scrapy.utils.log import configure_logging configure_logging(install_root_handler=False) logging.basicConfig( filename='log.txt', format='%(levelname)s: %(message)s', level=logging.INFO )
Refer to Run Scrapy from a script for more details about using Scrapy this way.
- settings (dict,
统计收集
Scrapy提供了一个方便的功能,以键/值的形式收集统计数据,其中值通常是计数器。 该工具称为统计收集器,可以通过Crawler API的stats属性进行访问,见使用Common Stats Collector部分。
不论如何,统计收集器始终可用,因此无论是否启用统计信息收集,您都可以将其导入模块并使用其API(用于增加或设置新的统计信息键)。 如果它被禁用,API仍然可以工作,但它不会收集任何东西。 这是为了简化统计收集器的使用:你可以花费不超过一行代码来在你的Spider中收集统计值,Scrapy扩展,或者你使用统计收集器的任何代码。
Stats Collector的另一个特点是它非常高效(启用时),并且在禁用时非常高效(几乎不明显)。
统计收集器为每个打开的Spider存放一个统计表,当Spider打开时它会自动打开,当Spider关闭时会自动关闭。
Common Stats Collector的使用
通过stats属性访问统计收集器。 以下是访问统计信息的扩展示例:
class ExtensionThatAccessStats(object):

    def __init__(self, stats):
        self.stats = stats

    @classmethod
    def from_crawler(cls, crawler):
        return cls(crawler.stats)
设置统计值:
stats.set_value('hostname', socket.gethostname())
增加属性值:
stats.inc_value('custom_count')
仅在大于之前时才设置统计值:
stats.max_value('max_items_scraped', value)
仅在低于之前时设置统计值:
stats.min_value('min_free_memory_percent', value)
获取统计值:
>>> stats.get_value('custom_count')
1
获取所有统计信息:
>>> stats.get_stats()
{'custom_count': 1, 'start_time': datetime.datetime(2009, 7, 14, 21, 47, 28, 977139)}
可用统计收集器
除了基本StatsCollector之外,Scrapy还有其他Stats收集器,它们扩展了基本Stats收集器。 您可以通过STATS_CLASS 设置选择要使用的Stats收集器。 默认使用的Stats收集器是MemoryStatsCollector。
MemoryStatsCollector
-
class
scrapy.statscollectors.MemoryStatsCollector¶ 一个简单的统计数据收集器,它在关闭后将最后一次抓取运行(对于每个爬虫)的统计数据保存在内存中。 可以通过
spider_stats属性访问这些统计信息,该属性是由爬虫域名作为键的dict。这是Scrapy中使用的默认Stats收集器。
-
spider_stats¶ 包含每个爬虫最后一次抓取运行的统计信息的dict(由爬虫名作键)。
-
DummyStatsCollector
-
class
scrapy.statscollectors.DummyStatsCollector¶ 一个什么都不做但非常有效的统计收集器(因为它什么都不做--请查看源码)。 This stats collector can be set via the
STATS_CLASSsetting, to disable stats collect in order to improve performance. However, the performance penalty of stats collection is usually marginal compared to other Scrapy workload like parsing pages.
Sending e-mail
Although Python makes sending e-mails relatively easy via the smtplib library, Scrapy provides its own facility for sending e-mails which is very easy to use and it’s implemented using Twisted non-blocking IO, to avoid interfering with the non-blocking IO of the crawler. It also provides a simple API for sending attachments and it’s very easy to configure, with a few settings.
Quick example
There are two ways to instantiate the mail sender. You can instantiate it using the standard constructor:
from scrapy.mail import MailSender
mailer = MailSender()
Or you can instantiate it passing a Scrapy settings object, which will respect the settings:
mailer = MailSender.from_settings(settings)
And here is how to use it to send an e-mail (without attachments):
mailer.send(to=["someone@example.com"], subject="Some subject", body="Some body", cc=["another@example.com"])
MailSender class reference
MailSender is the preferred class to use for sending emails from Scrapy, as it uses Twisted non-blocking IO, like the rest of the framework.
-
class
scrapy.mail.MailSender(smtphost=None, mailfrom=None, smtpuser=None, smtppass=None, smtpport=None)¶ Parameters: - smtphost (str or bytes) – the SMTP host to use for sending the emails. If omitted, the
MAIL_HOSTsetting will be used. - mailfrom (str) – the address used to send emails (in the
From:header). If omitted, theMAIL_FROMsetting will be used. - smtpuser – the SMTP user. If omitted, the
MAIL_USERsetting will be used. If not given, no SMTP authentication will be performed. - smtppass (str or bytes) – the SMTP pass for authentication.
- smtpport (int) – the SMTP port to connect to
- smtptls (boolean) – enforce using SMTP STARTTLS
- smtpssl (boolean) – enforce using a secure SSL connection
-
classmethod
from_settings(settings)¶ Instantiate using a Scrapy settings object, which will respect these Scrapy settings.
Parameters: settings ( scrapy.settings.Settingsobject) – the e-mail recipients
-
send(to, subject, body, cc=None, attachs=(), mimetype='text/plain', charset=None)¶ Send email to the given recipients.
Parameters: - to (str or list of str) – the e-mail recipients
- subject (str) – the subject of the e-mail
- cc (str or list of str) – the e-mails to CC
- body (str) – the e-mail body
- attachs (iterable) – an iterable of tuples
(attach_name, mimetype, file_object)whereattach_nameis a string with the name that will appear on the e-mail’s attachment,mimetypeis the mimetype of the attachment andfile_objectis a readable file object with the contents of the attachment - mimetype (str) – the MIME type of the e-mail
- charset (str) – the character encoding to use for the e-mail contents
- smtphost (str or bytes) – the SMTP host to use for sending the emails. If omitted, the
Mail settings
These settings define the default constructor values of the MailSender
class, and can be used to configure e-mail notifications in your project without
writing any code (for those extensions and code that uses MailSender).
MAIL_USER
Default: None
User to use for SMTP authentication. If disabled no SMTP authentication will be performed.
MAIL_TLS
Default: False
Enforce using STARTTLS. STARTTLS is a way to take an existing insecure connection, and upgrade it to a secure connection using SSL/TLS.
Telnet Console
Scrapy comes with a built-in telnet console for inspecting and controlling a Scrapy running process. The telnet console is just a regular python shell running inside the Scrapy process, so you can do literally anything from it.
The telnet console is a built-in Scrapy extension which comes enabled by default, but you can also disable it if you want. For more information about the extension itself see Telnet console extension.
How to access the telnet console
The telnet console listens in the TCP port defined in the
TELNETCONSOLE_PORT setting, which defaults to 6023. To access
the console you need to type:
telnet localhost 6023
>>>
You need the telnet program which comes installed by default in Windows, and most Linux distros.
Available variables in the telnet console
The telnet console is like a regular Python shell running inside the Scrapy process, so you can do anything from it including importing new modules, etc.
However, the telnet console comes with some default variables defined for convenience:
| Shortcut | Description |
|---|---|
crawler |
the Scrapy Crawler (scrapy.crawler.Crawler object) |
engine |
Crawler.engine attribute |
spider |
the active spider |
slot |
the engine slot |
extensions |
the Extension Manager (Crawler.extensions attribute) |
stats |
the Stats Collector (Crawler.stats attribute) |
settings |
the Scrapy settings object (Crawler.settings attribute) |
est |
print a report of the engine status |
prefs |
for memory debugging (see Debugging memory leaks) |
p |
a shortcut to the pprint.pprint function |
hpy |
for memory debugging (see Debugging memory leaks) |
Telnet console usage examples
Here are some example tasks you can do with the telnet console:
View engine status
You can use the est() method of the Scrapy engine to quickly show its state
using the telnet console:
telnet localhost 6023
>>> est()
Execution engine status

time()-engine.start_time                        : 8.62972998619
engine.has_capacity()                           : False
len(engine.downloader.active)                   : 16
engine.scraper.is_idle()                        : False
engine.spider.name                              : followall
engine.spider_is_idle(engine.spider)            : False
engine.slot.closing                             : False
len(engine.slot.inprogress)                     : 16
len(engine.slot.scheduler.dqs or [])            : 0
len(engine.slot.scheduler.mqs)                  : 92
len(engine.scraper.slot.queue)                  : 0
len(engine.scraper.slot.active)                 : 0
engine.scraper.slot.active_size                 : 0
engine.scraper.slot.itemproc_size               : 0
engine.scraper.slot.needs_backout()             : False
Pause, resume and stop the Scrapy engine
To pause:
telnet localhost 6023
>>> engine.pause()
>>>
To resume:
telnet localhost 6023
>>> engine.unpause()
>>>
To stop:
telnet localhost 6023
>>> engine.stop()
Connection closed by foreign host.
Telnet Console signals
-
scrapy.extensions.telnet.update_telnet_vars(telnet_vars)¶ Sent just before the telnet console is opened. You can hook up to this signal to add, remove or update the variables that will be available in the telnet local namespace. In order to do that, you need to update the
telnet_varsdict in your handler.Parameters: telnet_vars (dict) – the dict of telnet variables
- Logging
- Learn how to use Python’s builtin logging on Scrapy.
- Stats Collection
- Collect statistics about your scraping crawler.
- Sending e-mail
- Send email notifications when certain events occur.
- Telnet Console
- Inspect a running crawler using a built-in Python console.
- Web Service
- Monitor and control a crawler using a web service.
解决特定的问题
常见问题
How does Scrapy compare to BeautifulSoup or lxml?
BeautifulSoup and lxml are libraries for parsing HTML and XML. Scrapy is an application framework for writing web spiders that crawl web sites and extract data from them.
Scrapy provides a built-in mechanism for extracting data (called selectors) but you can easily use BeautifulSoup (or lxml) instead, if you feel more comfortable working with them. After all, they’re just parsing libraries which can be imported and used from any Python code.
In other words, comparing BeautifulSoup (or lxml) to Scrapy is like comparing jinja2 to Django.
Can I use Scrapy with BeautifulSoup?
Yes, you can.
As mentioned above, BeautifulSoup can be used
for parsing HTML responses in Scrapy callbacks.
You just have to feed the response’s body into a BeautifulSoup object
and extract whatever data you need from it.
Here’s an example spider using BeautifulSoup API, with lxml as the HTML parser:
from bs4 import BeautifulSoup
import scrapy


class ExampleSpider(scrapy.Spider):
    name = "example"
    allowed_domains = ["example.com"]
    start_urls = (
        'http://www.example.com/',
    )

    def parse(self, response):
        # use lxml to get decent HTML parsing speed
        soup = BeautifulSoup(response.text, 'lxml')
        yield {
            "url": response.url,
            "title": soup.h1.string
        }
Note
BeautifulSoup supports several HTML/XML parsers.
See BeautifulSoup’s official documentation on which ones are available.
What Python versions does Scrapy support?
Scrapy is supported under Python 2.7 and Python 3.4+ under CPython (default Python implementation) and PyPy (starting with PyPy 5.9). Python 2.6 support was dropped starting at Scrapy 0.20. Python 3 support was added in Scrapy 1.1. PyPy support was added in Scrapy 1.4, PyPy3 support was added in Scrapy 1.5.
Note
For Python 3 support on Windows, it is recommended to use Anaconda/Miniconda as outlined in the installation guide.
Did Scrapy “steal” X from Django?
Probably, but we don’t like that word. We think Django is a great open source project and an example to follow, so we’ve used it as an inspiration for Scrapy.
We believe that, if something is already done well, there’s no need to reinvent it. This concept, besides being one of the foundations for open source and free software, not only applies to software but also to documentation, procedures, policies, etc. So, instead of going through each problem ourselves, we choose to copy ideas from those projects that have already solved them properly, and focus on the real problems we need to solve.
We’d be proud if Scrapy serves as an inspiration for other projects. Feel free to steal from us!
Does Scrapy work with HTTP proxies?
Yes. Support for HTTP proxies is provided (since Scrapy 0.8) through the HTTP
Proxy downloader middleware. See
HttpProxyMiddleware.
How can I scrape an item with attributes in different pages?
Scrapy crashes with: ImportError: No module named win32api
You need to install pywin32 because of this Twisted bug.
How can I simulate a user login in my spider?
See Using FormRequest.from_response() to simulate a user login.
Does Scrapy crawl in breadth-first or depth-first order?
By default, Scrapy uses a LIFO queue for storing pending requests, which basically means that it crawls in DFO order. This order is more convenient in most cases. If you do want to crawl in true BFO order, you can do it by setting the following settings:
DEPTH_PRIORITY = 1
SCHEDULER_DISK_QUEUE = 'scrapy.squeues.PickleFifoDiskQueue'
SCHEDULER_MEMORY_QUEUE = 'scrapy.squeues.FifoMemoryQueue'
My Scrapy crawler has memory leaks. What can I do?
Also, Python has a builtin memory leak issue which is described in Leaks without leaks.
How can I make Scrapy consume less memory?
See previous question.
Can I use Basic HTTP Authentication in my spiders?
Yes, see HttpAuthMiddleware.
Why does Scrapy download pages in English instead of my native language?
Try changing the default Accept-Language request header by overriding the
DEFAULT_REQUEST_HEADERS setting.
Can I run a spider without creating a project?
Yes. You can use the runspider command. For example, if you have a
spider written in a my_spider.py file you can run it with:
scrapy runspider my_spider.py
See runspider command for more info.
I get “Filtered offsite request” messages. How can I fix them?
Those messages (logged with DEBUG level) don’t necessarily mean there is a
problem, so you may not need to fix them.
Those messages are thrown by the Offsite Spider Middleware, which is a spider middleware (enabled by default) whose purpose is to filter out requests to domains outside the ones covered by the spider.
For more info see:
OffsiteMiddleware.
What is the recommended way to deploy a Scrapy crawler in production?
See Deploying Spiders.
Can I use JSON for large exports?
It’ll depend on how large your output is. See this warning in JsonItemExporter
documentation.
Can I return (Twisted) deferreds from signal handlers?
Some signals support returning deferreds from their handlers, others don’t. See the Built-in signals reference to know which ones.
What does the response status code 999 means?
999 is a custom response status code used by Yahoo sites to throttle requests.
Try slowing down the crawling speed by using a download delay of 2 (or
higher) in your spider:
class MySpider(CrawlSpider):
name = 'myspider'
download_delay = 2
# [ ... rest of the spider code ... ]
Or by setting a global download delay in your project with the
DOWNLOAD_DELAY setting.
Can I call pdb.set_trace() from my spiders to debug them?
Yes, but you can also use the Scrapy shell which allows you to quickly analyze
(and even modify) the response being processed by your spider, which is, quite
often, more useful than plain old pdb.set_trace().
For more info see Invoking the shell from spiders to inspect responses.
Simplest way to dump all my scraped items into a JSON/CSV/XML file?
To dump into a JSON file:
scrapy crawl myspider -o items.json
To dump into a CSV file:
scrapy crawl myspider -o items.csv
To dump into a XML file:
scrapy crawl myspider -o items.xml
For more information see Feed exports
What’s this huge cryptic __VIEWSTATE parameter used in some forms?
The __VIEWSTATE parameter is used in sites built with ASP.NET/VB.NET. For
more info on how it works see this page. Also, here’s an example spider
which scrapes one of these sites.
What’s the best way to parse big XML/CSV data feeds?
Parsing big feeds with XPath selectors can be problematic since they need to build the DOM of the entire feed in memory, and this can be quite slow and consume a lot of memory.
In order to avoid parsing all the entire feed at once in memory, you can use
the functions xmliter and csviter from scrapy.utils.iterators
module. In fact, this is what the feed spiders (see Spiders) use
under the cover.
Does Scrapy manage cookies automatically?
Yes, Scrapy receives and keeps track of cookies sent by servers, and sends them back on subsequent requests, like any regular web browser does.
For more info see Requests and Responses and CookiesMiddleware.
How can I see the cookies being sent and received from Scrapy?
Enable the COOKIES_DEBUG setting.
How can I instruct a spider to stop itself?
Raise the CloseSpider exception from a callback. For
more info see: CloseSpider.
How can I prevent my Scrapy bot from getting banned?
Should I use spider arguments or settings to configure my spider?
Both spider arguments and settings can be used to configure your spider. There is no strict rule that mandates to use one or the other, but settings are more suited for parameters that, once set, don’t change much, while spider arguments are meant to change more often, even on each spider run and sometimes are required for the spider to run at all (for example, to set the start url of a spider).
To illustrate with an example, assuming you have a spider that needs to log into a site to scrape data, and you only want to scrape data from a certain section of the site (which varies each time). In that case, the credentials to log in would be settings, while the url of the section to scrape would be a spider argument.
I’m scraping a XML document and my XPath selector doesn’t return any items
You may need to remove namespaces. See Removing namespaces.
调试Spider
本文档介绍了调试Spider程序的最常用技术。 考虑下面的scrapy spider:
import scrapy
from myproject.items import MyItem
class MySpider(scrapy.Spider):
name = 'myspider'
start_urls = (
'http://example.com/page1',
'http://example.com/page2',
)
def parse(self, response):
# collect `item_urls`
for item_url in item_urls:
yield scrapy.Request(item_url, self.parse_item)
def parse_item(self, response):
item = MyItem()
# populate `item` fields
# and extract item_details_url
yield scrapy.Request(item_details_url, self.parse_details, meta={'item': item})
def parse_details(self, response):
item = response.meta['item']
# populate more `item` fields
return item
基本上这是一个解析两页(start_urls)的Item的简单Spider。 Item还有一个包含附加信息的详细页,因此我们使用Request的meta功能传递部分填充的Item。
解析命令
检查Spider输出的最基本的方法是使用parse命令。 它允许在方法级别检查Spider不同部分的行为。 它具有使用灵活和简单的优点,但不允许在方法内调试代码。
查看从特定网址获取Item:
$ scrapy parse --spider=myspider -c parse_item -d 2 <item_url>
[ ... scrapy log lines crawling example.com spider ... ]
>>> STATUS DEPTH LEVEL 2 <<<
# Scraped Items ------------------------------------------------------------
[{'url': <item_url>}]
# Requests -----------------------------------------------------------------
[]
使用--verbose或-v选项,我们可以看到每个深度级别的状态:
$ scrapy parse --spider=myspider -c parse_item -d 2 -v <item_url>
[ ... scrapy log lines crawling example.com spider ... ]
>>> DEPTH LEVEL: 1 <<<
# Scraped Items ------------------------------------------------------------
[]
# Requests -----------------------------------------------------------------
[<GET item_details_url>]
>>> DEPTH LEVEL: 2 <<<
# Scraped Items ------------------------------------------------------------
[{'url': <item_url>}]
# Requests -----------------------------------------------------------------
[]
检查从单个start_url中抓取的Item也可以使用以下方法轻松实现:
$ scrapy parse --spider=myspider -d 3 'http://example.com/page1'
Scrapy Shell
虽然parse命令对于检查Spider的行为非常有用,但除了显示收到的响应和输出外,对于检查回调内部发生了什么没有太大帮助。 parse_details有时没有收到任何Item的情况时如何调试?
幸运的是,在这种情况下,shell可以满足(请参阅从Spider调用shell来检查响应):
from scrapy.shell import inspect_response
def parse_details(self, response):
item = response.meta.get('item', None)
if item:
# populate more `item` fields
return item
else:
inspect_response(response, self)
另请参见:从Spider中调用shell来检查响应。
Spider合约
0.15版本新增功能。
注意
这是一项新功能(在Scrapy 0.15中引入),可能会需要辅助功能/API更新。 检查发行说明中通知的更新。
测试Spider可能变得特别麻烦,虽然没有什么能够阻止你编写单元测试,但任务很快就会变得繁重。 Scrapy提供了一种通过合约来测试Spider的综合方法。
这允许您通过对示例url进行硬编码来测试Spider的每个回调,并通过各种约束检查回调如何处理响应。 每条合约都以@为前缀并包含在文档字符串中。 看下面的例子:
def parse(self, response):
""" This function parses a sample response. Some contracts are mingled
with this docstring.
@url http://www.amazon.com/s?field-keywords=selfish+gene
@returns items 1 16
@returns requests 0 0
@scrapes Title Author Year Price
"""
此回调使用三个内置合约进行测试:
-
class
scrapy.contracts.default.UrlContract¶ 此合约(
@url)设定检查此Spider的其他合约条件时使用的样本网址。 该合约是强制性的。 运行检查时忽略所有缺少此合约的回调:@url url
-
class
scrapy.contracts.default.ReturnsContract¶ 该合约(
@returns)为Spider所返回的Item和请求设定了下限和上限。 上限是可选的:@returns item(s)|request(s) [min [max]]
-
class
scrapy.contracts.default.ScrapesContract¶ 此合约(
@scrapes)检查回调所返回的所有Item是否具有指定的字段:@scrapes field_1 field_2 ...
使用check命令运行合约检查。
自定义合约
如果您发现您需要比内置的Scrapy合约更多的能力,可以使用SPIDER_CONTRACTS 设置在项目中创建和加载您自己的合约:
SPIDER_CONTRACTS = {
'myproject.contracts.ResponseCheck': 10,
'myproject.contracts.ItemValidate': 10,
}
每个合约必须继承自scrapy.contracts.Contract,并且可以重写三种方法:
-
class
scrapy.contracts.Contract(method, *args)¶ Parameters: - method (function) – 合约关联的回调函数
- args (list) – 传递到docstring的参数列表(空格分隔)
-
pre_process(response)¶ 这允许在将样本请求传递给回调之前,勾入对该请求接收到的响应的各种检查。
-
post_process(output)¶ 这允许处理回调的输出。 迭代器在传递给这个钩子之前被转换成列表形式。
下面是一个演示合约,用于检查收到的响应中是否存在自定义头: 引发scrapy.exceptions.ContractFail以便正确打印失败:
from scrapy.contracts import Contract
from scrapy.exceptions import ContractFail
class HasHeaderContract(Contract):
""" Demo contract which checks the presence of a custom header
@has_header X-CustomHeader
"""
name = 'has_header'
def pre_process(self, response):
for header in self.args:
if header not in response.headers:
raise ContractFail('X-CustomHeader not present')
常见做法
本节介绍使用Scrapy时的常见做法。 这些内容涵盖了很多主题,并不经常涉及其他任何特定部分。
从脚本运行Scrapy
您可以使用API从脚本运行Scrapy,而不是通过scrapy crawl这一运行Scrapy的典型方式。
请记住,Scrapy建立在Twisted异步网络库之上,因此您需要在Twisted reactor中运行它。
您可以用来运行您的Spider的第一个实用程序是scrapy.crawler.CrawlerProcess。 这个类将为你启动一个Twisted reactor,配置日志记录和设置关闭处理程序。 这个类被所有Scrapy命令使用。
下面是一个演示如何使用它运行单个Spider的示例。
import scrapy
from scrapy.crawler import CrawlerProcess
class MySpider(scrapy.Spider):
# Your spider definition
...
process = CrawlerProcess({
'USER_AGENT': 'Mozilla/4.0 (compatible; MSIE 7.0; Windows NT 5.1)'
})
process.crawl(MySpider)
process.start() # the script will block here until the crawling is finished
确保检查CrawlerProcess文档以熟悉其使用细节。
如果您在Scrapy项目中,可以将一些额外帮助组件导入您的项目中。 您可以自动导入你的Spider,传递它们的名称给CrawlerProcess,然后使用get_project_settings获取带有您项目设置的Settings实例。
下面是一个如何操作的例子,以testspiders项目为例。
from scrapy.crawler import CrawlerProcess
from scrapy.utils.project import get_project_settings
process = CrawlerProcess(get_project_settings())
# 'followall' is the name of one of the spiders of the project.
process.crawl('followall', domain='scrapinghub.com')
process.start() # the script will block here until the crawling is finished
还有另一个Scrapy实用程序可以更好地控制爬取过程:scrapy.crawler.CrawlerRunner。 这个类是一个简单的封装器,封装了一些简单的帮助器来运行多个爬虫,但它不会以任何方式启动或干扰现有的反应器。
在调度你的Spider之后明确运行这个反应器类。 如果您的应用程序已经在使用Twisted并且您想在同一个反应器中运行Scrapy,建议您使用CrawlerRunner而不是CrawlerProcess。
请注意,在Spider完成后,您还必须自行关闭Twisted反应器。 这可以通过向CrawlerRunner.crawl方法返回的延迟新增回调来实现。
以下是在MySpider完成运行后手动停止反应器回调的示例。
from twisted.internet import reactor
import scrapy
from scrapy.crawler import CrawlerRunner
from scrapy.utils.log import configure_logging
class MySpider(scrapy.Spider):
# Your spider definition
...
configure_logging({'LOG_FORMAT': '%(levelname)s: %(message)s'})
runner = CrawlerRunner()
d = runner.crawl(MySpider)
d.addBoth(lambda _: reactor.stop())
reactor.run() # the script will block here until the crawling is finished
也可以看看
在同一进程中运行多个Spider
默认情况下,当您运行scrapy crawl时,Scrapy为每个进程运行一个spider。 但是,Scrapy支持使用内部API为每个进程运行多个spider。
这是一个同时运行多个Spider的例子:
import scrapy
from scrapy.crawler import CrawlerProcess
class MySpider1(scrapy.Spider):
# Your first spider definition
...
class MySpider2(scrapy.Spider):
# Your second spider definition
...
process = CrawlerProcess()
process.crawl(MySpider1)
process.crawl(MySpider2)
process.start() # the script will block here until all crawling jobs are finished
使用CrawlerRunner的相同示例:
import scrapy
from twisted.internet import reactor
from scrapy.crawler import CrawlerRunner
from scrapy.utils.log import configure_logging
class MySpider1(scrapy.Spider):
# Your first spider definition
...
class MySpider2(scrapy.Spider):
# Your second spider definition
...
configure_logging()
runner = CrawlerRunner()
runner.crawl(MySpider1)
runner.crawl(MySpider2)
d = runner.join()
d.addBoth(lambda _: reactor.stop())
reactor.run() # the script will block here until all crawling jobs are finished
同样的例子,但通过链接延迟来依次运行Spider:
from twisted.internet import reactor, defer
from scrapy.crawler import CrawlerRunner
from scrapy.utils.log import configure_logging
class MySpider1(scrapy.Spider):
# Your first spider definition
...
class MySpider2(scrapy.Spider):
# Your second spider definition
...
configure_logging()
runner = CrawlerRunner()
@defer.inlineCallbacks
def crawl():
yield runner.crawl(MySpider1)
yield runner.crawl(MySpider2)
reactor.stop()
crawl()
reactor.run() # the script will block here until the last crawl call is finished
也可以看看
分布式抓取
Scrapy没有提供任何内置工具用来以分布式(多服务器)方式运行爬虫。 但是,根据您计划分布抓取的方式有不同的分布抓取的途径。
如果你有很多Spider,分配负载的明显方法是设置许多抓取实例并在这些实例之间分配Spider。
如果你想通过许多机器运行一个(大)Spider,你通常会做的就是分开要爬取的网址并将它们发送给每个单独的Spider。 下面是一个具体的例子:
首先,您准备要抓取的网址列表并将其放入单独的文件/网址中:
http://somedomain.com/urls-to-crawl/spider1/part1.list
http://somedomain.com/urls-to-crawl/spider1/part2.list
http://somedomain.com/urls-to-crawl/spider1/part3.list
然后你在三个不同的爬虫服务器上运行同一个Spider。 Spider会收到一个(spider)参数part,其中包含要爬取分区的编号:
curl http://scrapy1.mycompany.com:6800/schedule.json -d project=myproject -d spider=spider1 -d part=1
curl http://scrapy2.mycompany.com:6800/schedule.json -d project=myproject -d spider=spider1 -d part=2
curl http://scrapy3.mycompany.com:6800/schedule.json -d project=myproject -d spider=spider1 -d part=3
避免被禁止
有些网站采取了一些具有不同程度的复杂性措施,以防止机器人爬取。 避开这些措施可能非常困难棘手,有时可能需要特殊的基本结构。 如果有疑问,请考虑联系商业支持。
处理这些类型的网站时,请注意以下几点提示:
- 从众所周知的浏览器用户代理池中循环你的用户代理(谷歌以获得它们的列表)
- 禁用cookie(请参阅
COOKIES_ENABLED),因为有些网站可能使用cookie来识别机器人行为 - 使用下载延迟(2或更高)。 请参阅
DOWNLOAD_DELAY设置。 - 如果可能,请使用Google缓存来抓取页面,而不是直接访问网站
- 使用一个循环的IP池。 例如,免费的Tor项目或付费服务(如ProxyMesh)。 开源的替代品是scrapoxy,一个超级代理,您可以将自己的代理附加到其上。
- 使用一个绕过内部禁止的高度分布式下载器,令你可以专注于解析干净的页面。 这种下载程序的一个例子是Crawlera
如果您仍然无法避免您的机器人被禁止,请考虑联系商业支持。
广泛抓取
Scrapy默认设置针对特定网站进行了优化。 这些网站通常由一个单独的Scrapy Spider来处理,虽然这不是必需或不需要的(例如,有通用的Spider可以处理任何给定的网站)。
除了这种“重点抓取”之外,还有另一种常见的抓取方式,涵盖了大量(可能无限制)的域名,并且仅受时间或其他任意约束的限制,而不是在域名被抓取完成或当没有请求执行时停止。 这些被称为“广泛抓取”,是搜索引擎使用的典型抓取工具。
以下是广泛抓取中常见的一些属性:
- 它们抓取很多域(通常是无限的)而不是一组特定的站点
- 它们不需要对域名完全抓取,因为这样做不切实际(或不可能)的,而是按时间或抓取页数来限制抓取
- 它们在逻辑上更简单(与具有许多提取规则的非常复杂的Spider相反),因为数据通常在单独的阶段中进行后处理
- 它们同时抓取多个域,这使得他们可以通过不受任何特定站点约束的限制实现更快的爬取速度(每个站点缓慢爬取,但并行抓取许多站点)
如上所述,Scrapy默认设置是针对集中抓取而不是广泛抓取优化的。 然而,由于其异步架构,Scrapy非常适合执行快速的广泛爬行。 本页总结了在使用Scrapy进行广泛抓取时需要记住的一些事情,以及为实现有效的广泛抓取而调整的Scrapy设置的具体建议。
提高并发性
并发性是并行处理的请求数。 有一个全局限制和一个每个域限制。
Scrapy中的默认全局并发限制不适合并行爬取许多不同的域,因此您需要增加它。 增加多少取决于爬虫程序将有多少可用的CPU和内存。 一个好的起点是100,但最好的方法是做一些试验,并确定您的爬取进程在什么样的并发性下限制了CPU。 为了获得最佳性能,您应该选择CPU使用率为80-90%的并发性。
增加全局并发性可使用:
CONCURRENT_REQUESTS = 100
Increase Twisted IO thread pool maximum size
目前Scrapy使用线程池以阻塞的方式进行DNS解析。 对于更高的并发级别,爬取可能会很慢,甚至无法达到DNS解析程序超时。 增加处理DNS查询的线程数的可能解决方案。 DNS队列将得到更快的处理,加快建立连接和整体爬取。
要增加最大线程池大小可使用:
REACTOR_THREADPOOL_MAXSIZE = 20
Setup your own DNS
If you have multiple crawling processes and single central DNS, it can act like DoS attack on the DNS server resulting to slow down of entire network or even blocking your machines. To avoid this setup your own DNS server with local cache and upstream to some large DNS like OpenDNS or Verizon.
Reduce log level
When doing broad crawls you are often only interested in the crawl rates you
get and any errors found. These stats are reported by Scrapy when using the
INFO log level. In order to save CPU (and log storage requirements) you
should not use DEBUG log level when preforming large broad crawls in
production. Using DEBUG level when developing your (broad) crawler may be
fine though.
To set the log level use:
LOG_LEVEL = 'INFO'
禁用cookies
除非你真的需要,否则禁用cookies。 进行广泛抓取时通常不需要Cookie(搜索引擎抓取工具忽略它们),它们通过节省一些CPU周期并减少Scrapy抓取工具的内存占用量来提高性能。
要禁用Cookie,请使用:
COOKIES_ENABLED = False
Disable retries
Retrying failed HTTP requests can slow down the crawls substantially, specially when sites causes are very slow (or fail) to respond, thus causing a timeout error which gets retried many times, unnecessarily, preventing crawler capacity to be reused for other domains.
To disable retries use:
RETRY_ENABLED = False
Reduce download timeout
Unless you are crawling from a very slow connection (which shouldn’t be the case for broad crawls) reduce the download timeout so that stuck requests are discarded quickly and free up capacity to process the next ones.
To reduce the download timeout use:
DOWNLOAD_TIMEOUT = 15
禁用重定向
考虑禁用重定向,除非您有兴趣follow它们。 在进行广泛抓取时,通常会保存重定向并在之后的抓取中重新访问网站以解决它们。 这也有助于保持每个爬取批次的请求数量不变,否则重定向循环可能会导致爬虫对某个特定域上的资源投入过多。
要禁用重定向,请使用:
REDIRECT_ENABLED = False
Enable crawling of “Ajax Crawlable Pages”
Some pages (up to 1%, based on empirical data from year 2013) declare themselves as ajax crawlable. This means they provide plain HTML version of content that is usually available only via AJAX. Pages can indicate it in two ways:
- by using
#!in URL - this is the default way; - by using a special meta tag - this way is used on “main”, “index” website pages.
Scrapy handles (1) automatically; to handle (2) enable AjaxCrawlMiddleware:
AJAXCRAWL_ENABLED = True
When doing broad crawls it’s common to crawl a lot of “index” web pages; AjaxCrawlMiddleware helps to crawl them correctly. It is turned OFF by default because it has some performance overhead, and enabling it for focused crawls doesn’t make much sense.
Using Firefox for scraping
Here is a list of tips and advice on using Firefox for scraping, along with a list of useful Firefox add-ons to ease the scraping process.
检查实时浏览器DOM的注意事项
由于开发人员工具是在实时浏览器DOM上操作的,因此在检查页面源代码时,您实际上看到的不是原始HTML,而是在应用一些浏览器清理和执行Javascript代码后修改的HTML。 尤其是Firefox,它以向表中添加<tbody>元素而闻名。 另一方面,Scrapy不修改原始页面HTML,因此如果在XPath表达式中使用<tbody> ,则无法提取任何数据。
因此,当使用 Firefox 和 XPath 时,你应该记住以下几点:
- 在检查DOM以查找要在Scrapy中使用的xpath时,禁用Javascript(在开发人员工具设置中,单击禁用Javascript)。
- • 永远不要使用完整的XPath路径,使用基于属性(如
id,class,width等)或任何标识特性,如contains(@href, 'image')的相对和聪明的路径。 - 不要在XPath表达式中包含
<tbody>元素,除非您真正知道自己在做什么。
对抓取有帮助的Firefox附加组件(注:因Firefox改版,下面所述的插件大多已失效。可自行到Firefox插件中查找。)
注:Firebug已取消
Firebug is a widely known tool among web developers and it’s also very useful for scraping. In particular, its Inspect Element feature comes very handy when you need to construct the XPaths for extracting data because it allows you to view the HTML code of each page element while moving your mouse over it.
See Using Firebug for scraping for a detailed guide on how to use Firebug with Scrapy.
XPath Checker
XPath Checker is another Firefox add-on for testing XPaths on your pages.
Tamper Data
Tamper Data is a Firefox add-on which allows you to view and modify the HTTP request headers sent by Firefox. Firebug also allows to view HTTP headers, but not to modify them.
Firecookie
Firecookie makes it easier to view and manage cookies. You can use this extension to create a new cookie, delete existing cookies, see a list of cookies for the current site, manage cookies permissions and a lot more.
Using Firebug for scraping
Note
本指南中使用的示例网站Google Directory已不可用,因为它 已被Google关闭。 不过,本指南中的概念仍然有效。 另外,2.0版本的本章节更新了相应的技术指南。 请参阅:Using your browser’s Developer Tools for scraping 网址:https://docs.scrapy.org/en/latest/topics/developer-tools.html#using-your-browser-s-developer-tools-for-scraping
Introduction
This document explains how to use Firebug (a Firefox add-on) to make the scraping process easier and more fun. For other useful Firefox add-ons see Useful Firefox add-ons for scraping. There are some caveats with using Firefox add-ons to inspect pages, see Caveats with inspecting the live browser DOM.
In this example, we’ll show how to use Firebug to scrape data from the Google Directory, which contains the same data as the Open Directory Project used in the tutorial but with a different face.
Firebug comes with a very useful feature called Inspect Element which allows you to inspect the HTML code of the different page elements just by hovering your mouse over them. Otherwise you would have to search for the tags manually through the HTML body which can be a very tedious task.
In the following screenshot you can see the Inspect Element tool in action.
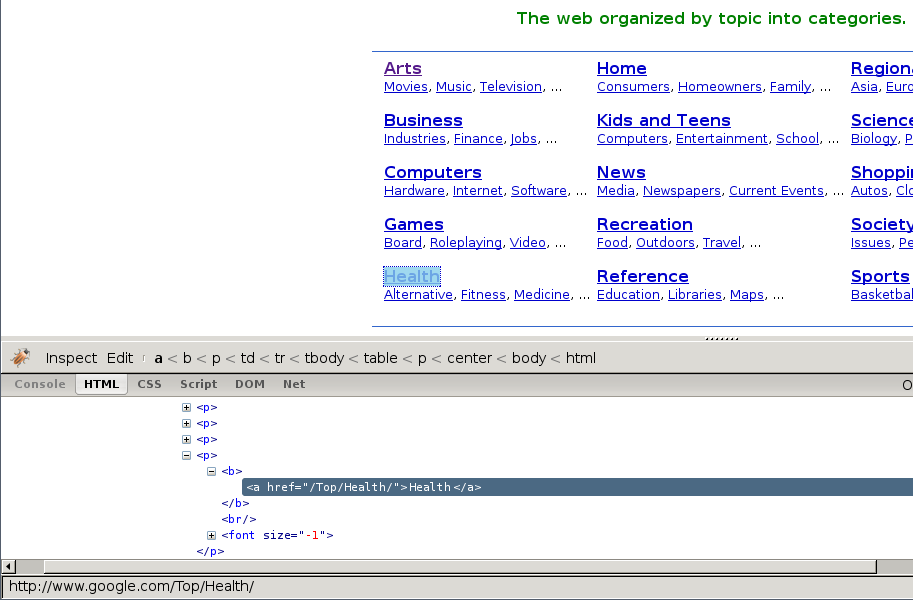
At first sight, we can see that the directory is divided in categories, which are also divided in subcategories.
However, it seems that there are more subcategories than the ones being shown in this page, so we’ll keep looking:
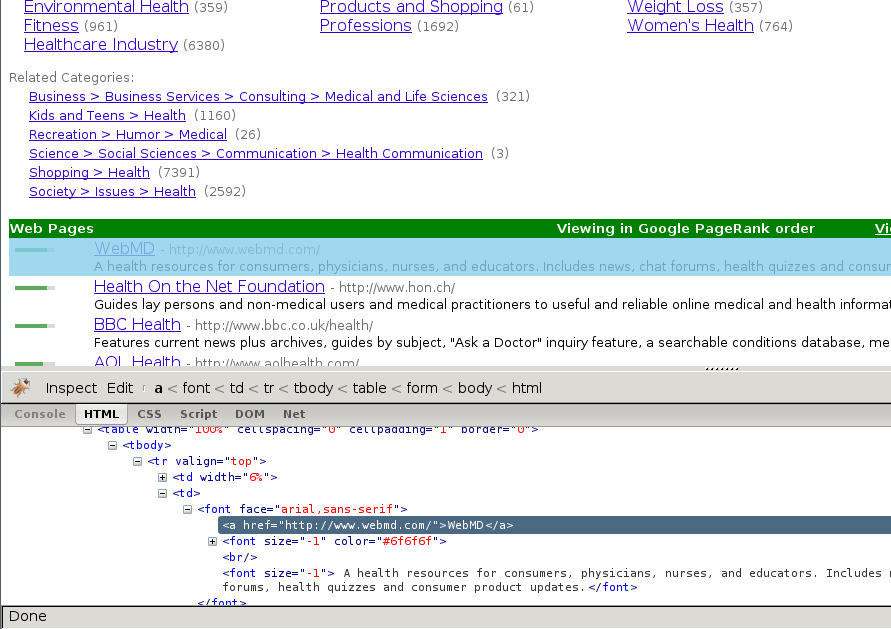
As expected, the subcategories contain links to other subcategories, and also links to actual websites, which is the purpose of the directory.
Getting links to follow
By looking at the category URLs we can see they share a pattern:
Once we know that, we are able to construct a regular expression to follow those links. For example, the following one:
directory\.google\.com/[A-Z][a-zA-Z_/]+$
So, based on that regular expression we can create the first crawling rule:
Rule(LinkExtractor(allow='directory.google.com/[A-Z][a-zA-Z_/]+$', ),
'parse_category',
follow=True,
),
The Rule object instructs
CrawlSpider based spiders how to follow the
category links. parse_category will be a method of the spider which will
process and extract data from those pages.
This is how the spider would look so far:
from scrapy.linkextractors import LinkExtractor
from scrapy.spiders import CrawlSpider, Rule
class GoogleDirectorySpider(CrawlSpider):
name = 'directory.google.com'
allowed_domains = ['directory.google.com']
start_urls = ['http://directory.google.com/']
rules = (
Rule(LinkExtractor(allow='directory\.google\.com/[A-Z][a-zA-Z_/]+$'),
'parse_category', follow=True,
),
)
def parse_category(self, response):
# write the category page data extraction code here
pass
Extracting the data
Now we’re going to write the code to extract data from those pages.
With the help of Firebug, we’ll take a look at some page containing links to websites (say http://directory.google.com/Top/Arts/Awards/) and find out how we can extract those links using Selectors. We’ll also use the Scrapy shell to test those XPath’s and make sure they work as we expect.
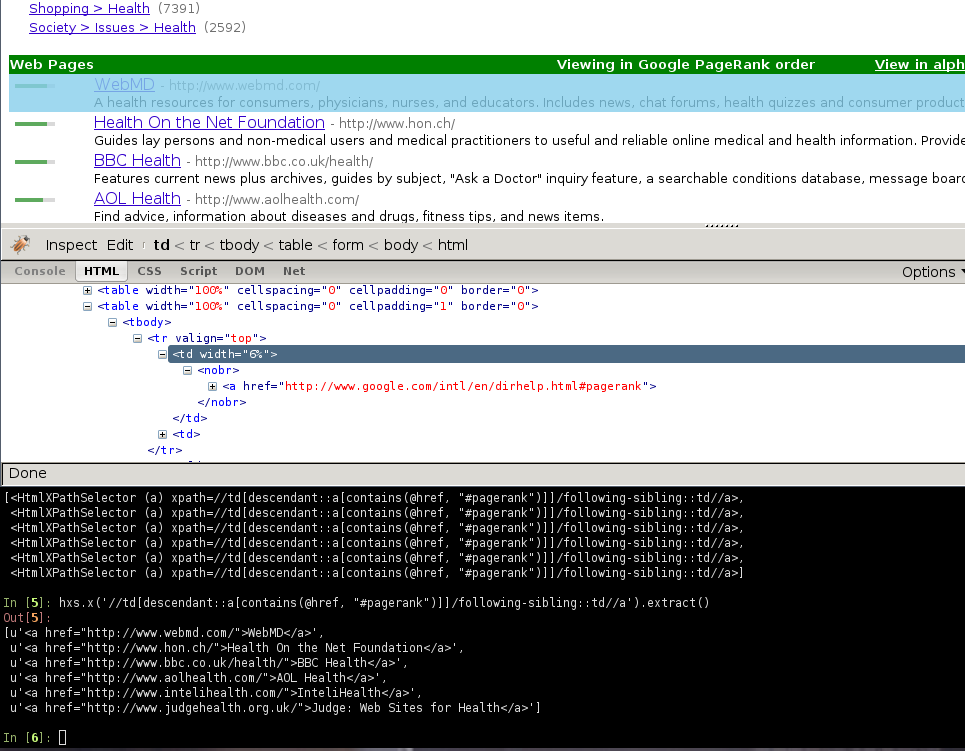
As you can see, the page markup is not very descriptive: the elements don’t
contain id, class or any attribute that clearly identifies them, so
we’ll use the ranking bars as a reference point to select the data to extract
when we construct our XPaths.
After using FireBug, we can see that each link is inside a td tag, which is
itself inside a tr tag that also contains the link’s ranking bar (in
another td).
So we can select the ranking bar, then find its parent (the tr), and then
finally, the link’s td (which contains the data we want to scrape).
This results in the following XPath:
//td[descendant::a[contains(@href, "#pagerank")]]/following-sibling::td//a
It’s important to use the Scrapy shell to test these complex XPath expressions and make sure they work as expected.
Basically, that expression will look for the ranking bar’s td element, and
then select any td element who has a descendant a element whose
href attribute contains the string #pagerank”
Of course, this is not the only XPath, and maybe not the simpler one to select
that data. Another approach could be, for example, to find any font tags
that have that grey colour of the links,
Finally, we can write our parse_category() method:
def parse_category(self, response):
# The path to website links in directory page
links = response.xpath('//td[descendant::a[contains(@href, "#pagerank")]]/following-sibling::td/font')
for link in links:
item = DirectoryItem()
item['name'] = link.xpath('a/text()').extract()
item['url'] = link.xpath('a/@href').extract()
item['description'] = link.xpath('font[2]/text()').extract()
yield item
Be aware that you may find some elements which appear in Firebug but
not in the original HTML, such as the typical case of <tbody>
elements.
or tags which Therefer in page HTML sources may on Firebug inspects the live DOM
Debugging memory leaks
In Scrapy, objects such as Requests, Responses and Items have a finite lifetime: they are created, used for a while, and finally destroyed.
From all those objects, the Request is probably the one with the longest lifetime, as it stays waiting in the Scheduler queue until it’s time to process it. For more info see Architecture overview.
As these Scrapy objects have a (rather long) lifetime, there is always the risk of accumulating them in memory without releasing them properly and thus causing what is known as a “memory leak”.
To help debugging memory leaks, Scrapy provides a built-in mechanism for tracking objects references called trackref, and you can also use a third-party library called Guppy for more advanced memory debugging (see below for more info). Both mechanisms must be used from the Telnet Console.
Common causes of memory leaks
It happens quite often (sometimes by accident, sometimes on purpose) that the
Scrapy developer passes objects referenced in Requests (for example, using the
meta attribute or the request callback function)
and that effectively bounds the lifetime of those referenced objects to the
lifetime of the Request. This is, by far, the most common cause of memory leaks
in Scrapy projects, and a quite difficult one to debug for newcomers.
In big projects, the spiders are typically written by different people and some of those spiders could be “leaking” and thus affecting the rest of the other (well-written) spiders when they get to run concurrently, which, in turn, affects the whole crawling process.
The leak could also come from a custom middleware, pipeline or extension that
you have written, if you are not releasing the (previously allocated) resources
properly. For example, allocating resources on spider_opened
but not releasing them on spider_closed may cause problems if
you’re running multiple spiders per process.
Too Many Requests?
By default Scrapy keeps the request queue in memory; it includes
Request objects and all objects
referenced in Request attributes (e.g. in meta).
While not necessarily a leak, this can take a lot of memory. Enabling
persistent job queue could help keeping memory usage
in control.
Debugging memory leaks with trackref
trackref is a module provided by Scrapy to debug the most common cases of
memory leaks. It basically tracks the references to all live Requests,
Responses, Item and Selector objects.
You can enter the telnet console and inspect how many objects (of the classes
mentioned above) are currently alive using the prefs() function which is an
alias to the print_live_refs() function:
telnet localhost 6023
>>> prefs()
Live References
ExampleSpider 1 oldest: 15s ago
HtmlResponse 10 oldest: 1s ago
Selector 2 oldest: 0s ago
FormRequest 878 oldest: 7s ago
As you can see, that report also shows the “age” of the oldest object in each
class. If you’re running multiple spiders per process chances are you can
figure out which spider is leaking by looking at the oldest request or response.
You can get the oldest object of each class using the
get_oldest() function (from the telnet console).
Which objects are tracked?
The objects tracked by trackrefs are all from these classes (and all its
subclasses):
A real example
我们来看一个假设的内存泄漏情况的具体例子。 假设我们的Spider有一行类似代码:
return Request("http://www.somenastyspider.com/product.php?pid=%d" % product_id,
callback=self.parse, meta={referer: response})
该行在请求中传递响应引用,实际上将响应生命周期与请求的生命周期相关联,肯定会导致内存泄漏。
让我们看看如何通过使用trackref工具发现原因(之前不知道哪里出现问题)。
爬虫运行几分钟后,我们注意到它的内存使用量已经增长很多,我们可以进入它的telnet控制台并检查实时引用:
>>> prefs()
Live References
SomenastySpider 1 oldest: 15s ago
HtmlResponse 3890 oldest: 265s ago
Selector 2 oldest: 0s ago
Request 3878 oldest: 250s ago
The fact that there are so many live responses (and that they’re so old) is definitely suspicious, as responses should have a relatively short lifetime compared to Requests. The number of responses is similar to the number of requests, so it looks like they are tied in a some way. We can now go and check the code of the spider to discover the nasty line that is generating the leaks (passing response references inside requests).
Sometimes extra information about live objects can be helpful. Let’s check the oldest response:
>>> from scrapy.utils.trackref import get_oldest
>>> r = get_oldest('HtmlResponse')
>>> r.url
'http://www.somenastyspider.com/product.php?pid=123'
If you want to iterate over all objects, instead of getting the oldest one, you
can use the scrapy.utils.trackref.iter_all() function:
>>> from scrapy.utils.trackref import iter_all
>>> [r.url for r in iter_all('HtmlResponse')]
['http://www.somenastyspider.com/product.php?pid=123',
'http://www.somenastyspider.com/product.php?pid=584',
...
Too many spiders?
If your project has too many spiders executed in parallel,
the output of prefs() can be difficult to read.
For this reason, that function has a ignore argument which can be used to
ignore a particular class (and all its subclases). For
example, this won’t show any live references to spiders:
>>> from scrapy.spiders import Spider
>>> prefs(ignore=Spider)
scrapy.utils.trackref module
Here are the functions available in the trackref module.
-
class
scrapy.utils.trackref.object_ref¶ Inherit from this class (instead of object) if you want to track live instances with the
trackrefmodule.
-
scrapy.utils.trackref.print_live_refs(class_name, ignore=NoneType)¶ Print a report of live references, grouped by class name.
Parameters: ignore (class or classes tuple) – if given, all objects from the specified class (or tuple of classes) will be ignored.
-
scrapy.utils.trackref.get_oldest(class_name)¶ Return the oldest object alive with the given class name, or
Noneif none is found. Useprint_live_refs()first to get a list of all tracked live objects per class name.
-
scrapy.utils.trackref.iter_all(class_name)¶ Return an iterator over all objects alive with the given class name, or
Noneif none is found. Useprint_live_refs()first to get a list of all tracked live objects per class name.
Debugging memory leaks with Guppy
trackref provides a very convenient mechanism for tracking down memory
leaks, but it only keeps track of the objects that are more likely to cause
memory leaks (Requests, Responses, Items, and Selectors). However, there are
other cases where the memory leaks could come from other (more or less obscure)
objects. If this is your case, and you can’t find your leaks using trackref,
you still have another resource: the Guppy library.
If you use pip, you can install Guppy with the following command:
pip install guppy
The telnet console also comes with a built-in shortcut (hpy) for accessing
Guppy heap objects. Here’s an example to view all Python objects available in
the heap using Guppy:
>>> x = hpy.heap()
>>> x.bytype
Partition of a set of 297033 objects. Total size = 52587824 bytes.
Index Count % Size % Cumulative % Type
0 22307 8 16423880 31 16423880 31 dict
1 122285 41 12441544 24 28865424 55 str
2 68346 23 5966696 11 34832120 66 tuple
3 227 0 5836528 11 40668648 77 unicode
4 2461 1 2222272 4 42890920 82 type
5 16870 6 2024400 4 44915320 85 function
6 13949 5 1673880 3 46589200 89 types.CodeType
7 13422 5 1653104 3 48242304 92 list
8 3735 1 1173680 2 49415984 94 _sre.SRE_Pattern
9 1209 0 456936 1 49872920 95 scrapy.http.headers.Headers
<1676 more rows. Type e.g. '_.more' to view.>
You can see that most space is used by dicts. Then, if you want to see from which attribute those dicts are referenced, you could do:
>>> x.bytype[0].byvia
Partition of a set of 22307 objects. Total size = 16423880 bytes.
Index Count % Size % Cumulative % Referred Via:
0 10982 49 9416336 57 9416336 57 '.__dict__'
1 1820 8 2681504 16 12097840 74 '.__dict__', '.func_globals'
2 3097 14 1122904 7 13220744 80
3 990 4 277200 2 13497944 82 "['cookies']"
4 987 4 276360 2 13774304 84 "['cache']"
5 985 4 275800 2 14050104 86 "['meta']"
6 897 4 251160 2 14301264 87 '[2]'
7 1 0 196888 1 14498152 88 "['moduleDict']", "['modules']"
8 672 3 188160 1 14686312 89 "['cb_kwargs']"
9 27 0 155016 1 14841328 90 '[1]'
<333 more rows. Type e.g. '_.more' to view.>
As you can see, the Guppy module is very powerful but also requires some deep knowledge about Python internals. For more info about Guppy, refer to the Guppy documentation.
Leaks without leaks
Sometimes, you may notice that the memory usage of your Scrapy process will only increase, but never decrease. Unfortunately, this could happen even though neither Scrapy nor your project are leaking memory. This is due to a (not so well) known problem of Python, which may not return released memory to the operating system in some cases. For more information on this issue see:
The improvements proposed by Evan Jones, which are detailed in this paper, got merged in Python 2.5, but this only reduces the problem, it doesn’t fix it completely. To quote the paper:
Unfortunately, this patch can only free an arena if there are no more objects allocated in it anymore. This means that fragmentation is a large issue. An application could have many megabytes of free memory, scattered throughout all the arenas, but it will be unable to free any of it. This is a problem experienced by all memory allocators. The only way to solve it is to move to a compacting garbage collector, which is able to move objects in memory. This would require significant changes to the Python interpreter.
To keep memory consumption reasonable you can split the job into several smaller jobs or enable persistent job queue and stop/start spider from time to time.
下载和处理文件与图像
Scrapy提供了可重复使用的Item管道用于下载附加到特定Item的文件(例如,当您抓取产品并且还想下载图像到本地时)。 这些管道共享一些功能和结构(我们将它们称为媒体管道),但通常您可以使用“文件管道”或“图像管道”。
两个管道都实现这些功能:
- 避免重新下载最近下载的媒体
- 指定存储媒体的位置(文件系统目录,Amazon S3存储单元,Google云存储存储单元)
图像管道有几个额外的功能来处理图像:
- 将所有下载的图像转换为通用格式(JPG)和模式(RGB)
- 生成缩略图
- 检查图像宽度/高度以确保它们符合最小限制
管道还保留当前计划下载媒体URL的内部队列,并将获取到的包含相同媒体得那些响应连接到该队列。 这避免了多个Item共享相同的媒体进行多次下载。
使用文件管道
使用FilesPipeline时的典型工作流程如下所示:
- 在Spider中,您需要抓取一个Item,并将所需的URL放入
file_urls字段中。 - Item从Spider中返回并转到Item管道。
- 当Item到达
FilesPipeline时,file_urls字段中的URL将使用标准Scrapy调度程序和下载程序(这意味着调度程序和下载程序中间件被重用)计划下载,但具有更高的优先级,在其他页面被抓取之前处理它们。 Item在该特定管道阶段保持“锁定”状态,直到文件完成下载(或由于某种原因失败)。 - 文件下载完成后,另一个字段(
files)将被填充。 该字段将包含一个包含下载文件信息的字典列表,例如下载的路径,原始抓取的URL(取自file_urls字段)和文件校验和。files字段列表中的文件将保留原始file_urls字段的相同顺序。 如果某个文件下载失败,则会记录一个错误,并且该文件不会出现在files字段中。
使用图像管道
使用ImagesPipeline与使用FilesPipeline大致相似,但所使用的默认字段名称不同:您可以对Item的图像链接使用image_urls,它将填充images字段以获取有关下载图像的信息。
对图像文件使用ImagesPipeline的优点是,您可以配置一些额外的功能,例如生成缩略图和根据其大小过滤图像。
Images Pipeline使用Pillow缩略图像并将图像统一化为JPEG/RGB格式,因此您需要安装此库才能使用它。 Python Imaging Library(PIL)在大多数情况下也可以工作,但是在某些设置中会导致异常,所以我们推荐使用Pillow来代替PIL。
启用媒体管道
要启用媒体管道,您必须先将其添加到您的项目ITEM_PIPELINES设置中。
对于图像管道,请使用:
ITEM_PIPELINES = {'scrapy.pipelines.images.ImagesPipeline': 1}
对于文件管道,请使用:
ITEM_PIPELINES = {'scrapy.pipelines.files.FilesPipeline': 1}
注意
您也可以同时使用文件和图像管道(注:最后的数字是id,分别取1、2、3...)。
然后,将用于存储下载图像的目标存储设置为有效值。 否则,管道将保持禁用状态,即使您将它包含在ITEM_PIPELINES设置中。
对于文件管道,设置FILES_STORE配置:
FILES_STORE = '/path/to/valid/dir'
对于图像管道,设置IMAGES_STORE配置:
IMAGES_STORE = '/path/to/valid/dir'
支持的存储
文件系统目前是唯一官方支持的存储,但也支持在Amazon S3和Google云端存储中存储文件。
文件系统存储
这些文件被存储为名称为它们URL的SHA1哈希的文件。
例如,下面的图片网址:
http://www.example.com/image.jpg
它的SHA1哈希是:
3afec3b4765f8f0a07b78f98c07b83f013567a0a
将被下载并存储在以下文件中:
<IMAGES_STORE>/full/3afec3b4765f8f0a07b78f98c07b83f013567a0a.jpg
其中:
<IMAGES_STORE>是IMAGES_STORE设置中为图像管道定义的文件夹.full是将完整图像与缩略图分开的子目录(如果使用的话)。 有关更多信息,请参阅图像的缩略图生成。
Amazon S3存储(注册后仅免费使用一年)
FILES_STORE和IMAGES_STORE可以表示Amazon S3存储单元。 Scrapy会自动将文件上传到存储单元。
例如,这是一个有效的IMAGES_STORE值:
IMAGES_STORE = 's3://bucket/images'
您可以修改用于存储文件的访问控制列表(ACL)策略,该策略由FILES_STORE_S3_ACL和IMAGES_STORE_S3_ACL设置定义。 默认情况下,ACL被设置为private。 要使这些文件公开可用,请使用public-read策略:
IMAGES_STORE_S3_ACL = 'public-read'
有关更多信息,请参阅Amazon S3开发人员指南中的预留ACL。
Google云端存储(中国没有的)
FILES_STORE and IMAGES_STORE can represent a Google Cloud Storage
bucket. Scrapy will automatically upload the files to the bucket. (requires google-cloud-storage )
For example, these are valid IMAGES_STORE and GCS_PROJECT_ID settings:
IMAGES_STORE = 'gs://bucket/images/'
GCS_PROJECT_ID = 'project_id'
For information about authentication, see this documentation.
用法示例
首先为了使用媒体管道,启用它。
然后,如果Spider返回一个带有URL键(file_urls或image_urls的字典,分别为文件或图像管道返回字典),管道将把结果放在相应的键下files或images)。
如果您更喜欢使用Item,那么定义一个带有必要字段的自定义Item,就像本例中的Images Pipeline:
import scrapy
class MyItem(scrapy.Item):
# ... other item fields ...
image_urls = scrapy.Field()
images = scrapy.Field()
如果要为URL键或结果键使用另一个字段名称,也可以覆盖它。
对于文件管道,设置FILES_URLS_FIELD和/或FILES_RESULT_FIELD配置:
FILES_URLS_FIELD = 'field_name_for_your_files_urls'
FILES_RESULT_FIELD = 'field_name_for_your_processed_files'
对于图像管道,设置IMAGES_URLS_FIELD和/或IMAGES_RESULT_FIELD配置:
IMAGES_URLS_FIELD = 'field_name_for_your_images_urls'
IMAGES_RESULT_FIELD = 'field_name_for_your_processed_images'
如果您需要更复杂的内容或希望覆盖自定义管道行为,请参阅扩展媒体管道。
如果您从ImagePipeline继承了多个图像管道,并且您希望在不同管道中具有不同的设置,可以设置以管道类的大写名称开头的设置键。 例如,如果您的管道名称为MyPipeline,并且您想要定制IMAGES_URLS_FIELD,则可以定义设置MYPIPELINE_IMAGES_URLS_FIELD并使用您的自定义设置。
附加功能
过期文件
图像管道避免了下载最近下载过的文件。 要调整此保留延迟,请使用FILES_EXPIRES设置(或图像管道为 IMAGES_EXPIRES),它指定延迟天数:
# 120 days of delay for files expiration
FILES_EXPIRES = 120
# 30 days of delay for images expiration
IMAGES_EXPIRES = 30
这两个设置的默认值是90天。
如果你的FilesPipeline的子类管道想有不同的设置,你可以设置以大写的类名开头的设置键。 例如给定管道类名为MyPipeline你可以设置设置键:
MYPIPELINE_FILES_EXPIRES = 180
然后管道类MyPipeline将到期时间设置为180。
为图像生成缩略图
图像管道可以自动创建下载图像的缩略图。
为了使用此功能,您必须将IMAGES_THUMBS设置为字典,其中的键是缩略图名称,值是它们的尺寸。
For example:
IMAGES_THUMBS = {
'small': (50, 50),
'big': (270, 270),
}
当您使用此功能时,图像管道将使用以下格式创建每个指定尺寸的缩略图:
<IMAGES_STORE>/thumbs/<size_name>/<image_id>.jpg
其中:
<size_name>是IMAGES_THUMBS字典中指定的键(small,big, 等等)<image_id>是图片URL的SHA1哈希
使用small和big缩略图名称存储的图像文件示例:
<IMAGES_STORE>/full/63bbfea82b8880ed33cdb762aa11fab722a90a24.jpg
<IMAGES_STORE>/thumbs/small/63bbfea82b8880ed33cdb762aa11fab722a90a24.jpg
<IMAGES_STORE>/thumbs/big/63bbfea82b8880ed33cdb762aa11fab722a90a24.jpg
第一个是从网站下载的完整图像。
过滤掉小图片
使用图像管道时,您可以通过在IMAGES_MIN_HEIGHT和 IMAGES_MIN_WIDTH设置中指定允许的最小尺寸来删除太小的图像。
For example:
IMAGES_MIN_HEIGHT = 110
IMAGES_MIN_WIDTH = 110
Note
尺寸约束完全不会影响缩略图的生成。
可以只设置一个尺寸约束,或同时设置两个。 当设置这两个值时,将只保存满足这两个最小值的图像。 对于上述示例,尺寸(105x105)或(105x200)或(200x105)的图像都将被丢弃,因为至少有一个尺寸小于约束。
默认情况下,没有尺寸限制,因此会处理所有图像。
允许重定向
默认情况下,媒体管道忽略重定向,即媒体文件URL请求被HTTP重定向意味着媒体下载被认为失败。
要处理媒体重定向,请将此设置设置为True:
MEDIA_ALLOW_REDIRECTS = True
扩展媒体管道
请参见此处,您可以在自定义Files Pipeline中重写的方法:
-
class
scrapy.pipelines.files.FilesPipeline¶ -
get_media_requests(item, info)¶ 如工作流程所示,管道从Item获取将要下载的图像的URL。 为了做到这一点,您可以覆盖
get_media_requests()方法并为每个文件URL返回一个请求:def get_media_requests(self, item, info): for file_url in item['file_urls']: yield scrapy.Request(file_url)这些请求将通过管道进行处理,当它们完成下载时,结果将作为包含两个的元素的元组的列表发送到
item_completed()方法。 每个元组将包含(success, file_info_or_error),其中:success是一个布尔值,如果图像下载成功,则为True;如果由于某种原因失败,则为Falsefile_info_or_error是一个包含下列关键字的词典(如果success为True)或Twisted Failure(如果出现问题)。url- 文件下载的网址。 这是get_media_requests()方法返回请求的url。path- 存储文件的路径(相对于FILES_STORE)checksum- 图像内容的MD5哈希
由
item_completed()接收的元组列表保证保持与从get_media_requests()方法返回的请求相同的顺序。以下是
results参数的典型值:[(True, {'checksum': '2b00042f7481c7b056c4b410d28f33cf', 'path': 'full/0a79c461a4062ac383dc4fade7bc09f1384a3910.jpg', 'url': 'http://www.example.com/files/product1.pdf'}), (False, Failure(...))]默认情况下,
get_media_requests()方法返回None,意味着没有要为该Item下载的文件。
-
item_completed(results, item, info)¶ 当对单个项的所有文件请求都已完成(已完成下载或由于某种原因失败)时,调用
FilesPipeline.item_completed()方法。item_completed()方法必须返回用于发送到后续item管道阶段的输出,因此您必须返回(或抛弃)该项,就像在任何管道中一样。下面是
item_completed()方法的一个示例,我们将下载的文件路径(传入的results)存储在file_paths字段中,如果该项不包含任何文件,则将其删除:(注:results是一个包含(success, file_info)可迭代容器,第一个值代表状态True/False,第二个值是一个dict。如上面所示。)from scrapy.exceptions import DropItem # 遍历results,取出第一个值为True的dict['path'] def item_completed(self, results, item, info): file_paths = [x['path'] for ok, x in results if ok] if not file_paths: raise DropItem("Item contains no files") item['file_paths'] = file_paths return item默认情况下,
item_completed()方法返回item。
-
请参见此处可在自定义图像管道中重写的方法:
-
class
scrapy.pipelines.images.ImagesPipeline¶ ImagesPipeline是FilesPipeline的扩展,它可以自定义字段名并为图像添加自定义行为。-
get_media_requests(item, info)¶ 工作方式与
FilesPipeline.get_media_requests()方法相同,但对图像URL使用不同的字段名。必须返回对每个图像URL的Request。
-
item_completed(results, item, info)¶ 当对单个项的所有文件请求都已完成(已完成下载或由于某种原因失败)时,调用
ImagesPipeline.item_completed()方法。工作方式与
FilesPipeline.item_completed()方法相同,但使用不同的字段名存储图像下载结果。默认情况下,
item_completed()方法返回item。
-
自定义图像管道示例
下面是图像管道的完整示例。要启用自定义媒体管道组件,必须将其类导入路径添加到ITEM_PIPELINES设置:
import scrapy
from scrapy.pipelines.images import ImagesPipeline
from scrapy.exceptions import DropItem
class MyImagesPipeline(ImagesPipeline):
def get_media_requests(self, item, info):
for image_url in item['image_urls']:
yield scrapy.Request(image_url)
def item_completed(self, results, item, info):
image_paths = [x['path'] for ok, x in results if ok]
if not image_paths:
raise DropItem("Item contains no images")
item['image_paths'] = image_paths
return item
部署Spider
本节介绍您为部署Scrapy Spider定期运行它们的不同选项。 在本地机器上运行Scrapy Spider程序对于(早期)开发阶段非常方便,但是当您需要执行长时间运行的Spider或移动Spider到生产环境以连续运行时,就不是很合适了。 以下是部署Scrapy Spider解决方案。
部署Scrapy Spider的普遍选择是:
- Scrapyd (开源)
- Scrapy Cloud (基于云)
部署到Scrapyd服务器
Scrapyd是运行Scrapy Spider的开源应用程序。 它提供了一个带有HTTP API的服务器,能够运行和监控Scrapy Spider。
要将spider部署到Scrapyd,您可以使用由scrapyd-client包提供的scrapyd-deploy工具。 请参阅scrapyd-deploy文档了解更多信息。
Scrapyd由一些Scrapy开发人员维护。
部署到Scrapy Cloud 
Scrapy Cloud是Scrapy背后的公司Scrapinghub托管的基于云的服务。
Scrapy Cloud不需要安装和监控服务器,并提供了一个很好的用户界面来管理Spider并查看抓取的Item,日志和统计信息。
要将Scider部署到Scrapy Cloud,您可以使用shub命令行工具。 请参阅Scrapy Cloud文档了解更多信息。
Scrapy Cloud与Scrapyd兼容,并且可以根据需要在它们之间进行切换 - 从scrapy.cfg文件中读取配置,就像scrapyd-deploy一样。
AutoThrottle扩展
这是一个基于Scrapy服务器和您正在爬取的网站的负载自动限制爬网速度的扩展。
设计目标
- 2. 对站点更友好,而不是使用默认的下载延迟0
- 自动将Scrapy调整到最佳爬取速度,这样用户就不必调整下载延迟来找到最佳的爬取速度。 用户只需要指定它允许请求的最大并发数,而扩展完成其余的工作。
工作原理
AutoThrottle扩展动态调整下载延迟,使spider平均向每个远程网站发送AUTOTHROTTLE_TARGET_CONCURRENCY 并发请求。
它使用下载延迟来计算延迟。 其主要思想如下:如果服务器需要延迟数秒来响应,那么客户端应该每延迟/N 秒发送一个请求以并行处理N个请求。(注:使得总延迟秒数与服务器需求一致。)
与调整延迟不同,这个延迟只需设置一个小小的固定下载延迟,并使用CONCURRENT_REQUESTS_PER_DOMAIN或CONCURRENT_REQUESTS_PER_IP选项对并发性施加硬限制。 它将提供类似的效果,但有一些重要的区别:
- 因为下载延迟很小,偶尔会有突发请求;
- non-200(错误)响应通常会比常规响应更快地返回,因此在下载延迟很小而且并发限制很高的情况下,当服务器开始返回错误时,爬虫将更快地向服务器发送请求。 但这与爬虫应该做的相反——在出现错误的情况下,减慢速度更有意义:这些错误可能是由高请求率引起的。
自动限速(AutoThrottle)没有这些问题。
限速算法
AutoThrottle算法根据以下规则调整下载延迟:
- spiders always start with a download delay of
AUTOTHROTTLE_START_DELAY; - when a response is received, the target download delay is calculated as
latency / Nwherelatencyis a latency of the response, andNisAUTOTHROTTLE_TARGET_CONCURRENCY. - download delay for next requests is set to the average of previous download delay and the target download delay;
- latencies of non-200 responses are not allowed to decrease the delay;
- download delay can’t become less than
DOWNLOAD_DELAYor greater thanAUTOTHROTTLE_MAX_DELAY
Note
AutoThrottle扩展尊重并发和延迟的标准Scrapy设置。 这意味着它将尊重CONCURRENT_REQUESTS_PER_DOMAIN 和CONCURRENT_REQUESTS_PER_IP选项,并且从不设置低于DOWNLOAD_DELAY的延迟。
在Scrapy中,下载延迟是以建立TCP连接和接收HTTP报头之间经过的时间来衡量的。
注意,在协作多任务环境中,很难准确测量这些延迟,因为Scrapy可能正忙于处理spider回调,例如,无法参与下载。 但是,这些延迟仍然可以合理地估计Scrapy(最终是服务器)的繁忙程度,并且这个扩展是在这个前提下构建的。
Settings
用于控制自动限速扩展的设置为:
AUTOTHROTTLE_ENABLEDAUTOTHROTTLE_START_DELAYAUTOTHROTTLE_MAX_DELAYAUTOTHROTTLE_TARGET_CONCURRENCYAUTOTHROTTLE_DEBUGCONCURRENT_REQUESTS_PER_DOMAINCONCURRENT_REQUESTS_PER_IPDOWNLOAD_DELAY
For more information see How it works.
AUTOTHROTTLE_MAX_DELAY
Default: 60.0
The maximum download delay (in seconds) to be set in case of high latencies.
AUTOTHROTTLE_TARGET_CONCURRENCY
New in version 1.1.
Default: 1.0
Scrapy应并行发送到远程网站的平均请求数。
默认情况下,AutoThrottle会调整延迟,以便向每个远程网站发送单个并发请求。 将此选项设置为更高的值(例如2.0),以增加远程服务器上的吞吐量和负载。 较低的 AUTOTHROTTLE_TARGET_CONCURRENCY 值(例如0.5)使爬虫程序更加保守和礼貌。
请注意,启用AutoThrottle扩展时,仍会遵循CONCURRENT_REQUESTS_PER_DOMAIN 和CONCURRENT_REQUESTS_PER_IP选项。 这意味着,如果AUTOTHROTTLE_TARGET_CONCURRENCY设置为高于CONCURRENT_REQUESTS_PER_DOMAIN 或CONCURRENT_REQUESTS_PER_IP的值,则爬虫程序将不会达到此并发请求数。
在每个给定的时间点上,Scrapy可以比AUTOTHROTTLE_TARGET_CONCURRENCY发送更多或更少的并发请求;这是爬虫程序尝试接近的建议值,而不是硬性限制。
基准测试
New in version 0.17.
Scrapy附带了一个简单的基准测试套件,它生成一个本地HTTP服务器,并以尽可能快的速度对其进行爬取。 此基准测试的目标是了解Scrapy在硬件中的性能,以便有一个通用的比较基准。 它使用一个简单的爬虫,什么也不做,只是跟踪链接。
To run it use:
scrapy bench
You should see an output like this:
2016-12-16 21:18:48 [scrapy.utils.log] INFO: Scrapy 1.2.2 started (bot: quotesbot)
2016-12-16 21:18:48 [scrapy.utils.log] INFO: Overridden settings: {'CLOSESPIDER_TIMEOUT': 10, 'ROBOTSTXT_OBEY': True, 'SPIDER_MODULES': ['quotesbot.spiders'], 'LOGSTATS_INTERVAL': 1, 'BOT_NAME': 'quotesbot', 'LOG_LEVEL': 'INFO', 'NEWSPIDER_MODULE': 'quotesbot.spiders'}
2016-12-16 21:18:49 [scrapy.middleware] INFO: Enabled extensions:
['scrapy.extensions.closespider.CloseSpider',
'scrapy.extensions.logstats.LogStats',
'scrapy.extensions.telnet.TelnetConsole',
'scrapy.extensions.corestats.CoreStats']
2016-12-16 21:18:49 [scrapy.middleware] INFO: Enabled downloader middlewares:
['scrapy.downloadermiddlewares.robotstxt.RobotsTxtMiddleware',
'scrapy.downloadermiddlewares.httpauth.HttpAuthMiddleware',
'scrapy.downloadermiddlewares.downloadtimeout.DownloadTimeoutMiddleware',
'scrapy.downloadermiddlewares.defaultheaders.DefaultHeadersMiddleware',
'scrapy.downloadermiddlewares.useragent.UserAgentMiddleware',
'scrapy.downloadermiddlewares.retry.RetryMiddleware',
'scrapy.downloadermiddlewares.redirect.MetaRefreshMiddleware',
'scrapy.downloadermiddlewares.httpcompression.HttpCompressionMiddleware',
'scrapy.downloadermiddlewares.redirect.RedirectMiddleware',
'scrapy.downloadermiddlewares.cookies.CookiesMiddleware',
'scrapy.downloadermiddlewares.stats.DownloaderStats']
2016-12-16 21:18:49 [scrapy.middleware] INFO: Enabled spider middlewares:
['scrapy.spidermiddlewares.httperror.HttpErrorMiddleware',
'scrapy.spidermiddlewares.offsite.OffsiteMiddleware',
'scrapy.spidermiddlewares.referer.RefererMiddleware',
'scrapy.spidermiddlewares.urllength.UrlLengthMiddleware',
'scrapy.spidermiddlewares.depth.DepthMiddleware']
2016-12-16 21:18:49 [scrapy.middleware] INFO: Enabled item pipelines:
[]
2016-12-16 21:18:49 [scrapy.core.engine] INFO: Spider opened
2016-12-16 21:18:49 [scrapy.extensions.logstats] INFO: Crawled 0 pages (at 0 pages/min), scraped 0 items (at 0 items/min)
2016-12-16 21:18:50 [scrapy.extensions.logstats] INFO: Crawled 70 pages (at 4200 pages/min), scraped 0 items (at 0 items/min)
2016-12-16 21:18:51 [scrapy.extensions.logstats] INFO: Crawled 134 pages (at 3840 pages/min), scraped 0 items (at 0 items/min)
2016-12-16 21:18:52 [scrapy.extensions.logstats] INFO: Crawled 198 pages (at 3840 pages/min), scraped 0 items (at 0 items/min)
2016-12-16 21:18:53 [scrapy.extensions.logstats] INFO: Crawled 254 pages (at 3360 pages/min), scraped 0 items (at 0 items/min)
2016-12-16 21:18:54 [scrapy.extensions.logstats] INFO: Crawled 302 pages (at 2880 pages/min), scraped 0 items (at 0 items/min)
2016-12-16 21:18:55 [scrapy.extensions.logstats] INFO: Crawled 358 pages (at 3360 pages/min), scraped 0 items (at 0 items/min)
2016-12-16 21:18:56 [scrapy.extensions.logstats] INFO: Crawled 406 pages (at 2880 pages/min), scraped 0 items (at 0 items/min)
2016-12-16 21:18:57 [scrapy.extensions.logstats] INFO: Crawled 438 pages (at 1920 pages/min), scraped 0 items (at 0 items/min)
2016-12-16 21:18:58 [scrapy.extensions.logstats] INFO: Crawled 470 pages (at 1920 pages/min), scraped 0 items (at 0 items/min)
2016-12-16 21:18:59 [scrapy.core.engine] INFO: Closing spider (closespider_timeout)
2016-12-16 21:18:59 [scrapy.extensions.logstats] INFO: Crawled 518 pages (at 2880 pages/min), scraped 0 items (at 0 items/min)
2016-12-16 21:19:00 [scrapy.statscollectors] INFO: Dumping Scrapy stats:
{'downloader/request_bytes': 229995,
'downloader/request_count': 534,
'downloader/request_method_count/GET': 534,
'downloader/response_bytes': 1565504,
'downloader/response_count': 534,
'downloader/response_status_count/200': 534,
'finish_reason': 'closespider_timeout',
'finish_time': datetime.datetime(2016, 12, 16, 16, 19, 0, 647725),
'log_count/INFO': 17,
'request_depth_max': 19,
'response_received_count': 534,
'scheduler/dequeued': 533,
'scheduler/dequeued/memory': 533,
'scheduler/enqueued': 10661,
'scheduler/enqueued/memory': 10661,
'start_time': datetime.datetime(2016, 12, 16, 16, 18, 49, 799869)}
2016-12-16 21:19:00 [scrapy.core.engine] INFO: Spider closed (closespider_timeout)
That tells you that Scrapy is able to crawl about 3000 pages per minute in the hardware where you run it. Note that this is a very simple spider intended to follow links, any custom spider you write will probably do more stuff which results in slower crawl rates. How slower depends on how much your spider does and how well it’s written.
将来,将向基准测试套件添加更多的案例,以涵盖其他常见场景。
作业:暂停和恢复爬取
有时,对于大型网站来说,最好暂停爬取,以后再继续爬取。
Scrapy通过提供以下功能支持这一功能:
- • 在磁盘上保持预定请求的调度程序
- 在磁盘上保留已访问请求的重复筛选器
- 在批处理之间保持某些爬虫状态(键/值对)持久的扩展
作业目录
要启用持久性支持,只需通过 JOBDIR设置定义作业目录 。 此目录将用于存储所有必需的数据,以保持单个作业(即爬虫运行)的状态。 :) 需要注意的是,该目录不能由不同的spider共享,甚至不能由同一个spider的不同作业/运行共享,因为它用于存储单个作业的状态。
How to use it
要启动启用持久性支持的spider,请按如下方式运行:
scrapy crawl somespider -s JOBDIR=crawls/somespider-1
然后,您可以随时(通过按Ctrl-C或发送信号)安全地停止爬虫,稍后通过发出相同的命令恢复它:
scrapy crawl somespider -s JOBDIR=crawls/somespider-1
在批处理之间保持持久状态
有时您需要在暂停/恢复批处理之间保持一些持久的爬虫状态。 你可以使用spider.state属性,它应该是一个dict。 有一个内置的扩展,当spider启动和停止时,它负责序列化、存储和从作业目录加载该属性。
下面是一个使用spider状态的回调示例(为了简洁起见,省略了其他spider代码):
def parse_item(self, response):
# parse item here
self.state['items_count'] = self.state.get('items_count', 0) + 1
持久性问题
如果您想使用Scrapy持久性支持,需要记住以下几点:
Cookie过期
Cookie可能过期。 所以,如果你不尽快恢复你的爬虫,预定的请求可能不再工作。 如果你的爬虫不依赖Cookie,这就不是问题了。
请求序列化
要使持久性工作,Request对象必须可由pickle模块序列化,除了传递给它们的__init__方法的 callback和errback值之外,这些值必须是正在运行的Spider类的方法。
The most common issue here is to use lambda functions on request callbacks that
can’t be persisted.
So, for example, this won’t work:(注:旧版本示例)
def some_callback(self, response):
somearg = 'test'
return scrapy.Request('http://www.example.com', callback=lambda r: self.other_callback(r, somearg))
def other_callback(self, response, somearg):
print "the argument passed is:", somearg
But this will:
def some_callback(self, response):
somearg = 'test'
return scrapy.Request('http://www.example.com', callback=self.other_callback, meta={'somearg': somearg})
def other_callback(self, response):
somearg = response.meta['somearg']
print "the argument passed is:", somearg
如果要记录无法序列化的请求,可以在项目的“设置”页中将SCHEDULER_DEBUG 设置项设置为True。
默认为False。
- Frequently Asked Questions
- Get answers to most frequently asked questions.
- Debugging Spiders
- Learn how to debug common problems of your scrapy spider.
- Spiders Contracts
- Learn how to use contracts for testing your spiders.
- Common Practices
- Get familiar with some Scrapy common practices.
- Broad Crawls
- Tune Scrapy for crawling a lot domains in parallel.
- Using Firefox for scraping
- Learn how to scrape with Firefox and some useful add-ons.
- Using Firebug for scraping
- Learn how to scrape efficiently using Firebug.
- Debugging memory leaks
- Learn how to find and get rid of memory leaks in your crawler.
- Downloading and processing files and images
- Download files and/or images associated with your scraped items.
- Deploying Spiders
- Deploying your Scrapy spiders and run them in a remote server.
- AutoThrottle extension
- Adjust crawl rate dynamically based on load.
- Benchmarking
- Check how Scrapy performs on your hardware.
- Jobs: pausing and resuming crawls
- Learn how to pause and resume crawls for large spiders.
Extending Scrapy
架构概述
本文档描述了Scrapy的体系结构以及它的组件如何交互。
概述
下图显示了Scrapy体系结构及其组件的概述以及在系统内部发生的数据流概述(用红色箭头表示)。 下面将对这些组件进行简要说明,并提供有关这些组件的更多详细信息的链接。 数据流也在下面描述。
数据流
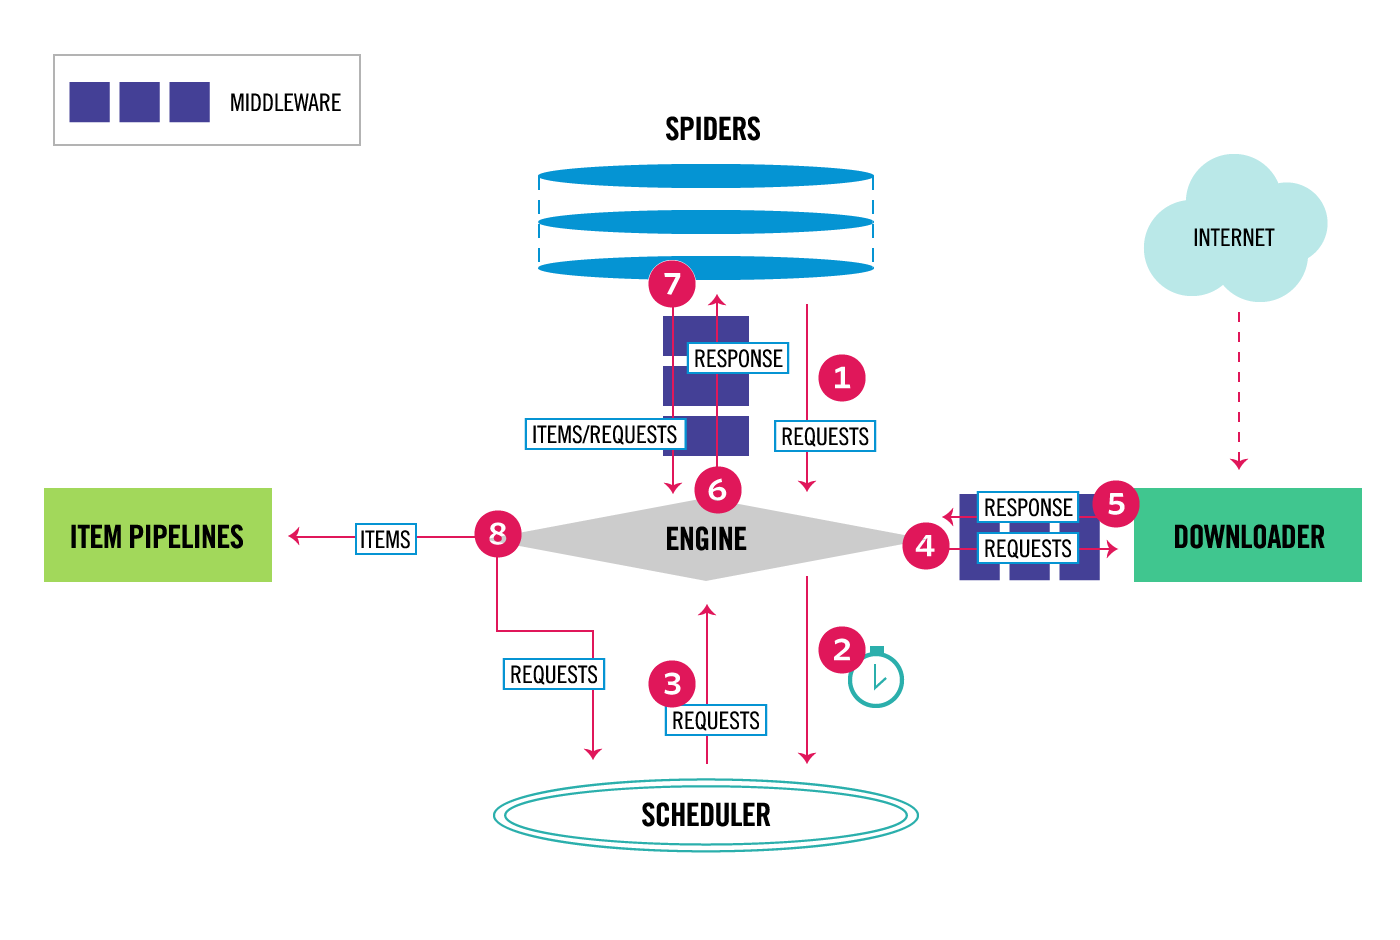
Scrapy中的数据流由执行引擎控制,如下所示:
- Engine从Spider获取初始请求进行爬取。
- Engine在Scheduler中调度请求,并寻找下一个用来抓取的请求。
- Scheduler将下一个请求返回给Engine。
- Engine通过Downloader Middlewares(参见
process_request())将请求发送到Downloader。 - 一旦页面完成下载,Downloader生成一个Response(包含该页面)并通过Downloader Middlewares将其发送到引擎(参见
process_response())。 - Engine接收来自Downloader的Response并通过Spider Middleware 将其发送到Spider进行处理(请参阅
process_spider_input())。 - Spider处理Response,并通过Spider Middleware返回被抓取的Item和新的请求(将要follow的)到Engine (参阅
process_spider_output())。 - Engine将已处理的Item发送到Item管道,然后将处理后的请求发送到Scheduler,并可能对下一个请求进行爬取。
- 重复处理(从步骤1开始),直到Scheduler没有更多请求。
组件
调度器
调度程序接收来自引擎的请求,并将它们排入队列,以便在引擎请求它们时提供(引擎)。
下载器
下载器负责获取网页并将它们馈送到引擎,然后引擎将它们馈送给蜘蛛。
Item管道
Item管道负责处理Spider提取(或抓取)到的Item。 典型的任务包括清理,验证和持久化(如将Item存储在数据库中)。 更多信息请参阅Item Pipeline.
Downloader middlewares
Downloader middlewares是位于引擎和下载器之间的特定钩子,负责处理引擎传给下载器的请求和下载器传给引擎的响应。
如果您需要执行以下操作之一,请使用Downloader middleware:
- 在将请求发送给下载器之前处理请求(即在Scrapy将请求发送到网站之前);
- 在传递给Spider之前改变接收到的响应;
- 发送新的请求,而不是将接收到的响应传递给Spider;
- 向Spider传递响应而不需要获取网页;
- 默默地弃用一些请求。
更多信息请参阅Downloader Middleware.
Spider middlewares
Spider中间件是引擎和Spider之间的特定钩子,能够处理Spider输入(响应)和输出(Item和请求)。
需要使用Spider中间件的几种情况
- spider回调输出的后处理 - 更改/添加/删除请求或Item;
- start_requests的后处理;
- 处理Spider异常;
- 根据响应内容为一些请求调用errback而不是回调。
更多信息请参阅Spider Middleware.
Downloader Middleware
下载器中间件是Scrapy的请求/响应处理的钩子框架。 这是一个轻量的低级系统,用于全局改变Scrapy的请求和响应。
激活一个下载中间件
要激活一个下载器中间件组件,需将它添加到DOWNLOADER_MIDDLEWARES设置中,该设置是一个字典,其键是中间件类路径,值是中间件顺序。
这是一个例子:
DOWNLOADER_MIDDLEWARES = {
'myproject.middlewares.CustomDownloaderMiddleware': 543,
}
DOWNLOADER_MIDDLEWARES设置与Scrapy中定义的DOWNLOADER_MIDDLEWARES_BASE设置合并(并不意味着被覆盖),然后按顺序排序以获得最终的启用中间件排序列表:第一个中间件是靠近引擎的中间件,最后一个是靠近下载器的中间件。 换句话说,每个中间件的process_request()方法将以增序(100,200,300,...)和每个中间件的process_response()方法调用中间件将按降序调用。
要决定分配给中间件的顺序,请参阅DOWNLOADER_MIDDLEWARES_BASE设置,并根据要插入中间件的位置选择一个值。 顺序很重要,因为每个中间件都执行不同的操作,而您的中间件可能依赖于某些以前(或后续)正在应用的中间件。
如果要禁用内置中间件(在DOWNLOADER_MIDDLEWARES_BASE中定义并默认启用的中间件),则必须在项目的DOWNLOADER_MIDDLEWARES设置中定义并分配None作为它的值。 例如,如果您想禁用用户代理中间件:
DOWNLOADER_MIDDLEWARES = {
'myproject.middlewares.CustomDownloaderMiddleware': 543,
'scrapy.downloadermiddlewares.useragent.UserAgentMiddleware': None,
}
最后,请注意某些中间件可能需要通过特定设置启用。 有关更多信息,请参阅每个中间件文档。
编写自定义下载中间件
每个中间件组件都是一个Python类,它定义了一种或多种以下方法:
-
class
scrapy.downloadermiddlewares.DownloaderMiddleware¶ 注意
所有下载器中间件方法都可能返回延迟。
-
process_request(request, spider)¶ 每个通过下载中间件的请求都会调用此方法。
process_request()应该:返回None, 或返回Response对象, 或返回Request对象,或引发IgnoreRequest异常.如果它返回
None,Scrapy将继续处理此请求,执行所有其他中间件,直到最后调用合适的下载器处理程序执行请求(及下载响应)。如果它返回一个
Response对象,Scrapy将不会调用任何其他process_request()或process_exception()方法或适当的下载功能;它会返回该响应。 每个响应都会调用已安装中间件的process_response()方法。如果它返回一个
Request对象,Scrapy将停止调用process_request方法并重新调度返回的请求。 一旦新返回的请求被执行,将对下载的响应中调用适当的中间件链。如果它引发
IgnoreRequest异常,将调用已安装的下载器中间件的process_exception()方法。 如果它们都不处理异常,则调用请求的errback函数(Request.errback)。 如果没有代码处理引发的异常,它将被忽略并且不被记录(不像其他异常)。参数:
-
process_response(request, response, spider)¶ process_response()应该:返回一个Response对象,或返回一个Request对象或引发一个IgnoreRequest异常。如果它返回一个
Response(它可以与给定响应相同或新的响应),响应将继续被链中的中间件的process_response()处理。如果它返回一个
Request对象,则中间件链将停止,并且将返回的请求重新调度以备之后下载。 这与从process_request()返回请求的行为相同。如果它引发一个
IgnoreRequest异常,则调用该请求的errback函数(Request.errback)。 如果没有代码处理引发的异常,它将被忽略并且不被记录(不像其他异常)。参数:
-
process_exception(request, exception, spider)¶ 当下载处理程序或
process_request()(来自下载中间件)引发异常(包括IgnoreRequest异常)时,Scrapy会调用process_exception()process_exception()应返回:None,或Response对象, 或Request对象.如果它返回
None,Scrapy将继续处理此异常,执行已安装中间件的任何其他process_exception()方法,直到没有中间件被遗留,开始默认异常处理。如果它返回一个
Response对象,则启动已安装中间件链的process_response()方法,并且Scrapy不会调用任何其他中间件的process_exception()方法。如果它返回一个
Request对象,则返回的请求将被重新调度以备将来下载。 这会停止执行中间件的process_exception()方法,就像返回响应一样。参数:
-
内置下载中间件参考
本页描述了Scrapy附带的所有下载中间件组件。 有关如何使用它们以及如何编写自己的下载中间件的信息,请参阅下载中间件使用指南。
有关默认启用的组件列表(及其顺序),请参阅DOWNLOADER_MIDDLEWARES_BASE设置。
CookiesMiddleware
该中间件可以处理需要cookie的网站,例如那些使用会话的网站。 它跟踪由Web服务器发送的cookie,并将其发回(从Spider中),就像web浏览器一样。
以下设置可用于配置Cookie中间件:
每个Spider的多个cookie会话
版本0.15的新增。
支持通过使用cookiejar请求元键保持每个Spider的多个cookie会话。 默认情况下,它使用一个单独的cookie jar(会话),但你可以传递一个标识符来使用其他的。
例如:
for i, url in enumerate(urls):
yield scrapy.Request(url, meta={'cookiejar': i},
callback=self.parse_page)
请注意,cookiejar元键不是“粘性”的。 您需要将它传递给随后的请求。 例如:
def parse_page(self, response):
# do some processing
return scrapy.Request("http://www.example.com/otherpage",
meta={'cookiejar': response.meta['cookiejar']},
callback=self.parse_other_page)
COOKIES_ENABLED
Default: True
是否启用Cookie中间件。 如果禁用,则不会将Cookie发送到Web服务器。
请注意,如果Request的meta ['dont_merge_cookies']为True。
不管COOKIES_ENABLED的值是什么, cookies将不会被发送到Web服务器,并且在Response中接收到的cookies 不会与现有的cookies合并。
有关更多详细信息,请参阅Request中的cookie参数
COOKIES_DEBUG
默认值:False
如果启用,Scrapy将记录在请求中发送的所有Cookie(即. Cookie头文件) 和所有收到响应的Cookie (即. Set-Cookie头文件).
以下是一个启用了COOKIES_DEBUG的日志示例:
2011-04-06 14:35:10-0300 [scrapy.core.engine] INFO: Spider opened
2011-04-06 14:35:10-0300 [scrapy.downloadermiddlewares.cookies] DEBUG: Sending cookies to: <GET http://www.diningcity.com/netherlands/index.html>
Cookie: clientlanguage_nl=en_EN
2011-04-06 14:35:14-0300 [scrapy.downloadermiddlewares.cookies] DEBUG: Received cookies from: <200 http://www.diningcity.com/netherlands/index.html>
Set-Cookie: JSESSIONID=B~FA4DC0C496C8762AE4F1A620EAB34F38; Path=/
Set-Cookie: ip_isocode=US
Set-Cookie: clientlanguage_nl=en_EN; Expires=Thu, 07-Apr-2011 21:21:34 GMT; Path=/
2011-04-06 14:49:50-0300 [scrapy.core.engine] DEBUG: Crawled (200) <GET http://www.diningcity.com/netherlands/index.html> (referer: None)
[...]
DefaultHeadersMiddleware
-
class
scrapy.downloadermiddlewares.defaultheaders.DefaultHeadersMiddleware¶ 该中间件将所有默认请求头文件设置为
DEFAULT_REQUEST_HEADERS中指定的请求头文件。
DownloadTimeoutMiddleware
-
class
scrapy.downloadermiddlewares.downloadtimeout.DownloadTimeoutMiddleware¶ 该中间件使用
DOWNLOAD_TIMEOUT设置或download_timeoutSpider属性为指定的请求设置下载超时。
注意
您还可以使用Request.meta的download_timeout键设置每个请求的下载超时时间,即使在禁用了DownloadTimeoutMiddleware的情况下也支持此功能。
HttpAuthMiddleware
-
class
scrapy.downloadermiddlewares.httpauth.HttpAuthMiddleware¶ 该中间件使用基本访问验证(又名:HTTP auth)来验证某些Spider生成的所有请求 .
要启用某些Spider的HTTP认证,请设置这些Spider的
http_user和http_pass属性。例:
from scrapy.spiders import CrawlSpider class SomeIntranetSiteSpider(CrawlSpider): http_user = 'someuser' http_pass = 'somepass' name = 'intranet.example.com' # .. rest of the spider code omitted ...
HttpCacheMiddleware
-
class
scrapy.downloadermiddlewares.httpcache.HttpCacheMiddleware¶ 该中间件为所有HTTP请求和响应提供低级缓存。 它必须与缓存存储后端以及缓存策略结合使用。
Scrapy附带三个HTTP缓存存储后端:
您可以使用
HTTPCACHE_STORAGE设置更改HTTP缓存存储后端。 或者你也可以实现你自己的存储后端。Scrapy附带两个HTTP缓存策略:
您可以使用
HTTPCACHE_POLICY设置更改HTTP缓存策略。 或者你也可以实现你自己的策略。您还可以使
dont_cache元键为True避免缓存每个策略的响应。
虚拟策略(默认)
该策略不接受任何HTTP Cache-Control指令。 每个请求及其相应的响应都被缓存。 当再次遇到相同的请求时,将返回响应而不从Internet传输任何内容。
Dummy策略对于更快地测试Spider(无需每次都等待下载)以及当Internet连接不可用时尝试离线使用Spider都很有用。 它的目标是能够像之前直接运行Spider那样“重演”运行Spider。
为了使用此策略,请设置:
HTTPCACHE_POLICY为scrapy.extensions.httpcache.DummyPolicy
RFC2616 policy
This policy provides a RFC2616 compliant HTTP cache, i.e. with HTTP Cache-Control awareness, aimed at production and used in continuous runs to avoid downloading unmodified data (to save bandwidth and speed up crawls).
what is implemented:
Do not attempt to store responses/requests with no-store cache-control directive set
Do not serve responses from cache if no-cache cache-control directive is set even for fresh responses
Compute freshness lifetime from max-age cache-control directive
Compute freshness lifetime from Expires response header
Compute freshness lifetime from Last-Modified response header (heuristic used by Firefox)
Compute current age from Age response header
Compute current age from Date header
Revalidate stale responses based on Last-Modified response header
Revalidate stale responses based on ETag response header
Set Date header for any received response missing it
Support max-stale cache-control directive in requests
This allows spiders to be configured with the full RFC2616 cache policy, but avoid revalidation on a request-by-request basis, while remaining conformant with the HTTP spec.
Example:
Add Cache-Control: max-stale=600 to Request headers to accept responses that have exceeded their expiration time by no more than 600 seconds.
See also: RFC2616, 14.9.3
what is missing:
- Pragma: no-cache support https://www.w3.org/Protocols/rfc2616/rfc2616-sec14.html#sec14.9.1
- Vary header support https://www.w3.org/Protocols/rfc2616/rfc2616-sec13.html#sec13.6
- Invalidation after updates or deletes https://www.w3.org/Protocols/rfc2616/rfc2616-sec13.html#sec13.10
- … probably others ..
In order to use this policy, set:
HTTPCACHE_POLICYtoscrapy.extensions.httpcache.RFC2616Policy
Filesystem storage backend (default)
File system storage backend is available for the HTTP cache middleware.
In order to use this storage backend, set:
HTTPCACHE_STORAGEtoscrapy.extensions.httpcache.FilesystemCacheStorage
Each request/response pair is stored in a different directory containing the following files:
request_body- the plain request bodyrequest_headers- the request headers (in raw HTTP format)response_body- the plain response bodyresponse_headers- the request headers (in raw HTTP format)meta- some metadata of this cache resource in Pythonrepr()format (grep-friendly format)pickled_meta- the same metadata inmetabut pickled for more efficient deserialization
The directory name is made from the request fingerprint (see
scrapy.utils.request.fingerprint), and one level of subdirectories is
used to avoid creating too many files into the same directory (which is
inefficient in many file systems). An example directory could be:
/path/to/cache/dir/example.com/72/72811f648e718090f041317756c03adb0ada46c7
DBM storage backend
New in version 0.13.
A DBM storage backend is also available for the HTTP cache middleware.
By default, it uses the anydbm module, but you can change it with the
HTTPCACHE_DBM_MODULE setting.
In order to use this storage backend, set:
HTTPCACHE_STORAGEtoscrapy.extensions.httpcache.DbmCacheStorage
LevelDB storage backend
New in version 0.23.
A LevelDB storage backend is also available for the HTTP cache middleware.
This backend is not recommended for development because only one process can access LevelDB databases at the same time, so you can’t run a crawl and open the scrapy shell in parallel for the same spider.
In order to use this storage backend:
- set
HTTPCACHE_STORAGEtoscrapy.extensions.httpcache.LeveldbCacheStorage - install LevelDB python bindings like
pip install leveldb
HTTPCache middleware settings
The HttpCacheMiddleware can be configured through the following
settings:
New in version 0.11.
Default: False
Whether the HTTP cache will be enabled.
Changed in version 0.11: Before 0.11, HTTPCACHE_DIR was used to enable cache.
Default: 0
Expiration time for cached requests, in seconds.
Cached requests older than this time will be re-downloaded. If zero, cached requests will never expire.
Changed in version 0.11: Before 0.11, zero meant cached requests always expire.
Default: 'httpcache'
The directory to use for storing the (low-level) HTTP cache. If empty, the HTTP cache will be disabled. If a relative path is given, is taken relative to the project data dir. For more info see: Default structure of Scrapy projects.
New in version 0.10.
Default: []
Don’t cache response with these HTTP codes.
Default: False
If enabled, requests not found in the cache will be ignored instead of downloaded.
New in version 0.10.
Default: ['file']
Don’t cache responses with these URI schemes.
Default: 'scrapy.extensions.httpcache.FilesystemCacheStorage'
The class which implements the cache storage backend.
New in version 0.13.
Default: 'anydbm'
The database module to use in the DBM storage backend. This setting is specific to the DBM backend.
New in version 0.18.
Default: 'scrapy.extensions.httpcache.DummyPolicy'
The class which implements the cache policy.
New in version 1.0.
Default: False
If enabled, will compress all cached data with gzip. This setting is specific to the Filesystem backend.
New in version 1.1.
Default: False
If enabled, will cache pages unconditionally.
A spider may wish to have all responses available in the cache, for future use with Cache-Control: max-stale, for instance. The DummyPolicy caches all responses but never revalidates them, and sometimes a more nuanced policy is desirable.
This setting still respects Cache-Control: no-store directives in responses. If you don’t want that, filter no-store out of the Cache-Control headers in responses you feedto the cache middleware.
New in version 1.1.
Default: []
List of Cache-Control directives in responses to be ignored.
Sites often set “no-store”, “no-cache”, “must-revalidate”, etc., but get upset at the traffic a spider can generate if it respects those directives. This allows to selectively ignore Cache-Control directives that are known to be unimportant for the sites being crawled.
We assume that the spider will not issue Cache-Control directives in requests unless it actually needs them, so directives in requests are not filtered.
HttpCompressionMiddleware
-
class
scrapy.downloadermiddlewares.httpcompression.HttpCompressionMiddleware¶ 该中间件允许从网站发送/接收压缩(gzip,deflate)流量。
该中间件还支持解码brotli-compressed响应,只要安装了brotlipy.
HttpProxyMiddleware
0.8版新增功能
-
class
scrapy.downloadermiddlewares.httpproxy.HttpProxyMiddleware¶ 该中间件通过为
Request对象设置proxy元值,为请求设置HTTP代理。与Python标准库模块urllib和urllib2一样,它遵从以下环境变量:
http_proxyhttps_proxyno_proxy
您还可以将每个请求的元量
proxy设置为像http:// some_proxy_server:port或http:// username:password @ some_proxy_server :端口。 请注意,此值优先于http_proxy/https_proxy环境变量,并且也会忽略no_proxy环境变量。
RedirectMiddleware
-
class
scrapy.downloadermiddlewares.redirect.RedirectMiddleware¶ 该中间件根据响应状态处理请求的重定向。
请求经过的URL(重定向时)可以在Request.meta的redirect_urls键中找到。
可以通过以下设置配置RedirectMiddleware(有关更多信息,请参阅设置文档):
如果Request.meta将dont_redirect键设置为True,则此中间件将忽略该请求。
如果你想在你的Spider中处理一些重定向状态码,你可以在Spider的handle_httpstatus_list属性中指定它们。
例如,如果您希望重定向中间件忽略301和302响应(并将它们传递给您的Spider),您可以这样做:
class MySpider(CrawlSpider):
handle_httpstatus_list = [301, 302]
Request.meta的handle_httpstatus_list键也可以用来指定在每个请求的基础上允许哪个响应代码。 如果您想允许任何请求的响应代码,您还可以将meta key handle_httpstatus_all设置为True。
MetaRefreshMiddleware
-
class
scrapy.downloadermiddlewares.redirect.MetaRefreshMiddleware¶ 该中间件处理基于元刷新html标签的请求重定向。
MetaRefreshMiddleware可以通过以下设置进行配置(有关更多信息,请参阅设置文档):
这个中间件遵守RedirectMiddleware中描述的REDIRECT_MAX_TIMES设置,dont_redirect和redirect_urls请求元键
MetaRefreshMiddleware设置
New in version 0.17.
Default: True
Whether the Meta Refresh middleware will be enabled.
Default: 100
The maximum meta-refresh delay (in seconds) to follow the redirection. Some sites use meta-refresh for redirecting to a session expired page, so we restrict automatic redirection to the maximum delay.
RetryMiddleware
-
class
scrapy.downloadermiddlewares.retry.RetryMiddleware¶ A middleware to retry failed requests that are potentially caused by temporary problems such as a connection timeout or HTTP 500 error.
Failed pages are collected on the scraping process and rescheduled at the end, once the spider has finished crawling all regular (non failed) pages. Once there are no more failed pages to retry, this middleware sends a signal (retry_complete), so other extensions could connect to that signal.
The RetryMiddleware can be configured through the following
settings (see the settings documentation for more info):
If Request.meta has dont_retry key
set to True, the request will be ignored by this middleware.
RetryMiddleware Settings
Default: 2
Maximum number of times to retry, in addition to the first download.
Maximum number of retries can also be specified per-request using
max_retry_times attribute of Request.meta.
When initialized, the max_retry_times meta key takes higher
precedence over the RETRY_TIMES setting.
Default: [500, 502, 503, 504, 408]
Which HTTP response codes to retry. Other errors (DNS lookup issues, connections lost, etc) are always retried.
In some cases you may want to add 400 to RETRY_HTTP_CODES because
it is a common code used to indicate server overload. It is not included by
default because HTTP specs say so.
RobotsTxtMiddleware
-
class
scrapy.downloadermiddlewares.robotstxt.RobotsTxtMiddleware¶ 该中间件过滤掉robots.txt排除标准禁止的请求。
为确保Scrapy遵守robots.txt,请确保中间件已启用,并且已启用
ROBOTSTXT_OBEY设置。
If Request.meta has
dont_obey_robotstxt key set to True
the request will be ignored by this middleware even if
ROBOTSTXT_OBEY is enabled.
DownloaderStats
-
class
scrapy.downloadermiddlewares.stats.DownloaderStats¶ 存储所有通过它的请求,响应和异常的统计信息的中间件。
要使用此中间件,您必须启用
DOWNLOADER_STATS设置。
UserAgentMiddleware
-
class
scrapy.downloadermiddlewares.useragent.UserAgentMiddleware¶ 允许Spider重写默认用户代理的中间件。
为了使Spider重写默认用户代理,必须设置其user_agent属性。
AjaxCrawlMiddleware
-
class
scrapy.downloadermiddlewares.ajaxcrawl.AjaxCrawlMiddleware¶ 根据meta-fragment html标签查找“AJAX可抓取”页面变体的中间件。 有关详细信息,请参阅https://developers.google.com/webmasters/ajax-crawling/docs/getting-started。
Note
Scrapy finds ‘AJAX crawlable’ pages for URLs like
'http://example.com/!#foo=bar'even without this middleware. AjaxCrawlMiddleware is necessary when URL doesn’t contain'!#'. This is often a case for ‘index’ or ‘main’ website pages.
AjaxCrawlMiddleware Settings
New in version 0.21.
Default: False
Whether the AjaxCrawlMiddleware will be enabled. You may want to enable it for broad crawls.
Spider Middleware
Spider中间件是Scrapy Spider处理机制的钩子框架,您可以插入自定义功能来处理发送给Spiders的响应和Spider生成的请求和Item。
激活Spider中间件
要激活Spider中间件组件,将它添加到SPIDER_MIDDLEWARES设置中,该设置是一个字典,其键是中间件类路径,值是中间件顺序。
这是一个例子:
SPIDER_MIDDLEWARES = {
'myproject.middlewares.CustomSpiderMiddleware': 543,
}
将SPIDER_MIDDLEWARES设置与Scrapy中定义的SPIDER_MIDDLEWARES_BASE设置合并(不会重写),然后按顺序排序以获得最终的启用中间件排序列表:第一个中间件是靠近引擎的中间件,最后一个是靠近Spider的中间件。 换句话说,每个中间件的process_spider_input()方法将以递增的中间件顺序(100,200,300,...)和process_spider_output()方法将以递减的中间件顺序调用。
要决定分配给中间件的顺序,请参阅SPIDER_MIDDLEWARES_BASE设置,并根据要插入中间件的位置选择一个值。 顺序很重要,因为每个中间件都执行不同的操作,而您的中间件可能依赖于某些前序(或后续)正在应用的中间件。
如果要禁用内置中间件(在SPIDER_MIDDLEWARES_BASE中定义并在默认情况下启用的中间件),则必须在您的项目SPIDER_MIDDLEWARES设置中定义它并分配None作为其值。 例如,如果您想禁用off-site中间件:
SPIDER_MIDDLEWARES = {
'myproject.middlewares.CustomSpiderMiddleware': 543,
'scrapy.spidermiddlewares.offsite.OffsiteMiddleware': None,
}
最后,请注意某些中间件可能需要通过特定设置启用。 有关更多信息,请参阅每个中间件文档。
编写自定义Spider中间件
每个中间件组件都是一个Python类,它定义了以下一种或多种方法:
-
class
scrapy.spidermiddlewares.SpiderMiddleware¶ -
process_spider_input(response, spider)¶ 这种方法被每一个通过Spider中间件进入Spider的响应调用。
process_spider_input()应该返回None或引发异常。如果它返回
None,Scrapy将继续处理此响应,执行所有其他中间件,直到最终将响应交给Spider进行处理。如果它引发异常,Scrapy将不会继续调用任何其他Spider中间件的
process_spider_input(),而是调用请求errback。 errback的输出由反向的process_spider_output()来处理,如果发生异常调用process_spider_exception()。参数:
-
process_spider_output(response, result, spider)¶ 该方法被Spider处理完响应后返回的结果调用。
process_spider_output()返回一个可迭代的Request,字典或Item对象.Parameters:
-
process_spider_exception(response, exception, spider)¶ 当一个Spider或
process_spider_input()方法(来自其他Spider中间件)引发异常时,将调用此方法。process_spider_exception()应该返回None或可迭代的Response,dict或Item对象。如果它返回
None,则Scrapy将继续处理此异常,在后续中间件组件中执行任何其他process_spider_exception(),直到没有中间件组件遗留并且异常到达引擎(异常被记录和丢弃)。如果它返回一个可迭代的
process_spider_output()管道,将不会调用其他的process_spider_exception()。Parameters:
-
process_start_requests(start_requests, spider)¶ 版本0.15的新功能
该方法被spider初始请求调用,作用与
process_spider_output()方法类似,但它没有关联的响应,并且只能返回请求(不是Item)。它接收一个迭代(在
start_requests参数中)并且必须返回另一个Request对象的迭代。注意
在spider中间件中实现此方法时,应始终返回一个可迭代的(跟随输入的)并且不会消耗所有的
start_requests迭代器,因为它可能非常大(甚至无限)并导致内存溢出。 Scrapy引擎设计用于在有能力处理初始请求时就提取它们,因此在有其他停止Spider的条件(如时间限制或项目/页数)的情况下,初始请求迭代器可能会无穷无尽。参数:
-
内置Spider中间件参考
本页面描述了Scrapy附带的所有Spider中间件组件。 有关如何使用它们以及如何编写自己的Spider中间件的信息,请参阅Spider中间件使用指南。
有关默认启用的组件列表(及其顺序),请参阅SPIDER_MIDDLEWARES_BASE设置。
DepthMiddleware
-
class
scrapy.spidermiddlewares.depth.DepthMiddleware¶ DepthMiddleware用于跟踪被抓取站点内每个请求的深度。 它通过设置request.meta ['depth'] = 0来工作,只要没有先前设置的值(通常只是第一个请求)并以1递增即可。
It can be used to limit the maximum depth to scrape, control Request priority based on their depth, and things like that.
The
DepthMiddlewarecan be configured through the following settings (see the settings documentation for more info):DEPTH_LIMIT- The maximum depth that will be allowed to crawl for any site. If zero, no limit will be imposed.DEPTH_STATS- Whether to collect depth stats.DEPTH_PRIORITY- Whether to prioritize the requests based on their depth.
HttpErrorMiddleware
-
class
scrapy.spidermiddlewares.httperror.HttpErrorMiddleware¶ 过滤掉不成功的(错误的)HTTP响应,这样Spider就不必处理它们,因为它们(大部分时间)会产生开销,消耗更多资源,并使Spider逻辑更加复杂。
根据HTTP标准,成功的响应是状态码在200-300范围内的响应。
如果您仍想处理该范围之外的响应代码,则可以使用handle_httpstatus_list spider属性或HTTPERROR_ALLOWED_CODES设置来指定Spider能够处理的响应代码。
例如,如果你想让Spider来处理404响应,你可以这样做:
class MySpider(CrawlSpider):
handle_httpstatus_list = [404]
Request.meta的handle_httpstatus_list键也可以在每个请求的基础上用来指定允许哪个响应代码。 如果您想允许任何请求的响应代码,您还可以将meta key handle_httpstatus_all设置为True。
但请记住,除非你真的知道你在做什么,否则处理非200响应通常是一个坏主意。
有关更多信息,请参阅:HTTP状态码定义。
OffsiteMiddleware
-
class
scrapy.spidermiddlewares.offsite.OffsiteMiddleware¶ 过滤Spider所涉及域之外的URL请求。
This middleware filters out every request whose host names aren’t in the spider’s
allowed_domainsattribute. All subdomains of any domain in the list are also allowed. E.g. the rulewww.example.orgwill also allowbob.www.example.orgbut notwww2.example.comnorexample.com.When your spider returns a request for a domain not belonging to those covered by the spider, this middleware will log a debug message similar to this one:
DEBUG: Filtered offsite request to 'www.othersite.com': <GET http://www.othersite.com/some/page.html>To avoid filling the log with too much noise, it will only print one of these messages for each new domain filtered. So, for example, if another request for
www.othersite.comis filtered, no log message will be printed. But if a request forsomeothersite.comis filtered, a message will be printed (but only for the first request filtered).If the spider doesn’t define an
allowed_domainsattribute, or the attribute is empty, the offsite middleware will allow all requests.If the request has the
dont_filterattribute set, the offsite middleware will allow the request even if its domain is not listed in allowed domains.
RefererMiddleware
-
class
scrapy.spidermiddlewares.referer.RefererMiddleware¶ 根据生成它的Response的URL填充Request
Referer标头。
RefererMiddleware设置
1.4版本新功能.
默认值: 'scrapy.spidermiddlewares.referer.DefaultReferrerPolicy'
填充Request头文件的“Referer”时应用的Referrer Policy。
注意
You can also set the Referrer Policy per request,
using the special "referrer_policy" Request.meta key,
with the same acceptable values as for the REFERRER_POLICY setting.
- either a path to a
scrapy.spidermiddlewares.referer.ReferrerPolicysubclass — a custom policy or one of the built-in ones (see classes below), - or one of the standard W3C-defined string values,
- or the special
"scrapy-default".
-
class
scrapy.spidermiddlewares.referer.DefaultReferrerPolicy¶ A variant of “no-referrer-when-downgrade”, with the addition that “Referer” is not sent if the parent request was using
file://ors3://scheme.
Warning
Scrapy’s default referrer policy — just like “no-referrer-when-downgrade”,
the W3C-recommended value for browsers — will send a non-empty
“Referer” header from any http(s):// to any https:// URL,
even if the domain is different.
“same-origin” may be a better choice if you want to remove referrer information for cross-domain requests.
-
class
scrapy.spidermiddlewares.referer.NoReferrerPolicy¶ https://www.w3.org/TR/referrer-policy/#referrer-policy-no-referrer
The simplest policy is “no-referrer”, which specifies that no referrer information is to be sent along with requests made from a particular request client to any origin. The header will be omitted entirely.
-
class
scrapy.spidermiddlewares.referer.NoReferrerWhenDowngradePolicy¶ https://www.w3.org/TR/referrer-policy/#referrer-policy-no-referrer-when-downgrade
The “no-referrer-when-downgrade” policy sends a full URL along with requests from a TLS-protected environment settings object to a potentially trustworthy URL, and requests from clients which are not TLS-protected to any origin.
Requests from TLS-protected clients to non-potentially trustworthy URLs, on the other hand, will contain no referrer information. A Referer HTTP header will not be sent.
This is a user agent’s default behavior, if no policy is otherwise specified.
Note
“no-referrer-when-downgrade” policy is the W3C-recommended default, and is used by major web browsers.
However, it is NOT Scrapy’s default referrer policy (see DefaultReferrerPolicy).
-
class
scrapy.spidermiddlewares.referer.SameOriginPolicy¶ https://www.w3.org/TR/referrer-policy/#referrer-policy-same-origin
The “same-origin” policy specifies that a full URL, stripped for use as a referrer, is sent as referrer information when making same-origin requests from a particular request client.
Cross-origin requests, on the other hand, will contain no referrer information. A Referer HTTP header will not be sent.
-
class
scrapy.spidermiddlewares.referer.OriginPolicy¶ https://www.w3.org/TR/referrer-policy/#referrer-policy-origin
The “origin” policy specifies that only the ASCII serialization of the origin of the request client is sent as referrer information when making both same-origin requests and cross-origin requests from a particular request client.
-
class
scrapy.spidermiddlewares.referer.StrictOriginPolicy¶ https://www.w3.org/TR/referrer-policy/#referrer-policy-strict-origin
The “strict-origin” policy sends the ASCII serialization of the origin of the request client when making requests: - from a TLS-protected environment settings object to a potentially trustworthy URL, and - from non-TLS-protected environment settings objects to any origin.
Requests from TLS-protected request clients to non- potentially trustworthy URLs, on the other hand, will contain no referrer information. A Referer HTTP header will not be sent.
-
class
scrapy.spidermiddlewares.referer.OriginWhenCrossOriginPolicy¶ https://www.w3.org/TR/referrer-policy/#referrer-policy-origin-when-cross-origin
The “origin-when-cross-origin” policy specifies that a full URL, stripped for use as a referrer, is sent as referrer information when making same-origin requests from a particular request client, and only the ASCII serialization of the origin of the request client is sent as referrer information when making cross-origin requests from a particular request client.
-
class
scrapy.spidermiddlewares.referer.StrictOriginWhenCrossOriginPolicy¶ https://www.w3.org/TR/referrer-policy/#referrer-policy-strict-origin-when-cross-origin
The “strict-origin-when-cross-origin” policy specifies that a full URL, stripped for use as a referrer, is sent as referrer information when making same-origin requests from a particular request client, and only the ASCII serialization of the origin of the request client when making cross-origin requests:
- from a TLS-protected environment settings object to a potentially trustworthy URL, and
- from non-TLS-protected environment settings objects to any origin.
Requests from TLS-protected clients to non- potentially trustworthy URLs, on the other hand, will contain no referrer information. A Referer HTTP header will not be sent.
-
class
scrapy.spidermiddlewares.referer.UnsafeUrlPolicy¶ https://www.w3.org/TR/referrer-policy/#referrer-policy-unsafe-url
The “unsafe-url” policy specifies that a full URL, stripped for use as a referrer, is sent along with both cross-origin requests and same-origin requests made from a particular request client.
Note: The policy’s name doesn’t lie; it is unsafe. This policy will leak origins and paths from TLS-protected resources to insecure origins. Carefully consider the impact of setting such a policy for potentially sensitive documents.
Warning
“unsafe-url” policy is NOT recommended.
UrlLengthMiddleware
-
class
scrapy.spidermiddlewares.urllength.UrlLengthMiddleware¶ 筛选出URL长度超过URLLENGTH_LIMIT的请求
The
UrlLengthMiddlewarecan be configured through the following settings (see the settings documentation for more info):URLLENGTH_LIMIT- The maximum URL length to allow for crawled URLs.
扩展
扩展框架提供了一种将自定义功能插入到Scrapy中的机制。
扩展只是在Scrapy启动时实例化的常规类。
扩展设置
扩展程序使用Scrapy设置来管理其设置,就像其他Scrapy代码一样。
扩展名通常以其自己的名称作为其设置的前缀,以避免与现有(和未来)扩展名冲突。 例如,假设处理Google Sitemaps的扩展将使用像GOOGLESITEMAP_ENABLED,GOOGLESITEMAP_DEPTH等设置。
载入 & 激活扩展
扩展在启动时通过实例化扩展类的单个实例来加载和激活。 因此,所有的扩展初始化代码必须在类构造函数中执行(__ init __方法)。
要使扩展程序可用,请将其添加到Scrapy设置中的EXTENSIONS设置。 在EXTENSIONS中,每个扩展都用一个字符串表示:扩展类名的完整Python路径。 例如:
EXTENSIONS = {
'scrapy.extensions.corestats.CoreStats': 500,
'scrapy.extensions.telnet.TelnetConsole': 500,
}
如您所见,EXTENSIONS设置是一个字典,其中键是扩展路径,它们的值是定义扩展加载 顺序。 EXTENSIONS设置将与Scrapy中定义的EXTENSIONS_BASE设置合并(不会重写),然后按顺序排序以获得启用扩展的最终排序列表。
由于扩展通常不相互依赖,因此在大多数情况下,加载顺序无关紧要。 这就是为什么EXTENSIONS_BASE设置将所有扩展定义为相同的顺序(0)。 但是,如果您需要添加依赖于已加载的其他扩展的扩展,则可以利用此功能。
可用,启用和禁用扩展
并非所有可用的扩展都被启用。 其中一些通常取决于特定的设置。 例如,默认情况下HTTP Cache扩展可用,但除非设置了HTTPCACHE_ENABLED设置,否则禁用。
禁用扩展
为了禁用默认启用的扩展(即 包含在EXTENSIONS_BASE设置中的那些),您必须将其顺序设置为None。 例如:
EXTENSIONS = {
'scrapy.extensions.corestats.CoreStats': None,
}
编写自定义扩展
每个扩展都是一个Python类。 Scrapy扩展(也包括中间件和管道)的主要入口点是接收Crawler实例的from_crawler类方法。 通过Crawler对象,您可以访问设置,信号,统计信息并控制爬行行为。
通常,扩展连接到信号并执行由它们触发的任务。
最后,如果from_crawler方法引发NotConfigured异常,则该扩展将被禁用。 否则,该扩展将被启用。
扩展示例
这里我们将实现一个简单的扩展来说明上一节中描述的概念。 这个扩展每次都会记录一条消息:
- Spider被打开
- Spider被关闭
- 抓取指定数量的Item
该扩展将通过MYEXT_ENABLED设置启用,Item数量将通过MYEXT_ITEMCOUNT设置指定。
这是扩展的代码:
import logging
from scrapy import signals
from scrapy.exceptions import NotConfigured
logger = logging.getLogger(__name__)
class SpiderOpenCloseLogging(object):
def __init__(self, item_count):
self.item_count = item_count
self.items_scraped = 0
@classmethod
def from_crawler(cls, crawler):
# first check if the extension should be enabled and raise
# NotConfigured otherwise
if not crawler.settings.getbool('MYEXT_ENABLED'):
raise NotConfigured
# get the number of items from settings
item_count = crawler.settings.getint('MYEXT_ITEMCOUNT', 1000)
# instantiate the extension object
ext = cls(item_count)
# connect the extension object to signals
crawler.signals.connect(ext.spider_opened, signal=signals.spider_opened)
crawler.signals.connect(ext.spider_closed, signal=signals.spider_closed)
crawler.signals.connect(ext.item_scraped, signal=signals.item_scraped)
# return the extension object
return ext
def spider_opened(self, spider):
logger.info("opened spider %s", spider.name)
def spider_closed(self, spider):
logger.info("closed spider %s", spider.name)
def item_scraped(self, item, spider):
self.items_scraped += 1
if self.items_scraped % self.item_count == 0:
logger.info("scraped %d items", self.items_scraped)
内置扩展参考
通用扩展
Telnet控制台扩展
-
class
scrapy.extensions.telnet.TelnetConsole
提供一个Telnet控制台,用于在当前运行的Scrapy过程中进入Python解释器,这对调试非常有用。
telnet控制台必须通过TELNETCONSOLE_ENABLED设置启用,服务器将侦听TELNETCONSOLE_PORT中指定的端口。
内存使用扩展
-
class
scrapy.extensions.memusage.MemoryUsage
注意
此扩展在Windows中不起作用。
监控运行Spider的Scrapy进程使用的内存,并:
- 超过某个值时发送通知电子邮件
- 超过一定值时关闭Spider
当达到特定警告值(MEMUSAGE_WARNING_MB)并达到最大值(MEMUSAGE_LIMIT_MB)时,会触发通知电子邮件,也会导致Spider关闭并且Scrapy进程被终止。
该扩展由MEMUSAGE_ENABLED设置启用,并且可以使用以下设置进行配置:
内存调试器扩展
-
class
scrapy.extensions.memdebug.MemoryDebugger
调试内存使用的扩展。 它收集有关以下信息:
- Python垃圾收集器未收集的对象
- 不应该留下的激活对象。 有关更多信息,请参阅使用trackref调试内存泄漏
要启用此扩展,请打开MEMDEBUG_ENABLED设置。 信息将存储在统计信息中。
关闭Spider扩展
-
class
scrapy.extensions.closespider.CloseSpider
在满足某些条件时自动关闭Spider,并针对每种情况使用特定的关闭原因。
关闭Spider的条件可以通过以下设置进行配置:
默认值: 0
An integer which specifies a number of seconds. If the spider remains open for
more than that number of second, it will be automatically closed with the
reason closespider_timeout. If zero (or non set), spiders won’t be closed by
timeout.
Default: 0
An integer which specifies a number of items. If the spider scrapes more than
that amount and those items are passed by the item pipeline, the
spider will be closed with the reason closespider_itemcount.
Requests which are currently in the downloader queue (up to
CONCURRENT_REQUESTS requests) are still processed.
If zero (or non set), spiders won’t be closed by number of passed items.
New in version 0.11.
Default: 0
An integer which specifies the maximum number of responses to crawl. If the spider
crawls more than that, the spider will be closed with the reason
closespider_pagecount. If zero (or non set), spiders won’t be closed by
number of crawled responses.
New in version 0.11.
Default: 0
An integer which specifies the maximum number of errors to receive before
closing the spider. If the spider generates more than that number of errors,
it will be closed with the reason closespider_errorcount. If zero (or non
set), spiders won’t be closed by number of errors.
StatsMailer扩展
-
class
scrapy.extensions.statsmailer.StatsMailer
这个简单的扩展可用于每次域名完成抓取时发送通知电子邮件,包括收集的Scrapy统计信息。 该电子邮件将发送给STATSMAILER_RCPTS设置中指定的所有收件人。
调试扩展
堆栈跟踪转储扩展
-
class
scrapy.extensions.debug.StackTraceDump
收到SIGQUIT或SIGUSR2信号时,转储有关正在运行的进程的信息。 转储的信息如下:
- 引擎状态(使用
scrapy.utils.engine.get_engine_status()) - 活动参考(请参阅使用trackref调试内存泄漏)
- 所有线程的堆栈跟踪
After the stack trace and engine status is dumped, the Scrapy process continues running normally.
This extension only works on POSIX-compliant platforms (ie. not Windows), because the SIGQUIT and SIGUSR2 signals are not available on Windows.
There are at least two ways to send Scrapy the SIGQUIT signal:
By pressing Ctrl-while a Scrapy process is running (Linux only?)
By running this command (assuming
<pid>is the process id of the Scrapy process):kill -QUIT <pid>
核心API 
0.15版本新功能。
本部分介绍Scrapy核心API,它被用于扩展和中间件的开发人员。
Crawler API
Scrapy API的主要入口点是通过from_crawler类方法将Crawler对象传递给扩展。 该对象提供对所有Scrapy核心组件的访问,并且它是扩展访问它们并将其功能挂接到Scrapy的唯一方式。
扩展管理器负责加载并跟踪已安装的扩展,并通过EXTENSIONS设置进行配置,该设置包含所有可用扩展及其顺序的字典,类似于配置下载器中间件的方式。
-
class
scrapy.crawler.Crawler(spidercls, settings)¶ Crawler对象必须使用
scrapy.spiders.Spider子类和scrapy.settings.Settings对象实例化。-
signals¶ 该Crawler的信号管理器。
这被用于扩展和中间件将功能挂载到Scrapy上
有关信号的介绍,请参阅Signals。
有关API,请参阅
SignalManager类。
-
stats¶ 此Crawler的统计信息收集器。
它被用于扩展和中间件对它们行为的统计记录,以及访问其他扩展收集的统计信息。
有关统计信息收集的介绍,请参阅统计信息收集。
有关API,请参阅
StatsCollector类。
-
engine¶ 执行引擎,用于协调调度程序,下载程序和Spider之间的核心爬行逻辑。
某些扩展可能希望访问Scrapy引擎,以检查或修改下载程序和调度程序的行为。但这是高级用法,并且此API尚不稳定。
-
crawl(*args, **kwargs)¶ 在执行引擎处于活动状态时,通过使用给定的args和kwargs参数实例化其spider类来启动爬网程序。
异步爬网完成时返回。
-
-
class
scrapy.crawler.CrawlerRunner(settings=None)¶ 这是一个便捷的帮助类,用于在已安装Twisted的reactor内跟踪,管理和运行爬网程序。
CrawlerRunner对象必须用
Settings对象实例化。除非编写手动处理爬行过程的脚本,否则不需要该类(因为Scrapy负责相应使用它)。 有关示例,请参阅从脚本运行Scrapy。
-
crawl(crawler_or_spidercls, *args, **kwargs)¶ Run a crawler with the provided arguments.
It will call the given Crawler’s
crawl()method, while keeping track of it so it can be stopped later.If crawler_or_spidercls isn’t a
Crawlerinstance, this method will try to create one using this parameter as the spider class given to it.Returns a deferred that is fired when the crawling is finished.
Parameters:
-
create_crawler(crawler_or_spidercls)¶ Return a
Crawlerobject.- If crawler_or_spidercls is a Crawler, it is returned as-is.
- If crawler_or_spidercls is a Spider subclass, a new Crawler is constructed for it.
- If crawler_or_spidercls is a string, this function finds a spider with this name in a Scrapy project (using spider loader), then creates a Crawler instance for it.
-
stop()¶ Stops simultaneously all the crawling jobs taking place.
Returns a deferred that is fired when they all have ended.
-
-
class
scrapy.crawler.CrawlerProcess(settings=None, install_root_handler=True)¶ 基类:
scrapy.crawler.CrawlerRunner在一个进程中同时运行多个scrapy爬虫的类。
This class extends
CrawlerRunnerby adding support for starting a Twisted reactor and handling shutdown signals, like the keyboard interrupt command Ctrl-C. It also configures top-level logging.This utility should be a better fit than
CrawlerRunnerif you aren’t running another Twisted reactor within your application.The CrawlerProcess object must be instantiated with a
Settingsobject.Parameters: install_root_handler – whether to install root logging handler (default: True) This class shouldn’t be needed (since Scrapy is responsible of using it accordingly) unless writing scripts that manually handle the crawling process. See Run Scrapy from a script for an example.
-
crawl(crawler_or_spidercls, *args, **kwargs)¶ Run a crawler with the provided arguments.
It will call the given Crawler’s
crawl()method, while keeping track of it so it can be stopped later.If crawler_or_spidercls isn’t a
Crawlerinstance, this method will try to create one using this parameter as the spider class given to it.Returns a deferred that is fired when the crawling is finished.
Parameters:
-
create_crawler(crawler_or_spidercls)¶ Return a
Crawlerobject.- If crawler_or_spidercls is a Crawler, it is returned as-is.
- If crawler_or_spidercls is a Spider subclass, a new Crawler is constructed for it.
- If crawler_or_spidercls is a string, this function finds a spider with this name in a Scrapy project (using spider loader), then creates a Crawler instance for it.
-
start(stop_after_crawl=True)¶ This method starts a Twisted reactor, adjusts its pool size to
REACTOR_THREADPOOL_MAXSIZE, and installs a DNS cache based onDNSCACHE_ENABLEDandDNSCACHE_SIZE.If stop_after_crawl is True, the reactor will be stopped after all crawlers have finished, using
join().Parameters: stop_after_crawl (boolean) – stop or not the reactor when all crawlers have finished
-
stop()¶ Stops simultaneously all the crawling jobs taking place.
Returns a deferred that is fired when they all have ended.
-
Settings API
-
scrapy.settings.SETTINGS_PRIORITIES¶ 设置Scrapy中默认设置的键名和优先级的字典。
每个项目定义一个设置入口点,给它一个用于识别的代码名称和一个整数优先级。 在设置和检索
Settings类中的值时,优先级高的优先。SETTINGS_PRIORITIES = { 'default': 0, 'command': 10, 'project': 20, 'spider': 30, 'cmdline': 40, }
有关每个设置源的详细说明,请参阅:设置。
-
scrapy.settings.get_settings_priority(priority)¶ 在
SETTINGS_PRIORITIES字典中查找给定字符串优先级并返回其数值或直接返回给定数字优先级的帮助函数。
-
class
scrapy.settings.Settings(values=None, priority='project')¶ 基类:
scrapy.settings.BaseSettings该对象存储用于配置内部组件的Scrapy设置,并可用于进一步的自定义。
It is a direct subclass and supports all methods of
BaseSettings. Additionally, after instantiation of this class, the new object will have the global default settings described on Built-in settings reference already populated.
-
class
scrapy.settings.BaseSettings(values=None, priority='project')¶ 这个类的实例像字典一样,存储优先级以及它们的
(key, value)对,并且可以被冻结(即被标记为不可变的)。Key-value entries can be passed on initialization with the
valuesargument, and they would take theprioritylevel (unlessvaluesis already an instance ofBaseSettings, in which case the existing priority levels will be kept). If thepriorityargument is a string, the priority name will be looked up inSETTINGS_PRIORITIES. Otherwise, a specific integer should be provided.Once the object is created, new settings can be loaded or updated with the
set()method, and can be accessed with the square bracket notation of dictionaries, or with theget()method of the instance and its value conversion variants. When requesting a stored key, the value with the highest priority will be retrieved.-
copy()¶ Make a deep copy of current settings.
This method returns a new instance of the
Settingsclass, populated with the same values and their priorities.Modifications to the new object won’t be reflected on the original settings.
-
copy_to_dict()¶ Make a copy of current settings and convert to a dict.
This method returns a new dict populated with the same values and their priorities as the current settings.
Modifications to the returned dict won’t be reflected on the original settings.
This method can be useful for example for printing settings in Scrapy shell.
-
freeze()¶ Disable further changes to the current settings.
After calling this method, the present state of the settings will become immutable. Trying to change values through the
set()method and its variants won’t be possible and will be alerted.
-
frozencopy()¶ Return an immutable copy of the current settings.
-
get(name, default=None)¶ Get a setting value without affecting its original type.
Parameters: - name (string) – the setting name
- default (any) – the value to return if no setting is found
-
getbool(name, default=False)¶ Get a setting value as a boolean.
1,'1', True` and'True'returnTrue, while0,'0',False,'False'andNonereturnFalse.For example, settings populated through environment variables set to
'0'will returnFalsewhen using this method.Parameters: - name (string) – the setting name
- default (any) – the value to return if no setting is found
-
getdict(name, default=None)¶ Get a setting value as a dictionary. If the setting original type is a dictionary, a copy of it will be returned. If it is a string it will be evaluated as a JSON dictionary. In the case that it is a
BaseSettingsinstance itself, it will be converted to a dictionary, containing all its current settings values as they would be returned byget(), and losing all information about priority and mutability.Parameters: - name (string) – the setting name
- default (any) – the value to return if no setting is found
-
getfloat(name, default=0.0)¶ Get a setting value as a float.
Parameters: - name (string) – the setting name
- default (any) – the value to return if no setting is found
-
getint(name, default=0)¶ Get a setting value as an int.
Parameters: - name (string) – the setting name
- default (any) – the value to return if no setting is found
-
getlist(name, default=None)¶ Get a setting value as a list. If the setting original type is a list, a copy of it will be returned. If it’s a string it will be split by “,”.
For example, settings populated through environment variables set to
'one,two'will return a list [‘one’, ‘two’] when using this method.Parameters: - name (string) – the setting name
- default (any) – the value to return if no setting is found
-
getpriority(name)¶ Return the current numerical priority value of a setting, or
Noneif the givennamedoes not exist.Parameters: name (string) – the setting name
-
getwithbase(name)¶ Get a composition of a dictionary-like setting and its _BASE counterpart.
Parameters: name (string) – name of the dictionary-like setting
-
maxpriority()¶ Return the numerical value of the highest priority present throughout all settings, or the numerical value for
defaultfromSETTINGS_PRIORITIESif there are no settings stored.
-
set(name, value, priority='project')¶ Store a key/value attribute with a given priority.
Settings should be populated before configuring the Crawler object (through the
configure()method), otherwise they won’t have any effect.Parameters: - name (string) – the setting name
- value (any) – the value to associate with the setting
- priority (string or int) – the priority of the setting. Should be a key of
SETTINGS_PRIORITIESor an integer
-
setmodule(module, priority='project')¶ Store settings from a module with a given priority.
This is a helper function that calls
set()for every globally declared uppercase variable ofmodulewith the providedpriority.Parameters: - module (module object or string) – the module or the path of the module
- priority (string or int) – the priority of the settings. Should be a key of
SETTINGS_PRIORITIESor an integer
-
update(values, priority='project')¶ Store key/value pairs with a given priority.
This is a helper function that calls
set()for every item ofvalueswith the providedpriority.If
valuesis a string, it is assumed to be JSON-encoded and parsed into a dict withjson.loads()first. If it is aBaseSettingsinstance, the per-key priorities will be used and thepriorityparameter ignored. This allows inserting/updating settings with different priorities with a single command.Parameters: - values (dict or string or
BaseSettings) – the settings names and values - priority (string or int) – the priority of the settings. Should be a key of
SETTINGS_PRIORITIESor an integer
- values (dict or string or
-
SpiderLoader API
-
class
scrapy.loader.SpiderLoader¶ 这个类负责检索和处理整个项目中定义的Spider类。
Custom spider loaders can be employed by specifying their path in the
SPIDER_LOADER_CLASSproject setting. They must fully implement thescrapy.interfaces.ISpiderLoaderinterface to guarantee an errorless execution.-
from_settings(settings)¶ This class method is used by Scrapy to create an instance of the class. It’s called with the current project settings, and it loads the spiders found recursively in the modules of the
SPIDER_MODULESsetting.Parameters: settings ( Settingsinstance) – project settings
-
load(spider_name)¶ Get the Spider class with the given name. It’ll look into the previously loaded spiders for a spider class with name spider_name and will raise a KeyError if not found.
Parameters: spider_name (str) – spider class name
-
list()¶ Get the names of the available spiders in the project.
-
Signals API
-
class
scrapy.signalmanager.SignalManager(sender=_Anonymous)¶ -
connect(receiver, signal, **kwargs)¶ 将接收器功能连接到信号。
The signal can be any object, although Scrapy comes with some predefined signals that are documented in the Signals section.
Parameters: - receiver (callable) – the function to be connected
- signal (object) – the signal to connect to
-
disconnect(receiver, signal, **kwargs)¶ Disconnect a receiver function from a signal. This has the opposite effect of the
connect()method, and the arguments are the same.
-
disconnect_all(signal, **kwargs)¶ Disconnect all receivers from the given signal.
Parameters: signal (object) – the signal to disconnect from
-
send_catch_log(signal, **kwargs)¶ Send a signal, catch exceptions and log them.
The keyword arguments are passed to the signal handlers (connected through the
connect()method).
-
send_catch_log_deferred(signal, **kwargs)¶ Like
send_catch_log()but supports returning deferreds from signal handlers.Returns a Deferred that gets fired once all signal handlers deferreds were fired. Send a signal, catch exceptions and log them.
The keyword arguments are passed to the signal handlers (connected through the
connect()method).
-
统计收集器API 
在scrapy.statscollectors模块下有几个Stats Collector,它们都实现由StatsCollector类定义的Stats Collector API(它们都从中继承)。
-
class
scrapy.statscollectors.StatsCollector¶ -
get_value(key, default=None)¶ Return the value for the given stats key or default if it doesn’t exist.
-
get_stats()¶ Get all stats from the currently running spider as a dict.
-
set_value(key, value)¶ Set the given value for the given stats key.
-
set_stats(stats)¶ Override the current stats with the dict passed in
statsargument.
-
inc_value(key, count=1, start=0)¶ Increment the value of the given stats key, by the given count, assuming the start value given (when it’s not set).
-
max_value(key, value)¶ Set the given value for the given key only if current value for the same key is lower than value. If there is no current value for the given key, the value is always set.
-
min_value(key, value)¶ Set the given value for the given key only if current value for the same key is greater than value. If there is no current value for the given key, the value is always set.
-
clear_stats()¶ Clear all stats.
The following methods are not part of the stats collection api but instead used when implementing custom stats collectors:
-
open_spider(spider)¶ Open the given spider for stats collection.
-
close_spider(spider)¶ Close the given spider. After this is called, no more specific stats can be accessed or collected.
-
Signals
Scrapy广泛使用信号来通知特定事件发生。 您可以捕获Scrapy项目中的一些信号(例如,使用extension)来执行其他任务或扩展Scrapy以添加未提供的功能。
尽管信号提供了多个参数,捕获它们的处理程序也不需要接受所有这些参数 - 信号分派机制只会传递处理程序接收到的参数。
您可以通过Signals API连接信号(或发送自己的信号)。
下面是一个简单的例子,展示如何捕捉信号并执行一些操作:
from scrapy import signals
from scrapy import Spider
class DmozSpider(Spider):
name = "dmoz"
allowed_domains = ["dmoz.org"]
start_urls = [
"http://www.dmoz.org/Computers/Programming/Languages/Python/Books/",
"http://www.dmoz.org/Computers/Programming/Languages/Python/Resources/",
]
@classmethod
def from_crawler(cls, crawler, *args, **kwargs):
spider = super(DmozSpider, cls).from_crawler(crawler, *args, **kwargs)
crawler.signals.connect(spider.spider_closed, signal=signals.spider_closed)
return spider
def spider_closed(self, spider):
spider.logger.info('Spider closed: %s', spider.name)
def parse(self, response):
pass
延迟信号处理程序
有些信号支持从它们的处理程序返回Twisted deferreds,请参阅下面的内置信号参考以了解详情。
内置信号参考
以下是Scrapy内置信号列表及其含义。
engine_started
-
scrapy.signals.engine_started()¶ 当Scrapy引擎开始爬行时发送。
该信号支持从处理程序返回延迟。
注意
这个信号可能会在spider_opened信号之后触发,具体取决于Spider的启动方式。 所以不要依赖这个信号在spider_opened之前被触发。
item_scraped
item_dropped
-
scrapy.signals.item_dropped(item, response, exception, spider)¶ Sent after an item has been dropped from the Item Pipeline when some stage raised a
DropItemexception.This signal supports returning deferreds from their handlers.
Parameters: - item (dict or
Itemobject) – the item dropped from the Item Pipeline - spider (
Spiderobject) – the spider which scraped the item - response (
Responseobject) – the response from where the item was dropped - exception (
DropItemexception) – the exception (which must be aDropItemsubclass) which caused the item to be dropped
- item (dict or
spider_closed
-
scrapy.signals.spider_closed(spider, reason)¶ Sent after a spider has been closed. This can be used to release per-spider resources reserved on
spider_opened.This signal supports returning deferreds from their handlers.
Parameters: - spider (
Spiderobject) – the spider which has been closed - reason (str) – a string which describes the reason why the spider was closed. If
it was closed because the spider has completed scraping, the reason
is
'finished'. Otherwise, if the spider was manually closed by calling theclose_spiderengine method, then the reason is the one passed in thereasonargument of that method (which defaults to'cancelled'). If the engine was shutdown (for example, by hitting Ctrl-C to stop it) the reason will be'shutdown'.
- spider (
spider_opened
-
scrapy.signals.spider_opened(spider)¶ Sent after a spider has been opened for crawling. This is typically used to reserve per-spider resources, but can be used for any task that needs to be performed when a spider is opened.
This signal supports returning deferreds from their handlers.
Parameters: spider ( Spiderobject) – the spider which has been opened
spider_idle
-
scrapy.signals.spider_idle(spider)¶ Sent when a spider has gone idle, which means the spider has no further:
- requests waiting to be downloaded
- requests scheduled
- items being processed in the item pipeline
If the idle state persists after all handlers of this signal have finished, the engine starts closing the spider. After the spider has finished closing, the
spider_closedsignal is sent.You may raise a
DontCloseSpiderexception to prevent the spider from being closed.This signal does not support returning deferreds from their handlers.
Parameters: spider ( Spiderobject) – the spider which has gone idle
Note
Scheduling some requests in your spider_idle handler does
not guarantee that it can prevent the spider from being closed,
although it sometimes can. That’s because the spider may still remain idle
if all the scheduled requests are rejected by the scheduler (e.g. filtered
due to duplication).
spider_error
-
scrapy.signals.spider_error(failure, response, spider)¶ Sent when a spider callback generates an error (ie. raises an exception).
This signal does not support returning deferreds from their handlers.
Parameters:
request_scheduled
request_dropped
response_received
Item导出器
一旦你抓取到Item,你经常想要保存或导出这些Item,以便在其他应用程序中使用这些数据。 毕竟,这是抓取过程的全部目的。
为此,Scrapy为不同的输出格式提供了一组Item导出器,如XML,CSV或JSON。
使用Item导出器
如果您只想使用项目导出器输出抓取的数据,请参阅Feed输出。 否则,如果您想知道Item导出器是如何工作的或需要更多自定义功能(默认导出没有提供的),请继续阅读以下内容。
为了使用Item导出器,你必须用它需要的参数来实例化它。 每个Item导出器需要不同的参数,因此请在内置项目导出器参考中查看每个导出器的文档。 在您实例化导出器后,您必须:
1.调用start_exporting()方法表明导出过程开始
2.为每个要导出的Item调用export_item()方法
3.最后调用finish_exporting()表明导出过程结束
在这里你可以看到一个Item管道,它使用多个Item导出器根据其中一个字段的值将Item分组到不同的文件中:
from scrapy.exporters import XmlItemExporter
class PerYearXmlExportPipeline(object):
"""Distribute items across multiple XML files according to their 'year' field"""
def open_spider(self, spider):
self.year_to_exporter = {}
def close_spider(self, spider):
for exporter in self.year_to_exporter.values():
exporter.finish_exporting()
exporter.file.close()
def _exporter_for_item(self, item):
year = item['year']
if year not in self.year_to_exporter:
f = open('{}.xml'.format(year), 'wb')
exporter = XmlItemExporter(f)
exporter.start_exporting()
self.year_to_exporter[year] = exporter
return self.year_to_exporter[year]
def process_item(self, item, spider):
exporter = self._exporter_for_item(item)
exporter.export_item(item)
return item
Item字段的序列化
默认情况下,字段值不加修改地传递给底层的序列化库,并且如何序列化它们的决定被委托给每个特定的序列化库。
但是,您可以 在其被传给序列化库之前 自定义序列化每个字段值的方式。
有两种方法可以自定义字段序列化的方式,这将在下面介绍。
1. 在字段中声明一个序列化器
如果使用Item,可以在字段元数据中声明序列化器。 序列化程序必须是可调用的,它接收一个值并返回其序列化形式。
例:
import scrapy
def serialize_price(value):
return '$ %s' % str(value)
class Product(scrapy.Item):
name = scrapy.Field()
price = scrapy.Field(serializer=serialize_price)
2. 重写serialize_field()方法
你也可以重写serialize_field()方法来自定义你的字段值导出方式。
确保在自定义代码之后调用基类serialize_field()方法。
例:
from scrapy.exporter import XmlItemExporter
class ProductXmlExporter(XmlItemExporter):
def serialize_field(self, field, name, value):
if field == 'price':
return '$ %s' % str(value)
return super(Product, self).serialize_field(field, name, value)
内置Item导出器参考
以下是与Scrapy捆绑在一起的Item Exporters列表。 其中一些包含输出示例,它们假设您正在导出这两个Item:
Item(name='Color TV', price='1200')
Item(name='DVD player', price='200')
BaseItemExporter
-
class
scrapy.exporters.BaseItemExporter(fields_to_export=None, export_empty_fields=False, encoding='utf-8', indent=0)¶ 这是所有Item导出器的(抽象)基类。 它提供所有(具体)Item导出器使用的常用功能的支持,例如定义要导出的字段,是否导出空字段或使用哪种编码。
这些特性可以通过构造函数参数进行配置,这些参数填充它们各自的实例属性:
fields_to_export,export_empty_fields,encoding,indent。-
export_item(item)¶ 导出给定的Item。 这个方法必须在子类中实现。
-
serialize_field(field, name, value)¶ 返回给定字段的序列化值。 如果要控制如何序列化/导出特定字段或值,则可以覆盖此方法(在自定义Item导出器中)。
默认情况下,此方法查找在Item字段中声明的序列化程序,并返回将该序列化程序应用于该值的结果。 如果未找到序列化程序,返回值不变,除非在
encoding属性中声明了编码将unicode值编码为str。参数:
-
start_exporting()¶ 通知导出过程开始, 一些导出器可能使用它产生一些必须的头文件(例如,
XmlItemExporter)。 您必须在导出任何Item之前调用此方法。
-
finish_exporting()¶ 通知导出过程结束, 一些导出器可能会使用它生成一些必需的页脚(例如,
XmlItemExporter)。 您必须在没有Item要导出后调用此方法。
-
fields_to_export¶ 包含要导出的字段名称的列表,如果您要导出所有字段,则为None。 默认值为None.
一些导出器(如
CsvItemExporter)依赖在此属性中定义的字段顺序。一些导出器可能需要fields_to_export列表,以便在Spider返回字典(不是
Item实例)时正确导出数据。
-
export_empty_fields¶ 在导出数据中是否包含空的/未填充的Item字段, 默认值为
False。 一些导出器(如CsvItemExporter)忽略这个属性,并总是导出所有的空字段。Item字典将忽略此选项。
-
encoding¶ encoding将用于编码unicode值。 这只会影响Unicode值(总是使用这个encoding序列化为str). 其他值类型则将不做改变传递给特定的序列化库。
-
indent¶ 用于缩进每个级别的输出的空格数, 默认值为
0。indent=None选择最紧凑的表示形式,所有Item放在同一行中没有缩进indent<=0每个Item占一行,无缩进indent>0每个Item占一行, 缩进为提供的数值
-
XmlItemExporter
-
class
scrapy.exporters.XmlItemExporter(file, item_element='item', root_element='items', **kwargs)¶ 以XML格式将Item导出到指定的文件对象。
参数: - file – 用来导出数据的类文件对象。 它的
write方法应该接受bytes(一个以二进制模式打开的磁盘文件,一个io.BytesIO对象等) - root_element (str) – 导出XML的根元素名
- item_element (str) – 导出XML的每个Item元素名
这个构造函数的附加关键字参数被传递给
BaseItemExporter构造函数。这个导出器的典型输出为:
<?xml version="1.0" encoding="utf-8"?> <items> <item> <name>Color TV</name> <price>1200</price> </item> <item> <name>DVD player</name> <price>200</price> </item> </items>除非在
serialize_field()方法中重写,否则多值字段将通过序列化将每个值放在<value>元素中。 这很方便,因为多值字段非常常见。例如,这个Item:
Item(name=['John', 'Doe'], age='23')将被序列化为:
<?xml version="1.0" encoding="utf-8"?> <items> <item> <name> <value>John</value> <value>Doe</value> </name> <age>23</age> </item> </items>- file – 用来导出数据的类文件对象。 它的
CsvItemExporter
-
class
scrapy.exporters.CsvItemExporter(file, include_headers_line=True, join_multivalued=', ', **kwargs)¶ Exports Items in CSV format to the given file-like object. If the
fields_to_exportattribute is set, it will be used to define the CSV columns and their order. Theexport_empty_fieldsattribute has no effect on this exporter.Parameters: - file – the file-like object to use for exporting the data. Its
writemethod should acceptbytes(a disk file opened in binary mode, aio.BytesIOobject, etc) - include_headers_line (str) – If enabled, makes the exporter output a header
line with the field names taken from
BaseItemExporter.fields_to_exportor the first exported item fields. - join_multivalued – The char (or chars) that will be used for joining multi-valued fields, if found.
The additional keyword arguments of this constructor are passed to the
BaseItemExporterconstructor, and the leftover arguments to the csv.writer constructor, so you can use any csv.writer constructor argument to customize this exporter.A typical output of this exporter would be:
product,price Color TV,1200 DVD player,200- file – the file-like object to use for exporting the data. Its
PickleItemExporter
-
class
scrapy.exporters.PickleItemExporter(file, protocol=0, **kwargs)¶ Exports Items in pickle format to the given file-like object.
Parameters: - file – the file-like object to use for exporting the data. Its
writemethod should acceptbytes(a disk file opened in binary mode, aio.BytesIOobject, etc) - protocol (int) – The pickle protocol to use.
For more information, refer to the pickle module documentation.
The additional keyword arguments of this constructor are passed to the
BaseItemExporterconstructor.Pickle isn’t a human readable format, so no output examples are provided.
- file – the file-like object to use for exporting the data. Its
PprintItemExporter
-
class
scrapy.exporters.PprintItemExporter(file, **kwargs)¶ Exports Items in pretty print format to the specified file object.
Parameters: file – the file-like object to use for exporting the data. Its writemethod should acceptbytes(a disk file opened in binary mode, aio.BytesIOobject, etc)The additional keyword arguments of this constructor are passed to the
BaseItemExporterconstructor.A typical output of this exporter would be:
{'name': 'Color TV', 'price': '1200'} {'name': 'DVD player', 'price': '200'}Longer lines (when present) are pretty-formatted.
JsonItemExporter
-
class
scrapy.exporters.JsonItemExporter(file, **kwargs)¶ 将JSON格式的项目导出到指定的类文件对象,将所有对象写为对象列表。 额外的构造函数参数被传递给
BaseItemExporter构造函数,剩余参数将传给JSONEncoder构造函数,因此您可以使用任何JSONEncoder构造函数参数定制这个导出器。参数: file – 用来导出数据的类文件对象. 它的 write方法应该接受bytes(一个以二进制模式打开的磁盘文件,一个io.BytesIO对象等)这个导出器的典型输出为:
[{"name": "Color TV", "price": "1200"}, {"name": "DVD player", "price": "200"}]警告
JSON是非常简单和灵活的序列化格式,但对于大量数据而言,它不能很好地扩展(例. 流模式)解析在JSON解析器(任何语言)之间并没有得到很好的支持(如果有的话),并且它们中的大多数只是解析内存中的整个对象。 如果您希望JSON的强大功能和简单性以更加适用于流的格式进行,请考虑使用
JsonLinesItemExporter,或者将输出拆分为多个块。
JsonLinesItemExporter
-
class
scrapy.exporters.JsonLinesItemExporter(file, **kwargs)¶ 将JSON格式的Item导出到指定的类文件对象,每行写入一个JSON编码的Item。 附加的构造函数参数被传递给
BaseItemExporter构造函数,剩余参数将传给JSONEncoder构造函数,因此您可以使用任何JSONEncoder构造函数参数定制这个导出器。参数: file – 用来导出数据的类文件对象 它的 write方法应该接受bytes(一个以二进制模式打开的磁盘文件,一个io.BytesIO对象等)这个导出器的典型输出为:
{"name": "Color TV", "price": "1200"} {"name": "DVD player", "price": "200"}与
JsonItemExporter生成的不同,此导出器生成的格式非常适合序列化大量数据。
- Architecture overview
- Understand the Scrapy architecture.
- Downloader Middleware
- Customize how pages get requested and downloaded.
- Spider Middleware
- Customize the input and output of your spiders.
- Extensions
- Extend Scrapy with your custom functionality
- Core API
- Use it on extensions and middlewares to extend Scrapy functionality
- Signals
- See all available signals and how to work with them.
- Item Exporters
- Quickly export your scraped items to a file (XML, CSV, etc).
All the rest
Release notes
Scrapy 1.5.0 (2017-12-29)
This release brings small new features and improvements across the codebase. Some highlights:
- Google Cloud Storage is supported in FilesPipeline and ImagesPipeline.
- Crawling with proxy servers becomes more efficient, as connections to proxies can be reused now.
- Warnings, exception and logging messages are improved to make debugging easier.
scrapy parsecommand now allows to set custom request meta via--metaargument.- Compatibility with Python 3.6, PyPy and PyPy3 is improved; PyPy and PyPy3 are now supported officially, by running tests on CI.
- Better default handling of HTTP 308, 522 and 524 status codes.
- Documentation is improved, as usual.
Backwards Incompatible Changes
- Scrapy 1.5 drops support for Python 3.3.
- Default Scrapy User-Agent now uses https link to scrapy.org (issue 2983).
This is technically backwards-incompatible; override
USER_AGENTif you relied on old value. - Logging of settings overridden by
custom_settingsis fixed; this is technically backwards-incompatible because the logger changes from[scrapy.utils.log]to[scrapy.crawler]. If you’re parsing Scrapy logs, please update your log parsers (issue 1343). - LinkExtractor now ignores
m4vextension by default, this is change in behavior. - 522 and 524 status codes are added to
RETRY_HTTP_CODES(issue 2851)
New features
- Support
<link>tags inResponse.follow(issue 2785) - Support for
ptpythonREPL (issue 2654) - Google Cloud Storage support for FilesPipeline and ImagesPipeline (issue 2923).
- New
--metaoption of the “scrapy parse” command allows to pass additional request.meta (issue 2883) - Populate spider variable when using
shell.inspect_response(issue 2812) - Handle HTTP 308 Permanent Redirect (issue 2844)
- Add 522 and 524 to
RETRY_HTTP_CODES(issue 2851) - Log versions information at startup (issue 2857)
scrapy.mail.MailSendernow works in Python 3 (it requires Twisted 17.9.0)- Connections to proxy servers are reused (issue 2743)
- Add template for a downloader middleware (issue 2755)
- Explicit message for NotImplementedError when parse callback not defined (issue 2831)
- CrawlerProcess got an option to disable installation of root log handler (issue 2921)
- LinkExtractor now ignores
m4vextension by default - Better log messages for responses over
DOWNLOAD_WARNSIZEandDOWNLOAD_MAXSIZElimits (issue 2927) - Show warning when a URL is put to
Spider.allowed_domainsinstead of a domain (issue 2250).
Bug fixes
- Fix logging of settings overridden by
custom_settings; this is technically backwards-incompatible because the logger changes from[scrapy.utils.log]to[scrapy.crawler], so please update your log parsers if needed (issue 1343) - Default Scrapy User-Agent now uses https link to scrapy.org (issue 2983).
This is technically backwards-incompatible; override
USER_AGENTif you relied on old value. - Fix PyPy and PyPy3 test failures, support them officially (issue 2793, issue 2935, issue 2990, issue 3050, issue 2213, issue 3048)
- Fix DNS resolver when
DNSCACHE_ENABLED=False(issue 2811) - Add
cryptographyfor Debian Jessie tox test env (issue 2848) - Add verification to check if Request callback is callable (issue 2766)
- Port
extras/qpsclient.pyto Python 3 (issue 2849) - Use getfullargspec under the scenes for Python 3 to stop DeprecationWarning (issue 2862)
- Update deprecated test aliases (issue 2876)
- Fix
SitemapSpidersupport for alternate links (issue 2853)
Docs
- Added missing bullet point for the
AUTOTHROTTLE_TARGET_CONCURRENCYsetting. (issue 2756) - Update Contributing docs, document new support channels (issue 2762, issue:3038)
- Include references to Scrapy subreddit in the docs
- Fix broken links; use https:// for external links (issue 2978, issue 2982, issue 2958)
- Document CloseSpider extension better (issue 2759)
- Use
pymongo.collection.Collection.insert_one()in MongoDB example (issue 2781) - Spelling mistake and typos (issue 2828, issue 2837, issue #2884, issue 2924)
- Clarify
CSVFeedSpider.headersdocumentation (issue 2826) - Document
DontCloseSpiderexception and clarifyspider_idle(issue 2791) - Update “Releases” section in README (issue 2764)
- Fix rst syntax in
DOWNLOAD_FAIL_ON_DATALOSSdocs (issue 2763) - Small fix in description of startproject arguments (issue 2866)
- Clarify data types in Response.body docs (issue 2922)
- Add a note about
request.meta['depth']to DepthMiddleware docs (issue 2374) - Add a note about
request.meta['dont_merge_cookies']to CookiesMiddleware docs (issue 2999) - Up-to-date example of project structure (issue 2964, issue 2976)
- A better example of ItemExporters usage (issue 2989)
- Document
from_crawlermethods for spider and downloader middlewares (issue 3019)
Scrapy 1.4.0 (2017-05-18)
Scrapy 1.4 does not bring that many breathtaking new features but quite a few handy improvements nonetheless.
Scrapy now supports anonymous FTP sessions with customizable user and
password via the new FTP_USER and FTP_PASSWORD settings.
And if you’re using Twisted version 17.1.0 or above, FTP is now available
with Python 3.
There’s a new response.follow method
for creating requests; it is now a recommended way to create Requests
in Scrapy spiders. This method makes it easier to write correct
spiders; response.follow has several advantages over creating
scrapy.Request objects directly:
- it handles relative URLs;
- it works properly with non-ascii URLs on non-UTF8 pages;
- in addition to absolute and relative URLs it supports Selectors;
for
<a>elements it can also extract their href values.
For example, instead of this:
for href in response.css('li.page a::attr(href)').extract():
url = response.urljoin(href)
yield scrapy.Request(url, self.parse, encoding=response.encoding)
One can now write this:
for a in response.css('li.page a'):
yield response.follow(a, self.parse)
Link extractors are also improved. They work similarly to what a regular
modern browser would do: leading and trailing whitespace are removed
from attributes (think href=" http://example.com") when building
Link objects. This whitespace-stripping also happens for action
attributes with FormRequest.
Please also note that link extractors do not canonicalize URLs by default anymore. This was puzzling users every now and then, and it’s not what browsers do in fact, so we removed that extra transformation on extractred links.
For those of you wanting more control on the Referer: header that Scrapy
sends when following links, you can set your own Referrer Policy.
Prior to Scrapy 1.4, the default RefererMiddleware would simply and
blindly set it to the URL of the response that generated the HTTP request
(which could leak information on your URL seeds).
By default, Scrapy now behaves much like your regular browser does.
And this policy is fully customizable with W3C standard values
(or with something really custom of your own if you wish).
See REFERRER_POLICY for details.
To make Scrapy spiders easier to debug, Scrapy logs more stats by default in 1.4: memory usage stats, detailed retry stats, detailed HTTP error code stats. A similar change is that HTTP cache path is also visible in logs now.
Last but not least, Scrapy now has the option to make JSON and XML items
more human-readable, with newlines between items and even custom indenting
offset, using the new FEED_EXPORT_INDENT setting.
Enjoy! (Or read on for the rest of changes in this release.)
Deprecations and Backwards Incompatible Changes
- Default to
canonicalize=Falseinscrapy.linkextractors.LinkExtractor(issue 2537, fixes issue 1941 and issue 1982): warning, this is technically backwards-incompatible - Enable memusage extension by default (issue 2539, fixes issue 2187);
this is technically backwards-incompatible so please check if you have
any non-default
MEMUSAGE_***options set. EDITORenvironment variable now takes precedence overEDITORoption defined in settings.py (issue 1829); Scrapy default settings no longer depend on environment variables. This is technically a backwards incompatible change.Spider.make_requests_from_urlis deprecated (issue 1728, fixes issue 1495).
New Features
- Accept proxy credentials in
proxyrequest meta key (issue 2526) - Support brotli-compressed content; requires optional brotlipy (issue 2535)
- New response.follow shortcut for creating requests (issue 1940)
- Added
flagsargument and attribute toRequestobjects (issue 2047) - Support Anonymous FTP (issue 2342)
- Added
retry/count,retry/max_reachedandretry/reason_count/<reason>stats toRetryMiddleware(issue 2543) - Added
httperror/response_ignored_countandhttperror/response_ignored_status_count/<status>stats toHttpErrorMiddleware(issue 2566) - Customizable
Referrer policyinRefererMiddleware(issue 2306) - New
data:URI download handler (issue 2334, fixes issue 2156) - Log cache directory when HTTP Cache is used (issue 2611, fixes issue 2604)
- Warn users when project contains duplicate spider names (fixes issue 2181)
CaselessDictnow acceptsMappinginstances and not only dicts (issue 2646)- Media downloads, with
FilesPipelinesorImagesPipelines, can now optionally handle HTTP redirects using the newMEDIA_ALLOW_REDIRECTSsetting (issue 2616, fixes issue 2004) - Accept non-complete responses from websites using a new
DOWNLOAD_FAIL_ON_DATALOSSsetting (issue 2590, fixes issue 2586) - Optional pretty-printing of JSON and XML items via
FEED_EXPORT_INDENTsetting (issue 2456, fixes issue 1327) - Allow dropping fields in
FormRequest.from_responseformdata whenNonevalue is passed (issue 667) - Per-request retry times with the new
max_retry_timesmeta key (issue 2642) python -m scrapyas a more explicit alternative toscrapycommand (issue 2740)
Bug fixes
- LinkExtractor now strips leading and trailing whitespaces from attributes (issue 2547, fixes issue 1614)
- Properly handle whitespaces in action attribute in
FormRequest(issue 2548) - Buffer CONNECT response bytes from proxy until all HTTP headers are received (issue 2495, fixes issue 2491)
- FTP downloader now works on Python 3, provided you use Twisted>=17.1 (issue 2599)
- Use body to choose response type after decompressing content (issue 2393, fixes issue 2145)
- Always decompress
Content-Encoding: gzipatHttpCompressionMiddlewarestage (issue 2391) - Respect custom log level in
Spider.custom_settings(issue 2581, fixes issue 1612) - ‘make htmlview’ fix for macOS (issue 2661)
- Remove “commands” from the command list (issue 2695)
- Fix duplicate Content-Length header for POST requests with empty body (issue 2677)
- Properly cancel large downloads, i.e. above
DOWNLOAD_MAXSIZE(issue 1616) - ImagesPipeline: fixed processing of transparent PNG images with palette (issue 2675)
Cleanups & Refactoring
- Tests: remove temp files and folders (issue 2570), fixed ProjectUtilsTest on OS X (issue 2569), use portable pypy for Linux on Travis CI (issue 2710)
- Separate building request from
_requests_to_followin CrawlSpider (issue 2562) - Remove “Python 3 progress” badge (issue 2567)
- Add a couple more lines to
.gitignore(issue 2557) - Remove bumpversion prerelease configuration (issue 2159)
- Add codecov.yml file (issue 2750)
- Set context factory implementation based on Twisted version (issue 2577, fixes issue 2560)
- Add omitted
selfarguments in default project middleware template (issue 2595) - Remove redundant
slot.add_request()call in ExecutionEngine (issue 2617) - Catch more specific
os.errorexception inFSFilesStore(issue 2644) - Change “localhost” test server certificate (issue 2720)
- Remove unused
MEMUSAGE_REPORTsetting (issue 2576)
Documentation
- Binary mode is required for exporters (issue 2564, fixes issue 2553)
- Mention issue with
FormRequest.from_responsedue to bug in lxml (issue 2572) - Use single quotes uniformly in templates (issue 2596)
- Document
ftp_userandftp_passwordmeta keys (issue 2587) - Removed section on deprecated
contrib/(issue 2636) - Recommend Anaconda when installing Scrapy on Windows (issue 2477, fixes issue 2475)
- FAQ: rewrite note on Python 3 support on Windows (issue 2690)
- Rearrange selector sections (issue 2705)
- Remove
__nonzero__fromSelectorListdocs (issue 2683) - Mention how to disable request filtering in documentation of
DUPEFILTER_CLASSsetting (issue 2714) - Add sphinx_rtd_theme to docs setup readme (issue 2668)
- Open file in text mode in JSON item writer example (issue 2729)
- Clarify
allowed_domainsexample (issue 2670)
Scrapy 1.3.3 (2017-03-10)
Bug fixes
- Make
SpiderLoaderraiseImportErroragain by default for missing dependencies and wrongSPIDER_MODULES. These exceptions were silenced as warnings since 1.3.0. A new setting is introduced to toggle between warning or exception if needed ; seeSPIDER_LOADER_WARN_ONLYfor details.
Scrapy 1.3.2 (2017-02-13)
Bug fixes
- Preserve request class when converting to/from dicts (utils.reqser) (issue 2510).
- Use consistent selectors for author field in tutorial (issue 2551).
- Fix TLS compatibility in Twisted 17+ (issue 2558)
Scrapy 1.3.1 (2017-02-08)
New features
- Support
'True'and'False'string values for boolean settings (issue 2519); you can now do something likescrapy crawl myspider -s REDIRECT_ENABLED=False. - Support kwargs with
response.xpath()to use XPath variables and ad-hoc namespaces declarations ; this requires at least Parsel v1.1 (issue 2457). - Add support for Python 3.6 (issue 2485).
- Run tests on PyPy (warning: some tests still fail, so PyPy is not supported yet).
Bug fixes
- Enforce
DNS_TIMEOUTsetting (issue 2496). - Fix
viewcommand ; it was a regression in v1.3.0 (issue 2503). - Fix tests regarding
*_EXPIRES settingswith Files/Images pipelines (issue 2460). - Fix name of generated pipeline class when using basic project template (issue 2466).
- Fix compatiblity with Twisted 17+ (issue 2496, issue 2528).
- Fix
scrapy.Iteminheritance on Python 3.6 (issue 2511). - Enforce numeric values for components order in
SPIDER_MIDDLEWARES,DOWNLOADER_MIDDLEWARES,EXTENIONSandSPIDER_CONTRACTS(issue 2420).
Documentation
- Reword Code of Coduct section and upgrade to Contributor Covenant v1.4 (issue 2469).
- Clarify that passing spider arguments converts them to spider attributes (issue 2483).
- Document
formidargument onFormRequest.from_response()(issue 2497). - Add .rst extension to README files (issue 2507).
- Mention LevelDB cache storage backend (issue 2525).
- Use
yieldin sample callback code (issue 2533). - Add note about HTML entities decoding with
.re()/.re_first()(issue 1704). - Typos (issue 2512, issue 2534, issue 2531).
Cleanups
- Remove reduntant check in
MetaRefreshMiddleware(issue 2542). - Faster checks in
LinkExtractorfor allow/deny patterns (issue 2538). - Remove dead code supporting old Twisted versions (issue 2544).
Scrapy 1.3.0 (2016-12-21)
This release comes rather soon after 1.2.2 for one main reason:
it was found out that releases since 0.18 up to 1.2.2 (included) use
some backported code from Twisted (scrapy.xlib.tx.*),
even if newer Twisted modules are available.
Scrapy now uses twisted.web.client and twisted.internet.endpoints directly.
(See also cleanups below.)
As it is a major change, we wanted to get the bug fix out quickly while not breaking any projects using the 1.2 series.
New Features
MailSendernow accepts single strings as values fortoandccarguments (issue 2272)scrapy fetch url,scrapy shell urlandfetch(url)inside scrapy shell now follow HTTP redirections by default (issue 2290); Seefetchandshellfor details.HttpErrorMiddlewarenow logs errors withINFOlevel instead ofDEBUG; this is technically backwards incompatible so please check your log parsers.- By default, logger names now use a long-form path, e.g.
[scrapy.extensions.logstats], instead of the shorter “top-level” variant of prior releases (e.g.[scrapy]); this is backwards incompatible if you have log parsers expecting the short logger name part. You can switch back to short logger names usingLOG_SHORT_NAMESset toTrue.
Dependencies & Cleanups
- Scrapy now requires Twisted >= 13.1 which is the case for many Linux distributions already.
- As a consequence, we got rid of
scrapy.xlib.tx.*modules, which copied some of Twisted code for users stuck with an “old” Twisted version ChunkedTransferMiddlewareis deprecated and removed from the default downloader middlewares.
Scrapy 1.2.3 (2017-03-03)
- Packaging fix: disallow unsupported Twisted versions in setup.py
Scrapy 1.2.2 (2016-12-06)
Bug fixes
- Fix a cryptic traceback when a pipeline fails on
open_spider()(issue 2011) - Fix embedded IPython shell variables (fixing issue 396 that re-appeared in 1.2.0, fixed in issue 2418)
- A couple of patches when dealing with robots.txt:
- handle (non-standard) relative sitemap URLs (issue 2390)
- handle non-ASCII URLs and User-Agents in Python 2 (issue 2373)
Documentation
- Document
"download_latency"key inRequest’smetadict (issue 2033) - Remove page on (deprecated & unsupported) Ubuntu packages from ToC (issue 2335)
- A few fixed typos (issue 2346, issue 2369, issue 2369, issue 2380) and clarifications (issue 2354, issue 2325, issue 2414)
Other changes
- Advertize conda-forge as Scrapy’s official conda channel (issue 2387)
- More helpful error messages when trying to use
.css()or.xpath()on non-Text Responses (issue 2264) startprojectcommand now generates a samplemiddlewares.pyfile (issue 2335)- Add more dependencies’ version info in
scrapy versionverbose output (issue 2404) - Remove all
*.pycfiles from source distribution (issue 2386)
Scrapy 1.2.1 (2016-10-21)
Bug fixes
- Include OpenSSL’s more permissive default ciphers when establishing TLS/SSL connections (issue 2314).
- Fix “Location” HTTP header decoding on non-ASCII URL redirects (issue 2321).
Documentation
- Fix JsonWriterPipeline example (issue 2302).
- Various notes: issue 2330 on spider names, issue 2329 on middleware methods processing order, issue 2327 on getting multi-valued HTTP headers as lists.
Other changes
- Removed
www.fromstart_urlsin built-in spider templates (issue 2299).
Scrapy 1.2.0 (2016-10-03)
New Features
- New
FEED_EXPORT_ENCODINGsetting to customize the encoding used when writing items to a file. This can be used to turn off\uXXXXescapes in JSON output. This is also useful for those wanting something else than UTF-8 for XML or CSV output (issue 2034). startprojectcommand now supports an optional destination directory to override the default one based on the project name (issue 2005).- New
SCHEDULER_DEBUGsetting to log requests serialization failures (issue 1610). - JSON encoder now supports serialization of
setinstances (issue 2058). - Interpret
application/json-amazonui-streamingasTextResponse(issue 1503). scrapyis imported by default when using shell tools (shell, inspect_response) (issue 2248).
Bug fixes
- DefaultRequestHeaders middleware now runs before UserAgent middleware (issue 2088). Warning: this is technically backwards incompatible, though we consider this a bug fix.
- HTTP cache extension and plugins that use the
.scrapydata directory now work outside projects (issue 1581). Warning: this is technically backwards incompatible, though we consider this a bug fix. Selectordoes not allow passing bothresponseandtextanymore (issue 2153).- Fixed logging of wrong callback name with
scrapy parse(issue 2169). - Fix for an odd gzip decompression bug (issue 1606).
- Fix for selected callbacks when using
CrawlSpiderwithscrapy parse(issue 2225). - Fix for invalid JSON and XML files when spider yields no items (issue 872).
- Implement
flush()fprStreamLoggeravoiding a warning in logs (issue 2125).
Refactoring
canonicalize_urlhas been moved to w3lib.url (issue 2168).
Tests & Requirements
Scrapy’s new requirements baseline is Debian 8 “Jessie”. It was previously Ubuntu 12.04 Precise. What this means in practice is that we run continuous integration tests with these (main) packages versions at a minimum: Twisted 14.0, pyOpenSSL 0.14, lxml 3.4.
Scrapy may very well work with older versions of these packages (the code base still has switches for older Twisted versions for example) but it is not guaranteed (because it’s not tested anymore).
Documentation
- Grammar fixes: issue 2128, issue 1566.
- Download stats badge removed from README (issue 2160).
- New scrapy architecture diagram (issue 2165).
- Updated
Responseparameters documentation (issue 2197). - Reworded misleading
RANDOMIZE_DOWNLOAD_DELAYdescription (issue 2190). - Add StackOverflow as a support channel (issue 2257).
Scrapy 1.1.4 (2017-03-03)
- Packaging fix: disallow unsupported Twisted versions in setup.py
Scrapy 1.1.3 (2016-09-22)
Bug fixes
- Class attributes for subclasses of
ImagesPipelineandFilesPipelinework as they did before 1.1.1 (issue 2243, fixes issue 2198)
Documentation
- Overview and tutorial rewritten to use http://toscrape.com websites (issue 2236, issue 2249, issue 2252).
Scrapy 1.1.2 (2016-08-18)
Bug fixes
- Introduce a missing
IMAGES_STORE_S3_ACLsetting to override the default ACL policy inImagesPipelinewhen uploading images to S3 (note that default ACL policy is “private” – instead of “public-read” – since Scrapy 1.1.0) IMAGES_EXPIRESdefault value set back to 90 (the regression was introduced in 1.1.1)
Scrapy 1.1.1 (2016-07-13)
Bug fixes
- Add “Host” header in CONNECT requests to HTTPS proxies (issue 2069)
- Use response
bodywhen choosing response class (issue 2001, fixes issue 2000) - Do not fail on canonicalizing URLs with wrong netlocs (issue 2038, fixes issue 2010)
- a few fixes for
HttpCompressionMiddleware(andSitemapSpider):- Do not decode HEAD responses (issue 2008, fixes issue 1899)
- Handle charset parameter in gzip Content-Type header (issue 2050, fixes issue 2049)
- Do not decompress gzip octet-stream responses (issue 2065, fixes issue 2063)
- Catch (and ignore with a warning) exception when verifying certificate against IP-address hosts (issue 2094, fixes issue 2092)
- Make
FilesPipelineandImagesPipelinebackward compatible again regarding the use of legacy class attributes for customization (issue 1989, fixes issue 1985)
New features
- Enable genspider command outside project folder (issue 2052)
- Retry HTTPS CONNECT
TunnelErrorby default (issue 1974)
Documentation
FEED_TEMPDIRsetting at lexicographical position (commit 9b3c72c)- Use idiomatic
.extract_first()in overview (issue 1994) - Update years in copyright notice (commit c2c8036)
- Add information and example on errbacks (issue 1995)
- Use “url” variable in downloader middleware example (issue 2015)
- Grammar fixes (issue 2054, issue 2120)
- New FAQ entry on using BeautifulSoup in spider callbacks (issue 2048)
- Add notes about scrapy not working on Windows with Python 3 (issue 2060)
- Encourage complete titles in pull requests (issue 2026)
Tests
- Upgrade py.test requirement on Travis CI and Pin pytest-cov to 2.2.1 (issue 2095)
Scrapy 1.1.0 (2016-05-11)
This 1.1 release brings a lot of interesting features and bug fixes:
- Scrapy 1.1 has beta Python 3 support (requires Twisted >= 15.5). See Beta Python 3 Support for more details and some limitations.
- Hot new features:
- Item loaders now support nested loaders (issue 1467).
FormRequest.from_responseimprovements (issue 1382, issue 1137).- Added setting
AUTOTHROTTLE_TARGET_CONCURRENCYand improved AutoThrottle docs (issue 1324). - Added
response.textto get body as unicode (issue 1730). - Anonymous S3 connections (issue 1358).
- Deferreds in downloader middlewares (issue 1473). This enables better robots.txt handling (issue 1471).
- HTTP caching now follows RFC2616 more closely, added settings
HTTPCACHE_ALWAYS_STOREandHTTPCACHE_IGNORE_RESPONSE_CACHE_CONTROLS(issue 1151). - Selectors were extracted to the parsel library (issue 1409). This means you can use Scrapy Selectors without Scrapy and also upgrade the selectors engine without needing to upgrade Scrapy.
- HTTPS downloader now does TLS protocol negotiation by default,
instead of forcing TLS 1.0. You can also set the SSL/TLS method
using the new
DOWNLOADER_CLIENT_TLS_METHOD.
- These bug fixes may require your attention:
- Don’t retry bad requests (HTTP 400) by default (issue 1289).
If you need the old behavior, add
400toRETRY_HTTP_CODES. - Fix shell files argument handling (issue 1710, issue 1550).
If you try
scrapy shell index.htmlit will try to load the URL http://index.html, usescrapy shell ./index.htmlto load a local file. - Robots.txt compliance is now enabled by default for newly-created projects
(issue 1724). Scrapy will also wait for robots.txt to be downloaded
before proceeding with the crawl (issue 1735). If you want to disable
this behavior, update
ROBOTSTXT_OBEYinsettings.pyfile after creating a new project. - Exporters now work on unicode, instead of bytes by default (issue 1080).
If you use
PythonItemExporter, you may want to update your code to disable binary mode which is now deprecated. - Accept XML node names containing dots as valid (issue 1533).
- When uploading files or images to S3 (with
FilesPipelineorImagesPipeline), the default ACL policy is now “private” instead of “public” Warning: backwards incompatible!. You can useFILES_STORE_S3_ACLto change it. - We’ve reimplemented
canonicalize_url()for more correct output, especially for URLs with non-ASCII characters (issue 1947). This could change link extractors output compared to previous scrapy versions. This may also invalidate some cache entries you could still have from pre-1.1 runs. Warning: backwards incompatible!.
- Don’t retry bad requests (HTTP 400) by default (issue 1289).
If you need the old behavior, add
Keep reading for more details on other improvements and bug fixes.
Beta Python 3 Support
We have been hard at work to make Scrapy run on Python 3. As a result, now you can run spiders on Python 3.3, 3.4 and 3.5 (Twisted >= 15.5 required). Some features are still missing (and some may never be ported).
Almost all builtin extensions/middlewares are expected to work. However, we are aware of some limitations in Python 3:
- Scrapy does not work on Windows with Python 3
- Sending emails is not supported
- FTP download handler is not supported
- Telnet console is not supported
Additional New Features and Enhancements
- Scrapy now has a Code of Conduct (issue 1681).
- Command line tool now has completion for zsh (issue 934).
- Improvements to
scrapy shell:- Support for bpython and configure preferred Python shell via
SCRAPY_PYTHON_SHELL(issue 1100, issue 1444). - Support URLs without scheme (issue 1498) Warning: backwards incompatible!
- Bring back support for relative file path (issue 1710, issue 1550).
- Support for bpython and configure preferred Python shell via
- Added
MEMUSAGE_CHECK_INTERVAL_SECONDSsetting to change default check interval (issue 1282). - Download handlers are now lazy-loaded on first request using their scheme (issue 1390, issue 1421).
- HTTPS download handlers do not force TLS 1.0 anymore; instead,
OpenSSL’s
SSLv23_method()/TLS_method()is used allowing to try negotiating with the remote hosts the highest TLS protocol version it can (issue 1794, issue 1629). RedirectMiddlewarenow skips the status codes fromhandle_httpstatus_liston spider attribute or inRequest’smetakey (issue 1334, issue 1364, issue 1447).- Form submission:
- now works with
<button>elements too (issue 1469). - an empty string is now used for submit buttons without a value (issue 1472)
- now works with
- Dict-like settings now have per-key priorities (issue 1135, issue 1149 and issue 1586).
- Sending non-ASCII emails (issue 1662)
CloseSpiderandSpiderStateextensions now get disabled if no relevant setting is set (issue 1723, issue 1725).- Added method
ExecutionEngine.close(issue 1423). - Added method
CrawlerRunner.create_crawler(issue 1528). - Scheduler priority queue can now be customized via
SCHEDULER_PRIORITY_QUEUE(issue 1822). .ppslinks are now ignored by default in link extractors (issue 1835).- temporary data folder for FTP and S3 feed storages can be customized
using a new
FEED_TEMPDIRsetting (issue 1847). FilesPipelineandImagesPipelinesettings are now instance attributes instead of class attributes, enabling spider-specific behaviors (issue 1891).JsonItemExporternow formats opening and closing square brackets on their own line (first and last lines of output file) (issue 1950).- If available,
botocoreis used forS3FeedStorage,S3DownloadHandlerandS3FilesStore(issue 1761, issue 1883). - Tons of documentation updates and related fixes (issue 1291, issue 1302, issue 1335, issue 1683, issue 1660, issue 1642, issue 1721, issue 1727, issue 1879).
- Other refactoring, optimizations and cleanup (issue 1476, issue 1481, issue 1477, issue 1315, issue 1290, issue 1750, issue 1881).
Deprecations and Removals
- Added
to_bytesandto_unicode, deprecatedstr_to_unicodeandunicode_to_strfunctions (issue 778). binary_is_textis introduced, to replace use ofisbinarytext(but with inverse return value) (issue 1851)- The
optional_featuresset has been removed (issue 1359). - The
--lsprofcommand line option has been removed (issue 1689). Warning: backward incompatible, but doesn’t break user code. - The following datatypes were deprecated (issue 1720):
scrapy.utils.datatypes.MultiValueDictKeyErrorscrapy.utils.datatypes.MultiValueDictscrapy.utils.datatypes.SiteNode
- The previously bundled
scrapy.xlib.pydispatchlibrary was deprecated and replaced by pydispatcher.
Relocations
telnetconsolewas relocated toextensions/(issue 1524).- Note: telnet is not enabled on Python 3 (https://github.com/scrapy/scrapy/pull/1524#issuecomment-146985595)
Bugfixes
- Scrapy does not retry requests that got a
HTTP 400 Bad Requestresponse anymore (issue 1289). Warning: backwards incompatible! - Support empty password for http_proxy config (issue 1274).
- Interpret
application/x-jsonasTextResponse(issue 1333). - Support link rel attribute with multiple values (issue 1201).
- Fixed
scrapy.http.FormRequest.from_responsewhen there is a<base>tag (issue 1564). - Fixed
TEMPLATES_DIRhandling (issue 1575). - Various
FormRequestfixes (issue 1595, issue 1596, issue 1597). - Makes
_monkeypatchesmore robust (issue 1634). - Fixed bug on
XMLItemExporterwith non-string fields in items (issue 1738). - Fixed startproject command in OS X (issue 1635).
- Fixed PythonItemExporter and CSVExporter for non-string item types (issue 1737).
- Various logging related fixes (issue 1294, issue 1419, issue 1263, issue 1624, issue 1654, issue 1722, issue 1726 and issue 1303).
- Fixed bug in
utils.template.render_templatefile()(issue 1212). - sitemaps extraction from
robots.txtis now case-insensitive (issue 1902). - HTTPS+CONNECT tunnels could get mixed up when using multiple proxies to same remote host (issue 1912).
Scrapy 1.0.7 (2017-03-03)
- Packaging fix: disallow unsupported Twisted versions in setup.py
Scrapy 1.0.6 (2016-05-04)
- FIX: RetryMiddleware is now robust to non-standard HTTP status codes (issue 1857)
- FIX: Filestorage HTTP cache was checking wrong modified time (issue 1875)
- DOC: Support for Sphinx 1.4+ (issue 1893)
- DOC: Consistency in selectors examples (issue 1869)
Scrapy 1.0.5 (2016-02-04)
- FIX: [Backport] Ignore bogus links in LinkExtractors (fixes issue 907, commit 108195e)
- TST: Changed buildbot makefile to use ‘pytest’ (commit 1f3d90a)
- DOC: Fixed typos in tutorial and media-pipeline (commit 808a9ea and commit 803bd87)
- DOC: Add AjaxCrawlMiddleware to DOWNLOADER_MIDDLEWARES_BASE in settings docs (commit aa94121)
Scrapy 1.0.4 (2015-12-30)
- Ignoring xlib/tx folder, depending on Twisted version. (commit 7dfa979)
- Run on new travis-ci infra (commit 6e42f0b)
- Spelling fixes (commit 823a1cc)
- escape nodename in xmliter regex (commit da3c155)
- test xml nodename with dots (commit 4418fc3)
- TST don’t use broken Pillow version in tests (commit a55078c)
- disable log on version command. closes #1426 (commit 86fc330)
- disable log on startproject command (commit db4c9fe)
- Add PyPI download stats badge (commit df2b944)
- don’t run tests twice on Travis if a PR is made from a scrapy/scrapy branch (commit a83ab41)
- Add Python 3 porting status badge to the README (commit 73ac80d)
- fixed RFPDupeFilter persistence (commit 97d080e)
- TST a test to show that dupefilter persistence is not working (commit 97f2fb3)
- explicit close file on file:// scheme handler (commit d9b4850)
- Disable dupefilter in shell (commit c0d0734)
- DOC: Add captions to toctrees which appear in sidebar (commit aa239ad)
- DOC Removed pywin32 from install instructions as it’s already declared as dependency. (commit 10eb400)
- Added installation notes about using Conda for Windows and other OSes. (commit 1c3600a)
- Fixed minor grammar issues. (commit 7f4ddd5)
- fixed a typo in the documentation. (commit b71f677)
- Version 1 now exists (commit 5456c0e)
- fix another invalid xpath error (commit 0a1366e)
- fix ValueError: Invalid XPath: //div/[id=”not-exists”]/text() on selectors.rst (commit ca8d60f)
- Typos corrections (commit 7067117)
- fix typos in downloader-middleware.rst and exceptions.rst, middlware -> middleware (commit 32f115c)
- Add note to ubuntu install section about debian compatibility (commit 23fda69)
- Replace alternative OSX install workaround with virtualenv (commit 98b63ee)
- Reference Homebrew’s homepage for installation instructions (commit 1925db1)
- Add oldest supported tox version to contributing docs (commit 5d10d6d)
- Note in install docs about pip being already included in python>=2.7.9 (commit 85c980e)
- Add non-python dependencies to Ubuntu install section in the docs (commit fbd010d)
- Add OS X installation section to docs (commit d8f4cba)
- DOC(ENH): specify path to rtd theme explicitly (commit de73b1a)
- minor: scrapy.Spider docs grammar (commit 1ddcc7b)
- Make common practices sample code match the comments (commit 1b85bcf)
- nextcall repetitive calls (heartbeats). (commit 55f7104)
- Backport fix compatibility with Twisted 15.4.0 (commit b262411)
- pin pytest to 2.7.3 (commit a6535c2)
- Merge pull request #1512 from mgedmin/patch-1 (commit 8876111)
- Merge pull request #1513 from mgedmin/patch-2 (commit 5d4daf8)
- Typo (commit f8d0682)
- Fix list formatting (commit 5f83a93)
- fix scrapy squeue tests after recent changes to queuelib (commit 3365c01)
- Merge pull request #1475 from rweindl/patch-1 (commit 2d688cd)
- Update tutorial.rst (commit fbc1f25)
- Merge pull request #1449 from rhoekman/patch-1 (commit 7d6538c)
- Small grammatical change (commit 8752294)
- Add openssl version to version command (commit 13c45ac)
Scrapy 1.0.3 (2015-08-11)
- add service_identity to scrapy install_requires (commit cbc2501)
- Workaround for travis#296 (commit 66af9cd)
Scrapy 1.0.2 (2015-08-06)
- Twisted 15.3.0 does not raises PicklingError serializing lambda functions (commit b04dd7d)
- Minor method name fix (commit 6f85c7f)
- minor: scrapy.Spider grammar and clarity (commit 9c9d2e0)
- Put a blurb about support channels in CONTRIBUTING (commit c63882b)
- Fixed typos (commit a9ae7b0)
- Fix doc reference. (commit 7c8a4fe)
Scrapy 1.0.1 (2015-07-01)
- Unquote request path before passing to FTPClient, it already escape paths (commit cc00ad2)
- include tests/ to source distribution in MANIFEST.in (commit eca227e)
- DOC Fix SelectJmes documentation (commit b8567bc)
- DOC Bring Ubuntu and Archlinux outside of Windows subsection (commit 392233f)
- DOC remove version suffix from ubuntu package (commit 5303c66)
- DOC Update release date for 1.0 (commit c89fa29)
Scrapy 1.0.0 (2015-06-19)
You will find a lot of new features and bugfixes in this major release. Make sure to check our updated overview to get a glance of some of the changes, along with our brushed tutorial.
Support for returning dictionaries in spiders
Declaring and returning Scrapy Items is no longer necessary to collect the scraped data from your spider, you can now return explicit dictionaries instead.
Classic version
class MyItem(scrapy.Item):
url = scrapy.Field()
class MySpider(scrapy.Spider):
def parse(self, response):
return MyItem(url=response.url)
New version
class MySpider(scrapy.Spider):
def parse(self, response):
return {'url': response.url}
Per-spider settings (GSoC 2014)
Last Google Summer of Code project accomplished an important redesign of the mechanism used for populating settings, introducing explicit priorities to override any given setting. As an extension of that goal, we included a new level of priority for settings that act exclusively for a single spider, allowing them to redefine project settings.
Start using it by defining a custom_settings
class variable in your spider:
class MySpider(scrapy.Spider):
custom_settings = {
"DOWNLOAD_DELAY": 5.0,
"RETRY_ENABLED": False,
}
Read more about settings population: Settings
Python Logging
Scrapy 1.0 has moved away from Twisted logging to support Python built in’s as default logging system. We’re maintaining backward compatibility for most of the old custom interface to call logging functions, but you’ll get warnings to switch to the Python logging API entirely.
Old version
from scrapy import log
log.msg('MESSAGE', log.INFO)
New version
import logging
logging.info('MESSAGE')
Logging with spiders remains the same, but on top of the
log() method you’ll have access to a custom
logger created for the spider to issue log
events:
class MySpider(scrapy.Spider):
def parse(self, response):
self.logger.info('Response received')
Read more in the logging documentation: Logging
Crawler API refactoring (GSoC 2014)
Another milestone for last Google Summer of Code was a refactoring of the internal API, seeking a simpler and easier usage. Check new core interface in: Core API
A common situation where you will face these changes is while running Scrapy from scripts. Here’s a quick example of how to run a Spider manually with the new API:
from scrapy.crawler import CrawlerProcess
process = CrawlerProcess({
'USER_AGENT': 'Mozilla/4.0 (compatible; MSIE 7.0; Windows NT 5.1)'
})
process.crawl(MySpider)
process.start()
Bear in mind this feature is still under development and its API may change until it reaches a stable status.
See more examples for scripts running Scrapy: Common Practices
Module Relocations
There’s been a large rearrangement of modules trying to improve the general structure of Scrapy. Main changes were separating various subpackages into new projects and dissolving both scrapy.contrib and scrapy.contrib_exp into top level packages. Backward compatibility was kept among internal relocations, while importing deprecated modules expect warnings indicating their new place.
Full list of relocations
Outsourced packages
Note
These extensions went through some minor changes, e.g. some setting names were changed. Please check the documentation in each new repository to get familiar with the new usage.
| Old location | New location |
|---|---|
| scrapy.commands.deploy | scrapyd-client (See other alternatives here: Deploying Spiders) |
| scrapy.contrib.djangoitem | scrapy-djangoitem |
| scrapy.webservice | scrapy-jsonrpc |
scrapy.contrib_exp and scrapy.contrib dissolutions
| Old location | New location |
|---|---|
| scrapy.contrib_exp.downloadermiddleware.decompression | scrapy.downloadermiddlewares.decompression |
| scrapy.contrib_exp.iterators | scrapy.utils.iterators |
| scrapy.contrib.downloadermiddleware | scrapy.downloadermiddlewares |
| scrapy.contrib.exporter | scrapy.exporters |
| scrapy.contrib.linkextractors | scrapy.linkextractors |
| scrapy.contrib.loader | scrapy.loader |
| scrapy.contrib.loader.processor | scrapy.loader.processors |
| scrapy.contrib.pipeline | scrapy.pipelines |
| scrapy.contrib.spidermiddleware | scrapy.spidermiddlewares |
| scrapy.contrib.spiders | scrapy.spiders |
|
scrapy.extensions.* |
Plural renames and Modules unification
| Old location | New location |
|---|---|
| scrapy.command | scrapy.commands |
| scrapy.dupefilter | scrapy.dupefilters |
| scrapy.linkextractor | scrapy.linkextractors |
| scrapy.spider | scrapy.spiders |
| scrapy.squeue | scrapy.squeues |
| scrapy.statscol | scrapy.statscollectors |
| scrapy.utils.decorator | scrapy.utils.decorators |
Class renames
| Old location | New location |
|---|---|
| scrapy.spidermanager.SpiderManager | scrapy.spiderloader.SpiderLoader |
Settings renames
| Old location | New location |
|---|---|
| SPIDER_MANAGER_CLASS | SPIDER_LOADER_CLASS |
Changelog
New Features and Enhancements
- Python logging (issue 1060, issue 1235, issue 1236, issue 1240, issue 1259, issue 1278, issue 1286)
- FEED_EXPORT_FIELDS option (issue 1159, issue 1224)
- Dns cache size and timeout options (issue 1132)
- support namespace prefix in xmliter_lxml (issue 963)
- Reactor threadpool max size setting (issue 1123)
- Allow spiders to return dicts. (issue 1081)
- Add Response.urljoin() helper (issue 1086)
- look in ~/.config/scrapy.cfg for user config (issue 1098)
- handle TLS SNI (issue 1101)
- Selectorlist extract first (issue 624, issue 1145)
- Added JmesSelect (issue 1016)
- add gzip compression to filesystem http cache backend (issue 1020)
- CSS support in link extractors (issue 983)
- httpcache dont_cache meta #19 #689 (issue 821)
- add signal to be sent when request is dropped by the scheduler (issue 961)
- avoid download large response (issue 946)
- Allow to specify the quotechar in CSVFeedSpider (issue 882)
- Add referer to “Spider error processing” log message (issue 795)
- process robots.txt once (issue 896)
- GSoC Per-spider settings (issue 854)
- Add project name validation (issue 817)
- GSoC API cleanup (issue 816, issue 1128, issue 1147, issue 1148, issue 1156, issue 1185, issue 1187, issue 1258, issue 1268, issue 1276, issue 1285, issue 1284)
- Be more responsive with IO operations (issue 1074 and issue 1075)
- Do leveldb compaction for httpcache on closing (issue 1297)
Deprecations and Removals
- Deprecate htmlparser link extractor (issue 1205)
- remove deprecated code from FeedExporter (issue 1155)
- a leftover for.15 compatibility (issue 925)
- drop support for CONCURRENT_REQUESTS_PER_SPIDER (issue 895)
- Drop old engine code (issue 911)
- Deprecate SgmlLinkExtractor (issue 777)
Relocations
- Move exporters/__init__.py to exporters.py (issue 1242)
- Move base classes to their packages (issue 1218, issue 1233)
- Module relocation (issue 1181, issue 1210)
- rename SpiderManager to SpiderLoader (issue 1166)
- Remove djangoitem (issue 1177)
- remove scrapy deploy command (issue 1102)
- dissolve contrib_exp (issue 1134)
- Deleted bin folder from root, fixes #913 (issue 914)
- Remove jsonrpc based webservice (issue 859)
- Move Test cases under project root dir (issue 827, issue 841)
- Fix backward incompatibility for relocated paths in settings (issue 1267)
Documentation
- CrawlerProcess documentation (issue 1190)
- Favoring web scraping over screen scraping in the descriptions (issue 1188)
- Some improvements for Scrapy tutorial (issue 1180)
- Documenting Files Pipeline together with Images Pipeline (issue 1150)
- deployment docs tweaks (issue 1164)
- Added deployment section covering scrapyd-deploy and shub (issue 1124)
- Adding more settings to project template (issue 1073)
- some improvements to overview page (issue 1106)
- Updated link in docs/topics/architecture.rst (issue 647)
- DOC reorder topics (issue 1022)
- updating list of Request.meta special keys (issue 1071)
- DOC document download_timeout (issue 898)
- DOC simplify extension docs (issue 893)
- Leaks docs (issue 894)
- DOC document from_crawler method for item pipelines (issue 904)
- Spider_error doesn’t support deferreds (issue 1292)
- Corrections & Sphinx related fixes (issue 1220, issue 1219, issue 1196, issue 1172, issue 1171, issue 1169, issue 1160, issue 1154, issue 1127, issue 1112, issue 1105, issue 1041, issue 1082, issue 1033, issue 944, issue 866, issue 864, issue 796, issue 1260, issue 1271, issue 1293, issue 1298)
Bugfixes
- Item multi inheritance fix (issue 353, issue 1228)
- ItemLoader.load_item: iterate over copy of fields (issue 722)
- Fix Unhandled error in Deferred (RobotsTxtMiddleware) (issue 1131, issue 1197)
- Force to read DOWNLOAD_TIMEOUT as int (issue 954)
- scrapy.utils.misc.load_object should print full traceback (issue 902)
- Fix bug for “.local” host name (issue 878)
- Fix for Enabled extensions, middlewares, pipelines info not printed anymore (issue 879)
- fix dont_merge_cookies bad behaviour when set to false on meta (issue 846)
Python 3 In Progress Support
- disable scrapy.telnet if twisted.conch is not available (issue 1161)
- fix Python 3 syntax errors in ajaxcrawl.py (issue 1162)
- more python3 compatibility changes for urllib (issue 1121)
- assertItemsEqual was renamed to assertCountEqual in Python 3. (issue 1070)
- Import unittest.mock if available. (issue 1066)
- updated deprecated cgi.parse_qsl to use six’s parse_qsl (issue 909)
- Prevent Python 3 port regressions (issue 830)
- PY3: use MutableMapping for python 3 (issue 810)
- PY3: use six.BytesIO and six.moves.cStringIO (issue 803)
- PY3: fix xmlrpclib and email imports (issue 801)
- PY3: use six for robotparser and urlparse (issue 800)
- PY3: use six.iterkeys, six.iteritems, and tempfile (issue 799)
- PY3: fix has_key and use six.moves.configparser (issue 798)
- PY3: use six.moves.cPickle (issue 797)
- PY3 make it possible to run some tests in Python3 (issue 776)
Tests
- remove unnecessary lines from py3-ignores (issue 1243)
- Fix remaining warnings from pytest while collecting tests (issue 1206)
- Add docs build to travis (issue 1234)
- TST don’t collect tests from deprecated modules. (issue 1165)
- install service_identity package in tests to prevent warnings (issue 1168)
- Fix deprecated settings API in tests (issue 1152)
- Add test for webclient with POST method and no body given (issue 1089)
- py3-ignores.txt supports comments (issue 1044)
- modernize some of the asserts (issue 835)
- selector.__repr__ test (issue 779)
Code refactoring
- CSVFeedSpider cleanup: use iterate_spider_output (issue 1079)
- remove unnecessary check from scrapy.utils.spider.iter_spider_output (issue 1078)
- Pydispatch pep8 (issue 992)
- Removed unused ‘load=False’ parameter from walk_modules() (issue 871)
- For consistency, use job_dir helper in SpiderState extension. (issue 805)
- rename “sflo” local variables to less cryptic “log_observer” (issue 775)
Scrapy 0.24.6 (2015-04-20)
- encode invalid xpath with unicode_escape under PY2 (commit 07cb3e5)
- fix IPython shell scope issue and load IPython user config (commit 2c8e573)
- Fix small typo in the docs (commit d694019)
- Fix small typo (commit f92fa83)
- Converted sel.xpath() calls to response.xpath() in Extracting the data (commit c2c6d15)
Scrapy 0.24.5 (2015-02-25)
- Support new _getEndpoint Agent signatures on Twisted 15.0.0 (commit 540b9bc)
- DOC a couple more references are fixed (commit b4c454b)
- DOC fix a reference (commit e3c1260)
- t.i.b.ThreadedResolver is now a new-style class (commit 9e13f42)
- S3DownloadHandler: fix auth for requests with quoted paths/query params (commit cdb9a0b)
- fixed the variable types in mailsender documentation (commit bb3a848)
- Reset items_scraped instead of item_count (commit edb07a4)
- Tentative attention message about what document to read for contributions (commit 7ee6f7a)
- mitmproxy 0.10.1 needs netlib 0.10.1 too (commit 874fcdd)
- pin mitmproxy 0.10.1 as >0.11 does not work with tests (commit c6b21f0)
- Test the parse command locally instead of against an external url (commit c3a6628)
- Patches Twisted issue while closing the connection pool on HTTPDownloadHandler (commit d0bf957)
- Updates documentation on dynamic item classes. (commit eeb589a)
- Merge pull request #943 from Lazar-T/patch-3 (commit 5fdab02)
- typo (commit b0ae199)
- pywin32 is required by Twisted. closes #937 (commit 5cb0cfb)
- Update install.rst (commit 781286b)
- Merge pull request #928 from Lazar-T/patch-1 (commit b415d04)
- comma instead of fullstop (commit 627b9ba)
- Merge pull request #885 from jsma/patch-1 (commit de909ad)
- Update request-response.rst (commit 3f3263d)
- SgmlLinkExtractor - fix for parsing <area> tag with Unicode present (commit 49b40f0)
Scrapy 0.24.4 (2014-08-09)
- pem file is used by mockserver and required by scrapy bench (commit 5eddc68)
- scrapy bench needs scrapy.tests* (commit d6cb999)
Scrapy 0.24.3 (2014-08-09)
- no need to waste travis-ci time on py3 for 0.24 (commit 8e080c1)
- Update installation docs (commit 1d0c096)
- There is a trove classifier for Scrapy framework! (commit 4c701d7)
- update other places where w3lib version is mentioned (commit d109c13)
- Update w3lib requirement to 1.8.0 (commit 39d2ce5)
- Use w3lib.html.replace_entities() (remove_entities() is deprecated) (commit 180d3ad)
- set zip_safe=False (commit a51ee8b)
- do not ship tests package (commit ee3b371)
- scrapy.bat is not needed anymore (commit c3861cf)
- Modernize setup.py (commit 362e322)
- headers can not handle non-string values (commit 94a5c65)
- fix ftp test cases (commit a274a7f)
- The sum up of travis-ci builds are taking like 50min to complete (commit ae1e2cc)
- Update shell.rst typo (commit e49c96a)
- removes weird indentation in the shell results (commit 1ca489d)
- improved explanations, clarified blog post as source, added link for XPath string functions in the spec (commit 65c8f05)
- renamed UserTimeoutError and ServerTimeouterror #583 (commit 037f6ab)
- adding some xpath tips to selectors docs (commit 2d103e0)
- fix tests to account for https://github.com/scrapy/w3lib/pull/23 (commit f8d366a)
- get_func_args maximum recursion fix #728 (commit 81344ea)
- Updated input/ouput processor example according to #560. (commit f7c4ea8)
- Fixed Python syntax in tutorial. (commit db59ed9)
- Add test case for tunneling proxy (commit f090260)
- Bugfix for leaking Proxy-Authorization header to remote host when using tunneling (commit d8793af)
- Extract links from XHTML documents with MIME-Type “application/xml” (commit ed1f376)
- Merge pull request #793 from roysc/patch-1 (commit 91a1106)
- Fix typo in commands.rst (commit 743e1e2)
- better testcase for settings.overrides.setdefault (commit e22daaf)
- Using CRLF as line marker according to http 1.1 definition (commit 5ec430b)
Scrapy 0.24.2 (2014-07-08)
- Use a mutable mapping to proxy deprecated settings.overrides and settings.defaults attribute (commit e5e8133)
- there is not support for python3 yet (commit 3cd6146)
- Update python compatible version set to debian packages (commit fa5d76b)
- DOC fix formatting in release notes (commit c6a9e20)
Scrapy 0.24.1 (2014-06-27)
- Fix deprecated CrawlerSettings and increase backwards compatibility with .defaults attribute (commit 8e3f20a)
Scrapy 0.24.0 (2014-06-26)
Enhancements
- Improve Scrapy top-level namespace (issue 494, issue 684)
- Add selector shortcuts to responses (issue 554, issue 690)
- Add new lxml based LinkExtractor to replace unmantained SgmlLinkExtractor (issue 559, issue 761, issue 763)
- Cleanup settings API - part of per-spider settings GSoC project (issue 737)
- Add UTF8 encoding header to templates (issue 688, issue 762)
- Telnet console now binds to 127.0.0.1 by default (issue 699)
- Update debian/ubuntu install instructions (issue 509, issue 549)
- Disable smart strings in lxml XPath evaluations (issue 535)
- Restore filesystem based cache as default for http cache middleware (issue 541, issue 500, issue 571)
- Expose current crawler in Scrapy shell (issue 557)
- Improve testsuite comparing CSV and XML exporters (issue 570)
- New offsite/filtered and offsite/domains stats (issue 566)
- Support process_links as generator in CrawlSpider (issue 555)
- Verbose logging and new stats counters for DupeFilter (issue 553)
- Add a mimetype parameter to MailSender.send() (issue 602)
- Generalize file pipeline log messages (issue 622)
- Replace unencodeable codepoints with html entities in SGMLLinkExtractor (issue 565)
- Converted SEP documents to rst format (issue 629, issue 630, issue 638, issue 632, issue 636, issue 640, issue 635, issue 634, issue 639, issue 637, issue 631, issue 633, issue 641, issue 642)
- Tests and docs for clickdata’s nr index in FormRequest (issue 646, issue 645)
- Allow to disable a downloader handler just like any other component (issue 650)
- Log when a request is discarded after too many redirections (issue 654)
- Log error responses if they are not handled by spider callbacks (issue 612, issue 656)
- Add content-type check to http compression mw (issue 193, issue 660)
- Run pypy tests using latest pypi from ppa (issue 674)
- Run test suite using pytest instead of trial (issue 679)
- Build docs and check for dead links in tox environment (issue 687)
- Make scrapy.version_info a tuple of integers (issue 681, issue 692)
- Infer exporter’s output format from filename extensions (issue 546, issue 659, issue 760)
- Support case-insensitive domains in url_is_from_any_domain() (issue 693)
- Remove pep8 warnings in project and spider templates (issue 698)
- Tests and docs for request_fingerprint function (issue 597)
- Update SEP-19 for GSoC project per-spider settings (issue 705)
- Set exit code to non-zero when contracts fails (issue 727)
- Add a setting to control what class is instanciated as Downloader component (issue 738)
- Pass response in item_dropped signal (issue 724)
- Improve scrapy check contracts command (issue 733, issue 752)
- Document spider.closed() shortcut (issue 719)
- Document request_scheduled signal (issue 746)
- Add a note about reporting security issues (issue 697)
- Add LevelDB http cache storage backend (issue 626, issue 500)
- Sort spider list output of scrapy list command (issue 742)
- Multiple documentation enhancemens and fixes (issue 575, issue 587, issue 590, issue 596, issue 610, issue 617, issue 618, issue 627, issue 613, issue 643, issue 654, issue 675, issue 663, issue 711, issue 714)
Bugfixes
- Encode unicode URL value when creating Links in RegexLinkExtractor (issue 561)
- Ignore None values in ItemLoader processors (issue 556)
- Fix link text when there is an inner tag in SGMLLinkExtractor and HtmlParserLinkExtractor (issue 485, issue 574)
- Fix wrong checks on subclassing of deprecated classes (issue 581, issue 584)
- Handle errors caused by inspect.stack() failures (issue 582)
- Fix a reference to unexistent engine attribute (issue 593, issue 594)
- Fix dynamic itemclass example usage of type() (issue 603)
- Use lucasdemarchi/codespell to fix typos (issue 628)
- Fix default value of attrs argument in SgmlLinkExtractor to be tuple (issue 661)
- Fix XXE flaw in sitemap reader (issue 676)
- Fix engine to support filtered start requests (issue 707)
- Fix offsite middleware case on urls with no hostnames (issue 745)
- Testsuite doesn’t require PIL anymore (issue 585)
Scrapy 0.22.2 (released 2014-02-14)
- fix a reference to unexistent engine.slots. closes #593 (commit 13c099a)
- downloaderMW doc typo (spiderMW doc copy remnant) (commit 8ae11bf)
- Correct typos (commit 1346037)
Scrapy 0.22.1 (released 2014-02-08)
- localhost666 can resolve under certain circumstances (commit 2ec2279)
- test inspect.stack failure (commit cc3eda3)
- Handle cases when inspect.stack() fails (commit 8cb44f9)
- Fix wrong checks on subclassing of deprecated classes. closes #581 (commit 46d98d6)
- Docs: 4-space indent for final spider example (commit 13846de)
- Fix HtmlParserLinkExtractor and tests after #485 merge (commit 368a946)
- BaseSgmlLinkExtractor: Fixed the missing space when the link has an inner tag (commit b566388)
- BaseSgmlLinkExtractor: Added unit test of a link with an inner tag (commit c1cb418)
- BaseSgmlLinkExtractor: Fixed unknown_endtag() so that it only set current_link=None when the end tag match the opening tag (commit 7e4d627)
- Fix tests for Travis-CI build (commit 76c7e20)
- replace unencodeable codepoints with html entities. fixes #562 and #285 (commit 5f87b17)
- RegexLinkExtractor: encode URL unicode value when creating Links (commit d0ee545)
- Updated the tutorial crawl output with latest output. (commit 8da65de)
- Updated shell docs with the crawler reference and fixed the actual shell output. (commit 875b9ab)
- PEP8 minor edits. (commit f89efaf)
- Expose current crawler in the scrapy shell. (commit 5349cec)
- Unused re import and PEP8 minor edits. (commit 387f414)
- Ignore None’s values when using the ItemLoader. (commit 0632546)
- DOC Fixed HTTPCACHE_STORAGE typo in the default value which is now Filesystem instead Dbm. (commit cde9a8c)
- show ubuntu setup instructions as literal code (commit fb5c9c5)
- Update Ubuntu installation instructions (commit 70fb105)
- Merge pull request #550 from stray-leone/patch-1 (commit 6f70b6a)
- modify the version of scrapy ubuntu package (commit 725900d)
- fix 0.22.0 release date (commit af0219a)
- fix typos in news.rst and remove (not released yet) header (commit b7f58f4)
Scrapy 0.22.0 (released 2014-01-17)
Enhancements
- [Backwards incompatible] Switched HTTPCacheMiddleware backend to filesystem (issue 541) To restore old backend set HTTPCACHE_STORAGE to scrapy.contrib.httpcache.DbmCacheStorage
- Proxy https:// urls using CONNECT method (issue 392, issue 397)
- Add a middleware to crawl ajax crawleable pages as defined by google (issue 343)
- Rename scrapy.spider.BaseSpider to scrapy.spider.Spider (issue 510, issue 519)
- Selectors register EXSLT namespaces by default (issue 472)
- Unify item loaders similar to selectors renaming (issue 461)
- Make RFPDupeFilter class easily subclassable (issue 533)
- Improve test coverage and forthcoming Python 3 support (issue 525)
- Promote startup info on settings and middleware to INFO level (issue 520)
- Support partials in get_func_args util (issue 506, issue:504)
- Allow running indiviual tests via tox (issue 503)
- Update extensions ignored by link extractors (issue 498)
- Add middleware methods to get files/images/thumbs paths (issue 490)
- Improve offsite middleware tests (issue 478)
- Add a way to skip default Referer header set by RefererMiddleware (issue 475)
- Do not send x-gzip in default Accept-Encoding header (issue 469)
- Support defining http error handling using settings (issue 466)
- Use modern python idioms wherever you find legacies (issue 497)
- Improve and correct documentation (issue 527, issue 524, issue 521, issue 517, issue 512, issue 505, issue 502, issue 489, issue 465, issue 460, issue 425, issue 536)
Fixes
- Update Selector class imports in CrawlSpider template (issue 484)
- Fix unexistent reference to engine.slots (issue 464)
- Do not try to call body_as_unicode() on a non-TextResponse instance (issue 462)
- Warn when subclassing XPathItemLoader, previously it only warned on instantiation. (issue 523)
- Warn when subclassing XPathSelector, previously it only warned on instantiation. (issue 537)
- Multiple fixes to memory stats (issue 531, issue 530, issue 529)
- Fix overriding url in FormRequest.from_response() (issue 507)
- Fix tests runner under pip 1.5 (issue 513)
- Fix logging error when spider name is unicode (issue 479)
Scrapy 0.20.2 (released 2013-12-09)
- Update CrawlSpider Template with Selector changes (commit 6d1457d)
- fix method name in tutorial. closes GH-480 (commit b4fc359
Scrapy 0.20.1 (released 2013-11-28)
- include_package_data is required to build wheels from published sources (commit 5ba1ad5)
- process_parallel was leaking the failures on its internal deferreds. closes #458 (commit 419a780)
Scrapy 0.20.0 (released 2013-11-08)
Enhancements
- New Selector’s API including CSS selectors (issue 395 and issue 426),
- Request/Response url/body attributes are now immutable (modifying them had been deprecated for a long time)
ITEM_PIPELINESis now defined as a dict (instead of a list)- Sitemap spider can fetch alternate URLs (issue 360)
- Selector.remove_namespaces() now remove namespaces from element’s attributes. (issue 416)
- Paved the road for Python 3.3+ (issue 435, issue 436, issue 431, issue 452)
- New item exporter using native python types with nesting support (issue 366)
- Tune HTTP1.1 pool size so it matches concurrency defined by settings (commit b43b5f575)
- scrapy.mail.MailSender now can connect over TLS or upgrade using STARTTLS (issue 327)
- New FilesPipeline with functionality factored out from ImagesPipeline (issue 370, issue 409)
- Recommend Pillow instead of PIL for image handling (issue 317)
- Added debian packages for Ubuntu quantal and raring (commit 86230c0)
- Mock server (used for tests) can listen for HTTPS requests (issue 410)
- Remove multi spider support from multiple core components (issue 422, issue 421, issue 420, issue 419, issue 423, issue 418)
- Travis-CI now tests Scrapy changes against development versions of w3lib and queuelib python packages.
- Add pypy 2.1 to continuous integration tests (commit ecfa7431)
- Pylinted, pep8 and removed old-style exceptions from source (issue 430, issue 432)
- Use importlib for parametric imports (issue 445)
- Handle a regression introduced in Python 2.7.5 that affects XmlItemExporter (issue 372)
- Bugfix crawling shutdown on SIGINT (issue 450)
- Do not submit reset type inputs in FormRequest.from_response (commit b326b87)
- Do not silence download errors when request errback raises an exception (commit 684cfc0)
Bugfixes
- Fix tests under Django 1.6 (commit b6bed44c)
- Lot of bugfixes to retry middleware under disconnections using HTTP 1.1 download handler
- Fix inconsistencies among Twisted releases (issue 406)
- Fix scrapy shell bugs (issue 418, issue 407)
- Fix invalid variable name in setup.py (issue 429)
- Fix tutorial references (issue 387)
- Improve request-response docs (issue 391)
- Improve best practices docs (issue 399, issue 400, issue 401, issue 402)
- Improve django integration docs (issue 404)
- Document bindaddress request meta (commit 37c24e01d7)
- Improve Request class documentation (issue 226)
Other
- Dropped Python 2.6 support (issue 448)
- Add cssselect python package as install dependency
- Drop libxml2 and multi selector’s backend support, lxml is required from now on.
- Minimum Twisted version increased to 10.0.0, dropped Twisted 8.0 support.
- Running test suite now requires mock python library (issue 390)
Thanks
Thanks to everyone who contribute to this release!
List of contributors sorted by number of commits:
69 Daniel Graña <dangra@...>
37 Pablo Hoffman <pablo@...>
13 Mikhail Korobov <kmike84@...>
9 Alex Cepoi <alex.cepoi@...>
9 alexanderlukanin13 <alexander.lukanin.13@...>
8 Rolando Espinoza La fuente <darkrho@...>
8 Lukasz Biedrycki <lukasz.biedrycki@...>
6 Nicolas Ramirez <nramirez.uy@...>
3 Paul Tremberth <paul.tremberth@...>
2 Martin Olveyra <molveyra@...>
2 Stefan <misc@...>
2 Rolando Espinoza <darkrho@...>
2 Loren Davie <loren@...>
2 irgmedeiros <irgmedeiros@...>
1 Stefan Koch <taikano@...>
1 Stefan <cct@...>
1 scraperdragon <dragon@...>
1 Kumara Tharmalingam <ktharmal@...>
1 Francesco Piccinno <stack.box@...>
1 Marcos Campal <duendex@...>
1 Dragon Dave <dragon@...>
1 Capi Etheriel <barraponto@...>
1 cacovsky <amarquesferraz@...>
1 Berend Iwema <berend@...>
Scrapy 0.18.4 (released 2013-10-10)
- IPython refuses to update the namespace. fix #396 (commit 3d32c4f)
- Fix AlreadyCalledError replacing a request in shell command. closes #407 (commit b1d8919)
- Fix start_requests laziness and early hangs (commit 89faf52)
Scrapy 0.18.3 (released 2013-10-03)
- fix regression on lazy evaluation of start requests (commit 12693a5)
- forms: do not submit reset inputs (commit e429f63)
- increase unittest timeouts to decrease travis false positive failures (commit 912202e)
- backport master fixes to json exporter (commit cfc2d46)
- Fix permission and set umask before generating sdist tarball (commit 06149e0)
Scrapy 0.18.2 (released 2013-09-03)
- Backport scrapy check command fixes and backward compatible multi crawler process(issue 339)
Scrapy 0.18.1 (released 2013-08-27)
- remove extra import added by cherry picked changes (commit d20304e)
- fix crawling tests under twisted pre 11.0.0 (commit 1994f38)
- py26 can not format zero length fields {} (commit abf756f)
- test PotentiaDataLoss errors on unbound responses (commit b15470d)
- Treat responses without content-length or Transfer-Encoding as good responses (commit c4bf324)
- do no include ResponseFailed if http11 handler is not enabled (commit 6cbe684)
- New HTTP client wraps connection losts in ResponseFailed exception. fix #373 (commit 1a20bba)
- limit travis-ci build matrix (commit 3b01bb8)
- Merge pull request #375 from peterarenot/patch-1 (commit fa766d7)
- Fixed so it refers to the correct folder (commit 3283809)
- added quantal & raring to support ubuntu releases (commit 1411923)
- fix retry middleware which didn’t retry certain connection errors after the upgrade to http1 client, closes GH-373 (commit bb35ed0)
- fix XmlItemExporter in Python 2.7.4 and 2.7.5 (commit de3e451)
- minor updates to 0.18 release notes (commit c45e5f1)
- fix contributters list format (commit 0b60031)
Scrapy 0.18.0 (released 2013-08-09)
- Lot of improvements to testsuite run using Tox, including a way to test on pypi
- Handle GET parameters for AJAX crawleable urls (commit 3fe2a32)
- Use lxml recover option to parse sitemaps (issue 347)
- Bugfix cookie merging by hostname and not by netloc (issue 352)
- Support disabling HttpCompressionMiddleware using a flag setting (issue 359)
- Support xml namespaces using iternodes parser in XMLFeedSpider (issue 12)
- Support dont_cache request meta flag (issue 19)
- Bugfix scrapy.utils.gz.gunzip broken by changes in python 2.7.4 (commit 4dc76e)
- Bugfix url encoding on SgmlLinkExtractor (issue 24)
- Bugfix TakeFirst processor shouldn’t discard zero (0) value (issue 59)
- Support nested items in xml exporter (issue 66)
- Improve cookies handling performance (issue 77)
- Log dupe filtered requests once (issue 105)
- Split redirection middleware into status and meta based middlewares (issue 78)
- Use HTTP1.1 as default downloader handler (issue 109 and issue 318)
- Support xpath form selection on FormRequest.from_response (issue 185)
- Bugfix unicode decoding error on SgmlLinkExtractor (issue 199)
- Bugfix signal dispatching on pypi interpreter (issue 205)
- Improve request delay and concurrency handling (issue 206)
- Add RFC2616 cache policy to HttpCacheMiddleware (issue 212)
- Allow customization of messages logged by engine (issue 214)
- Multiples improvements to DjangoItem (issue 217, issue 218, issue 221)
- Extend Scrapy commands using setuptools entry points (issue 260)
- Allow spider allowed_domains value to be set/tuple (issue 261)
- Support settings.getdict (issue 269)
- Simplify internal scrapy.core.scraper slot handling (issue 271)
- Added Item.copy (issue 290)
- Collect idle downloader slots (issue 297)
- Add ftp:// scheme downloader handler (issue 329)
- Added downloader benchmark webserver and spider tools Benchmarking
- Moved persistent (on disk) queues to a separate project (queuelib) which scrapy now depends on
- Add scrapy commands using external libraries (issue 260)
- Added
--pdboption toscrapycommand line tool - Added
XPathSelector.remove_namespaces()which allows to remove all namespaces from XML documents for convenience (to work with namespace-less XPaths). Documented in Selectors. - Several improvements to spider contracts
- New default middleware named MetaRefreshMiddldeware that handles meta-refresh html tag redirections,
- MetaRefreshMiddldeware and RedirectMiddleware have different priorities to address #62
- added from_crawler method to spiders
- added system tests with mock server
- more improvements to Mac OS compatibility (thanks Alex Cepoi)
- several more cleanups to singletons and multi-spider support (thanks Nicolas Ramirez)
- support custom download slots
- added –spider option to “shell” command.
- log overridden settings when scrapy starts
Thanks to everyone who contribute to this release. Here is a list of contributors sorted by number of commits:
130 Pablo Hoffman <pablo@...>
97 Daniel Graña <dangra@...>
20 Nicolás Ramírez <nramirez.uy@...>
13 Mikhail Korobov <kmike84@...>
12 Pedro Faustino <pedrobandim@...>
11 Steven Almeroth <sroth77@...>
5 Rolando Espinoza La fuente <darkrho@...>
4 Michal Danilak <mimino.coder@...>
4 Alex Cepoi <alex.cepoi@...>
4 Alexandr N Zamaraev (aka tonal) <tonal@...>
3 paul <paul.tremberth@...>
3 Martin Olveyra <molveyra@...>
3 Jordi Llonch <llonchj@...>
3 arijitchakraborty <myself.arijit@...>
2 Shane Evans <shane.evans@...>
2 joehillen <joehillen@...>
2 Hart <HartSimha@...>
2 Dan <ellisd23@...>
1 Zuhao Wan <wanzuhao@...>
1 whodatninja <blake@...>
1 vkrest <v.krestiannykov@...>
1 tpeng <pengtaoo@...>
1 Tom Mortimer-Jones <tom@...>
1 Rocio Aramberri <roschegel@...>
1 Pedro <pedro@...>
1 notsobad <wangxiaohugg@...>
1 Natan L <kuyanatan.nlao@...>
1 Mark Grey <mark.grey@...>
1 Luan <luanpab@...>
1 Libor Nenadál <libor.nenadal@...>
1 Juan M Uys <opyate@...>
1 Jonas Brunsgaard <jonas.brunsgaard@...>
1 Ilya Baryshev <baryshev@...>
1 Hasnain Lakhani <m.hasnain.lakhani@...>
1 Emanuel Schorsch <emschorsch@...>
1 Chris Tilden <chris.tilden@...>
1 Capi Etheriel <barraponto@...>
1 cacovsky <amarquesferraz@...>
1 Berend Iwema <berend@...>
Scrapy 0.16.5 (released 2013-05-30)
- obey request method when scrapy deploy is redirected to a new endpoint (commit 8c4fcee)
- fix inaccurate downloader middleware documentation. refs #280 (commit 40667cb)
- doc: remove links to diveintopython.org, which is no longer available. closes #246 (commit bd58bfa)
- Find form nodes in invalid html5 documents (commit e3d6945)
- Fix typo labeling attrs type bool instead of list (commit a274276)
Scrapy 0.16.4 (released 2013-01-23)
- fixes spelling errors in documentation (commit 6d2b3aa)
- add doc about disabling an extension. refs #132 (commit c90de33)
- Fixed error message formatting. log.err() doesn’t support cool formatting and when error occurred, the message was: “ERROR: Error processing %(item)s” (commit c16150c)
- lint and improve images pipeline error logging (commit 56b45fc)
- fixed doc typos (commit 243be84)
- add documentation topics: Broad Crawls & Common Practies (commit 1fbb715)
- fix bug in scrapy parse command when spider is not specified explicitly. closes #209 (commit c72e682)
- Update docs/topics/commands.rst (commit 28eac7a)
Scrapy 0.16.3 (released 2012-12-07)
- Remove concurrency limitation when using download delays and still ensure inter-request delays are enforced (commit 487b9b5)
- add error details when image pipeline fails (commit 8232569)
- improve mac os compatibility (commit 8dcf8aa)
- setup.py: use README.rst to populate long_description (commit 7b5310d)
- doc: removed obsolete references to ClientForm (commit 80f9bb6)
- correct docs for default storage backend (commit 2aa491b)
- doc: removed broken proxyhub link from FAQ (commit bdf61c4)
- Fixed docs typo in SpiderOpenCloseLogging example (commit 7184094)
Scrapy 0.16.2 (released 2012-11-09)
- scrapy contracts: python2.6 compat (commit a4a9199)
- scrapy contracts verbose option (commit ec41673)
- proper unittest-like output for scrapy contracts (commit 86635e4)
- added open_in_browser to debugging doc (commit c9b690d)
- removed reference to global scrapy stats from settings doc (commit dd55067)
- Fix SpiderState bug in Windows platforms (commit 58998f4)
Scrapy 0.16.1 (released 2012-10-26)
- fixed LogStats extension, which got broken after a wrong merge before the 0.16 release (commit 8c780fd)
- better backwards compatibility for scrapy.conf.settings (commit 3403089)
- extended documentation on how to access crawler stats from extensions (commit c4da0b5)
- removed .hgtags (no longer needed now that scrapy uses git) (commit d52c188)
- fix dashes under rst headers (commit fa4f7f9)
- set release date for 0.16.0 in news (commit e292246)
Scrapy 0.16.0 (released 2012-10-18)
Scrapy changes:
- added Spiders Contracts, a mechanism for testing spiders in a formal/reproducible way
- added options
-oand-tto therunspidercommand - documented AutoThrottle extension and added to extensions installed by default. You still need to enable it with
AUTOTHROTTLE_ENABLED - major Stats Collection refactoring: removed separation of global/per-spider stats, removed stats-related signals (
stats_spider_opened, etc). Stats are much simpler now, backwards compatibility is kept on the Stats Collector API and signals. - added
process_start_requests()method to spider middlewares - dropped Signals singleton. Signals should now be accesed through the Crawler.signals attribute. See the signals documentation for more info.
- dropped Signals singleton. Signals should now be accesed through the Crawler.signals attribute. See the signals documentation for more info.
- dropped Stats Collector singleton. Stats can now be accessed through the Crawler.stats attribute. See the stats collection documentation for more info.
- documented Core API
- lxml is now the default selectors backend instead of libxml2
- ported FormRequest.from_response() to use lxml instead of ClientForm
- removed modules:
scrapy.xlib.BeautifulSoupandscrapy.xlib.ClientForm - SitemapSpider: added support for sitemap urls ending in .xml and .xml.gz, even if they advertise a wrong content type (commit 10ed28b)
- StackTraceDump extension: also dump trackref live references (commit fe2ce93)
- nested items now fully supported in JSON and JSONLines exporters
- added
cookiejarRequest meta key to support multiple cookie sessions per spider - decoupled encoding detection code to w3lib.encoding, and ported Scrapy code to use that module
- dropped support for Python 2.5. See https://blog.scrapinghub.com/2012/02/27/scrapy-0-15-dropping-support-for-python-2-5/
- dropped support for Twisted 2.5
- added
REFERER_ENABLEDsetting, to control referer middleware - changed default user agent to:
Scrapy/VERSION (+http://scrapy.org) - removed (undocumented)
HTMLImageLinkExtractorclass fromscrapy.contrib.linkextractors.image - removed per-spider settings (to be replaced by instantiating multiple crawler objects)
USER_AGENTspider attribute will no longer work, useuser_agentattribute insteadDOWNLOAD_TIMEOUTspider attribute will no longer work, usedownload_timeoutattribute instead- removed
ENCODING_ALIASESsetting, as encoding auto-detection has been moved to the w3lib library - promoted DjangoItem to main contrib
- LogFormatter method now return dicts(instead of strings) to support lazy formatting (issue 164, commit dcef7b0)
- downloader handlers (
DOWNLOAD_HANDLERSsetting) now receive settings as the first argument of the constructor - replaced memory usage acounting with (more portable) resource module, removed
scrapy.utils.memorymodule - removed signal:
scrapy.mail.mail_sent - removed
TRACK_REFSsetting, now trackrefs is always enabled - DBM is now the default storage backend for HTTP cache middleware
- number of log messages (per level) are now tracked through Scrapy stats (stat name:
log_count/LEVEL) - number received responses are now tracked through Scrapy stats (stat name:
response_received_count) - removed
scrapy.log.startedattribute
Scrapy 0.14.4
- added precise to supported ubuntu distros (commit b7e46df)
- fixed bug in json-rpc webservice reported in https://groups.google.com/forum/#!topic/scrapy-users/qgVBmFybNAQ/discussion. also removed no longer supported ‘run’ command from extras/scrapy-ws.py (commit 340fbdb)
- meta tag attributes for content-type http equiv can be in any order. #123 (commit 0cb68af)
- replace “import Image” by more standard “from PIL import Image”. closes #88 (commit 4d17048)
- return trial status as bin/runtests.sh exit value. #118 (commit b7b2e7f)
Scrapy 0.14.3
- forgot to include pydispatch license. #118 (commit fd85f9c)
- include egg files used by testsuite in source distribution. #118 (commit c897793)
- update docstring in project template to avoid confusion with genspider command, which may be considered as an advanced feature. refs #107 (commit 2548dcc)
- added note to docs/topics/firebug.rst about google directory being shut down (commit 668e352)
- dont discard slot when empty, just save in another dict in order to recycle if needed again. (commit 8e9f607)
- do not fail handling unicode xpaths in libxml2 backed selectors (commit b830e95)
- fixed minor mistake in Request objects documentation (commit bf3c9ee)
- fixed minor defect in link extractors documentation (commit ba14f38)
- removed some obsolete remaining code related to sqlite support in scrapy (commit 0665175)
Scrapy 0.14.2
- move buffer pointing to start of file before computing checksum. refs #92 (commit 6a5bef2)
- Compute image checksum before persisting images. closes #92 (commit 9817df1)
- remove leaking references in cached failures (commit 673a120)
- fixed bug in MemoryUsage extension: get_engine_status() takes exactly 1 argument (0 given) (commit 11133e9)
- fixed struct.error on http compression middleware. closes #87 (commit 1423140)
- ajax crawling wasn’t expanding for unicode urls (commit 0de3fb4)
- Catch start_requests iterator errors. refs #83 (commit 454a21d)
- Speed-up libxml2 XPathSelector (commit 2fbd662)
- updated versioning doc according to recent changes (commit 0a070f5)
- scrapyd: fixed documentation link (commit 2b4e4c3)
- extras/makedeb.py: no longer obtaining version from git (commit caffe0e)
Scrapy 0.14.1
- extras/makedeb.py: no longer obtaining version from git (commit caffe0e)
- bumped version to 0.14.1 (commit 6cb9e1c)
- fixed reference to tutorial directory (commit 4b86bd6)
- doc: removed duplicated callback argument from Request.replace() (commit 1aeccdd)
- fixed formatting of scrapyd doc (commit 8bf19e6)
- Dump stacks for all running threads and fix engine status dumped by StackTraceDump extension (commit 14a8e6e)
- added comment about why we disable ssl on boto images upload (commit 5223575)
- SSL handshaking hangs when doing too many parallel connections to S3 (commit 63d583d)
- change tutorial to follow changes on dmoz site (commit bcb3198)
- Avoid _disconnectedDeferred AttributeError exception in Twisted>=11.1.0 (commit 98f3f87)
- allow spider to set autothrottle max concurrency (commit 175a4b5)
Scrapy 0.14
New features and settings
- Support for AJAX crawleable urls
- New persistent scheduler that stores requests on disk, allowing to suspend and resume crawls (r2737)
- added
-ooption toscrapy crawl, a shortcut for dumping scraped items into a file (or standard output using-) - Added support for passing custom settings to Scrapyd
schedule.jsonapi (r2779, r2783) - New
ChunkedTransferMiddleware(enabled by default) to support chunked transfer encoding (r2769) - Add boto 2.0 support for S3 downloader handler (r2763)
- Added marshal to formats supported by feed exports (r2744)
- In request errbacks, offending requests are now received in failure.request attribute (r2738)
- Big downloader refactoring to support per domain/ip concurrency limits (r2732)
CONCURRENT_REQUESTS_PER_SPIDERsetting has been deprecated and replaced by:
- check the documentation for more details
- Added builtin caching DNS resolver (r2728)
- Moved Amazon AWS-related components/extensions (SQS spider queue, SimpleDB stats collector) to a separate project: [scaws](https://github.com/scrapinghub/scaws) (r2706, r2714)
- Moved spider queues to scrapyd: scrapy.spiderqueue -> scrapyd.spiderqueue (r2708)
- Moved sqlite utils to scrapyd: scrapy.utils.sqlite -> scrapyd.sqlite (r2781)
- Real support for returning iterators on start_requests() method. The iterator is now consumed during the crawl when the spider is getting idle (r2704)
- Added
REDIRECT_ENABLEDsetting to quickly enable/disable the redirect middleware (r2697) - Added
RETRY_ENABLEDsetting to quickly enable/disable the retry middleware (r2694) - Added
CloseSpiderexception to manually close spiders (r2691) - Improved encoding detection by adding support for HTML5 meta charset declaration (r2690)
- Refactored close spider behavior to wait for all downloads to finish and be processed by spiders, before closing the spider (r2688)
- Added
SitemapSpider(see documentation in Spiders page) (r2658) - Added
LogStatsextension for periodically logging basic stats (like crawled pages and scraped items) (r2657) - Make handling of gzipped responses more robust (#319, r2643). Now Scrapy will try and decompress as much as possible from a gzipped response, instead of failing with an IOError.
- Simplified !MemoryDebugger extension to use stats for dumping memory debugging info (r2639)
- Added new command to edit spiders:
scrapy edit(r2636) and -e flag to genspider command that uses it (r2653) - Changed default representation of items to pretty-printed dicts. (r2631). This improves default logging by making log more readable in the default case, for both Scraped and Dropped lines.
- Added
spider_errorsignal (r2628) - Added
COOKIES_ENABLEDsetting (r2625) - Stats are now dumped to Scrapy log (default value of
STATS_DUMPsetting has been changed to True). This is to make Scrapy users more aware of Scrapy stats and the data that is collected there. - Added support for dynamically adjusting download delay and maximum concurrent requests (r2599)
- Added new DBM HTTP cache storage backend (r2576)
- Added
listjobs.jsonAPI to Scrapyd (r2571) CsvItemExporter: addedjoin_multivaluedparameter (r2578)- Added namespace support to
xmliter_lxml(r2552) - Improved cookies middleware by making COOKIES_DEBUG nicer and documenting it (r2579)
- Several improvements to Scrapyd and Link extractors
Code rearranged and removed
- Merged item passed and item scraped concepts, as they have often proved confusing in the past. This means: (r2630)
- original item_scraped signal was removed
- original item_passed signal was renamed to item_scraped
- old log lines
Scraped Item...were removed - old log lines
Passed Item...were renamed toScraped Item...lines and downgraded toDEBUGlevel
- Removed unused function: scrapy.utils.request.request_info() (r2577)
- Removed googledir project from examples/googledir. There’s now a new example project called dirbot available on github: https://github.com/scrapy/dirbot
- Removed support for default field values in Scrapy items (r2616)
- Removed experimental crawlspider v2 (r2632)
- Removed scheduler middleware to simplify architecture. Duplicates filter is now done in the scheduler itself, using the same dupe fltering class as before (DUPEFILTER_CLASS setting) (r2640)
- Removed support for passing urls to
scrapy crawlcommand (usescrapy parseinstead) (r2704) - Removed deprecated Execution Queue (r2704)
- Removed (undocumented) spider context extension (from scrapy.contrib.spidercontext) (r2780)
- removed
CONCURRENT_SPIDERSsetting (use scrapyd maxproc instead) (r2789) - Renamed attributes of core components: downloader.sites -> downloader.slots, scraper.sites -> scraper.slots (r2717, r2718)
- Renamed setting
CLOSESPIDER_ITEMPASSEDtoCLOSESPIDER_ITEMCOUNT(r2655). Backwards compatibility kept.
Scrapy 0.12
The numbers like #NNN reference tickets in the old issue tracker (Trac) which is no longer available.
New features and improvements
- Passed item is now sent in the
itemargument of theitem_passed(#273) - Added verbose option to
scrapy versioncommand, useful for bug reports (#298) - HTTP cache now stored by default in the project data dir (#279)
- Added project data storage directory (#276, #277)
- Documented file structure of Scrapy projects (see command-line tool doc)
- New lxml backend for XPath selectors (#147)
- Per-spider settings (#245)
- Support exit codes to signal errors in Scrapy commands (#248)
- Added
-cargument toscrapy shellcommand - Made
libxml2optional (#260) - New
deploycommand (#261) - Added
CLOSESPIDER_PAGECOUNTsetting (#253) - Added
CLOSESPIDER_ERRORCOUNTsetting (#254)
Scrapyd changes
- Scrapyd now uses one process per spider
- It stores one log file per spider run, and rotate them keeping the lastest 5 logs per spider (by default)
- A minimal web ui was added, available at http://localhost:6800 by default
- There is now a scrapy server command to start a Scrapyd server of the current project
Changes to settings
- added HTTPCACHE_ENABLED setting (False by default) to enable HTTP cache middleware
- changed HTTPCACHE_EXPIRATION_SECS semantics: now zero means “never expire”.
Deprecated/obsoleted functionality
- Deprecated
runservercommand in favor ofservercommand which starts a Scrapyd server. See also: Scrapyd changes - Deprecated
queuecommand in favor of using Scrapydschedule.jsonAPI. See also: Scrapyd changes - Removed the !LxmlItemLoader (experimental contrib which never graduated to main contrib)
Scrapy 0.10
The numbers like #NNN reference tickets in the old issue tracker (Trac) which is no longer available.
New features and improvements
- New Scrapy service called
scrapydfor deploying Scrapy crawlers in production (#218) (documentation available) - Simplified Images pipeline usage which doesn’t require subclassing your own images pipeline now (#217)
- Scrapy shell now shows the Scrapy log by default (#206)
- Refactored execution queue in a common base code and pluggable backends called “spider queues” (#220)
- New persistent spider queue (based on SQLite) (#198), available by default, which allows to start Scrapy in server mode and then schedule spiders to run.
- Added documentation for Scrapy command-line tool and all its available sub-commands. (documentation available)
- Feed exporters with pluggable backends (#197) (documentation available)
- Deferred signals (#193)
- Added two new methods to item pipeline open_spider(), close_spider() with deferred support (#195)
- Support for overriding default request headers per spider (#181)
- Replaced default Spider Manager with one with similar functionality but not depending on Twisted Plugins (#186)
- Splitted Debian package into two packages - the library and the service (#187)
- Scrapy log refactoring (#188)
- New extension for keeping persistent spider contexts among different runs (#203)
- Added dont_redirect request.meta key for avoiding redirects (#233)
- Added dont_retry request.meta key for avoiding retries (#234)
Command-line tool changes
- New scrapy command which replaces the old scrapy-ctl.py (#199) - there is only one global scrapy command now, instead of one scrapy-ctl.py per project - Added scrapy.bat script for running more conveniently from Windows
- Added bash completion to command-line tool (#210)
- Renamed command start to runserver (#209)
API changes
urlandbodyattributes of Request objects are now read-only (#230)Request.copy()andRequest.replace()now also copies theircallbackanderrbackattributes (#231)- Removed
UrlFilterMiddlewarefromscrapy.contrib(already disabled by default) - Offsite middelware doesn’t filter out any request coming from a spider that doesn’t have a allowed_domains attribute (#225)
- Removed Spider Manager
load()method. Now spiders are loaded in the constructor itself. - Changes to Scrapy Manager (now called “Crawler”):
scrapy.core.manager.ScrapyManagerclass renamed toscrapy.crawler.Crawlerscrapy.core.manager.scrapymanagersingleton moved toscrapy.project.crawler
- Moved module:
scrapy.contrib.spidermanagertoscrapy.spidermanager - Spider Manager singleton moved from
scrapy.spider.spidersto thespiders` attribute of ``scrapy.project.crawlersingleton. - moved Stats Collector classes: (#204)
scrapy.stats.collector.StatsCollectortoscrapy.statscol.StatsCollectorscrapy.stats.collector.SimpledbStatsCollectortoscrapy.contrib.statscol.SimpledbStatsCollector
- default per-command settings are now specified in the
default_settingsattribute of command object class (#201) - changed arguments of Item pipeline
process_item()method from(spider, item)to(item, spider) - backwards compatibility kept (with deprecation warning)
- changed arguments of Item pipeline
- moved
scrapy.core.signalsmodule toscrapy.signals - backwards compatibility kept (with deprecation warning)
- moved
- moved
scrapy.core.exceptionsmodule toscrapy.exceptions - backwards compatibility kept (with deprecation warning)
- moved
- added
handles_request()class method toBaseSpider - dropped
scrapy.log.exc()function (usescrapy.log.err()instead) - dropped
componentargument ofscrapy.log.msg()function - dropped
scrapy.log.log_levelattribute - Added
from_settings()class methods to Spider Manager, and Item Pipeline Manager
Changes to settings
- Added
HTTPCACHE_IGNORE_SCHEMESsetting to ignore certain schemes on !HttpCacheMiddleware (#225) - Added
SPIDER_QUEUE_CLASSsetting which defines the spider queue to use (#220) - Added
KEEP_ALIVEsetting (#220) - Removed
SERVICE_QUEUEsetting (#220) - Removed
COMMANDS_SETTINGS_MODULEsetting (#201) - Renamed
REQUEST_HANDLERStoDOWNLOAD_HANDLERSand make download handlers classes (instead of functions)
Scrapy 0.9
The numbers like #NNN reference tickets in the old issue tracker (Trac) which is no longer available.
New features and improvements
- Added SMTP-AUTH support to scrapy.mail
- New settings added:
MAIL_USER,MAIL_PASS(r2065 | #149) - Added new scrapy-ctl view command - To view URL in the browser, as seen by Scrapy (r2039)
- Added web service for controlling Scrapy process (this also deprecates the web console. (r2053 | #167)
- Support for running Scrapy as a service, for production systems (r1988, r2054, r2055, r2056, r2057 | #168)
- Added wrapper induction library (documentation only available in source code for now). (r2011)
- Simplified and improved response encoding support (r1961, r1969)
- Added
LOG_ENCODINGsetting (r1956, documentation available) - Added
RANDOMIZE_DOWNLOAD_DELAYsetting (enabled by default) (r1923, doc available) MailSenderis no longer IO-blocking (r1955 | #146)- Linkextractors and new Crawlspider now handle relative base tag urls (r1960 | #148)
- Several improvements to Item Loaders and processors (r2022, r2023, r2024, r2025, r2026, r2027, r2028, r2029, r2030)
- Added support for adding variables to telnet console (r2047 | #165)
- Support for requests without callbacks (r2050 | #166)
API changes
- Change
Spider.domain_nametoSpider.name(SEP-012, r1975) Response.encodingis now the detected encoding (r1961)HttpErrorMiddlewarenow returns None or raises an exception (r2006 | #157)scrapy.commandmodules relocation (r2035, r2036, r2037)- Added
ExecutionQueuefor feeding spiders to scrape (r2034) - Removed
ExecutionEnginesingleton (r2039) - Ported
S3ImagesStore(images pipeline) to use boto and threads (r2033) - Moved module:
scrapy.management.telnettoscrapy.telnet(r2047)
Scrapy 0.8
The numbers like #NNN reference tickets in the old issue tracker (Trac) which is no longer available.
New features
- Added DEFAULT_RESPONSE_ENCODING setting (r1809)
- Added
dont_clickargument toFormRequest.from_response()method (r1813, r1816) - Added
clickdataargument toFormRequest.from_response()method (r1802, r1803) - Added support for HTTP proxies (
HttpProxyMiddleware) (r1781, r1785) - Offsite spider middleware now logs messages when filtering out requests (r1841)
Backwards-incompatible changes
- Changed
scrapy.utils.response.get_meta_refresh()signature (r1804) - Removed deprecated
scrapy.item.ScrapedItemclass - usescrapy.item.Item instead(r1838) - Removed deprecated
scrapy.xpathmodule - usescrapy.selectorinstead. (r1836) - Removed deprecated
core.signals.domain_opensignal - usecore.signals.domain_openedinstead (r1822) log.msg()now receives aspiderargument (r1822)- Old domain argument has been deprecated and will be removed in 0.9. For spiders, you should always use the
spiderargument and pass spider references. If you really want to pass a string, use thecomponentargument instead.
- Old domain argument has been deprecated and will be removed in 0.9. For spiders, you should always use the
- Changed core signals
domain_opened,domain_closed,domain_idle - Changed Item pipeline to use spiders instead of domains
- The
domainargument ofprocess_item()item pipeline method was changed tospider, the new signature is:process_item(spider, item)(r1827 | #105) - To quickly port your code (to work with Scrapy 0.8) just use
spider.domain_namewhere you previously useddomain.
- The
- Changed Stats API to use spiders instead of domains (r1849 | #113)
StatsCollectorwas changed to receive spider references (instead of domains) in its methods (set_value,inc_value, etc).- added
StatsCollector.iter_spider_stats()method - removed
StatsCollector.list_domains()method - Also, Stats signals were renamed and now pass around spider references (instead of domains). Here’s a summary of the changes:
- To quickly port your code (to work with Scrapy 0.8) just use
spider.domain_namewhere you previously useddomain.spider_statscontains exactly the same data asdomain_stats.
CloseDomainextension moved toscrapy.contrib.closespider.CloseSpider(r1833)- Its settings were also renamed:
CLOSEDOMAIN_TIMEOUTtoCLOSESPIDER_TIMEOUTCLOSEDOMAIN_ITEMCOUNTtoCLOSESPIDER_ITEMCOUNT
- Removed deprecated
SCRAPYSETTINGS_MODULEenvironment variable - useSCRAPY_SETTINGS_MODULEinstead (r1840) - Renamed setting:
REQUESTS_PER_DOMAINtoCONCURRENT_REQUESTS_PER_SPIDER(r1830, r1844) - Renamed setting:
CONCURRENT_DOMAINStoCONCURRENT_SPIDERS(r1830) - Refactored HTTP Cache middleware
- HTTP Cache middleware has been heavilty refactored, retaining the same functionality except for the domain sectorization which was removed. (r1843 )
- Renamed exception:
DontCloseDomaintoDontCloseSpider(r1859 | #120) - Renamed extension:
DelayedCloseDomaintoSpiderCloseDelay(r1861 | #121) - Removed obsolete
scrapy.utils.markup.remove_escape_charsfunction - usescrapy.utils.markup.replace_escape_charsinstead (r1865)
Scrapy 0.7
First release of Scrapy.
Contributing to Scrapy
Important
Double check you are reading the most recent version of this document at https://doc.scrapy.org/en/master/contributing.html
There are many ways to contribute to Scrapy. Here are some of them:
- Blog about Scrapy. Tell the world how you’re using Scrapy. This will help newcomers with more examples and the Scrapy project to increase its visibility.
- Report bugs and request features in the issue tracker, trying to follow the guidelines detailed in Reporting bugs below.
- Submit patches for new functionality and/or bug fixes. Please read Writing patches and Submitting patches below for details on how to write and submit a patch.
- Join the Scrapy subreddit and share your ideas on how to improve Scrapy. We’re always open to suggestions.
- Answer Scrapy questions at Stack Overflow.
Reporting bugs
Note
Please report security issues only to scrapy-security@googlegroups.com. This is a private list only open to trusted Scrapy developers, and its archives are not public.
Well-written bug reports are very helpful, so keep in mind the following guidelines when reporting a new bug.
- check the FAQ first to see if your issue is addressed in a well-known question
- if you have a general question about scrapy usage, please ask it at Stack Overflow (use “scrapy” tag).
- check the open issues to see if it has already been reported. If it has, don’t dismiss the report, but check the ticket history and comments. If you have additional useful information, please leave a comment, or consider sending a pull request with a fix.
- search the scrapy-users list and Scrapy subreddit to see if it has been discussed there, or if you’re not sure if what you’re seeing is a bug. You can also ask in the #scrapy IRC channel.
- write complete, reproducible, specific bug reports. The smaller the test case, the better. Remember that other developers won’t have your project to reproduce the bug, so please include all relevant files required to reproduce it. See for example StackOverflow’s guide on creating a Minimal, Complete, and Verifiable example exhibiting the issue.
- the most awesome way to provide a complete reproducible example is to send a pull request which adds a failing test case to the Scrapy testing suite (see Submitting patches). This is helpful even if you don’t have an intention to fix the issue yourselves.
- include the output of
scrapy version -vso developers working on your bug know exactly which version and platform it occurred on, which is often very helpful for reproducing it, or knowing if it was already fixed.
Writing patches
The better written a patch is, the higher chance that it’ll get accepted and the sooner that will be merged.
Well-written patches should:
- contain the minimum amount of code required for the specific change. Small patches are easier to review and merge. So, if you’re doing more than one change (or bug fix), please consider submitting one patch per change. Do not collapse multiple changes into a single patch. For big changes consider using a patch queue.
- pass all unit-tests. See Running tests below.
- include one (or more) test cases that check the bug fixed or the new functionality added. See Writing tests below.
- if you’re adding or changing a public (documented) API, please include the documentation changes in the same patch. See Documentation policies below.
Submitting patches
The best way to submit a patch is to issue a pull request on GitHub, optionally creating a new issue first.
Remember to explain what was fixed or the new functionality (what it is, why it’s needed, etc). The more info you include, the easier will be for core developers to understand and accept your patch.
You can also discuss the new functionality (or bug fix) before creating the patch, but it’s always good to have a patch ready to illustrate your arguments and show that you have put some additional thought into the subject. A good starting point is to send a pull request on GitHub. It can be simple enough to illustrate your idea, and leave documentation/tests for later, after the idea has been validated and proven useful. Alternatively, you can start a conversation in the Scrapy subreddit to discuss your idea first.
Sometimes there is an existing pull request for the problem you’d like to solve, which is stalled for some reason. Often the pull request is in a right direction, but changes are requested by Scrapy maintainers, and the original pull request author haven’t had time to address them. In this case consider picking up this pull request: open a new pull request with all commits from the original pull request, as well as additional changes to address the raised issues. Doing so helps a lot; it is not considered rude as soon as the original author is acknowledged by keeping his/her commits.
You can pull an existing pull request to a local branch
by running git fetch upstream pull/$PR_NUMBER/head:$BRANCH_NAME_TO_CREATE
(replace ‘upstream’ with a remote name for scrapy repository,
$PR_NUMBER with an ID of the pull request, and $BRANCH_NAME_TO_CREATE
with a name of the branch you want to create locally).
See also: https://help.github.com/articles/checking-out-pull-requests-locally/#modifying-an-inactive-pull-request-locally.
When writing GitHub pull requests, try to keep titles short but descriptive. E.g. For bug #411: “Scrapy hangs if an exception raises in start_requests” prefer “Fix hanging when exception occurs in start_requests (#411)” instead of “Fix for #411”. Complete titles make it easy to skim through the issue tracker.
Finally, try to keep aesthetic changes (PEP 8 compliance, unused imports removal, etc) in separate commits than functional changes. This will make pull requests easier to review and more likely to get merged.
Coding style
Please follow these coding conventions when writing code for inclusion in Scrapy:
- Unless otherwise specified, follow PEP 8.
- It’s OK to use lines longer than 80 chars if it improves the code readability.
- Don’t put your name in the code you contribute; git provides enough metadata to identify author of the code. See https://help.github.com/articles/setting-your-username-in-git/ for setup instructions.
Documentation policies
- Don’t use docstrings for documenting classes, or methods which are
already documented in the official (sphinx) documentation. Alternatively,
do provide a docstring, but make sure sphinx documentation uses
autodoc extension to pull the docstring. For example, the
ItemLoader.add_value()method should be either documented only in the sphinx documentation (not it a docstring), or it should have a docstring which is pulled to sphinx documentation using autodoc extension. - Do use docstrings for documenting functions not present in the official
(sphinx) documentation, such as functions from
scrapy.utilspackage and its sub-modules.
Tests
Tests are implemented using the Twisted unit-testing framework, running tests requires tox.
Running tests
Make sure you have a recent enough tox installation:
tox --version
If your version is older than 1.7.0, please update it first:
pip install -U tox
To run all tests go to the root directory of Scrapy source code and run:
tox
To run a specific test (say tests/test_loader.py) use:
tox -- tests/test_loader.py
To see coverage report install coverage (pip install coverage) and run:
coverage report
see output of coverage --help for more options like html or xml report.
Writing tests
All functionality (including new features and bug fixes) must include a test case to check that it works as expected, so please include tests for your patches if you want them to get accepted sooner.
Scrapy uses unit-tests, which are located in the tests/ directory. Their module name typically resembles the full path of the module they’re testing. For example, the item loaders code is in:
scrapy.loader
And their unit-tests are in:
tests/test_loader.py
Versioning and API Stability
Versioning
There are 3 numbers in a Scrapy version: A.B.C
- A is the major version. This will rarely change and will signify very large changes.
- B is the release number. This will include many changes including features and things that possibly break backwards compatibility, although we strive to keep theses cases at a minimum.
- C is the bugfix release number.
Backward-incompatibilities are explicitly mentioned in the release notes, and may require special attention before upgrading.
Development releases do not follow 3-numbers version and are generally
released as dev suffixed versions, e.g. 1.3dev.
Note
With Scrapy 0.* series, Scrapy used odd-numbered versions for development releases. This is not the case anymore from Scrapy 1.0 onwards.
Starting with Scrapy 1.0, all releases should be considered production-ready.
For example:
- 1.1.1 is the first bugfix release of the 1.1 series (safe to use in production)
API Stability
API stability was one of the major goals for the 1.0 release.
Methods or functions that start with a single dash (_) are private and
should never be relied as stable.
Also, keep in mind that stable doesn’t mean complete: stable APIs could grow new methods or functionality but the existing methods should keep working the same way.
- Release notes
- See what has changed in recent Scrapy versions.
- Contributing to Scrapy
- Learn how to contribute to the Scrapy project.
- Versioning and API Stability
- Understand Scrapy versioning and API stability.