|
Edit Attributes in CSV Format |

  
|
|
Edit Attributes in CSV Format |
|
For a selected boundary condition parameter group, you can edit the parameter values in a .CSV file; this provides the ability to edit individual cells or an entire group of cells.
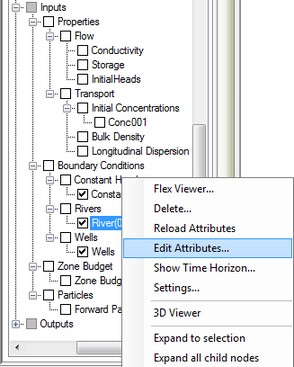
To load the list of parameter values for all cells, right-click on the desired Boundary Condition cell group from the model tree, and select "Edit Attributes...". The .CSV file will load using the default editor on your computer (for most cases, this will be Excel, but it may also include text editors). A .CSV file will load as shown below.
|
|
|
MS Excel has a limit of 1048576 rows by 16384 columns. If your model contains more than ~1 million cells, and/or more than 16384 stress periods, you will not be able to load the entire CSV file into Excel. Instead, you should do the editing in a text editor. |
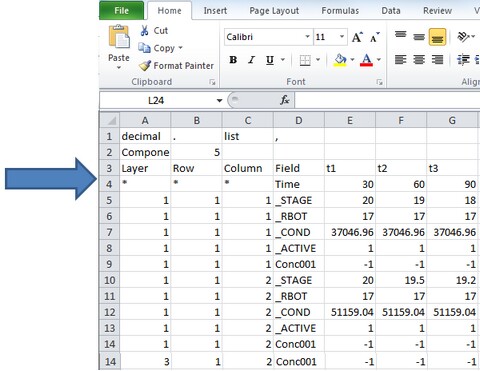
The format of this file is as follows:
| · | the first 3 columns will be layer, row, column. |
| · | the remaining columns contain the Fields for the selected boundary condition type; for example for the WEL package, the fields are _RATE (pumping rate) and _ACTIVE (set the boundary condition cell as active or inactive; use the value of 1 for active, and 0 for inactive |
| · | the third column contains the values for the fields for first stress period (t1, as shown in the column C header). The end time for the stress period is shown in row 2. |
| · | the fourth column contains the values for the second stress period (t2, as shown in the column D header). If the parameter values for boundary condition are constant (ie. for a steady-state model), then you will not see any additional columns. |
In the example above, there are 3 stress periods (indicated by t3); for a specific river cell (let's pick the first cell), there are 4 rows in the .CSV file, since you can edit the _Stage, _Rbot, _Cond, and _Active field for each stress period.
The number of fields in the file will change based on the selected boundary condition type.
The following "edits" are possible when adjusting the .CSV file:
| · | Add or Remove stress periods; simply add/remove the desired columns, then be sure to define an end time, and valid parameter values for all cells. When adding new stresses, be sure to increment the "t" row above the time value (eg. t1, t2, t3, ...) |
| · | Edit the end time for existing stress periods (when doing so, be sure that the time values increase as you go from left to right) |
| · | Add or remove cells from the selected BC Cell zone. (add/remove the desired rows, then enter field values accordingly) |
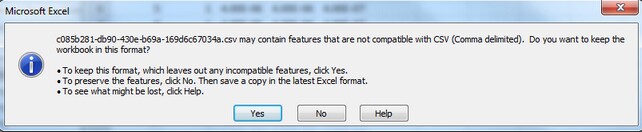
When you are done with the .CSV file, save the changes and close the file (Save with the same filename!). If you are using Excel as your .CSV editor, you may encounter the following warning when saving. Click Yes to continue.
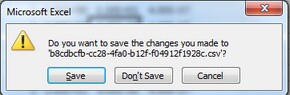
The file will then be saved. Upon exiting MS Excel, you may get prompted again to Save the file; since the file was already saved, it is not necessary to save again, so just click "Don't Save"
Once you are finished editing the file, you need to reload the modified CSV file to the selected parameter group. Right click on the same property group (from the Model Explorer), and select "Reload Attributes" from the menu that appears as shown below.

To confirm that your edits have made it back to the numerical model, you may want to click check the location of the boundary condition cells in the Flex viewer, and also edit the group (or single) cells that you modified, using Edit Group or Edit Single. In the case of edits for Recharge or Evapotranspiration, you can click on the Database to see the new zone values.