Pelican 3.7.1
Pelican是一款用Python编写的静态网站生成器.亮点包括:
- 支持reStructuredText和Markdown格式.
- 内置一个简单的CLI工具来(重新)生成你的网站.
- Easy to interface with distributed version control systems and web hooks
- 生成完全静态的网站,易于托管.
准备好了吗?阅读快速开始,开始你的Pelican之旅吧!
特性
Pelican3现在支持:
为什么叫“Pelican”?
“Pelican”是calepin通过改变字母顺序得到,法语的意思是“笔记本”。;)
源代码
文档
快速开始
强烈建议阅读所有文档,但是如果您的时间真的宝贵,那么以下是一些快速入门的步骤。
安装
安装Pelican(如果您打算用Markdown的话,请一并安装),需要Python2.7.x或者Python3.3+的运行环境.在您习惯的终端里面,输入下面的命令.如果需要权限的话,加上sudo:
pip install pelican markdown
创建一个项目
首先,为您的项目选择名称,为您的站点起一个名字,然后切换到该目录:
mkdir -p ~/projects/yoursite
cd ~/projects/yoursite
通过pelican-quickstart命令创建一个项目框架,首先Pelican会询问有关您网站的一些问题:
pelican-quickstart
有些问题后面的中括号里面给出了默认值,您可以直接敲回车,接受这些默认值[1]。当您询问您的网址前缀时,请按照指示输入您的域名(例如,http://example.com)。
Create an article
如果您什么都没写,您无法运行Pelican。使用您喜欢的文本编辑器创建您的第一篇文章,其中包含以下内容:
Title: My First Review
Date: 2010-12-03 10:20
Category: Review

Following is a review of my favorite mechanical keyboard.
鉴于此示例文章采用Markdown格式,请将其另存为~/projects/yoursite/content/keyboard-review.md。
生成你的网站
从您的站点目录中,运行Pelican命令来生成您的站点:
pelican content
您的网站现已在output目录中生成。(您可能会看到与Feed相关的警告,但在本地开发时是正常现象,可以忽略)。
预览您的网站
打开一个新的终端会话并运行以下命令切换到output目录并启动Pelican的Web服务器:
cd ~/projects/yoursite/output
python -m pelican.server
浏览器中访问http://localhost:8000/来预览您的网站。
继续阅读其他文档部分了解更多详细信息,并查看Pelican wiki的教程页面以获取社区发布的教程的链接。
安装Pelican
Pelican目前在Python 2.7.x和3.3中运行最好;不支持早期版本的Python。
您可以通过几种不同的方法安装Pelican。最简单的是通过pip:
pip install pelican
(请记住,为了安装Pelican系统范围,操作系统通常需要您使用sudo前缀上述命令。)
虽然上述是最简单的方法,但推荐的方法是在安装Pelican之前,通过virtualenv为Pelican创建一个虚拟环境。假设您已经安装了virtualenv,则可以打开一个新的终端会话并为Pelican创建一个新的虚拟环境:
virtualenv ~/virtualenvs/pelican
cd ~/virtualenvs/pelican
source bin/activate
一旦创建并激活了虚拟环境,可以通过pip install Pelican安装Pelican。或者,如果您有项目源,您可以使用distutils方法安装Pelican:
cd path-to-Pelican-source
python setup.py install
如果您安装了Git,并且更愿意安装最新的流行版本的Pelican而不是稳定的版本,请使用以下命令:
pip install -e "git+https://github.com/getpelican/pelican.git#egg=pelican"
一旦安装了Pelican,您可以运行Pelican --help查看基本使用选项。有关详细信息,请参阅发布部分。
可选包
如果您打算使用Markdown作为标记格式,则需要安装Markdown库:
pip install Markdown
可以在设置文件中启用排印增强功能,但首先必须安装必需的Typogrify库:
pip install typogrify
Dependencies
When Pelican is installed, the following dependent Python packages should be automatically installed without any action on your part:
- feedgenerator, to generate the Atom feeds
- jinja2, for templating support
- pygments, for syntax highlighting
- docutils, for supporting reStructuredText as an input format
- pytz, for timezone definitions
- blinker, an object-to-object and broadcast signaling system
- unidecode, for ASCII transliterations of Unicode text
- six, for Python 2 and 3 compatibility utilities
- MarkupSafe, for a markup safe string implementation
- python-dateutil, to read the date metadata
Upgrading
If you installed a stable Pelican release via pip and wish to upgrade to the latest stable release, you can do so by adding --upgrade:
pip install --upgrade pelican
If you installed Pelican via distutils or the bleeding-edge method, simply perform the same step to install the most recent version.
Kickstart your site
Once Pelican has been installed, you can create a skeleton project via the pelican-quickstart command, which begins by asking some questions about your site:
pelican-quickstart
Once you finish answering all the questions, your project will consist of the following hierarchy (except for pages — shown in parentheses below — which you can optionally add yourself if you plan to create non-chronological content):
yourproject/
├── content
│   └── (pages)
├── output
├── develop_server.sh
├── fabfile.py
├── Makefile
├── pelicanconf.py       # Main settings file
└── publishconf.py       # Settings to use when ready to publish
下一步是开始向已经为您创建好的content文件夹添加文章。
写文章
文章与页面
Pelican认为“文章”是按时间顺序的内容,例如博客上的帖子,因此与日期相关联。
“页面”的想法是,它们通常与时间无关,并且用于不经常变化的内容(例如,“关于”或“联系方式”页面)。
您可以在仓库中找到样本内容:pelican/samples/content/
文件元数据
Pelican尝试尽力从文件系统(例如,您的文章的类别)获取所需的信息,但还是需要在文件中以元数据形式提供的一些信息。
如果您以reStructuredText格式编写内容,则可以通过以下语法在文本文件中提供此元数据(记得为您的文件提供.rst扩展名):
My super title
##############

:date: 2010-10-03 10:20
:modified: 2010-10-04 18:40
:tags: thats, awesome
:category: yeah
:slug: my-super-post
:authors: Alexis Metaireau, Conan Doyle
:summary: Short version for index and feeds
作者和标签列表可以分号分隔,这样可以编写包含逗号的作者和标签:
:tags: pelican, publishing tool; pelican, bird
:authors: Metaireau, Alexis; Doyle, Conan
Pelican实现对reStructuredText的扩展,以支持abbr HTML标签。要使用它,在你的文章中写这样的东西:
This will be turned into :abbr:`HTML (HyperText Markup Language)`.
您还可以使用Markdown语法(文件以.md,.markdown,.mkd或.mdown )。Markdown生成需要您首先显式安装Markdown程序包,可以通过pip 安装 Markdown 。
Pelican还支持Markdown Extensions,如果它们不包含在默认的Markdown包中,可能需要单独安装,并且可以通过MARKDOWN 设置。
Markdown文章的元数据语法应遵循以下模式:
Title: My super title
Date: 2010-12-03 10:20
Modified: 2010-12-05 19:30
Category: Python
Tags: pelican, publishing
Slug: my-super-post
Authors: Alexis Metaireau, Conan Doyle
Summary: Short version for index and feeds

This is the content of my super blog post.
Readers for additional formats (such as AsciiDoc) are available via plugins. Refer to pelican-plugins repository for those.
Pelican还可以处理以.html和.htm结尾的HTML文件。Pelican以非常简单的方式解释HTML,从meta标签读取元数据,从title标签中获取标题,从body标签获取内容:
<html>
    <head>
        <title>My super title</title>
        <meta name="tags" content="thats, awesome" />
        <meta name="date" content="2012-07-09 22:28" />
        <meta name="modified" content="2012-07-10 20:14" />
        <meta name="category" content="yeah" />
        <meta name="authors" content="Alexis Métaireau, Conan Doyle" />
        <meta name="summary" content="Short version for index and feeds" />
    </head>
    <body>
        This is the content of my super blog post.
    </body>
</html>
使用HTML,标准元数据有一个简单的例外:tag可以通过tag元数据指定,如Pelican中的标准,或者通过keywords元数据,如HTML中的标准。这两个可以互换使用。
请注意,除了标题之外,这篇文章的元数据不是强制性的:如果未指定日期,并且DEFAULT_DATE设置为'fs',则Pelican将依靠文件的“mtime”时间戳,类别可以由文件所在的目录来确定。例如,位于python/foobar/myfoobar.rst的文件将具有foobar的分类。如果要以其他方式组织文件,其文件夹的名称不是一个好的分类名称,则可以将USE_FOLDER_AS_CATEGORY设置为False。在解析页面元数据中给出的日期时,Pelican支持W3C的建议子集ISO 8601。
注意
当尝试改变设置(特别是元数据)时,缓存可能会干扰站点的生成,并且更改可能不可见。在这种情况下,使用LOAD_CONTENT_CACHE = False禁用高速缓存,或使用 - ignore-cache 命令行开关。
modified应该是上次更新文章的时间,如果没有指定,则默认为date。此外,您可以在模板中显示modified,当您修改文章后,当您将modified设置为当前日期时,Feed阅读器中的Feed条目将自动更新。
authors是文章作者的逗号分隔列表。如果只有一个作者可以使用author字段。
如果没有明确指定给定帖子的摘要元数据,则SUMMARY_MAX_LENGTH设置可用于指定从文章开头使用多少个词作为摘要。
您还可以通过要在FILENAME_METADATA设置中设置的正则表达式从文件名中提取任何元数据。匹配的所有命名组将在元数据对象中设置。FILENAME_METADATA设置的默认值将仅从文件名中提取日期。例如,如果要同时提取日期和slug,您可以这样设置:'(?P<date>\d{4}-\d{2}-\d{2})_(?P<slug>.*)'
请注意,文件中可用的元数据优先于从文件名中提取的元数据。
页面
如果您在内容文件夹中创建一个名为pages的文件夹,则其中的所有文件将用于生成静态页面,例如About或Contact页面。(请参阅下面的示例文件系统布局。)
您可以使用DISPLAY_PAGES_ON_MENU设置来控制是否在主导航菜单中显示所有页面。(默认值为True。)
如果要排除任何页面链接到菜单中或列在菜单中,请将Status: hidden属性添加到其元数据中。如果您希望自定义错误页面,那么这将非常有用.
链接到内部内容
从Pelican3.1起,现在可以在源内容层次结构中指定文件的站点内链接,而不是生成的层次结构中的文件。这样可以更容易地将当前帖子与可能与该帖子一起坐的其他内容进行链接(而不必确定站点生成后将放置其他内容的位置)。
链接到内部内容(content中的文件)的语法是:{filename}path/to/file.注意,{filename}中的路径分隔符请采用斜线/,即使您是在Windows操作系统中.
例如,Pelican项目可能的结构如下:
website/
├── content
│   ├── category/
│   │   └── article1.rst
│   ├── article2.md
│   └── pages
│       └── about.md
└── pelican.conf.py
在这个例子中,article1.rst可能如下所示:
The first article
#################

:date: 2012-12-01 10:02

See below intra-site link examples in reStructuredText format.

`a link relative to the current file <{filename}../article2.md>`_
`a link relative to the content root <{filename}/article2.md>`_
而article2.md可以这样:
Title: The second article
Date: 2012-12-01 10:02

See below intra-site link examples in Markdown format.

[a link relative to the current file]({filename}category/article1.rst)
[a link relative to the content root]({filename}/category/article1.rst)
链接到静态文件
链接到非文章或非页面内容使用与上述相同的{filename}语法。重要的是要记住,除非包含它们的源目录包含在项目的pelicanconf.py文件的STATIC_PATHS设置中,否则这些文件不会被复制到输出目录。Pelican的默认配置包括images目录,但必须手动添加其他目录。忘记这样做会导致链接无效。
例如,项目的内容目录可能如下所示:
content
├── images
│   └── han.jpg
├── pdfs
│   └── menu.pdf
└── pages
    └── test.md
test.md将包括:

[Our Menu]({filename}/pdfs/menu.pdf)
pelicanconf.py将包括:
STATIC_PATHS = ['images', 'pdfs']
然后,站点生成将han.jpg复制到output / images / han.jpg,menu.pdf到output / pdfs / menu .pdf,并在test.md中写入适当的链接。
同一目录中的多种内容
从Pelican 3.5开始,静态文件可以安全地共享源目录与页面源文件,而不会在生成的站点中暴露页面源。任何这样的目录都必须添加到STATIC_PATHS和PAGE_PATHS(或STATIC_PATHS和ARTICLE_PATHS)中。Pelican将正常地识别和处理页面源文件,并将剩余的文件复制为一个独立的静态文件保留的目录。
注意:将静态和内容源文件放在同一个源目录中并不保证它们最终位于生成站点的相同位置。最简单的方法是使用{attach}链接语法(如下所述)。或者,可以将STATIC_SAVE_AS,PAGE_SAVE_AS和ARTICLE_SAVE_AS设置(以及相应的* _ URL设置)配置为将不同类型的文件放在一起,就像在早期版本的Pelican中一样。
添加静态文件
从Pelican 3.5开始,静态文件可以通过链接目标的这种语法“附加”到页面或文章:{attach} path / to / file这样做就像{filename} 语法,但也将静态文件重定位到链接文档的输出目录中。如果静态文件来源于链接文档源下的子目录,则该关系将在输出上保留。否则,它将成为链接文档的同层级文件。
这仅适用于链接到静态文件,并且仅当它们来自STATIC_PATHS设置中包含的目录时。
例如,项目的内容目录可能如下所示:
content
├── blog
│   ├── icons
│   │   └── icon.png
│   ├── photo.jpg
│   └── testpost.md
└── downloads
    └── archive.zip
pelicanconf.py将包括:
PATH = 'content'
STATIC_PATHS = ['blog', 'downloads']
ARTICLE_PATHS = ['blog']
ARTICLE_SAVE_AS = '{date:%Y}/{slug}.html'
ARTICLE_URL = '{date:%Y}/{slug}.html'
testpost.md将包括:
Title: Test Post
Category: test
Date: 2014-10-31


[Downloadable File]({attach}/downloads/archive.zip)
然后,站点生成将产生如下结构的输出目录:
output
└── 2014
    ├── archive.zip
    ├── icons
    │   └── icon.png
    ├── photo.jpg
    └── test-post.html
请注意,使用{attach}链接的所有文件都在文章的输出目录中或之下。
如果静态文件多次链接,则{attach}的重定位功能只能在要处理的第一个链接中工作。在第一个链接之后,Pelican将像{filename}处理{attach}。这样可以避免打破已处理的链接。
从多个文档链接到一个文件时要小心:由于第一个链接到一个文件最终确定了其位置,Pelican没有定义文档的处理顺序,使用{attach} 在由多个文档链接的文件上的可以使其位置从一个站点构建更改为下一个。(这是否会在实践中发生,将取决于操作系统,文件系统,Pelican版本,以及从项目中添加,修改或删除的文档。)链接到该文件的旧位置的任何外部站点可能会发现链接断开。因此,只有在连接文件共享一个目录的所有链接中使用{attach}才可以使用{attach}。在这些条件下,文件的输出位置在将来的版本中不会改变。在这些预防措施是不可能的情况下,请考虑使用{filename}链接而不是{attach},并让文件的位置由项目的STATIC_SAVE_AS 和STATIC_URL设置。(文件save_as和url覆盖仍然可以在EXTRA_PATH_METADATA中设置。)
链接到作者,类别,索引和标签
您可以使用{author}名称,{category} foobar,{index}和{tag}标签名链接到作者,类别,索引和标签语法。
不推荐的内部链接语法
为了与早期版本保持兼容,除了用于内部链接的花括号({})外,Pelican还支持垂直条(||)。例如:| filename | an_article.rst,| tag | tagname,| category | foobar。语法从||更改为{},以避免与Markdown扩展或reST指令发生冲突。旧的语法可能最终被删除。
导入现有站点
可以使用简单的脚本从WordPress,Tumblr,Dotclear和RSS feeds导入您的站点。See Importing an existing site.
翻译
翻译文章是可行的.为此,您需要向您的文章/页面添加lang元属性,并设置DEFAULT_LANG设置(默认为英文[en])。使用这些设置,只列出具有默认语言的文章,每篇文章将附有该文章的可用翻译列表。
注意
这个核心的Pelican功能不会为每个语言创建具有翻译模板的子站点(例如example.com/de)。对于这样的高级功能,可以使用i18n_subsites插件。
Pelican使用文章的URL“slug”来确定两个或更多个文章是否是彼此的翻译。可以在文件的元数据中手动设置slug;如果没有明确设置,Pelican会自动从文章的标题生成slug。
这是两个文章的例子,一个是英文,另一个是法文。
英文文章:
Foobar is not dead
##################

:slug: foobar-is-not-dead
:lang: en

That's true, foobar is still alive!
法语版:
Foobar n'est pas mort !
#######################

:slug: foobar-is-not-dead
:lang: fr

Oui oui, foobar est toujours vivant !
发布内容质量尽管如此,您可以看到,两个文章之间只有一个共同的条目是这个作为标识符在这里工作的slug。如果您不想以这种方式明确定义slug,那么您必须确保翻译的文章标题是相同的,因为slug将从文章标题自动生成。
如果您不希望通过DEFAULT_LANG设置检测到一个特定文章的原始版本,请使用translation元数据指定哪些帖子是翻译:
Foobar is not dead
##################

:slug: foobar-is-not-dead
:lang: en
:translation: true

That's true, foobar is still alive!
语法高亮显示
Pelican可以为您的代码块提供彩色语法高亮。为此,您必须在内容文件中使用以下约定。
对于reStructuredText,使用code-block指令指定要突出显示的代码类型(在这些示例中,我们将使用python):
.. code-block:: python

   print("Pelican is a static site generator.")
对于使用CodeHilite扩展提供语法高亮显示的Markdown,包括紧靠代码块的语言标识符,缩进标识符和代码:
There are two ways to specify the identifier:

    :::python
    print("The triple-colon syntax will *not* show line numbers.")

To display line numbers, use a path-less shebang instead of colons:

    #!python
    print("The path-less shebang syntax *will* show line numbers.")
指定的标识符(例如,python,ruby)应该在可用词法分析器中.
当使用reStructuredText时,code-block指令中提供了以下选项:
| 选项 | 有效值 | 描述 |
|---|---|---|
| anchorlinenos | N/A | 是否在标签中显示换行符号。 |
| classprefix | string | String to prepend to token class names |
| hl_lines | numbers | 要突出显示的行列表,要突出显示的行号由空格分隔。这与Sphinx中的强调线类似,但它不支持用连字符或逗号分隔的行号分隔的行号范围。 |
| lineanchors | string | 使用此字符串和-linenumber将锚点中的每一行括起来。 |
| linenos | string | 如果在表中存在或设置为“表”输出行号,如果设置为“inline”,则将其输入内联。“none”表示不输出此表的行号。 |
| linenospecial | number | 如果设置第n行将被赋予'特殊'css类。 |
| linenostart | number | 第一行的行号。 |
| linenostep | number | 每n行显示一次行号。 |
| lineseparator | string | 字符串在代码行之间打印,默认为“n”。 |
| linespans | string | 使用这个和-linenumber将每一行的每行换行。 |
| nobackground | N/A | 如果设置不输出包装元素的背景颜色 |
| nowrap | N/A | 如果设置不包装令牌。 |
| tagsfile | string | 用于名称定义的ctags文件。 |
| tagurlformat | string | 格式为ctag链接。 |
请注意,根据版本,您的Pygments模块可能没有所有这些选项可用。有关每个选项的更多详细信息,请参阅Pygments文档的HtmlFormatter部分。
例如,以下代码块启用行号,从153开始,并将带有pgcss的Pygments CSS类前缀,使名称更加独特,并避免可能的CSS冲突:
.. code-block:: identifier
    :classprefix: pgcss
    :linenos: table
    :linenostart: 153

   <indented code block goes here>
也可以在Pelican设置文件中指定PYGMENTS_RST_OPTIONS变量,以包含将自动应用于每个代码块的选项。
例如,如果要为每个代码块和CSS前缀显示行号,您可以将此变量设置为:
PYGMENTS_RST_OPTIONS = {'classprefix': 'pgcss', 'linenos': 'table'}
如果指定,单个代码块的设置将覆盖设置文件中的默认值。
发布草稿
如果您想以草稿的形式发布文章(例如,为了让朋友在发布前进行审核),您可以添加Status: draft属性到其元数据。然后,该文章将被输出到draft文件夹,而不是在索引页面上或任何分类或标签页面上列出。
如果您的文章应该自动发布为草稿(在文章完成之前不要意外发布文章),请将其状态包含在DEFAULT_METADATA中:
DEFAULT_METADATA = {
    'status': 'draft',
}
要在默认状态为draft时发布帖子,请更新帖子的元数据以包含Status: published。
发布您的网站
站点生成
一旦Pelican安装并且您有一些内容(例如,以Markdown或reST格式),您可以通过pelican命令将您的内容转换为HTML,指定内容的路径,(可选)路径到您的设置文件:
pelican /path/to/your/content/ [-s path/to/your/settings.py]
上述命令将生成您的站点并将其保存在output/文件夹中,使用默认主题生成一个简单的站点。默认主题由非常简单的HTML组成,没有样式,所以人们可以将其用作创建自己的主题的基础。
当在单个文章或页面上工作时,可以仅生成与该内容对应的文件。为此,请使用--write-selected参数,如下所示:
pelican --write-selected output/posts/my-post-title.html
请注意,您必须指定生成的output文件的路径,而不是源内容。要确定输出文件路径,请使用-debug标志来确定正确的文件名和位置。如果需要, --write-selected可以以逗号分隔的路径列表,或者可以配置为设置。(见:只写选择的内容)
您也可以告诉Pelican观看您的修改,而不是每次要查看更改时手动重新运行它。要启用此功能,请使用-r或--autoreload选项运行Pelican命令。
Pelican有其他命令行开关可用。看看帮助,看看你可以使用的所有选项:
pelican --help
查看生成的文件
Pelican生成的文件是静态文件,因此您实际上不需要特别查看它们。您可以使用浏览器直接打开生成的HTML文件:
firefox output/index.html
由于上述方法可能无法找到您的CSS和其他链接资源,因此使用Python运行简单的Web服务器通常会提供更可靠的预览体验。
对于Python 2,运行:
cd output
python -m SimpleHTTPServer
对于Python 3,运行:
cd output
python -m http.server
基本服务器启动后,您可以在http:// localhost:8000 /上预览您的站点
部署
生成网站后,在本地开发环境中进行预览,并准备将其部署到生产环境中,您可能会首先使用任何特定于生产的设置重新生成您的站点(例如,分析Feed等)你可能已经定义了:
pelican content -s publishconf.py
要使您的发布配置在您的pelicanconf.py之上,您可以通过在publishconf.py中包含以下行来导入pelicanconf设置。 :
from pelicanconf import *
如果您使用pelican-quickstart生成了publishconf.py,则默认情况下会包含该行。
部署您的站点的步骤将取决于它将在哪里托管。如果您有SSH访问运行Nginx或Apache的服务器,则可以使用rsync工具传输您的站点文件:
rsync -avc --delete output/ host.example.com:/var/www/your-site/
还有许多其他部署选项,其中一些可以通过pelican-quickstart命令首次设置您的站点时进行配置。有关通过GitHub页面发布的详细信息,请参阅提示页面。
自动化
虽然Pelican命令是生成您的站点的规范方式,但可以使用自动化工具来简化生成和发布流程。在pelican-quickstart过程中提出的问题之一涉及您是否要自动化站点生成和发布。如果您对该问题回答“是”,将在项目的根目录中生成fabfile.py和Makefile。这些文件预先填充了在Pelican快速入门过程中提供的其他答案中收集的某些信息,这些文件是作为起点,应该根据您的特定需求和使用模式进行定制。如果您发现某个自动化程序并不是那么实用,那么您可以随时删除那个程序,那并不会影响标准的Pelican命令的使用。
以下是“包装”Pelican命令的自动化工具,可以简化生成,预览和上传网站的过程。
Fabric
Fabric的优点是它是用Python编写的,因此可以在广泛的环境中使用。缺点是它必须单独安装。如果您的环境需要,请使用以下命令安装Fabric,前缀为sudo
pip install Fabric
注意
在Windows上安装PyCrypto
Fabric依赖于PyCrypto,如果您的系统没有C编译器,这很难安装。对于Windows用户,在安装Fabric之前,请使用easy_install http://www.voidspace.org.uk/downloads/pycrypto26/pycrypto-2.6.win32-py2.7.exe 这个StackOverflow的建议与Win32相比,即使您的操作系统是64位,您更有可能使用Win32版本的Python 2.7和PyCrypto来取得成功的Windows版本。
花点时间打开项目根目录下生成的fabfile.py文件。您将看到一些命令,其中任何一个都可以根据您的喜好重命名,删除或自定义。使用开箱即用的配置,您可以通过以下方式生成您的站点:
fab build
如果您希望每次检测到更改(在本地进行测试时都能方便),Pelican会自动重新生成您的站点,请改用以下命令:
fab regenerate
想要搭建本地服务器,并通过浏览器访问http://localhost:8000/来预览,可以使用这个命令:
fab serve
如果在pelican-quickstart过程中,当询问您是否要通过SSH上传您的站点时,您回答“是”,您可以使用以下命令通过SSH通过rsync发布您的站点:
fab publish
这些只是默认可用的几个命令,所以请随时浏览fabfile.py,看看有哪些其他命令可用。更重要的是,请不要犹豫,自定义fabfile.py以满足您的具体需求和偏好。
Make
在pelican-quickstart过程中对相关问题说“是”时,也会为您自动创建一个Makefile。这种方法的优点是,make命令是内置到大多数POSIX系统中,因此不需要安装任何其他的东西来使用它。不利的是,非POSIX系统(例如Windows)不包括make,并且将其安装在这些系统上可能是一个并不简单的任务。
如果要使用make使用pelicanconf.py中的设置生成您的站点,请运行:
make html
要使用publishconf.py中的设置生成生产站点,请运行:
make publish
如果您希望每次检测到更改(在本地进行测试时都能方便),Pelican会自动重新生成您的站点,请改用以下命令:
make regenerate
如果您希望通过浏览器访问http://localhost:8000/来预览您的网站,那么你需要这条命令:
make serve
正常来说,你需要将make regenerate和make serve运行在两个独立的进程中,但是你也可以这样一次搞定:
make devserver
上面的这条命令将会同时运行pelican的regeneration模式并发布到本地服务器http://localhost:8000.完成测试后,您应该通过以下方式停止开发服务器:
./develop_server.sh stop
准备发布网站后,您可以通过pelican-quickstart的问题中选择的方法进行上传。对于这个例子,我们将在ssh上使用rsync:
make rsync_upload
就这么简单!网站搭建完毕!
(默认的Makefile和devserver.sh脚本使用python和Pelican可执行文件完成其任务。如果要使用不同的可执行文件,例如python3,则可以分别设置PY和PELICAN环境变量来覆盖默认的可执行文件名。)
设置
Pelican是可以配置的,特别是,你可以在命令行参数中向pelican传入不同的配置文件:
pelican content -s path/to/your/pelicanconf.py
如果您使用pelican-quickstart命令,则默认情况下,您的主设置文件将被命名为pelicanconf.py。
注意
当尝试使用不同的设置(特别是元数据)时,缓存可能会干扰网站的生成,并且更改可能不可见。在这种情况下,使用LOAD_CONTENT_CACHE = False禁用高速缓存,或使用--ignore-cache 命令行开关。
设置以Python模块(文件)的形式配置。有一个示例设置文件可供参考。
所有设置标识符都必须全部大写设置,否则将不会被处理。设置项中的数字(5, 20, 等等.), 布尔值(True, False, None, 等等), 字典, 或者元组不应该在引号里面.所有其他值(即字符串)必须括在引号中。
除非另有说明,引用路径的设置可以是绝对的或相对于配置文件。
您在配置文件中定义的设置将被传递到模板,从而允许您使用您的设置添加站点范围的内容。
以下是pelican设置的列表:
基本设定
-
USE_FOLDER_AS_CATEGORY = True 当您不打算在帖子元数据中指定分类时,请将此设置设置为
True,然后在子文件夹中组织文章,子文件夹将成为您的帖子的分类。如果设置为False,则将使用DEFAULT_CATEGORY作为后备。
-
DEFAULT_CATEGORY = 'misc' 默认的分类值.
-
DISPLAY_PAGES_ON_MENU = True 是否在模板的菜单上显示页面。某些模板可能并不会采用这个配置.
-
DISPLAY_CATEGORIES_ON_MENU = True 是否在模板的菜单上显示类别。模板可能不会采用此设置。
-
DOCUTILS_SETTINGS = {} docutils发布商的额外配置设置(仅适用于reStructuredText)。有关详细信息,请参阅Docutils配置设置。
-
DELETE_OUTPUT_DIRECTORY = False 在生成新文件之前删除其内容的输出目录和里面的全部内容。这可以有助于防止较旧的不必要的文件持续存在于输出中。但是,这是一个破坏性的设置,应该非常小心。
-
OUTPUT_RETENTION = [] 应该保留并且不会从输出目录中删除的文件名列表。一个用例是保存版本控制数据。
例:
OUTPUT_RETENTION = [".hg", ".git", ".bzr"]
-
JINJA_ENVIRONMENT = {'trim_blocks': True, 'lstrip_blocks': True} 一个您要使用的自定义Jinja2环境变量的字典。这还包括您可能想要包括的扩展列表。见Jinja环境文件。
-
JINJA_FILTERS = {} 您要使用的自定义Jinja2过滤器的字典。字典应该将filtername映射到过滤器函数。
例:
JINJA_FILTERS = {'urlencode': urlencode_filter}
请参阅Jinja自定义过滤器文档。
-
LOG_FILTER = [] 包含记录级别(最多
警告)的元组列表和要忽略的消息。例:
LOG_FILTER = [(logging.WARN, 'TAG_SAVE_AS is set to False')]
-
READERS = {} pelican文件扩展名/阅读器类的字典,用于处理或忽略。
例如,为避免处理.html文件,请设置:
READERS = {'html': None}
要为
foo扩展名添加自定义阅读器,请设置:READERS = {'foo': FooReader}
-
IGNORE_FILES = ['.#*'] glob模式列表。与这些模式匹配的文件和目录将被处理器忽略。例如,默认的
['.#*']将会忽略emacs的锁文件,而['__pycache__']将会忽略Python3 的二进制文件.
-
MARKDOWN = {...} Markdown处理器的额外配置设置。有关支持的选项的完整列表,请参阅Python Markdown文档的选项部分。
extensions选项将从extension_configs选项自动计算。默认为:
MARKDOWN = {
    'extension_configs': {
        'markdown.extensions.codehilite': {'css_class': 'highlight'},
        'markdown.extensions.extra': {},
        'markdown.extensions.meta': {},
    },
    'output_format': 'html5',
}
注意
在您的设置文件中定义的字典将更新此默认字典。
-
OUTPUT_PATH = 'output/' 在哪里输出生成的文件。
-
PATH¶ 由Pelican处理的内容目录的路径。如果未定义,并且内容路径未通过
Pelican命令的参数指定,则Pelican将使用当前工作目录。
-
PAGE_PATHS = ['pages'] 相对于
PATH,可以查看页面的目录和文件列表。
-
PAGE_EXCLUDES = [] 在
ARTICLE_PATHS之外,查找页面时要排除的目录列表。
-
ARTICLE_PATHS = [''] 相对于
PATH,查看文章的目录和文件列表。
-
ARTICLE_EXCLUDES = [] 除了
PAGE_PATHS之外,在查找文章时要排除的目录列表。
-
OUTPUT_SOURCES = False 如果要将其原始格式的文章和页面(例如Markdown或reStructuredText)复制到指定的
OUTPUT_PATH,请设置为True。
-
OUTPUT_SOURCES_EXTENSION = '.text' 控制SourcesGenerator将使用的扩展名。默认为
.text。如果不是有效的字符串,将使用默认值。
-
PLUGINS = [] 要加载的插件列表。见插件。
-
PLUGIN_PATHS = [] 查找插件的目录列表。See Plugins.
-
SITENAME = 'A Pelican Blog' 您的网站名称
-
SITEURL¶ 您的网站的基本URL。默认情况下未定义,因此最好指定您的SITEURL;如果没有,则不会使用正确形式的URL生成Feed。您应该包括
http://和您的域,最后没有尾部斜杠。例如:SITEURL = 'http://mydomain.com'
-
STATIC_PATHS = ['images'] 要查找静态文件的目录列表(相对于
PATH)。这样的文件将被复制到输出目录而不进行修改。文章,页面和其他的内容源文件将会被自动跳过,所以,一个目录同时出现在这里,PAGE_PATHS和ARTICLE_PATHS是可以的.Pelican的默认设置包括“images”目录。
-
STATIC_EXCLUDES = [] 查找静态文件时要排除的目录列表。
-
STATIC_EXCLUDE_SOURCES = True 如果设置为False,则在复制
STATIC_PATHS中找到的文件时,不会跳过内容源文件。此设置是为了与版本3.5之前的Pelican版本向后兼容。除非STATIC_PATHS包含也在ARTICLE_PATHS或PAGE_PATHS中的目录,否则它不起作用。如果您要发布网站的源文件,请考虑使用OUTPUT_SOURCES设置。
-
TYPOGRIFY = False 如果设置为True,则可以通过Typogrify库将生成的HTML中的几个排版改进内容并入,该库可通过以下方式安装:
pip install typogrify
-
TYPOGRIFY_IGNORE_TAGS = [] Typogrify忽略的标签列表。默认情况下,Typogrify将忽略
pre和code标签。这需要安装Typogrify版本2.0.4或更高版本
-
SUMMARY_MAX_LENGTH = 50 创建文章的简短摘要时,这将是创建的文本的默认长度(以字为单位)。这仅适用于您的内容没有另外指定摘要。设置为
None将使摘要成为原始内容的副本。
-
WITH_FUTURE_DATES = True 如果禁用,日后的内容将默认为
draft。请参阅仅阅读修改内容以获取警告。
-
INTRASITE_LINK_REGEX = '[{|](?P<what>.*?)[|}]' 用于解析内部链接的正则表达式。链接到内部文件,标签等时的默认语法是在
{}或||中包含标识符,例如filename。{和}之间的标识符进入what捕获组。有关详细信息,请参见链接到内部内容。
-
PYGMENTS_RST_OPTIONS = [] 您的reStructuredText代码块的默认Pygments设置列表。有关支持的选项列表,请参见语法高亮显示。
-
SLUGIFY_SOURCE = 'title' 指定要从哪里自动生成slug。可以将
title设置为使用“Title:”元数据标签或basename在创建小插件时使用文章的文件名。
-
CACHE_CONTENT = False 如果
True,将内容保存在缓存中。有关缓存的详细信息,请参阅仅读取修改内容。
-
CONTENT_CACHING_LAYER = 'reader' 如果设置为
'reader',则只保存读者返回的原始内容和元数据。如果设置为'generator',则保存已处理的内容对象。
-
CACHE_PATH = 'cache' 用于存储缓存文件的目录。
-
GZIP_CACHE = True 如果
True,请使用gzip压缩缓存文件。
-
CHECK_MODIFIED_METHOD = 'mtime' 控制如何检查文件的修改。
-
LOAD_CONTENT_CACHE = False 如果
True,请从缓存加载未修改的内容。
-
WRITE_SELECTED = [] 如果此列表不为空,则仅输出文件及其列表中的路径。路径应该是绝对的或相对于当前的pelican工作目录。For possible use cases see Writing only selected content.
-
FORMATTED_FIELDS = ['summary'] 包含要解析并转换为HTML的reST / Markdown内容的元数据字段列表。
URL settings
首先要了解的是,现在有两种支持的URL形成方式:relative和absolute。相对URL在本地进行测试时非常有用,绝对URL是可靠的,在发布时最有用。支持两者的一种方法是具有一个Pelican配置文件用于本地开发,另一种用于发布。要查看此类设置的示例,请使用安装部分中所述的pelican-quickstart脚本,这将生成两个单独的配置文件,用于本地开发和发布,分别。
您可以自定义文件将被保存的URL和位置。* _ URL和* _ SAVE_AS变量使用Python的格式字符串。这些变量允许您将您的文章放在诸如{slug} /index.html的位置,并将其链接到{slug}以清除网址(请参见下面的示例) 。这些设置可让您灵活地将您的文章和页面放在任何地方。
Note
If you specify a datetime directive, it will be substituted using the input files’ date metadata attribute. If the date is not specified for a particular file, Pelican will rely on the file’s mtime timestamp. Check the Python datetime documentation for more information.
Also, you can use other file metadata attributes as well:
- slug
- date
- lang
- author
- category
Example usage:
ARTICLE_URL = 'posts/{date:%Y}/{date:%b}/{date:%d}/{slug}/'
ARTICLE_SAVE_AS = 'posts/{date:%Y}/{date:%b}/{date:%d}/{slug}/index.html'
PAGE_URL = 'pages/{slug}/'
PAGE_SAVE_AS = 'pages/{slug}/index.html'
This would save your articles into something like /posts/2011/Aug/07/sample-post/index.html, save your pages into /pages/about/index.html, and render them available at URLs of /posts/2011/Aug/07/sample-post/ and /pages/about/, respectively.
-
RELATIVE_URLS = False Defines whether Pelican should use document-relative URLs or not. Only set this to
Truewhen developing/testing and only if you fully understand the effect it can have on links/feeds.
-
ARTICLE_URL = '{slug}.html' The URL to refer to an article.
-
ARTICLE_SAVE_AS = '{slug}.html' The place where we will save an article.
-
ARTICLE_LANG_URL = '{slug}-{lang}.html' The URL to refer to an article which doesn’t use the default language.
-
ARTICLE_LANG_SAVE_AS = '{slug}-{lang}.html' The place where we will save an article which doesn’t use the default language.
-
DRAFT_URL = 'drafts/{slug}.html' The URL to refer to an article draft.
-
DRAFT_SAVE_AS = 'drafts/{slug}.html' The place where we will save an article draft.
-
DRAFT_LANG_URL = 'drafts/{slug}-{lang}.html' The URL to refer to an article draft which doesn’t use the default language.
-
DRAFT_LANG_SAVE_AS = 'drafts/{slug}-{lang}.html' The place where we will save an article draft which doesn’t use the default language.
-
PAGE_URL = 'pages/{slug}.html' The URL we will use to link to a page.
-
PAGE_SAVE_AS = 'pages/{slug}.html' The location we will save the page. This value has to be the same as PAGE_URL or you need to use a rewrite in your server config.
-
PAGE_LANG_URL = 'pages/{slug}-{lang}.html' The URL we will use to link to a page which doesn’t use the default language.
-
PAGE_LANG_SAVE_AS = 'pages/{slug}-{lang}.html' The location we will save the page which doesn’t use the default language.
-
CATEGORY_URL = 'category/{slug}.html' The URL to use for a category.
-
CATEGORY_SAVE_AS = 'category/{slug}.html' The location to save a category.
-
TAG_URL = 'tag/{slug}.html' The URL to use for a tag.
-
TAG_SAVE_AS = 'tag/{slug}.html' The location to save the tag page.
-
AUTHOR_URL = 'author/{slug}.html' The URL to use for an author.
-
AUTHOR_SAVE_AS = 'author/{slug}.html' The location to save an author.
-
YEAR_ARCHIVE_SAVE_AS = '' The location to save per-year archives of your posts.
-
MONTH_ARCHIVE_SAVE_AS = '' The location to save per-month archives of your posts.
-
DAY_ARCHIVE_SAVE_AS = '' The location to save per-day archives of your posts.
-
SLUG_SUBSTITUTIONS = () Substitutions to make prior to stripping out non-alphanumerics when generating slugs. Specified as a list of 3-tuples of
(from, to, skip)which are applied in order.skipis a boolean indicating whether or not to skip replacement of non-alphanumeric characters. Useful for backward compatibility with existing URLs.
-
AUTHOR_SUBSTITUTIONS = () Substitutions for authors.
SLUG_SUBSTITUTIONSis not taken into account here!
-
CATEGORY_SUBSTITUTIONS = () Added to
SLUG_SUBSTITUTIONSfor categories.
-
TAG_SUBSTITUTIONS = () Added to
SLUG_SUBSTITUTIONSfor tags.
Note
If you do not want one or more of the default pages to be created (e.g., you are the only author on your site and thus do not need an Authors page), set the corresponding *_SAVE_AS setting to '' to prevent the relevant page from being generated.
Note
Substitutions are applied in order with the side effect that keeping non-alphanum characters applies to the whole string when a replacement is made.
For example if you have the following setting:
SLUG_SUBSTITUTIONS = (('C++', 'cpp'), ('keep dot', 'keep.dot', True))
the string Keep Dot will be converted to keep.dot, however C++ will keep dot will be converted to cpp will keep.dot instead of cpp-will-keep.dot!
If you want to keep non-alphanum characters only for tags or categories but not other slugs then configure TAG_SUBSTITUTIONS and CATEGORY_SUBSTITUTIONS respectively!
Pelican can optionally create per-year, per-month, and per-day archives of your posts. These secondary archives are disabled by default but are automatically enabled if you supply format strings for their respective _SAVE_AS settings. Period archives fit intuitively with the hierarchical model of web URLs and can make it easier for readers to navigate through the posts you’ve written over time.
Example usage:
YEAR_ARCHIVE_SAVE_AS = 'posts/{date:%Y}/index.html'
MONTH_ARCHIVE_SAVE_AS = 'posts/{date:%Y}/{date:%b}/index.html'
With these settings, Pelican will create an archive of all your posts for the year at (for instance) posts/2011/index.html and an archive of all your posts for the month at posts/2011/Aug/index.html.
Note
Period archives work best when the final path segment is index.html. This way a reader can remove a portion of your URL and automatically arrive at an appropriate archive of posts, without having to specify a page name.
DIRECT_TEMPLATES work a bit differently than noted above. Only the _SAVE_AS settings are available, but it is available for any direct template.
-
ARCHIVES_SAVE_AS = 'archives.html' The location to save the article archives page.
-
YEAR_ARCHIVE_SAVE_AS = '' The location to save per-year archives of your posts.
-
MONTH_ARCHIVE_SAVE_AS = '' The location to save per-month archives of your posts.
-
DAY_ARCHIVE_SAVE_AS = '' The location to save per-day archives of your posts.
-
AUTHORS_SAVE_AS = 'authors.html' The location to save the author list.
-
CATEGORIES_SAVE_AS = 'categories.html' The location to save the category list.
-
TAGS_SAVE_AS = 'tags.html' The location to save the tag list.
-
INDEX_SAVE_AS = 'index.html' The location to save the list of all articles.
URLs for direct template pages are theme-dependent. Some themes use corresponding *_URL setting as string, while others hard-code them: 'archives.html', 'authors.html', 'categories.html', 'tags.html'.
Time and Date
-
TIMEZONE¶ The timezone used in the date information, to generate Atom and RSS feeds.
If no timezone is defined, UTC is assumed. This means that the generated Atom and RSS feeds will contain incorrect date information if your locale is not UTC.
Pelican issues a warning in case this setting is not defined, as it was not mandatory in previous versions.
Have a look at the wikipedia page to get a list of valid timezone values.
-
DEFAULT_DATE = None The default date you want to use. If
'fs', Pelican will use the file system timestamp information (mtime) if it can’t get date information from the metadata. If given any other string, it will be parsed by the same method as article metadata. If set to a tuple object, the default datetime object will instead be generated by passing the tuple to thedatetime.datetimeconstructor.
-
DEFAULT_DATE_FORMAT = '%a %d %B %Y' The default date format you want to use.
-
DATE_FORMATS = {} If you manage multiple languages, you can set the date formatting here.
If no
DATE_FORMATSare set, Pelican will fall back toDEFAULT_DATE_FORMAT. If you need to maintain multiple languages with different date formats, you can set theDATE_FORMATSdictionary using the language name (langmetadata in your post content) as the key.In addition to the standard C89 strftime format codes that are listed in Python strftime documentation, you can use the
-character between%and the format character to remove any leading zeros. For example,%d/%m/%Ywill output01/01/2014whereas%-d/%-m/%Ywill result in1/1/2014.DATE_FORMATS = { 'en': '%a, %d %b %Y', 'jp': '%Y-%m-%d(%a)', }
It is also possible to set different locale settings for each language by using a
(locale, format)tuple as a dictionary value which will override theLOCALEsetting:# On Unix/Linux DATE_FORMATS = { 'en': ('en_US','%a, %d %b %Y'), 'jp': ('ja_JP','%Y-%m-%d(%a)'), } # On Windows DATE_FORMATS = { 'en': ('usa','%a, %d %b %Y'), 'jp': ('jpn','%Y-%m-%d(%a)'), }
-
LOCALE¶ Change the locale [1]. A list of locales can be provided here or a single string representing one locale. When providing a list, all the locales will be tried until one works.
You can set locale to further control date format:
 LOCALE = ('usa', 'jpn',      # On Windows
           'en_US', 'ja_JP'   # On Unix/Linux
)
For a list of available locales refer to locales on Windows or on Unix/Linux, use the
locale -acommand; see manpage locale(1) for more information.
| [1] | Default is the system locale. |
模板页
-
TEMPLATE_PAGES = None 包含将使用博客条目呈现的模板页面的映射。See Template pages.
If you want to generate custom pages besides your blog entries, you can point any Jinja2 template file with a path pointing to the file and the destination path for the generated file.
For instance, if you have a blog with three static pages — a list of books, your resume, and a contact page — you could have:
TEMPLATE_PAGES = {'src/books.html': 'dest/books.html',
                  'src/resume.html': 'dest/resume.html',
                  'src/contact.html': 'dest/contact.html'}
-
DIRECT_TEMPLATES = ['index', 'categories', 'authors', 'archives'] List of templates that are used directly to render content. Typically direct templates are used to generate index pages for collections of content (e.g., tags and category index pages). If the tag and category collections are not needed, set
DIRECT_TEMPLATES = ['index', 'archives']
-
PAGINATED_DIRECT_TEMPLATES = ['index'] Provides the direct templates that should be paginated.
-
EXTRA_TEMPLATES_PATHS = [] A list of paths you want Jinja2 to search for templates. Can be used to separate templates from the theme. Example: projects, resume, profile ... These templates need to use
DIRECT_TEMPLATESsetting.
Metadata
-
AUTHOR¶ Default author (usually your name).
-
DEFAULT_METADATA = {} The default metadata you want to use for all articles and pages.
-
FILENAME_METADATA = '(?P<date>d{4}-d{2}-d{2}).*' The regexp that will be used to extract any metadata from the filename. All named groups that are matched will be set in the metadata object. The default value will only extract the date from the filename.
For example, to extract both the date and the slug:
FILENAME_METADATA = '(?P<date>\d{4}-\d{2}-\d{2})_(?P<slug>.*)'
See also
SLUGIFY_SOURCE.
-
PATH_METADATA = '' Like
FILENAME_METADATA, but parsed from a page’s full path relative to the content source directory.
-
EXTRA_PATH_METADATA = {} Extra metadata dictionaries keyed by relative path. Relative paths require correct OS-specific directory separators (i.e. / in UNIX and \ in Windows) unlike some other Pelican file settings.
Not all metadata needs to be embedded in source file itself. For example, blog posts are often named following a YYYY-MM-DD-SLUG.rst pattern, or nested into YYYY/MM/DD-SLUG directories. To extract metadata from the filename or path, set FILENAME_METADATA or PATH_METADATA to regular expressions that use Python’s group name notation (?P<name>…). If you want to attach additional metadata but don’t want to encode it in the path, you can set EXTRA_PATH_METADATA:
EXTRA_PATH_METADATA = {
    'relative/path/to/file-1': {
        'key-1a': 'value-1a',
        'key-1b': 'value-1b',
        },
    'relative/path/to/file-2': {
        'key-2': 'value-2',
        },
    }
This can be a convenient way to shift the installed location of a particular file:
# Take advantage of the following defaults
# STATIC_SAVE_AS = '{path}'
# STATIC_URL = '{path}'
STATIC_PATHS = [
    'static/robots.txt',
    ]
EXTRA_PATH_METADATA = {
    'static/robots.txt': {'path': 'robots.txt'},
    }
Feed settings
By default, Pelican uses Atom feeds. However, it is also possible to use RSS feeds if you prefer.
Pelican generates category feeds as well as feeds for all your articles. It does not generate feeds for tags by default, but it is possible to do so using the TAG_FEED_ATOM and TAG_FEED_RSS settings:
-
FEED_DOMAIN = None, i.e. base URL is "/" The domain prepended to feed URLs. Since feed URLs should always be absolute, it is highly recommended to define this (e.g., “http://feeds.example.com”). If you have already explicitly defined SITEURL (see above) and want to use the same domain for your feeds, you can just set:
FEED_DOMAIN = SITEURL.
-
FEED_ATOM = None, i.e. no Atom feed Relative URL to output the Atom feed.
-
FEED_RSS = None, i.e. no RSS Relative URL to output the RSS feed.
-
FEED_ALL_ATOM = 'feeds/all.atom.xml' Relative URL to output the all-posts Atom feed: this feed will contain all posts regardless of their language.
-
FEED_ALL_RSS = None, i.e. no all-posts RSS Relative URL to output the all-posts RSS feed: this feed will contain all posts regardless of their language.
-
CATEGORY_FEED_ATOM = 'feeds/%s.atom.xml' Where to put the category Atom feeds. [2]
-
CATEGORY_FEED_RSS = None, i.e. no RSS Where to put the category RSS feeds.
-
AUTHOR_FEED_ATOM = 'feeds/%s.atom.xml' Where to put the author Atom feeds. [2]
-
AUTHOR_FEED_RSS = 'feeds/%s.rss.xml' Where to put the author RSS feeds. [2]
-
TAG_FEED_ATOM = None, i.e. no tag feed Relative URL to output the tag Atom feed. It should be defined using a “%s” match in the tag name.
-
TAG_FEED_RSS = None, i.e. no RSS tag feed Relative URL to output the tag RSS feed
-
FEED_MAX_ITEMS¶ Maximum number of items allowed in a feed. Feed item quantity is unrestricted by default.
-
RSS_FEED_SUMMARY_ONLY = True Only include item summaries in the
descriptiontag of RSS feeds. If set toFalse, the full content will be included instead. This setting doesn’t affect Atom feeds, only RSS ones.
If you don’t want to generate some or any of these feeds, set the above variables to None.
| [2] | (1, 2, 3) %s is the name of the category. |
FeedBurner
If you want to use FeedBurner for your feed, you will likely need to decide upon a unique identifier. For example, if your site were called “Thyme” and hosted on the www.example.com domain, you might use “thymefeeds” as your unique identifier, which we’ll use throughout this section for illustrative purposes. In your Pelican settings, set the FEED_ATOM attribute to thymefeeds/main.xml to create an Atom feed with an original address of http://www.example.com/thymefeeds/main.xml. Set the FEED_DOMAIN attribute to http://feeds.feedburner.com, or http://feeds.example.com if you are using a CNAME on your own domain (i.e., FeedBurner’s “MyBrand” feature).
There are two fields to configure in the FeedBurner interface: “Original Feed” and “Feed Address”. In this example, the “Original Feed” would be http://www.example.com/thymefeeds/main.xml and the “Feed Address” suffix would be thymefeeds/main.xml.
Pagination
The default behaviour of Pelican is to list all the article titles along with a short description on the index page. While this works well for small-to-medium sites, sites with a large quantity of articles will probably benefit from paginating this list.
You can use the following settings to configure the pagination.
-
DEFAULT_ORPHANS = 0 The minimum number of articles allowed on the last page. Use this when you don’t want the last page to only contain a handful of articles.
-
DEFAULT_PAGINATION = False The maximum number of articles to include on a page, not including orphans. False to disable pagination.
-
PAGINATION_PATTERNS¶ A set of patterns that are used to determine advanced pagination output.
Using Pagination Patterns
The PAGINATION_PATTERNS setting can be used to configure where subsequent pages are created. The setting is a sequence of three element tuples, where each tuple consists of:
(minimum page, URL setting, SAVE_AS setting,)
For example, if you wanted the first page to just be /, and the second (and subsequent) pages to be /page/2/, you would set PAGINATION_PATTERNS as follows:
PAGINATION_PATTERNS = (
    (1, '{base_name}/', '{base_name}/index.html'),
    (2, '{base_name}/page/{number}/', '{base_name}/page/{number}/index.html'),
)
This would cause the first page to be written to {base_name}/index.html, and subsequent ones would be written into page/{number} directories.
Translations
Pelican offers a way to translate articles. See the Content section for more information.
-
DEFAULT_LANG = 'en' The default language to use.
-
TRANSLATION_FEED_ATOM = 'feeds/all-%s.atom.xml' Where to put the Atom feed for translations. [3]
-
TRANSLATION_FEED_RSS = None, i.e. no RSS Where to put the RSS feed for translations.
| [3] | %s is the language |
Ordering content
-
NEWEST_FIRST_ARCHIVES = True Order archives by newest first by date. (False: orders by date with older articles first.)
-
REVERSE_CATEGORY_ORDER = False Reverse the category order. (True: lists by reverse alphabetical order; default lists alphabetically.)
-
ARTICLE_ORDER_BY = 'reversed-date' Defines how the articles (
articles_page.object_listin the template) are sorted. Valid options are: metadata as a string (usereversed-prefix the reverse the sort order), special option'basename'which will use the basename of the file (without path) or a custom function to extract the sorting key from articles. The default value,'reversed-date', will sort articles by date in reverse order (i.e. newest article comes first).
-
PAGE_ORDER_BY = 'basename' Defines how the pages (
PAGESvariable in the template) are sorted. Options are same asARTICLE_ORDER_BY. The default value,'basename'will sort pages by their basename.
Themes
创建pelican主题在一个专门的部分(见创建主题)。但是,这里是与主题相关的设置。
-
THEME¶ 主题用于产生输出的网站。可以是主题文件夹的相对或绝对路径,或通过
pelican安装的默认主题或主题的名称(见下文)。
-
THEME_STATIC_DIR = 'theme' 输出路径中的目的地目录,Pelican将放置从THEME_STATIC_PATHS收集的文件。默认是theme。
-
THEME_STATIC_PATHS = ['static'] Static theme paths you want to copy. Default value is static, but if your theme has other static paths, you can put them here. If files or directories with the same names are included in the paths defined in this settings, they will be progressively overwritten.
-
CSS_FILE = 'main.css' Specify the CSS file you want to load.
By default, two themes are available. You can specify them using the THEME setting or by passing the -t option to the pelican command:
- notmyidea
- simple (a synonym for “plain text” :)
There are a number of other themes available at https://github.com/getpelican/pelican-themes. Pelican comes with pelican-themes, a small script for managing themes.
You can define your own theme, either by starting from scratch or by duplicating and modifying a pre-existing theme. Here is a guide on how to create your theme.
Following are example ways to specify your preferred theme:
# Specify name of a built-in theme
THEME = "notmyidea"
# Specify name of a theme installed via the pelican-themes tool
THEME = "chunk"
# Specify a customized theme, via path relative to the settings file
THEME = "themes/mycustomtheme"
# Specify a customized theme, via absolute path
THEME = "/home/myuser/projects/mysite/themes/mycustomtheme"
The built-in notmyidea theme can make good use of the following settings. Feel free to use them in your themes as well.
-
SITESUBTITLE¶ A subtitle to appear in the header.
-
DISQUS_SITENAME¶ Pelican can handle Disqus comments. Specify the Disqus sitename identifier here.
-
GITHUB_URL¶ Your GitHub URL (if you have one). It will then use this information to create a GitHub ribbon.
-
GOOGLE_ANALYTICS¶ Set to
UA-XXXXX-YProperty’s tracking ID to activate Google Analytics.
-
GA_COOKIE_DOMAIN¶ Set cookie domain field of Google Analytics tracking code. Defaults to
auto.
-
GOSQUARED_SITENAME¶ Set to ‘XXX-YYYYYY-X’ to activate GoSquared.
-
MENUITEMS¶ A list of tuples (Title, URL) for additional menu items to appear at the beginning of the main menu.
-
PIWIK_SSL_URL¶ If the SSL-URL differs from the normal Piwik-URL you have to include this setting too. (optional)
-
PIWIK_SITE_ID¶ ID for the monitored website. You can find the ID in the Piwik admin interface > Settings > Websites.
-
LINKS¶ 在标题上显示链接的元组列表(标题,URL)。
-
SOCIAL¶ A list of tuples (Title, URL) to appear in the “social” section.
-
TWITTER_USERNAME¶ Allows for adding a button to articles to encourage others to tweet about them. Add your Twitter username if you want this button to appear.
-
LINKS_WIDGET_NAME¶ Allows override of the name of the links widget. If not specified, defaults to “links”.
-
SOCIAL_WIDGET_NAME¶ Allows override of the name of the “social” widget. If not specified, defaults to “social”.
In addition, you can use the “wide” version of the notmyidea theme by adding the following to your configuration:
CSS_FILE = "wide.css"
Logging
Sometimes, a long list of warnings may appear during site generation. Finding the meaningful error message in the middle of tons of annoying log output can be quite tricky. In order to filter out redundant log messages, Pelican comes with the LOG_FILTER setting.
LOG_FILTER should be a list of tuples (level, msg), each of them being composed of the logging level (up to warning) and the message to be ignored. Simply populate the list with the log messages you want to hide, and they will be filtered out.
For example:
[(logging.WARN, 'TAG_SAVE_AS is set to False')]
It is possible to filter out messages by a template. Check out source code to obtain a template.
For example:
[(logging.WARN, 'Empty alt attribute for image %s in %s')]
Warning
Silencing messages by templates is a dangerous feature. It is possible to unintentionally filter out multiple message types with the same template (including messages from future Pelican versions). Proceed with caution.
Note
This option does nothing if --debug is passed.
Reading only modified content
To speed up the build process, Pelican can optionally read only articles and pages with modified content.
When Pelican is about to read some content source file:
The hash or modification time information for the file from a previous build are loaded from a cache file if
LOAD_CONTENT_CACHEisTrue. These files are stored in theCACHE_PATHdirectory. If the file has no record in the cache file, it is read as usual.The file is checked according to
CHECK_MODIFIED_METHOD:- If set to
'mtime', the modification time of the file is checked. - If set to a name of a function provided by the
hashlibmodule, e.g.'md5', the file hash is checked. - If set to anything else or the necessary information about the file cannot be found in the cache file, the content is read as usual.
- If set to
If the file is considered unchanged, the content data saved in a previous build corresponding to the file is loaded from the cache, and the file is not read.
If the file is considered changed, the file is read and the new modification information and the content data are saved to the cache if
CACHE_CONTENTisTrue.
If CONTENT_CACHING_LAYER is set to 'reader' (the default), the raw content and metadata returned by a reader are cached. If this setting is instead set to 'generator', the processed content object is cached. Caching the processed content object may conflict with plugins (as some reading related signals may be skipped) and the WITH_FUTURE_DATES functionality (as the draft status of the cached content objects would not change automatically over time).
Checking modification times is faster than comparing file hashes, but it is not as reliable because mtime information can be lost, e.g., when copying content source files using the cp or rsync commands without the mtime preservation mode (which for rsync can be invoked by passing the --archive flag).
The cache files are Python pickles, so they may not be readable by different versions of Python as the pickle format often changes. If such an error is encountered, it is caught and the cache file is rebuilt automatically in the new format. The cache files will also be rebuilt after the GZIP_CACHE setting has been changed.
The --ignore-cache command-line option is useful when the whole cache needs to be regenerated, such as when making modifications to the settings file that will affect the cached content, or just for debugging purposes. When Pelican runs in autoreload mode, modification of the settings file will make it ignore the cache automatically if AUTORELOAD_IGNORE_CACHE is True.
Note that even when using cached content, all output is always written, so the modification times of the generated *.html files will always change. Therefore, rsync-based uploading may benefit from the --checksum option.
Writing only selected content
When only working on a single article or page, or making tweaks to your theme, it is often desirable to generate and review your work as quickly as possible. In such cases, generating and writing the entire site output is often unnecessary. By specifying only the desired files as output paths in the WRITE_SELECTED list, only those files will be written. This list can be also specified on the command line using the --write-selected option, which accepts a comma-separated list of output file paths. By default this list is empty, so all output is written. See Site generation for more details.
Example settings
# -*- coding: utf-8 -*-
from __future__ import unicode_literals

AUTHOR = 'Alexis Métaireau'
SITENAME = "Alexis' log"
SITEURL = 'http://blog.notmyidea.org'
TIMEZONE = "Europe/Paris"

# can be useful in development, but set to False when you're ready to publish
RELATIVE_URLS = True

GITHUB_URL = 'http://github.com/ametaireau/'
DISQUS_SITENAME = "blog-notmyidea"
REVERSE_CATEGORY_ORDER = True
LOCALE = "C"
DEFAULT_PAGINATION = 4
DEFAULT_DATE = (2012, 3, 2, 14, 1, 1)

FEED_ALL_RSS = 'feeds/all.rss.xml'
CATEGORY_FEED_RSS = 'feeds/%s.rss.xml'

LINKS = (('Biologeek', 'http://biologeek.org'),
         ('Filyb', "http://filyb.info/"),
         ('Libert-fr', "http://www.libert-fr.com"),
         ('N1k0', "http://prendreuncafe.com/blog/"),
         ('Tarek Ziadé', "http://ziade.org/blog"),
         ('Zubin Mithra', "http://zubin71.wordpress.com/"),)

SOCIAL = (('twitter', 'http://twitter.com/ametaireau'),
          ('lastfm', 'http://lastfm.com/user/akounet'),
          ('github', 'http://github.com/ametaireau'),)

# global metadata to all the contents
DEFAULT_METADATA = {'yeah': 'it is'}

# path-specific metadata
EXTRA_PATH_METADATA = {
    'extra/robots.txt': {'path': 'robots.txt'},
    }

# static paths will be copied without parsing their contents
STATIC_PATHS = [
    'pictures',
    'extra/robots.txt',
    ]

# custom page generated with a jinja2 template
TEMPLATE_PAGES = {'pages/jinja2_template.html': 'jinja2_template.html'}

# code blocks with line numbers
PYGMENTS_RST_OPTIONS = {'linenos': 'table'}

# foobar will not be used, because it's not in caps. All configuration keys
# have to be in caps
foobar = "barbaz"
创建主题
为了生成其HTML输出,Pelican由于其灵活性和直观的语法使用了Jinja模板引擎。如果要创建自己的主题,请随时从“simple”主题中获得灵感。
要使用您创建的主题(或手动下载或修改)生成您的网站,您可以通过-t标志指定该主题:
pelican content -s pelicanconf.py -t /projects/your-site/themes/your-theme
如果您不想在每次调用时指定主题,您可以在设置中定义THEME,以指向首选主题的位置。
结构
要制作自己的主题,您必须遵循以下结构:
├── static
│   ├── css
│   └── images
└── templates
    ├── archives.html         // to display archives
    ├── period_archives.html  // to display time-period archives
    ├── article.html          // processed for each article
    ├── author.html           // processed for each author
    ├── authors.html          // must list all the authors
    ├── categories.html       // must list all the categories
    ├── category.html         // processed for each category
    ├── index.html            // the index (list all the articles)
    ├── page.html             // processed for each page
    ├── tag.html              // processed for each tag
    └── tags.html             // must list all the tags. Can be a tag cloud.
- static包含将被复制到输出theme文件夹的所有静态资源。上述文件系统布局包括CSS和图像文件夹,但这些只是示例。把你需要的东西放在这里.
- templates包含将用于生成内容的所有模板。上面列出的模板文件是强制性的;您可以添加自己的模板,如果它有助于在创建主题时保持组织。
模板和变量
这个想法是使用一个简单的语法,您可以将其嵌入到HTML页面中。本文档描述了哪些模板应该存在于主题中,哪些变量将在生成时传递给每个模板。
所有的模板都可以读取配置文件中的变量,当然,变量必须大写.您可以直接访问它们。
常用变量
所有这些设置将适用于所有模板。
| 变量 | 描述 |
|---|---|
| output_file | 当前正在生成的文件的名称。例如,当Pelican呈现主页时,output_file将为“index.html”。 |
| articles | 文章列表,按日期下降。所有元素都是Article对象,因此您可以访问其属性(例如标题,摘要,作者等)。有时候这是隐藏的(例如在标签页面中)。您可以在all_articles变量中找到他们. |
| dates | 相同的文章列表,但按日期排序,升序。 |
| drafts | 草稿文章清单 |
| tags | 包含所有标签的(标签,文章)元组的列表。 |
| categories | 包含所有类别和相应文章(值)的(类别,文章)元组的列表 |
| pages | 页面列表 |
| hidden_pages | 隐藏页面的列表 |
排序
URL包装器(当前类别,标签和作者)具有比较方法,可以轻松地按名称排序:
{% for tag, articles in tags|sort %}
如果要根据不同的条件进行排序,则 Jinja的排序命令具有多个选项。
日期格式
Pelican根据您的设置和区域设置格式化日期(DATE_FORMATS / DEFAULT_DATE_FORMAT),并提供locale_date属性。另一方面,date属性将是一个datetime对象。如果您需要与设置不同的日期的自定义格式,请使用Pelican附带的Jinja过滤器strftime。用法与Python strftime格式相同,但是过滤器将根据您设置中提供的语言环境进行正确的操作并格式化日期:
{{ article.date|strftime('%d %B %Y') }}
index.html
这是您的博客的首页或索引,生成于index.html。
如果分页处于活动状态,后续页面将驻留在index {number} .html中。
| Variable | Description |
|---|---|
| articles_paginator | 文章列表的分页对象 |
| articles_page | 当前页的文章 |
| articles_previous_page | 前一页的文章(无如果页面不存在) |
| articles_next_page | 下一页的文章(无如果页面不存在) |
| dates_paginator | A paginator object for the article list, ordered by date, ascending. |
| dates_page | The current page of articles, ordered by date, ascending. |
| dates_previous_page | The previous page of articles, ordered by date, ascending (None if page does not exist) |
| dates_next_page | The next page of articles, ordered by date, ascending (None if page does not exist) |
| page_name | ‘index’ – useful for pagination links |
author.html
This template will be processed for each of the existing authors, with output generated according to the AUTHOR_SAVE_AS setting (Default: author/{author_name}.html). If pagination is active, subsequent pages will by default reside at author/{author_name}{number}.html.
| Variable | Description |
|---|---|
| author | The name of the author being processed |
| articles | Articles by this author |
| dates | Articles by this author, but ordered by date, ascending |
| articles_paginator | A paginator object for the list of articles |
| articles_page | The current page of articles |
| articles_previous_page | The previous page of articles (None if page does not exist) |
| articles_next_page | The next page of articles (None if page does not exist) |
| dates_paginator | A paginator object for the article list, ordered by date, ascending. |
| dates_page | The current page of articles, ordered by date, ascending. |
| dates_previous_page | The previous page of articles, ordered by date, ascending (None if page does not exist) |
| dates_next_page | The next page of articles, ordered by date, ascending (None if page does not exist) |
| page_name | AUTHOR_URL where everything after {slug} is removed – useful for pagination links |
category.html
This template will be processed for each of the existing categories, with output generated according to the CATEGORY_SAVE_AS setting (Default: category/{category_name}.html). If pagination is active, subsequent pages will by default reside at category/{category_name}{number}.html.
| Variable | Description |
|---|---|
| category | The name of the category being processed |
| articles | Articles for this category |
| dates | Articles for this category, but ordered by date, ascending |
| articles_paginator | 文章列表的分页对象 |
| articles_page | The current page of articles |
| articles_previous_page | The previous page of articles (None if page does not exist) |
| articles_next_page | The next page of articles (None if page does not exist) |
| dates_paginator | A paginator object for the list of articles, ordered by date, ascending |
| dates_page | The current page of articles, ordered by date, ascending |
| dates_previous_page | The previous page of articles, ordered by date, ascending (None if page does not exist) |
| dates_next_page | The next page of articles, ordered by date, ascending (None if page does not exist) |
| page_name | CATEGORY_URL where everything after {slug} is removed – useful for pagination links |
article.html
This template will be processed for each article, with output generated according to the ARTICLE_SAVE_AS setting (Default: {article_name}.html). 下面的变量在渲染时有效。
| Variable | Description |
|---|---|
| article | 要显示的文章对象 |
| category | 当前文章的分类名称 |
您放在文章源文件的起始处中的任何元数据将作为article对象的字段提供。字段名称将与元数据字段的名称相同,但全部小写字符除外。
例如,您可以在文章元数据中添加一个名为FacebookImage的字段,如下所示:
Title: I love Python more than music
Date: 2013-11-06 10:06
Tags: personal, python
Category: Tech
Slug: python-je-l-aime-a-mourir
Author: Francis Cabrel
FacebookImage: http://franciscabrel.com/images/pythonlove.png
这个新的元数据将在article.html模板中作为article.facebookimage提供。这将允许您,例如,为Facebook打开的图形标签指定一个图像,每个文章将会更改:
<meta property="og:image" content="{{ article.facebookimage }}"/>
page.html
This template will be processed for each page, with output generated according to the PAGE_SAVE_AS setting (Default: pages/{page_name}.html). The following variables are available when rendering.
| Variable | Description |
|---|---|
| page | The page object to be displayed. You can access its title, slug, and content. |
tag.html
This template will be processed for each tag, with output generated according to the TAG_SAVE_AS setting (Default: tag/{tag_name}.html). If pagination is active, subsequent pages will by default reside at tag/{tag_name}{number}.html.
| Variable | Description |
|---|---|
| tag | The name of the tag being processed |
| articles | Articles related to this tag |
| dates | Articles related to this tag, but ordered by date, ascending |
| articles_paginator | A paginator object for the list of articles |
| articles_page | The current page of articles |
| articles_previous_page | The previous page of articles (None if page does not exist) |
| articles_next_page | The next page of articles (None if page does not exist) |
| dates_paginator | A paginator object for the list of articles, ordered by date, ascending |
| dates_page | The current page of articles, ordered by date, ascending |
| dates_previous_page | The previous page of articles, ordered by date, ascending (None if page does not exist) |
| dates_next_page | The next page of articles, ordered by date, ascending (None if page does not exist) |
| page_name | TAG_URL where everything after {slug} is removed – useful for pagination links |
period_archives.html
This template will be processed for each year of your posts if a path for YEAR_ARCHIVE_SAVE_AS is defined, each month if MONTH_ARCHIVE_SAVE_AS is defined, and each day if DAY_ARCHIVE_SAVE_AS is defined.
| Variable | Description |
|---|---|
| period | A tuple of the form (year, month, day) that indicates the current time period. year and day are numbers while month is a string. This tuple only contains year if the time period is a given year. It contains both year and month if the time period is over years and months and so on. |
You can see an example of how to use period in the “simple” theme period_archives.html template.
对象
在模板中可用和有用的详细对象属性。不是所有的属性都列在这里,这是在模板中被认为有用的属性的选择。
Article
文章的字符串表示是source_path属性。
| 属性 | 描述 |
|---|---|
| author | 本文的作者。 |
| authors | 本文的作者的列表。 |
| category | 本文的分类。 |
| content | 文章的呈现内容。 |
| date | 表示文章日期的日期时间对象。 |
| date_format | 默认日期格式或区域设置日期格式。 |
| default_template | 默认模板名称。 |
| in_default_lang | 表示文章是否以默认语言编写的布尔值。 |
| lang | 文章的语言。 |
| locale_date | 日期由date_format格式化。 |
| metadata | 文章标题元数据dict。 |
| save_as | 保存文章页面的位置。 |
| slug | Page slug. |
| source_path | 文章源文件的完整系统路径。 |
| status | The article status, can be any of ‘published’ or ‘draft’. |
| summary | 呈现摘要内容。 |
| tags | 标签对象的列表。 |
| template | 用于渲染的模板名称。 |
| title | Title of the article. |
| translations | List of translations Article objects. |
| url | URL to the article page. |
Author / Category / Tag
这些对象的字符串表示是name属性。
| 属性 | 描述 |
|---|---|
| name | 该对象的名称[1]。 |
| page_name | 作者页面名称。 |
| save_as | 保存作者页面的位置。 |
| slug | Page slug. |
| url | Author页面的URL。 |
| [1] | 作者对象来自:authors:或AUTHOR。 |
Page
The string representation of a Page is the source_path attribute.
| Attribute | Description |
|---|---|
| author | The Author of this page. |
| content | The rendered content of the page. |
| date | Datetime object representing the page date. |
| date_format | Either default date format or locale date format. |
| default_template | Default template name. |
| in_default_lang | Boolean representing if the article is written in the default language. |
| lang | Language of the article. |
| locale_date | Date formatted by the date_format. |
| metadata | Page header metadata dict. |
| save_as | Location to save the page. |
| slug | Page slug. |
| source_path | Full system path of the page source file. |
| status | The page status, can be any of ‘published’ or ‘draft’. |
| summary | Rendered summary content. |
| tags | List of Tag objects. |
| template | Template name to use for rendering. |
| title | Title of the page. |
| translations | List of translations Article objects. |
| url | URL to the page. |
Feeds
The feed variables changed in 3.0. Each variable now explicitly lists ATOM or RSS in the name. ATOM is still the default. Old themes will need to be updated. Here is a complete list of the feed variables:
FEED_ATOM
FEED_RSS
FEED_ALL_ATOM
FEED_ALL_RSS
CATEGORY_FEED_ATOM
CATEGORY_FEED_RSS
AUTHOR_FEED_ATOM
AUTHOR_FEED_RSS
TAG_FEED_ATOM
TAG_FEED_RSS
TRANSLATION_FEED_ATOM
TRANSLATION_FEED_RSS
Inheritance
自3.0版以来,Pelican支持从simple主题继承,因此您可以在自己的主题中重新使用simple主题模板。
如果您的主题的templates /目录中的其中一个强制性文件丢失,将由简单主题中的匹配模板替换。因此,如果simple主题中的模板的HTML结构适合您,则不必从头开始编写新模板。
You can also extend templates from the simple theme in your own themes by using the {% extends %} directive as in the following example:
{% extends "!simple/index.html" %}   <!-- extends the ``index.html`` template from the ``simple`` theme -->

{% extends "index.html" %}   <!-- "regular" extending -->
Example
使用该系统,可以创建一个只有两个文件的主题。
base.html
第一个文件是templates / base.html模板:
{% extends "!simple/base.html" %}

{% block head %}
{{ super() }}
   <link rel="stylesheet" type="text/css" href="{{ SITEURL }}/theme/css/style.css" />
{% endblock %}
- On the first line, we extend the
base.htmltemplate from thesimpletheme, so we don’t have to rewrite the entire file. - On the third line, we open the
headblock which has already been defined in thesimpletheme. - On the fourth line, the function
super()keeps the content previously inserted in theheadblock. - On the fifth line, we append a stylesheet to the page.
- On the last line, we close the
headblock.
This file will be extended by all the other templates, so the stylesheet will be linked from all pages.
style.css
The second file is the static/css/style.css CSS stylesheet:
body {
    font-family : monospace ;
    font-size : 100% ;
    background-color : white ;
    color : #111 ;
    width : 80% ;
    min-width : 400px ;
    min-height : 200px ;
    padding : 1em ;
    margin : 5% 10% ;
    border : thin solid gray ;
    border-radius : 5px ;
    display : block ;
}

a:link    { color : blue ; text-decoration : none ;      }
a:hover   { color : blue ; text-decoration : underline ; }
a:visited { color : blue ;                               }

h1 a { color : inherit !important }
h2 a { color : inherit !important }
h3 a { color : inherit !important }
h4 a { color : inherit !important }
h5 a { color : inherit !important }
h6 a { color : inherit !important }

pre {
    margin : 2em 1em 2em 4em ;
}

#menu li {
    display : inline ;
}

#post-list {
    margin-bottom : 1em ;
    margin-top : 1em ;
}
插件
从3.0版开始,Pelican支持插件。插件是一种向Pelican添加功能的方式,而无需直接修改Pelican内核。
如何使用插件
要加载插件,您必须在设置文件中指定它们。有两种方法可以这样做。第一种方法是使用可调用的路径指定字符串:
PLUGINS = ['package.myplugin',]
或者,另一种方法是导入它们并将它们添加到列表中:
from package import myplugin
PLUGINS = [myplugin,]
注意
当使用不同的插件(特别是处理元数据和内容的插件)进行实验时,缓存可能会发生干扰,并且更改可能不可见。在这种情况下,使用LOAD_CONTENT_CACHE = False禁用高速缓存,或使用 --ignore-cache 命令行开关。
如果您的插件不在可以导入的路径中,则可以通过PLUGIN_PATHS设置指定路径列表。如以下示例所示,PLUGIN_PATHS列表中的路径可以是绝对路径,也可以是相对于设置文件的相对路径:
PLUGIN_PATHS = ["plugins", "/srv/pelican/plugins"]
PLUGINS = ["assets", "liquid_tags", "sitemap"]
在哪里可以找到插件
我们保留一个独立的插件库,供人们共享和使用。请访问pelican-plugins仓库以获取可用插件的列表。
请注意,尽管我们尽力检查和维护这些插件,但它们由Pelican社区提交,因此可能具有不同级别的支持和互操作性。
如何创建插件
插件是基于信号的概念。pelican发送信号,插件订阅这些信号。信号列表在后续章节中定义。
插件的唯一规则是定义一个可调用的register函数,您可以在其中将信号映射到插件逻辑。我们来看一个简单的例子:
from pelican import signals

def test(sender):
    print "%s initialized !!" % sender

def register():
    signals.initialized.connect(test)
注意
信号接收器被弱引用,因此不能在register中定义它们,否则它们将在信号发出前被垃圾回收。
信号列表
以下列出了当前实施的信号:
| 信号 | 参数 | 描述 |
|---|---|---|
| initialized | pelican对象 | |
| finalized | pelican对象 | invoked after all the generators are executed and just before pelican exits useful for custom post processing actions, such as: - minifying js/css assets. - notify/ping search engines with an updated sitemap. |
| generator_init | generator | 在Generator.__init__中被调用 |
| all_generators_finalized | generators | 在所有的生成器执行结束后,在写入内容之前调用 |
| readers_init | readers | 在Readers.__init__中被调用。 |
| article_generator_context | article_generator, metadata | |
| article_generator_preread | article_generator | 在ArticlesGenerator.generate_context读取一篇文章之前调用;在每篇文章解析之前做一些事情。 |
| article_generator_init | article_generator | 在ArticlesGenerator.__init__中被调用 |
| article_generator_pretaxonomy | article_generator | invoked before categories and tags lists are created useful when e.g. modifying the list of articles to be generated so that removed articles are not leaked in categories or tags |
| article_generator_finalized | article_generator | 在ArticlesGenerator.generate_context的末尾调用 |
| article_generator_write_article | article_generator, content | 在写入每篇文章之前调用,content参数为文章 |
| article_writer_finalized | article_generator, writer | 在所有文章和相关页面都被写入之后,在文章生成器关闭之前被调用。 |
| get_generators | pelican object | 在Pelican.get_generator_classes中调用,可以返回一个Generator或一个元组或一个列表中的几个生成器。 |
| get_writer | pelican object | invoked in Pelican.get_writer, can return a custom Writer. |
| page_generator_context | page_generator, metadata | |
| page_generator_preread | page_generator | invoked before a page is read in PageGenerator.generate_context; use if code needs to do something before every page is parsed. |
| page_generator_init | page_generator | invoked in the PagesGenerator.__init__ |
| page_generator_finalized | page_generator | invoked at the end of PagesGenerator.generate_context |
| page_writer_finalized | page_generator, writer | invoked after all pages have been written, but before the page generator is closed. |
| static_generator_context | static_generator, metadata | |
| static_generator_preread | static_generator | invoked before a static file is read in StaticGenerator.generate_context; use if code needs to do something before every static file is added to the staticfiles list. |
| static_generator_init | static_generator | invoked in the StaticGenerator.__init__ |
| static_generator_finalized | static_generator | invoked at the end of StaticGenerator.generate_context |
| content_object_init | content_object | 在Content.__init__结尾调用 |
| content_written | path, context | 每次写入一个文件调用一次 |
| feed_written | path, context, feed | 每次写入一个feed调用一次 |
警告
如果您打算读取内容对象的summary或content属性,请避免使用content_object_init信号。That combination can result in unresolved links when Linking to internal content (see pelican-plugins bug #314). 请用_summary和_content属性,或者,在最后再调用你的插件(例如,all_generators_finalized)。
Note
在pelican3.2之后,信号名称被标准化。较旧的插件可能需要更新为新的名称才能使用:
| 老名字 | 新名字 |
|---|---|
| article_generate_context | article_generator_context |
| article_generate_finalized | article_generator_finalized |
| article_generate_preread | article_generator_preread |
| pages_generate_context | page_generator_context |
| pages_generate_preread | page_generator_preread |
| pages_generator_finalized | page_generator_finalized |
| pages_generator_init | page_generator_init |
| static_generate_context | static_generator_context |
| static_generate_preread | static_generator_preread |
方法案例
我们最终意识到,创建插件的一些方法最好在文档中共享,所以写在了这里!
如何创建新的阅读器
您可能想要支持您自己的输入格式。虽然在Pelican核心中添加此功能可能会有意义,但我们明智地选择避免这种情况,而是采取通过插件添加阅读器的方式.
这么选择的理由主要是插件很容易编写,并且作为不是特别常用的功能,这样不会特别影响pelican的运行速度.
不多说了,这里是一个例子:
from pelican import signals
from pelican.readers import BaseReader

# Create a new reader class, inheriting from the pelican.reader.BaseReader
class NewReader(BaseReader):
    enabled = True  # Yeah, you probably want that :-)

    # The list of file extensions you want this reader to match with.
    # If multiple readers were to use the same extension, the latest will
    # win (so the one you're defining here, most probably).
    file_extensions = ['yeah']

    # You need to have a read method, which takes a filename and returns
    # some content and the associated metadata.
    def read(self, filename):
        metadata = {'title': 'Oh yeah',
                    'category': 'Foo',
                    'date': '2012-12-01'}

        parsed = {}
        for key, value in metadata.items():
            parsed[key] = self.process_metadata(key, value)

        return "Some content", parsed

def add_reader(readers):
    readers.reader_classes['yeah'] = NewReader

# This is how pelican works.
def register():
    signals.readers_init.connect(add_reader)
添加新的生成器
添加新的生成器也很容易。有关如何创建自己的生成器的更多信息,您可能需要查看Pelican内部实现。
def get_generators(pelican_object):
    # define a new generator here if you need to
    return MyGenerator

signals.get_generators.connect(get_generators)
pelican主题
描述
pelican-themes是一个用于管理pelican主题的命令行工具。
用法
可选参数:
| -h, --help | 显示帮助文档,然后退出 |
| -l, --list | 显示已安装的主题 |
| -i theme_path, --install theme_path | |
| 安装一个或者多个主题 | |
| -r theme_name, --remove theme_name | |
| 删除一个或多个主题 | |
| -s theme_path, --symlink theme_path | |
| 与“-install”相同,但创建一个符号链接,而不是复制主题。适用于主题开发 | |
| -v, --verbose | 详细输出 |
| --version | 显示这个脚本的版本号 |
实例
列出已安装的主题
给pelican-themes传递参数-l或者--list,可以列出所有可用的pelican主题。
$ pelican-themes -l
notmyidea
two-column@
simple
$ pelican-themes --list
notmyidea
two-column@
simple
在这个例子中,我们可以看到有三个主题:notmyidea,simple和two-column。
two-colume有一个后缀@,因为这个主题并没有安装到pelican主题所在的路径,而是仅仅链接到主题目录(参见创建符号链接获取更多信息)。
请注意,您可以将--list选项与-v或--verbose选项进行组合,以获得更详细的输出,如下所示:
$ pelican-themes -v -l
/usr/local/lib/python2.6/dist-packages/pelican-2.6.0-py2.6.egg/pelican/themes/notmyidea
/usr/local/lib/python2.6/dist-packages/pelican-2.6.0-py2.6.egg/pelican/themes/two-column (symbolic link to `/home/skami/Dev/Python/pelican-themes/two-column')
/usr/local/lib/python2.6/dist-packages/pelican-2.6.0-py2.6.egg/pelican/themes/simple
安装主题
您可以使用-i或--install选项安装一个或多个主题。此选项将作为您想要安装的主题的路径作为参数,并且可以与verbose选项相结合:
# pelican-themes --install ~/Dev/Python/pelican-themes/notmyidea-cms --verbose
# pelican-themes --install ~/Dev/Python/pelican-themes/notmyidea-cms\
                           ~/Dev/Python/pelican-themes/martyalchin \
                           --verbose
# pelican-themes -vi ~/Dev/Python/pelican-themes/two-column
删除主题
pelican-themes命令也可以从pelican主题路径中删除主题。-r或者--remove选项需要一个参数,即你打算删除的一个或者多个主题名,也可以配合--verbose选项一起使用。
# pelican-themes --remove two-column
# pelican-themes -r martyachin notmyidea-cmd -v
Creating symbolic links
pelican-themes也可以通过创建符号链接来安装主题,而不是将整个主题复制到pelican主题路径中。
想要为一个主题创建符号链接,你可以使用-s或者--symlink,它的工作方式与--install差不多:
# pelican-themes --symlink ~/Dev/Python/pelican-themes/two-column
In this example, the two-column theme is now symbolically linked to the Pelican themes path, so we can use it, but we can also modify it without having to reinstall it after each modification.
这对主题开发很有用:
$ sudo pelican-themes -s ~/Dev/Python/pelican-themes/two-column
$ pelican ~/Blog/content -o /tmp/out -t two-column
$ firefox /tmp/out/index.html
$ vim ~/Dev/Pelican/pelican-themes/two-column/static/css/main.css
$ pelican ~/Blog/content -o /tmp/out -t two-column
$ cp /tmp/bg.png ~/Dev/Pelican/pelican-themes/two-column/static/img/bg.png
$ pelican ~/Blog/content -o /tmp/out -t two-column
$ vim ~/Dev/Pelican/pelican-themes/two-column/templates/index.html
$ pelican ~/Blog/content -o /tmp/out -t two-column
Doing several things at once
The --install, --remove and --symlink option are not mutually exclusive, so you can combine them in the same command line to do more than one operation at time, like this:
# pelican-themes --remove notmyidea-cms two-column \
                 --install ~/Dev/Python/pelican-themes/notmyidea-cms-fr \
                 --symlink ~/Dev/Python/pelican-themes/two-column \
                 --verbose
In this example, the theme notmyidea-cms is replaced by the theme notmyidea-cms-fr
Importing an existing site
Description
pelican-import is a command-line tool for converting articles from other software to reStructuredText or Markdown. The supported import formats are:
- WordPress XML export
- Dotclear export
- Posterous API
- Tumblr API
- RSS/Atom feed
从HTML到reStructuredText或Markdown的转换依赖于Pandoc。对于Dotclear,如果源文章是使用Markdown语法编写的,则不会被转换(因为Pelican也支持Markdown)。
Dependencies
pelican-import has some dependencies not required by the rest of Pelican:
- BeautifulSoup4 and lxml, for WordPress and Dotclear import. Can be installed like any other Python package (
pip install BeautifulSoup4 lxml). - Feedparser, for feed import (
pip install feedparser). - Pandoc, see the Pandoc site for installation instructions on your operating system.
Usage
pelican-import [-h] [--wpfile] [--dotclear] [--posterous] [--tumblr] [--feed] [-o OUTPUT]
               [-m MARKUP] [--dir-cat] [--dir-page] [--strip-raw] [--disable-slugs]
               [-e EMAIL] [-p PASSWORD] [-b BLOGNAME]
               input|api_token|api_key
Positional arguments
inputThe input file to read api_token(Posterous only) api_token can be obtained from http://posterous.com/api/ api_key(Tumblr only) api_key can be obtained from http://www.tumblr.com/oauth/apps
Optional arguments
-h, --help Show this help message and exit --wpfile WordPress XML export (default: False) --dotclear Dotclear export (default: False) --posterous Posterous API (default: False) --tumblr Tumblr API (default: False) --feed Feed to parse (default: False) -o OUTPUT, --output OUTPUT Output path (default: output) -m MARKUP, --markup MARKUP Output markup format (supports rst & markdown) (default: rst) --dir-cat Put files in directories with categories name (default: False) --dir-page Put files recognised as pages in “pages/” sub- directory (wordpress import only) (default: False) --filter-author Import only post from the specified author. --strip-raw Strip raw HTML code that can’t be converted to markup such as flash embeds or iframes (wordpress import only) (default: False) --disable-slugs Disable storing slugs from imported posts within output. With this disabled, your Pelican URLs may not be consistent with your original posts. (default: False) -e EMAIL, --email=EMAIL Email used to authenticate Posterous API -p PASSWORD, --password=PASSWORD Password used to authenticate Posterous API -b BLOGNAME, --blogname=BLOGNAME Blog name used in Tumblr API
Examples
For WordPress:
$ pelican-import --wpfile -o ~/output ~/posts.xml
For Dotclear:
$ pelican-import --dotclear -o ~/output ~/backup.txt
for Posterous:
$ pelican-import --posterous -o ~/output --email=<email_address> --password=<password> <api_token>
For Tumblr:
$ pelican-import --tumblr -o ~/output --blogname=<blogname> <api_token>
Tests
To test the module, one can use sample files:
- for WordPress: http://wpcandy.com/made/the-sample-post-collection
- for Dotclear: http://media.dotaddict.org/tda/downloads/lorem-backup.txt
Frequently Asked Questions (FAQ)
Here are some frequently asked questions about Pelican.
我能做什么?
你可以做的太多了!首先,您可以通过IRC(首选)或问题跟踪器报告任何Pelican建议或问题。If submitting an issue report, please first check the existing issue list (both open and closed) in order to avoid submitting a duplicate issue.
If you want to contribute, please fork the git repository, create a new feature branch, make your changes, and issue a pull request. Someone will review your changes as soon as possible. Please refer to the How to Contribute section for more details.
You can also contribute by creating themes and improving the documentation.
Is the Pelican settings file mandatory?
Configuration files are optional and are just an easy way to configure Pelican. For basic operations, it’s possible to specify options while invoking Pelican via the command line. See pelican --help for more information.
Changes to the settings file take no effect
When experimenting with different settings (especially the metadata ones) caching may interfere and the changes may not be visible. In such cases, ensure that caching is disabled via LOAD_CONTENT_CACHE = False or use the --ignore-cache command-line switch.
I’m creating my own theme. How do I use Pygments for syntax highlighting?
Pygments adds some classes to the generated content. These classes are used by themes to style code syntax highlighting via CSS. Specifically, you can customize the appearance of your syntax highlighting via the .highlight pre class in your theme’s CSS file. To see how various styles can be used to render Django code, for example, use the style selector drop-down at top-right on the Pygments project demo site.
You can use the following example commands to generate a starting CSS file from a Pygments built-in style (in this case, “monokai”) and then copy the generated CSS file to your new theme:
pygmentize -S monokai -f html -a .highlight > pygment.css
cp pygment.css path/to/theme/static/css/
Don’t forget to import your pygment.css file from your main CSS file.
How do I create my own theme?
Please refer to Creating themes.
I want to use Markdown, but I got an error.
If you try to generate Markdown content without first installing the Markdown library, may see a message that says No valid files found in content. Markdown is not a hard dependency for Pelican, so if you have content in Markdown format, you will need to explicitly install the Markdown library. You can do so by typing the following command, prepending sudo if permissions require it:
pip install markdown
Can I use arbitrary metadata in my templates?
Yes. For example, to include a modified date in a Markdown post, one could include the following at the top of the article:
Modified: 2012-08-08
For reStructuredText, this metadata should of course be prefixed with a colon:
:Modified: 2012-08-08
This metadata can then be accessed in templates such as article.html via:
{% if article.modified %}
Last modified: {{ article.modified }}
{% endif %}
If you want to include metadata in templates outside the article context (e.g., base.html), the if statement should instead be:
{% if article and article.modified %}
How do I assign custom templates on a per-page basis?
It’s as simple as adding an extra line of metadata to any page or article that you want to have its own template. For example, this is how it would be handled for content in reST format:
:template: template_name
For content in Markdown format:
Template: template_name
Then just make sure your theme contains the relevant template file (e.g. template_name.html).
How can I override the generated URL of a specific page or article?
Include url and save_as metadata in any pages or articles that you want to override the generated URL. Here is an example page in reST format:
Override url/save_as page
#########################

:url: override/url/
:save_as: override/url/index.html
With this metadata, the page will be written to override/url/index.html and Pelican will use url override/url/ to link to this page.
How can I use a static page as my home page?
The override feature mentioned above can be used to specify a static page as your home page. The following Markdown example could be stored in content/pages/home.md:
Title: Welcome to My Site
URL:
save_as: index.html

Thank you for visiting. Welcome!
If the original blog index is still wanted, it can then be saved in a different location by setting INDEX_SAVE_AS = 'blog_index.html' for the 'index' direct template.
What if I want to disable feed generation?
To disable feed generation, all feed settings should be set to None. All but three feed settings already default to None, so if you want to disable all feed generation, you only need to specify the following settings:
FEED_ALL_ATOM = None
CATEGORY_FEED_ATOM = None
TRANSLATION_FEED_ATOM = None
AUTHOR_FEED_ATOM = None
AUTHOR_FEED_RSS = None
The word None should not be surrounded by quotes. Please note that None and '' are not the same thing.
I’m getting a warning about feeds generated without SITEURL being set properly
RSS and Atom feeds require all URL links to be absolute. In order to properly generate links in Pelican you will need to set SITEURL to the full path of your site.
Feeds are still generated when this warning is displayed, but links within may be malformed and thus the feed may not validate.
My feeds are broken since I upgraded to Pelican 3.x
Starting in 3.0, some of the FEED setting names were changed to more explicitly refer to the Atom feeds they inherently represent (much like the FEED_RSS setting names). Here is an exact list of the renamed settings:
FEED -> FEED_ATOM
TAG_FEED -> TAG_FEED_ATOM
CATEGORY_FEED -> CATEGORY_FEED_ATOM
Starting in 3.1, the new feed FEED_ALL_ATOM has been introduced: this feed will aggregate all posts regardless of their language. This setting generates 'feeds/all.atom.xml' by default and FEED_ATOM now defaults to None. The following feed setting has also been renamed:
TRANSLATION_FEED -> TRANSLATION_FEED_ATOM
Older themes that referenced the old setting names may not link properly. In order to rectify this, please update your theme for compatibility by changing the relevant values in your template files. For an example of complete feed headers and usage please check out the simple theme.
Is Pelican only suitable for blogs?
No. Pelican can be easily configured to create and maintain any type of static site. This may require a little customization of your theme and Pelican configuration. For example, if you are building a launch site for your product and do not need tags on your site, you could remove the relevant HTML code from your theme. You can also disable generation of tag-related pages via:
TAGS_SAVE_AS = ''
TAG_SAVE_AS = ''
Why does Pelican always write all HTML files even with content caching enabled?
In order to reliably determine whether the HTML output is different before writing it, a large part of the generation environment including the template contexts, imported plugins, etc. would have to be saved and compared, at least in the form of a hash (which would require special handling of unhashable types), because of all the possible combinations of plugins, pagination, etc. which may change in many different ways. This would require a lot more processing time and memory and storage space. Simply writing the files each time is a lot faster and a lot more reliable.
However, this means that the modification time of the files changes every time, so a rsync based upload will transfer them even if their content hasn’t changed. A simple solution is to make rsync use the --checksum option, which will make it compare the file checksums in a much faster way than Pelican would.
When only several specific output files are of interest (e.g. when working on some specific page or the theme templates), the WRITE_SELECTED option may help, see Writing only selected content.
How to process only a subset of all articles?
It is often useful to process only e.g. 10 articles for debugging purposes. This can be achieved by explicitly specifying only the filenames of those articles in ARTICLE_PATHS. A list of such filenames could be found using a command similar to cd content; find -name '*.md' | head -n 10.
My tag-cloud is missing/broken since I upgraded Pelican
In an ongoing effort to steamline Pelican, tag_cloud generation has been moved out of the pelican core and into a separate plugin. See the Plugins documentation further information about the Pelican plugin system.
Since I upgraded Pelican my pages are no longer rendered
Pages were available to themes as lowercase pages and uppercase PAGES. To bring this inline with the Templates and variables section, PAGES has been removed. This is quickly resolved by updating your theme to iterate over pages instead of PAGES. Just replace:
{% for pg in PAGES %}
with something like:
{% for pg in pages %}
How can I stop Pelican from trying to parse my static files as content?
Pelican’s article and page generators run before it’s static generator. That means if you use a setup similar to the default configuration, where a static source directory is defined inside a *_PATHS setting, all files that have a valid content file ending (.html, .rst, .md, ...) will be treated as articles or pages before they get treated as static files.
To circumvent this issue either use the appropriate *_EXCLUDES setting or disable the offending reader via READERS if you don’t need it.
小提示
以下是关于pelican的一些提示,您可能会发现有用。
自定义404页
当浏览器请求Web服务器找不到的资源时,Web服务器通常会显示一个通用的“文件未找到”(404)错误页面,这个页面可能是光秃秃的而不雅观的。提供与您网站主题相匹配的错误页面的一种方法是创建自定义404页面(不是一篇文章),例如存储在content/pages/404.md:
Title: Not Found
Status: hidden
Save_as: 404.html

The requested item could not be located. Perhaps you might want to check
the [Archives](/archives.html)?
下一步是配置您的Web服务器来显示此自定义页面,而不是其默认的404页面。对于Nginx,将以下内容添加到配置文件的location块中:
error_page 404 /404.html;
对于Apache:
ErrorDocument 404 /404.html
对于Amazon S3,首先导航到您的AWS cosole上的桶设置中的Static Site Hosting菜单。从那里:
Error Document: 404.html
发布到GitHub 
GitHub页面提供了一种简单方便的发布pelican网站的方法。两种类型的GitHub页面:项目页面和用户页面。鹈鹕网站可以作为项目页面和用户页面一起发布。
项目页
要将pelican网站作为项目页面发布,您需要将pelican生成的output目录推送到存储库的gh-pages分支在GitHub上。
可以使用pip安装的出色的ghp-import使此过程非常简单。
例如,如果您的Pelican网站的源码包含在GitHub仓库中,并且如果要以“Project Pages”的形式将该Pelican站点发布到此仓库,则可以使用以下内容:
$ pelican content -o output -s pelicanconf.py
$ ghp-import output
$ git push origin gh-pages
The ghp-import output command updates the local gh-pages branch with the content of the output directory (creating the branch if it doesn’t already exist).The git push origin gh-pages command updates the remote gh-pages branch, effectively publishing the Pelican site.
注意
由pelican-quickstart命令创建的Makefile(以及Fabfile的gh_pages任务的github目标将Pelican站点发布为项目页面, 如上所述。
注意
Windows上的ghp-import
Until ghp-import Pull Request #25 is accepted, you will need to install a custom build of ghp-import: pip install https://github.com/chevah/ghp-import/archive/win-support.zip
用户页
To publish a Pelican site in the form of User Pages, you need to push the content of the output dir generated by Pelican to the master branch of your <username>.github.io repository on GitHub.
再次,您可以利用ghp-import:
$ pelican content -o output -s pelicanconf.py
$ ghp-import output
$ git push git@github.com:elemoine/elemoine.github.io.git gh-pages:master
The git push command pushes the local gh-pages branch (freshly updated by the ghp-import command) to the elemoine.github.io repository’s master branch on GitHub.
注意
要将您的pelican网站发布为用户页面,请随意调整Makefile的github目标。
额外的提示
Tip #1:
To automatically update your Pelican site on each commit, you can create a post-commit hook. For example, you can add the following to .git/hooks/post-commit:
pelican content -o output -s pelicanconf.py && ghp-import output && git push origin gh-pages
Tip #2:
To use a custom domain with GitHub Pages, you need to put the domain of your site (e.g., blog.example.com) inside a CNAME file at the root of your site. To do this, create the content/extra/ directory and add a CNAME file to it. Then use the STATIC_PATHS setting to tell Pelican to copy this file to your output directory. For example:
STATIC_PATHS = ['images', 'extra/CNAME']
EXTRA_PATH_METADATA = {'extra/CNAME': {'path': 'CNAME'},}
Note: use forward slashes, /, even on Windows.
暗示
You can also use the EXTRA_PATH_METADATA mechanism to place a favicon.ico or robots.txt at the root of any site.
如何添加YouTube或Vimeo视频
最简单的方法是将来自这些网站的视频的嵌入代码直接粘贴到源内容中。
或者,您还可以使用像liquid_tags,pelican_youtube或pelican_vimeo之类的Pelican插件将视频嵌入到您的内容中。
此外,标记语言(如reST和Markdown)具有插件,可让您将视频嵌入到标记中。对于Markdown,您可以使用reST视频指令作为reST或mdx_video插件。
贡献和反馈指南
有很多方法可以帮助pelican.您可以改进文档,添加缺少的功能,并修复错误(或只是报告它们)。您还可以通过查看和评论现有问题来帮助您。
不要犹豫,在GitHub上fork pelican,并提交问题或提出请求。这样做时,请遵守以下准则。
如何获得帮助
在您寻求帮助之前,请确保您执行以下操作:
- 仔细阅读文档。如果匆忙,至少使用文档页面左上方提供的搜索字段。确保您阅读了您正在使用的Pelican版本的文档。
- 使用搜索引擎(例如,DuckDuckGo,Google)来搜索您的问题的解决方案。有人可能已经找到了解决方案,也许是以插件或特定的设置组合的形式。
- 尝试在干净的环境中重现问题,确保您使用:
- 最新的pelican版本(或最新的pelican的git克隆的master分支)
- pelican所使用的库的最新版
- 没有插件,或仅仅安装了问题相关的插件。
注意:最常见的问题来源是(1)主题,(2)设置文件和(3)make / fab中的自动化包装机。如果您在使用以下步骤生成您的网站时无法重现您的问题,则问题几乎肯定与您选择的主题和/或设置文件(而不是pelican本身):
cd ~/projects/your-site
git clone https://github.com/getpelican/pelican ~/projects/pelican
pelican content -s ~/projects/pelican/samples/pelican.conf.py -t ~/projects/pelican/pelican/themes/notmyidea
如果尽管上述努力仍然无法解决您的问题,请务必在查询中包含以下信息,最好以上传到粘贴服务,GitHub仓库或其他公开内容的链接形式可访问位置:
- 请详细描述你的Pelican版本(也就是
pelican --version的输出或者,如果你克隆了git仓库,也可以用HEAD commit的哈希值)以及你的安装方式(你所用到的所有命令,例如,pip install pelican)。 - If you are looking for a way to get some end result, prepare a detailed description of what the end result should look like (preferably in the form of an image or a mock-up page) and explain in detail what you have done so far to achieve it.
- If you are trying to solve some issue, prepare a detailed description of how to reproduce the problem. If the issue cannot be easily reproduced, it cannot be debugged by developers or volunteers. Describe only the minimum steps necessary to reproduce it (no extra plugins, etc. ).
- Upload your settings file or any other custom code that would enable people to reproduce the problem or to see what you have already tried to achieve the desired end result.
- Upload detailed and complete output logs and backtraces (remember to add the
--debugflag:pelican --debug content [...])
Once the above preparation is ready, you can contact people willing to help via (preferably) the #pelican IRC channel or send a message to authors at getpelican dot com. Remember to include all the information you prepared.
#pelican 即时聊天频道
- 由于时区的原因,您可能无法很快得到回应,但是,请耐心等待,并保持登录,总有人会回应你的(可能要几个小时)。
- 如果您没有IRC客户端,请使用webchat进行快速反馈。
- You can direct your IRC client to the channel using this IRC link or you can manually join the
#pelicanIRC channel on the freenode IRC network.
贡献代码
在您提交贡献之前,请先问一下是否需要这个贡献,以防您花费大量了时间来处理的问题,却由于已知原因而被拒绝。考虑一下您的新功能是否可能更适合作为插件 - 您可以通过请求帮助来决定。
在Github使用Git
- Create a new git branch specific to your change (as opposed to making your commits in the master branch).
- Don’t put multiple unrelated fixes/features in the same branch / pull request. For example, if you’re hacking on a new feature and find a bugfix that doesn’t require your new feature, make a new distinct branch and pull request for the bugfix.
- Check for unnecessary whitespace via
git diff --checkbefore committing. - First line of your commit message should start with present-tense verb, be 50 characters or less, and include the relevant issue number(s) if applicable. Example:
Ensure proper PLUGIN_PATH behavior. Refs #428.If the commit completely fixes an existing bug report, please useFixes #585orFix #585syntax (so the relevant issue is automatically closed upon PR merge). - After the first line of the commit message, add a blank line and then a more detailed explanation (when relevant).
- 压缩您的提交以消除合并提交,并确保清晰可读的提交历史记录。
- 如果您先前提交了GitHub问题,并希望提供解决该问题的代码,请使用
hub pull-request而不是使用GitHub的Web UI提交pull请求。这不是一个绝对的要求,而是使维护者的生活更容易!Specifically: install hub and then run hub pull-request to turn your GitHub issue into a pull request containing your code.
贡献质量标准
- 坚持使用PEP8编程标准。This can be eased via the pep8 or flake8 tools, the latter of which in particular will give you some useful hints about ways in which the code/formatting can be improved.
- Make sure your code is compatible with Python 2.7, 3.3, and 3.4 — see our compatibility cheatsheet for more details.
- Add docs and tests for your changes. Undocumented and untested features will not be accepted.
- Run all the tests on all versions of Python supported by Pelican to ensure nothing was accidentally broken.
Check out our Git Tips page or ask for help if you need assistance or have any questions about these guidelines.
设置开发环境
设置开发环境的方法太多了,以下是使用virtualenv的方法。如果您没有安装virtualenv,可以通过以下方式进行安装:
$ pip install virtualenv
虚拟环境允许您处理彼此隔离的Python项目,以便您在不同的项目中可以使用不同的包(和包版本)。
要创建和激活虚拟环境,请使用以下语法:
$ virtualenv ~/virtualenvs/pelican
$ cd ~/virtualenvs/pelican
$ . bin/activate
克隆Pelican源代码:
$ git clone https://github.com/getpelican/pelican.git src/pelican
安装开发环境依赖项:
$ cd src/pelican
$ pip install -r requirements/developer.pip
安装Pelican及其依赖:
$ python setup.py develop
或使用pip:
$ pip install -e .
构建文档
如果您对文档进行了更改,则应在提交之前预览更改:
$ pip install sphinx
$ cd src/pelican/docs
$ make html
在浏览器中打开_build/html/index.html以预览文档。
运行测试套件
每次添加功能时,有两项测试要做:检查现有测试是否通过,并添加新功能或修补程序的测试。
The tests live in pelican/tests and you can run them using the “discover” feature of unittest:
$ python -Wd -m unittest discover
After making your changes and running the tests, you may see a test failure mentioning that “some generated files differ from the expected functional tests output.” If you have made changes that affect the HTML output generated by Pelican, and the changes to that output are expected and deemed correct given the nature of your changes, then you should update the output used by the functional tests. To do so, make sure you have both ``en_EN.utf8`` and ``fr_FR.utf8`` locales installed, and then run the following two commands:
$ LC_ALL=en_US.utf8 pelican -o pelican/tests/output/custom/ \
    -s samples/pelican.conf.py samples/content/
$ LC_ALL=fr_FR.utf8 pelican -o pelican/tests/output/custom_locale/ \
    -s samples/pelican.conf_FR.py samples/content/
$ LC_ALL=en_US.utf8 pelican -o pelican/tests/output/basic/ \
    samples/content/
Python 3开发技巧
Here are some tips that may be useful when doing some code for both Python 2.7 and Python 3 at the same time:
- Assume every string and literal is unicode (import unicode_literals):
- Do not use prefix
u'. - Do not encode/decode strings in the middle of sth. Follow the code to the source (or target) of a string and encode/decode at the first/last possible point.
- In other words, write your functions to expect and to return unicode.
- Encode/decode strings if e.g. the source is a Python function that is known to handle this badly, e.g. strftime() in Python 2.
- Do not use prefix
- Use new syntax: print function, “except ... as e” (not comma) etc.
- Refactor method calls like
dict.iteritems(),xrange()etc. in a way that runs without code change in both Python versions. - Do not use magic method
__unicode()__in new classes. Use only__str()__and decorate the class with@python_2_unicode_compatible. - Do not start int literals with a zero. This is a syntax error in Py3k.
- Unfortunately I did not find an octal notation that is valid in both Pythons. Use decimal instead.
- use six, e.g.:
isinstance(.., basestring) -> isinstance(.., six.string_types)isinstance(.., unicode) -> isinstance(.., six.text_type)
setlocale()in Python 2 bails when we give the locale name as unicode, and since we are usingfrom __future__ import unicode_literals, we do that everywhere! As a workaround, I enclosed the localename withstr(); in Python 2 this casts the name to a byte string, in Python 3 this should do nothing, because the locale name already had been unicode.- Kept range() almost everywhere as-is (2to3 suggests list(range())), just changed it where I felt necessary.
- Changed xrange() back to range(), so it is valid in both Python versions.
记录提示
Try to use logging with appropriate levels.
For logging messages that are not repeated, use the usual Python way:
# at top of file
import logging
logger = logging.getLogger(__name__)

# when needed
logger.warning("A warning with %s formatting", arg_to_be_formatted)
Do not format log messages yourself. Use %s formatting in messages and pass arguments to logger. This is important, because Pelican logger will preprocess some arguments (like Exceptions) for Py2/Py3 compatibility.
限制无关日志消息
If the log message can occur several times, you may want to limit the log to prevent flooding. In order to do that, use the extra keyword argument for the logging message in the following format:
logger.warning("A warning with %s formatting", arg_to_be_formatted,
    extra={'limit_msg': 'A generic message for too many warnings'})
Optionally, you can also set 'limit_args' as a tuple of arguments in extra dict if your generic message needs formatting.
Limit is set to 5, i.e, first four logs with the same 'limit_msg' are outputted normally but the fifth one will be logged using 'limit_msg' (and 'limit_args' if present). After the fifth, corresponding log messages will be ignored.
For example, if you want to log missing resources, use the following code:
for resource in resources:
    if resource.is_missing:
        logger.warning(
            'The resource %s is missing', resource.name,
            extra={'limit_msg': 'Other resources were missing'})
The log messages will be displayed as follows:
WARNING: The resource prettiest_cat.jpg is missing
WARNING: The resource best_cat_ever.jpg is missing
WARNING: The resource cutest_cat.jpg is missing
WARNING: The resource lolcat.jpg is missing
WARNING: Other resources were missing
在日志¶中输出回溯
If you’re logging inside an except block, you may want to provide the traceback information as well. You can do that by setting exc_info keyword argument to True during logging. However, doing so by default can be undesired because tracebacks are long and can be confusing to regular users. Try to limit them to --debug mode like the following:
try:
    some_action()
except Exception as e:
    logger.error('Exception occurred: %s', e,
        exc_info=settings.get('DEBUG', False))
pelican内部实现
本节将简单介绍pelican的内部实现。你将会看到,这很简单,但是读一些文档仍然是有用的。:)
您还可以在有关Pelican部分历史记录中找到原始作者用一些软件设计信息撰写的报告摘录。
总体结构
总的来说,pelican就是处理一个文件列表,然后输出一些文件。通常,输入文件是reStructuredText和Markdown文件,输出是一个博客,但输入和输出都可以是任何你想要的。
逻辑分为不同的类和概念:
- Writers负责编写文件:.html文件,RSS提要等。由于这个操作用得太多了,这个对象仅仅会被创建一次,然后传递给生成器。
- Readers用于从各种格式(目前支持HTML,Markdown和reStructuredText,当然,这是可扩展的)。给定一个文件,它们返回元数据(作者,标签,分类等)和文章内容(HTML格式)。
- Generators生成不同的输出。例如,pelican有
ArticlesGenerator和PageGenerator。给定一个配置,他们可以做任何他们想要的。大多数时候,它是从输入生成文件。 - pelican还使用了模板,所以写自己的主题很容易。Pelican的模板语法采用了Jinja2库,非常容易学习,所以请不要犹豫,去创建自己的主题吧。
如何实现新的reader?
你是否想添加一个优秀的标记语言到你的pelican呢?好吧,你现在需要做的仅仅是创建一个类,写一个read方法,然后返回HTML内容和一些metadata。
看看下面的Markdown阅读器:
class MarkdownReader(BaseReader):
    enabled = bool(Markdown)

    def read(self, source_path):
        """Parse content and metadata of markdown files"""
        text = pelican_open(source_path)
        md_extensions = {'markdown.extensions.meta': {},
                         'markdown.extensions.codehilite': {}}
        md = Markdown(extensions=md_extensions.keys(),
                      extension_configs=md_extensions)
        content = md.convert(text)

        metadata = {}
        for name, value in md.Meta.items():
            name = name.lower()
            meta = self.process_metadata(name, value[0])
            metadata[name] = meta
        return content, metadata
简单极了,不是吗?
如果您的新reader需要一些额外的Python依赖,那么记得将他们的import语句放在try...except代码块里面。然后在阅读器类中,设置enabled类属性来标记导入成功或失败。这使得用户可以继续使用自己喜欢的标记方法,而不需要为不使用的格式安装模块。
如何实现新的generator
Generator有两个重要的方法。你并不一定要同时创建这两个方法,你创建了哪个就会调用哪个。
- 对于所有的generator来说,
generate_context都是第一个被调用的。你可以在这里随便做什么,如果有必要,在这里更新全局上下文。此上下文在所有生成器之间共享,并将被传递给模板。例如,PageGenerator的generate_context方法查找所有页面,将其转换为对象,并使用它们填充上下文。在此阶段,请一定要注意,不要输出任何使用此上下文的内容,因为它可能会因其他生成器的影响而改变。 - 然后调用
generate_output。猜猜它是做什么的?哦,生成输出。:)在这里,您可能需要查看上下文并调用作为此函数的第一个参数传递的writer对象的方法。在PageGenerator示例中,此方法将查看记录在全局上下文中的所有页面,并为遇到的每个页面输出磁盘上的文件(使用写入程序write_file) 。
有关pelican的历史
警告
该页面来自于2010年12月撰写pelican之后原始作者(AlexisMétaireau)所写的报告。信息可能不是最新的。
pelican是一个简单的静态博客生成器。它解析标记文件(现在为Markdown或reStructuredText),并生成一个包含其中的所有文件的HTML文件夹。我选择使用Python来实施pelican,因为它似乎很简单,适合我的需要。我不想为每个事物定义一个类,但仍然想让我的东西松散耦合。事实证明,这正是我想要的。不时,感谢一些用户的反馈,我花了很少时间提供修复。到目前为止,我已经重构pelican代码两次了。每次花费不到30分钟。
用例
我以前使用的WordPress,一个解决方案,您可以托管在网络服务器上管理您的博客。大多数情况下,我更喜欢使用Markdown或reStructuredText等标记语言来输入我的文章。为此,我使用vim。我认为让人们选择他们想要写文章的工具很重要。在我看来,博客管理工具应该允许你采取任何形式的输入,并将其转换成一个博客。这就是pelican所做的。您可以使用所需的工具和所需的标记语言编写文章,然后生成静态HTML博客。
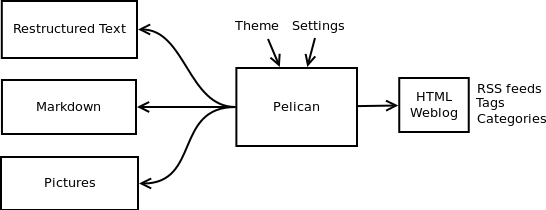
为了足够灵活,pelican有模板支持,所以你可以很容易地编写自己的主题,如果你想。
设计过程
pelican来自我的需要。最初,我创建了一个单一的文件应用程序,慢慢地改成了现在的样子.首先,我写了一篇关于我想做什么的文件。然后,我创建了我想要解析的内容(reStructuredText文件),并开始尝试使用代码。pelican有200多行,包含几乎十个功能和一个类,当它是第一次可用。
我一直在面对不同的问题,并希望在使用它时向Pelican添加功能。我做的第一个更改是添加设置文件的支持。可以将选项传递到命令行,但是如果有很多选项,则可能很繁琐。以同样的方式,随着时间的推移,我添加了不同的东西的支持:Atom订阅源,多个主题,多个标记支持等。在某些时候,似乎对于pelican来说,“只有一个文件”的咒语不够好,所以我决定重新修改一下,并将其分割成多个不同的文件。
我分离了不同类和概念的逻辑:
- writers负责文件的所有写入过程。他们负责编写.html文件,RSS提要等。由于这些操作是常用的,所以对象被创建一次,然后传递给生成器。
- readers用于从各种格式(Markdown和reStructuredText现在读取,但系统是可扩展的)。给定一个文件,它们返回元数据(作者,标签,分类等)和内容(HTML格式)。
- generators生成不同的输出。例如,pelican有一个文章发布器和PagesGenerator,其他。给定一个配置,他们可以做任何你想要他们做的事情。大部分时间是从输入(用户输入和文件)生成文件。
我也处理内容对象。他们可以是文章,页面,引用,或任何你想要的。它们在contents.py模块中定义,并表示程序要使用的一些内容。
更详细地,
以下是pelican类的概述。
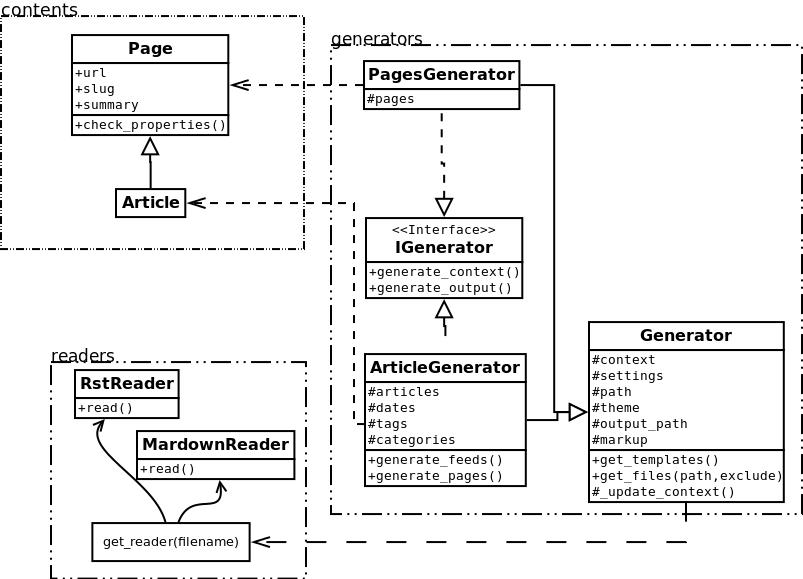
接口不是真的存在,我已经添加它只是为了澄清整个图片。我使用鸭子类型,而不是接口。
在内部,遵循以下过程:
- 首先,解析命令行,并且使用用户的一些内容来初始化不同的生成器对象。
- 创建了一个
context。它包含来自命令行的设置和设置文件(如果提供)。 - 调用每个生成器的
generate_context方法,更新上下文。 - 编写器被创建并被赋予每个生成器的
generate_output方法。
我进行两个调用,因为重要的是当输出由生成器生成时,上下文将不会改变。换句话说,第一个方法generate_context应该修改上下文,而第二个generate_output方法不应该。
那么,在generate_context和generate_content方法中,由发生器来做想要的事情。使用ArticlesGenerator类将有助于了解其他一些概念。调用generate_context方法时会发生什么:
- 阅读文件夹“路径”,查找重组的文本文件,加载它们,并构建一个内容对象(
Article)。为此,请使用Reader对象。 - 使用所有这些文章更新
context。
然后,generate_content方法使用context和writer生成想要的输出。
发布历史
3.7.1 (2017-01-10)
- Fix locale issues in Quickstart script
- Specify encoding for README and CHANGELOG in setup.py
3.7.0 (2016-12-12)
- Atom feeds output
<content>in addition to<summary> - Atom feeds use
<published>for the original publication date and<updated>for modifications - Simplify Atom feed ID generation and support URL fragments
- Produce category feeds with category-specific titles
- RSS feeds now default to summary instead of full content; set
RSS_FEED_SUMMARY_ONLY = Falseto revert to previous behavior - Replace
MD_EXTENSIONSwithMARKDOWNsetting - Replace
JINJA_EXTENSIONSwith more-robustJINJA_ENVIRONMENTsetting - Improve summary truncation logic to handle special characters and tags that span multiple lines, using HTML parser instead of regular expressions
- Include summary when looking for intra-site link substitutions
- Link to authors and index via
{author}nameand{index}syntax - Override widget names via
LINKS_WIDGET_NAMEandSOCIAL_WIDGET_NAME - Add
INDEX_SAVE_ASoption to override defaultindex.htmlvalue - Remove
PAGEScontext variable for themes in favor ofpages SLUG_SUBSTITUTIONSnow accepts 3-tuple elements, allowing URL slugs to contain non-alphanumeric characters- Tag and category slugs can be controlled with greater precision using the
TAG_SUBSTITUTIONSandCATEGORY_SUBSTITUTIONSsettings - Author slugs can be controlled with greater precision using the
AUTHOR_SUBSTITUTIONSsetting DEFAULT_DATEcan be defined as a string- Use
mtimeinstead ofctimewhenDEFAULT_DATE = 'fs' - Add
--fatal=errors|warningsoption for use with continuous integration - When using generator-level caching, ensure previously-cached files are processed instead of just new files.
- Add Python and Pelican version information to debug output
- Improve compatibility with Python 3.5
- Comply with and enforce PEP8 guidelines
- Replace tables in settings documentation with
data::directives
3.6.3 (2015-08-14)
- Fix permissions issue in release tarball
3.6.2 (2015-08-01)
- Fix installation errors related to Unicode in tests
- Don’t show pagination in
notmyideatheme if there’s only one page - Make hidden pages available in context
- Improve URLWrapper comparison
3.6.0 (2015-06-15)
- Disable caching by default in order to prevent potential confusion
- Improve caching behavior, replacing
picklewithcpickle - Allow Markdown or reST content in metadata fields other than
summary - Support semicolon-separated author/tag lists
- Improve flexibility of article sorting
- Add
--relative-urlsargument - Support devserver listening on addresses other than localhost
- Unify HTTP server handlers to
pelican.serverthroughout - Handle intra-site links to draft posts
- Move
tag_cloudfrom core to plugin - Load default theme’s external resources via HTTPS
- Import drafts from WordPress XML
- Improve support for Windows users
- Enhance logging and test suite
- Clean up and refactor codebase
- New signals:
all_generators_finalizedandpage_writer_finalized
3.5.0 (2014-11-04)
- Introduce
ARTICLE_ORDER_BYandPAGE_ORDER_BYsettings to control the order of articles and pages. - Include time zone information in dates rendered in templates.
- Expose the reader name in the metadata for articles and pages.
- Add the ability to store static files along with content in the same directory as articles and pages using
{attach}in the path. - Prevent Pelican from raising an exception when there are duplicate pieces of metadata in a Markdown file.
- Introduce the
TYPOGRIFY_IGNORE_TAGSsetting to add HTML tags to be ignored by Typogrify. - Add the ability to use
-in date formats to strip leading zeros. For example,%-d/%-m/%ywill now result in the date9/8/12. - Ensure feed generation is correctly disabled during quickstart configuration.
- Fix
PAGE_EXCLUDESandARTICLE_EXCLUDESfrom incorrectly matching sub-directories. - Introduce
STATIC_EXCLUDEsetting to add static file excludes. - Fix an issue when using
PAGINATION_PATTERNSwhileRELATIVE_URLSis enabled. - Fix feed generation causing links to use the wrong language for month names when using other locales.
- Fix an issue where the authors list in the simple template wasn’t correctly formatted.
- Fix an issue when parsing non-string URLs from settings.
- Improve consistency of debug and warning messages.
3.4.0 (2014-07-01)
- Speed up content generation via new caching mechanism
- Add selective post generation (instead of always building entire site)
- Many documentation improvements, including switching to prettier RtD theme
- Add support for multiple content and plugin paths
- Add
:modified:metadata field to complement:date:. Used to specify the last date and time an article was updated independently from the date and time it was published. - Add support for multiple authors via new
:authors:metadata field - Watch for changes in static directories when in auto-regeneration mode
- Add filters to limit log output when desired
- Add language support to drafts
- Add
SLUGIFY_SOURCEsetting to control how post slugs are generated - Fix many issues relating to locale and encoding
- Apply Typogrify filter to post summary
- Preserve file metadata (e.g. time stamps) when copying static files to output
- Move AsciiDoc support from Pelican core into separate plugin
- Produce inline links instead of reference-style links when importing content
- Improve handling of
IGNORE_FILESsetting behavior - Properly escape symbol characters in tag names (e.g.,
C++) - Minor tweaks for Python 3.4 compatibility
- Add several new signals
3.3.0 (2013-09-24)
- Drop Python 3.2 support in favor of Python 3.3
- Add
Fabfileso Fabric can be used for workflow automation instead of Make OUTPUT_RETENTIONsetting can be used to preserve metadata (e.g., VCS data such as.hgand.git) from being removed from output directory- Tumblr import
- Improve logic and consistency when cleaning output folder
- Improve documentation versioning and release automation
- Improve pagination flexibility
- Rename signals for better consistency (some plugins may need to be updated)
- Move metadata extraction from generators to readers; metadata extraction no longer article-specific
- Deprecate
FILES_TO_COPYin favor ofSTATIC_PATHSandEXTRA_PATH_METADATA - Summaries in Markdown posts no longer include footnotes
- Remove unnecessary whitespace in output via
lstrip_blocksJinja parameter - Move PDF generation from core to plugin
- Replace
MARKUPsetting withREADERS - Add warning if img tag is missing
altattribute - Add support for
{}in relative links syntax, besides|| - Add support for
{tag}and{category}relative links - Add a
content_writtensignal
3.2.1 and 3.2.2
- Facilitate inclusion in FreeBSD Ports Collection
3.2 (2013-04-24)
- Support for Python 3!
- Override page save-to location from meta-data (enables using a static page as the site’s home page, for example)
- Time period archives (per-year, per-month, and per-day archives of posts)
- Posterous blog import
- Improve WordPress blog import
- Migrate plugins to separate repository
- Improve HTML parser
- Provide ability to show or hide categories from menu using
DISPLAY_CATEGORIES_ON_MENUoption - Auto-regeneration can be told to ignore files via
IGNORE_FILESsetting - Improve post-generation feedback to user
- For multilingual posts, use meta-data to designate which is the original and which is the translation
- Add
.mdownto list of supported Markdown file extensions - Document-relative URL generation (
RELATIVE_URLS) is now off by default
3.1 (2012-12-04)
- Importer now stores slugs within files by default. This can be disabled with the
--disable-slugsoption. - Improve handling of links to intra-site resources
- Ensure WordPress import adds paragraphs for all types of line endings in post content
- Decode HTML entities within WordPress post titles on import
- Improve appearance of LinkedIn icon in default theme
- Add GitHub and Google+ social icons support in default theme
- Optimize social icons
- Add
FEED_ALL_ATOMandFEED_ALL_RSSto generate feeds containing all posts regardless of their language - Split
TRANSLATION_FEEDintoTRANSLATION_FEED_ATOMandTRANSLATION_FEED_RSS - Different feeds can now be enabled/disabled individually
- Allow for blank author: if
AUTHORsetting is not set, author won’t default to${USER}anymore, and a post won’t contain any author information if the post author is empty - Move LESS and Webassets support from Pelican core to plugin
- The
DEFAULT_DATEsetting now defaults toNone, which means that articles won’t be generated unless date metadata is specified - Add
FILENAME_METADATAsetting to support metadata extraction from filename - Add
gzip_cacheplugin to compress common text files into a.gzfile within the same directory as the original file, preventing the server (e.g. Nginx) from having to compress files during an HTTP call - Add support for AsciiDoc-formatted content
- Add
USE_FOLDER_AS_CATEGORYsetting so that feature can be toggled on/off - Support arbitrary Jinja template files
- Restore basic functional tests
- New signals:
generator_init,get_generators, andarticle_generate_preread
3.0 (2012-08-08)
- Refactored the way URLs are handled
- Improved the English documentation
- Fixed packaging using
setuptoolsentrypoints - Added
typogrifysupport - Added a way to disable feed generation
- Added support for
DIRECT_TEMPLATES - Allow multiple extensions for content files
- Added LESS support
- Improved the import script
- Added functional tests
- Rsync support in the generated Makefile
- Improved feed support (easily pluggable with Feedburner for instance)
- Added support for
abbrin reST - Fixed a bunch of bugs :-)
2.8 (2012-02-28)
- Dotclear importer
- Allow the usage of Markdown extensions
- Themes are now easily extensible
- Don’t output pagination information if there is only one page
- Add a page per author, with all their articles
- Improved the test suite
- Made the themes easier to extend
- Removed Skribit support
- Added a
pelican-quickstartscript - Fixed timezone-related issues
- Added some scripts for Windows support
- Date can be specified in seconds
- Never fail when generating posts (skip and continue)
- Allow the use of future dates
- Support having different timezones per language
- Enhanced the documentation
2.7 (2011-06-11)
- Use
loggingrather than echoing to stdout - Support custom Jinja filters
- Compatibility with Python 2.5
- Added a theme manager
- Packaged for Debian
- Added draft support
2.6 (2011-03-08)
- Changes in the output directory structure
- Makes templates easier to work with / create
- Added RSS support (was Atom-only)
- Added tag support for the feeds
- Enhance the documentation
- Added another theme (brownstone)
- Added translations
- Added a way to use cleaner URLs with a rewrite url module (or equivalent)
- Added a tag cloud
- Added an autoreloading feature: the blog is automatically regenerated each time a modification is detected
- Translate the documentation into French
- Import a blog from an RSS feed
- Pagination support
- Added Skribit support
2.5 (2010-11-20)
- Import from WordPress
- Added some new themes (martyalchin / wide-notmyidea)
- First bug report!
- Linkedin support
- Added a FAQ
- Google Analytics support
- Twitter support
- Use relative URLs, not static ones
2.4 (2010-11-06)
- Minor themes changes
- Add Disqus support (so we have comments)
- Another code refactoring
- Added config settings about pages
- Blog entries can also be generated in PDF
2.3 (2010-10-31)
- Markdown support
2.2 (2010-10-30)
- Prettify output
- Manages static pages as well
2.1 (2010-10-30)
- Make notmyidea the default theme
2.0 (2010-10-30)
- Refactoring to be more extensible
- Change into the setting variables
1.2 (2010-09-28)
- Added a debug option
- Added per-category feeds
- Use filesystem to get dates if no metadata is provided
- Add Pygments support
1.1 (2010-08-19)
- First working version