
2.2. 高级NumPy 
Author: Pauli Virtanen
NumPy is at the base of Python’s scientific stack of tools. 它的目的是对一块内存中的许多元素实现高效的操作。理解它如何工作的细节有助于有效地利用其灵活性、采用有用的快捷操作。
This section covers:
- NumPy数组的剖析及其结果。提示和技巧。
- 通用函数:什么是通用函数、为什么使用通用函数、以及如果你想要一个新的通用函数要做什么。
- 与其他工具集成:NumPy提供了几种方法来在ndarray中包装任何数据,没有不必要的拷贝。
- Recently added features, and what’s in them: PEP 3118 buffers, generalized ufuncs, ...
Prerequisites
- NumPy
- Cython
- Pillow(Python图像库,在几个例子中用到)
Chapter contents
Tip
In this section, numpy will be imported as follows:
>>> import numpy as np
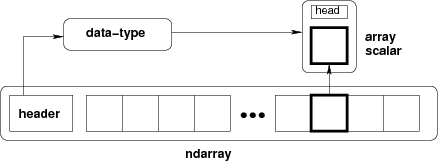
2.2.1. Life of ndarray
2.2.1.1. It’s...
ndarray =
内存块 + 索引方案 + 数据类型描述符
- raw data
- how to locate an element
- how to interpret an element
typedef struct PyArrayObject {
        PyObject_HEAD

        /* Block of memory */
        char *data;

        /* Data type descriptor */
        PyArray_Descr *descr;

        /* Indexing scheme */
        int nd;
        npy_intp *dimensions;
        npy_intp *strides;

        /* Other stuff */
        PyObject *base;
        int flags;
        PyObject *weakreflist;
} PyArrayObject;
2.2.1.2. Block of memory
>>> x = np.array([1, 2, 3], dtype=np.int32)
>>> x.data
<... at ...>
>>> str(x.data)
'\x01\x00\x00\x00\x02\x00\x00\x00\x03\x00\x00\x00'
Memory address of the data:
>>> x.__array_interface__['data'][0]
64803824
The whole __array_interface__:
>>> x.__array_interface__
{'data': (35828928, False),
 'descr': [('', '<i4')],
 'shape': (4,),
 'strides': None,
 'typestr': '<i4',
 'version': 3}
Reminder: two ndarrays may share the same memory:
>>> x = np.array([1, 2, 3, 4])
>>> y = x[:-1]
>>> x[0] = 9
>>> y
array([9, 2, 3])
Memory does not need to be owned by an ndarray:
>>> x = b'1234' # The 'b' is for "bytes", necessary in Python 3
x是一个字符串(在Python 3中是一个字节),我们可以将其数据表示为int数组:
>>> y = np.frombuffer(x, dtype=np.int8)
>>> y.data
<... at ...>
>>> y.base is x
True

>>> y.flags
  C_CONTIGUOUS : True
  F_CONTIGUOUS : True
  OWNDATA : False
  WRITEABLE : False
  ALIGNED : True
  UPDATEIFCOPY : False
owndata和writeable标志指示内存块的状态。
2.2.1.3. Data types
2.2.1.3.1. 描述符
dtype describes a single item in the array:
| type | 数据的标量类型,下面中的一个: int8、int16、float64等。 (fixed size) str、unicode、void(大小可变) |
| itemsize | size of the data block |
| byteorder | 字节顺序: 大端序 > / 小端序 < / 不可用| |
| fields | sub-dtypes, if it’s a structured data type |
| shape | 如果是一个子数组,则它为数组的形状 |
>>> np.dtype(int).type
<type 'numpy.int64'>
>>> np.dtype(int).itemsize
8
>>> np.dtype(int).byteorder
'='
2.2.1.3.2. 示例:读取.wav文件
The .wav file header:
| chunk_id | "RIFF" |
| chunk_size | 4-byte unsigned little-endian integer |
| format | "WAVE" |
| fmt_id | "fmt " |
| fmt_size | 4-byte unsigned little-endian integer |
| audio_fmt | 2-byte unsigned little-endian integer |
| num_channels | 2-byte unsigned little-endian integer |
| sample_rate | 4-byte unsigned little-endian integer |
| byte_rate | 4-byte unsigned little-endian integer |
| block_align | 2-byte unsigned little-endian integer |
| bits_per_sample | 2-byte unsigned little-endian integer |
| data_id | "data" |
| data_size | 4-byte unsigned little-endian integer |
- 44-byte block of raw data (in the beginning of the file)
- ... followed by
data_sizebytes of actual sound data.
.wav文件头作为NumPy结构化数据类型:
>>> wav_header_dtype = np.dtype([
...     ("chunk_id", (bytes, 4)), # flexible-sized scalar type, item size 4
...     ("chunk_size", "<u4"),    # little-endian unsigned 32-bit integer
...     ("format", "S4"),         # 4-byte string
...     ("fmt_id", "S4"),
...     ("fmt_size", "<u4"),
...     ("audio_fmt", "<u2"),     #
...     ("num_channels", "<u2"),  # .. more of the same ...
...     ("sample_rate", "<u4"),   #
...     ("byte_rate", "<u4"),
...     ("block_align", "<u2"),
...     ("bits_per_sample", "<u2"),
...     ("data_id", ("S1", (2, 2))), # sub-array, just for fun!
...     ("data_size", "u4"),
...     #
...     # the sound data itself cannot be represented here:
...     # it does not have a fixed size
...    ])
另见
wavreader.py
>>> wav_header_dtype['format']
dtype('S4')
>>> wav_header_dtype.fields
dict_proxy({'block_align': (dtype('uint16'), 32), 'format': (dtype('S4'), 8), 'data_id': (dtype(('S1', (2, 2))), 36), 'fmt_id': (dtype('S4'), 12), 'byte_rate': (dtype('uint32'), 28), 'chunk_id': (dtype('S4'), 0), 'num_channels': (dtype('uint16'), 22), 'sample_rate': (dtype('uint32'), 24), 'bits_per_sample': (dtype('uint16'), 34), 'chunk_size': (dtype('uint32'), 4), 'fmt_size': (dtype('uint32'), 16), 'data_size': (dtype('uint32'), 40), 'audio_fmt': (dtype('uint16'), 20)})
>>> wav_header_dtype.fields['format']
(dtype('S4'), 8)
- 第一个元素是结构化数据中的子类型,对应于名称
format - 第二个是它从元素开始的偏移量(以字节为单位)
练习
迷你练习,通过使用偏移量生成一个“稀疏”的dtype,并只有一些字段:
>>> wav_header_dtype = np.dtype(dict(
...   names=['format', 'sample_rate', 'data_id'],
...   offsets=[offset_1, offset_2, offset_3], # counted from start of structure in bytes
...   formats=list of dtypes for each of the fields,
... ))
and use that to read the sample rate, and data_id (as sub-array).
>>> f = open('data/test.wav', 'r')
>>> wav_header = np.fromfile(f, dtype=wav_header_dtype, count=1)
>>> f.close()
>>> print(wav_header)
[ ('RIFF', 17402L, 'WAVE', 'fmt ', 16L, 1, 1, 16000L, 32000L, 2, 16, [['d', 'a'], ['t', 'a']], 17366L)]
>>> wav_header['sample_rate']
array([16000], dtype=uint32)
Let’s try accessing the sub-array:
>>> wav_header['data_id']
array([[['d', 'a'],
        ['t', 'a']]],
      dtype='|S1')
>>> wav_header.shape
(1,)
>>> wav_header['data_id'].shape
(1, 2, 2)
当访问子数组时,维度被添加到末尾!
Note
有已经存在的模块,如wavfile、audiolab等用于加载声音数据...
2.2.1.3.3. 转换和重新解释/视图
转换
- 在赋值的时候
- 在数组构造的时候
- 在算术计算的时候
- etc.
- 以及手动转换:
.astype(dtype)
data re-interpretation
- 手动去做:
.view(dtype)
2.2.1.3.3.1. Casting
算术计算中的转换,简而言之:
- only type (not value!) of operands matters
- 选择能够代表两者的最大“安全”类型
- scalars can “lose” to arrays in some situations
通常拷贝数据时的转换:
>>> x = np.array([1, 2, 3, 4], dtype=np.float)
>>> x
array([ 1.,  2.,  3.,  4.])
>>> y = x.astype(np.int8)
>>> y
array([1, 2, 3, 4], dtype=int8)
>>> y + 1
array([2, 3, 4, 5], dtype=int8)
>>> y + 256
array([257, 258, 259, 260], dtype=int16)
>>> y + 256.0
array([ 257.,  258.,  259.,  260.])
>>> y + np.array([256], dtype=np.int32)
array([257, 258, 259, 260], dtype=int32)
在setitem时的类型转换:在元素赋值时数组的dtype不更改:
>>> y[:] = y + 1.5
>>> y
array([2, 3, 4, 5], dtype=int8)
Note
Exact rules: see numpy documentation
2.2.1.3.3.2. 重新解释/视图
Data block in memory (4 bytes)
0x01|| 0x02|| 0x03|| 0x04- 4个uint8,或者
- 4个int8,或者
- 2个int16,或者
- 1个int32,或者
- 1个float32,或者
- ...
How to switch from one to another?
Switch the dtype:
>>> x = np.array([1, 2, 3, 4], dtype=np.uint8)
>>> x.dtype = "<i2"
>>> x
array([ 513, 1027], dtype=int16)
>>> 0x0201, 0x0403
(513, 1027)
0x010x02|| 0x030x04Note
little-endian:在内存中,最低有效字节位于左边
Create a new view:
>>> y = x.view("<i4")
>>> y
array([67305985], dtype=int32)
>>> 0x04030201
67305985
0x010x020x030x04
Note
.view()生成视图,不复制(或更改)内存块only changes the dtype (and adjusts array shape):
>>> x[1] = 5
>>> y
array([328193], dtype=int32)
>>> y.base is x
True
Mini-exercise: data re-interpretation
另见
view-colors.py
You have RGBA data in an array:
>>> x = np.zeros((10, 10, 4), dtype=np.int8)
>>> x[:, :, 0] = 1
>>> x[:, :, 1] = 2
>>> x[:, :, 2] = 3
>>> x[:, :, 3] = 4
where the last three dimensions are the R, B, and G, and alpha channels.
如何做一个字段名称为'r','g','b','a'的(10, 10)结构化数组而不复制数据?
>>> y = ...

>>> assert (y['r'] == 1).all()
>>> assert (y['g'] == 2).all()
>>> assert (y['b'] == 3).all()
>>> assert (y['a'] == 4).all()
答案
Warning
另一个正好占用4个字节内存的数组:
>>> y = np.array([[1, 3], [2, 4]], dtype=np.uint8).transpose()
>>> x = y.copy()
>>> x
array([[1, 2],
       [3, 4]], dtype=uint8)
>>> y
array([[1, 2],
       [3, 4]], dtype=uint8)
>>> x.view(np.int16)
array([[ 513],
       [1027]], dtype=int16)
>>> 0x0201, 0x0403
(513, 1027)
>>> y.view(np.int16)
array([[ 769, 1026]], dtype=int16)
- What happened?
- ... we need to look into what
x[0,1]actually means
>>> 0x0301, 0x0402
(769, 1026)
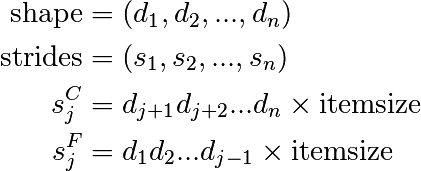
2.2.1.4. Indexing scheme: strides
2.2.1.4.1. 要点
The question:
>>> x = np.array([[1, 2, 3],
...               [4, 5, 6],
...               [7, 8, 9]], dtype=np.int8)
>>> str(x.data)
'\x01\x02\x03\x04\x05\x06\x07\x08\t'

At which byte in ``x.data`` does the item ``x[1, 2]`` begin?
The answer (in NumPy)
- strides:找到下一个元素跳转的字节数
- 每个维度一个stride
  >>> x.strides
  (3, 1)
  >>> byte_offset = 3*1 + 1*2   # to find x[1, 2]
  >>> x.flat[byte_offset]
  6
  >>> x[1, 2]
  6

- simple, **flexible**
2.2.1.4.1.1. C和Fortran的顺序
>>> x = np.array([[1, 2, 3],
...               [4, 5, 6]], dtype=np.int16, order='C')
>>> x.strides
(6, 2)
>>> str(x.data)
'\x01\x00\x02\x00\x03\x00\x04\x00\x05\x00\x06\x00'
- Need to jump 6 bytes to find the next row
- Need to jump 2 bytes to find the next column
>>> y = np.array(x, order='F')
>>> y.strides
(2, 4)
>>> str(y.data)
'\x01\x00\x04\x00\x02\x00\x05\x00\x03\x00\x06\x00'
- Need to jump 2 bytes to find the next row
- Need to jump 4 bytes to find the next column
更高的维度类似:
- C:最后的维度变化最快(=较小的stride)
- F:第一个维度变化最快
Note
Now we can understand the behavior of .view():
>>> y = np.array([[1, 3], [2, 4]], dtype=np.uint8).transpose()
>>> x = y.copy()
转置不影响数据的内存布局,只影响stride
>>> x.strides
(2, 1)
>>> y.strides
(1, 2)
>>> str(x.data)
'\x01\x02\x03\x04'
>>> str(y.data)
'\x01\x03\x02\x04'
- 当解释为2个int16时,结果不同
.copy()creates new arrays in the C order (by default)
2.2.1.4.1.2. 用整数切片
- 所有东西都可以通过只更改
shape、strides来表示,并可能只通过调整data指针表示! - 永远不会复制数据
>>> x = np.array([1, 2, 3, 4, 5, 6], dtype=np.int32)
>>> y = x[::-1]
>>> y
array([6, 5, 4, 3, 2, 1], dtype=int32)
>>> y.strides
(-4,)

>>> y = x[2:]
>>> y.__array_interface__['data'][0] - x.__array_interface__['data'][0]
8

>>> x = np.zeros((10, 10, 10), dtype=np.float)
>>> x.strides
(800, 80, 8)
>>> x[::2,::3,::4].strides
(1600, 240, 32)
类似地,转置永远不会生成拷贝(它只是交换stride):
>>> x = np.zeros((10, 10, 10), dtype=np.float)
>>> x.strides
(800, 80, 8)
>>> x.T.strides
(8, 80, 800)
但是:不是所有的reshape操作都可以通过使用stride来表示:
>>> a = np.arange(6, dtype=np.int8).reshape(3, 2)
>>> b = a.T
>>> b.strides
(1, 2)
So far, so good. However:
>>> str(a.data)
'\x00\x01\x02\x03\x04\x05'
>>> b
array([[0, 2, 4],
       [1, 3, 5]], dtype=int8)
>>> c = b.reshape(3*2)
>>> c
array([0, 2, 4, 1, 3, 5], dtype=int8)
这里,只用一个stride和a的内存块,没有办法表示数组c。Therefore, the reshape operation needs to make a copy here.
2.2.1.4.2. Example: fake dimensions with strides
Stride操纵
>>> from numpy.lib.stride_tricks import as_strided
>>> help(as_strided)
as_strided(x, shape=None, strides=None)
   Make an ndarray from the given array with the given shape and strides
Warning
as_strided不会检查是否在内存块边界内...
>>> x = np.array([1, 2, 3, 4], dtype=np.int16)
>>> as_strided(x, strides=(2*2, ), shape=(2, ))
array([1, 3], dtype=int16)
>>> x[::2]
array([1, 3], dtype=int16)
另见
stride-fakedims.py
Exercise
array([1, 2, 3, 4], dtype=np.int8)

-> array([[1, 2, 3, 4],
          [1, 2, 3, 4],
          [1, 2, 3, 4]], dtype=np.int8)
只使用
as_strided:Hint: byte_offset = stride[0]*index[0] + stride[1]*index[1] + ...
Spoiler
2.2.1.4.3. Broadcasting
- 用它做一些有用的东西:
[1, 2, 3, 4]和[5, 6, 7]的外积
>>> x = np.array([1, 2, 3, 4], dtype=np.int16)
>>> x2 = as_strided(x, strides=(0, 1*2), shape=(3, 4))
>>> x2
array([[1, 2, 3, 4],
       [1, 2, 3, 4],
       [1, 2, 3, 4]], dtype=int16)
>>> y = np.array([5, 6, 7], dtype=np.int16)
>>> y2 = as_strided(y, strides=(1*2, 0), shape=(3, 4))
>>> y2
array([[5, 5, 5, 5],
       [6, 6, 6, 6],
       [7, 7, 7, 7]], dtype=int16)
>>> x2 * y2
array([[ 5, 10, 15, 20],
       [ 6, 12, 18, 24],
       [ 7, 14, 21, 28]], dtype=int16)
... seems somehow familiar ...
>>> x = np.array([1, 2, 3, 4], dtype=np.int16)
>>> y = np.array([5, 6, 7], dtype=np.int16)
>>> x[np.newaxis,:] * y[:,np.newaxis]
array([[ 5, 10, 15, 20],
       [ 6, 12, 18, 24],
       [ 7, 14, 21, 28]], dtype=int16)
- Internally, array broadcasting is indeed implemented using 0-strides.
2.2.1.4.4. More tricks: diagonals
另见
stride-diagonals.py
Challenge
Pick diagonal entries of the matrix: (assume C memory order):
>>> x = np.array([[1, 2, 3],
...               [4, 5, 6],
...               [7, 8, 9]], dtype=np.int32)

>>> x_diag = as_strided(x, shape=(3,), strides=(???,))
Pick the first super-diagonal entries
[2, 6].And the sub-diagonals?
- (Hint to the last two: slicing first moves the point where striding
- starts from.)
答案
另见
stride-diagonals.py
Challenge
Compute the tensor trace:
>>> x = np.arange(5*5*5*5).reshape(5, 5, 5, 5)
>>> s = 0
>>> for i in range(5):
...    for j in range(5):
...       s += x[j, i, j, i]
by striding, and using
sum()on the result.>>> y = as_strided(x, shape=(5, 5), strides=(TODO, TODO)) >>> s2 = ... >>> assert s == s2
答案
2.2.1.4.5. CPU缓存的影响
Memory layout can affect performance:
In [1]: x = np.zeros((20000,))

In [2]: y = np.zeros((20000*67,))[::67]

In [3]: x.shape, y.shape
((20000,), (20000,))

In [4]: %timeit x.sum()
100000 loops, best of 3: 0.180 ms per loop

In [5]: %timeit y.sum()
100000 loops, best of 3: 2.34 ms per loop

In [6]: x.strides, y.strides
((8,), (536,))
Smaller strides are faster?
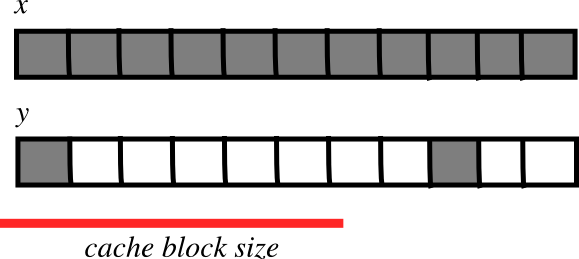
- CPU pulls data from main memory to its cache in blocks
- 如果连续操作的许多数组元素在一个单一的块内(stride较小):
 fewer transfers needed
- faster
另见
numexpr is designed to mitigate cache effects in array computing.
2.2.1.4.6. Example: inplace operations (caveat emptor)
Sometimes,
>>> a -= b
与下面的语句是不等同的
>>> a -= b.copy()
>>> x = np.array([[1, 2], [3, 4]])
>>> x -= x.transpose()
>>> x
array([[ 0, -1],
       [ 4,  0]])
>>> y = np.array([[1, 2], [3, 4]])
>>> y -= y.T.copy()
>>> y
array([[ 0, -1],
       [ 1,  0]])
xandx.transpose()share datax -= x.transpose()逐个元素修改数据...- 因为
x和x.transpose()有不同的striding,修改的数据重新出现在RHS
2.2.1.5. 剖析结果 
- memory block: may be shared,
.base,.data - data type descriptor: structured data, sub-arrays, byte order, casting, viewing,
.astype(),.view() - strided indexing: strides, C/F-order, slicing w/ integers,
as_strided, broadcasting, stride tricks,diag, CPU cache coherence
2.2.2. 通用函数 
2.2.2.1. What they are?
Ufunc对数组的所有元素执行元素级别操作。
Examples:
np.add, np.subtract, scipy.special.*, ...
自动支持:broadcasting、casting...
The author of an ufunc only has to supply the elementwise operation, NumPy takes care of the rest.
The elementwise operation needs to be implemented in C (or, e.g., Cython)
2.2.2.1.1. Parts of an Ufunc
Provided by user
void ufunc_loop(void **args, int *dimensions, int *steps, void *data)
{
    /*
     * int8 output = elementwise_function(int8 input_1, int8 input_2)
     *
     * This function must compute the ufunc for many values at once,
     * in the way shown below.
     */
    char *input_1 = (char*)args[0];
    char *input_2 = (char*)args[1];
    char *output = (char*)args[2];
    int i;

    for (i = 0; i < dimensions[0]; ++i) {
        *output = elementwise_function(*input_1, *input_2);
        input_1 += steps[0];
        input_2 += steps[1];
        output += steps[2];
    }
}
The NumPy part, built by
char types[3]

types[0] = NPY_BYTE   /* type of first input arg */
types[1] = NPY_BYTE   /* type of second input arg */
types[2] = NPY_BYTE   /* type of third input arg */

PyObject *python_ufunc = PyUFunc_FromFuncAndData(
    ufunc_loop,
    NULL,
    types,
    1, /* ntypes */
    2, /* num_inputs */
    1, /* num_outputs */
    identity_element,
    name,
    docstring,
    unused)
- ufunc也可以支持多种不同输入—输出类型组合。
2.2.2.1.2. Making it easier
ufunc_loopis of very generic form, and NumPy provides pre-made onesPyUfunc_f_ffloat elementwise_func(float input_1)PyUfunc_ff_ffloat elementwise_func(float input_1, float input_2)PyUfunc_d_ddouble elementwise_func(double input_1)PyUfunc_dd_ddouble elementwise_func(double input_1, double input_2)PyUfunc_D_Delementwise_func(npy_cdouble *input, npy_cdouble* output)PyUfunc_DD_Delementwise_func(npy_cdouble *in1, npy_cdouble *in2, npy_cdouble* out)- Only
elementwise_funcneeds to be supplied - ... except when your elementwise function is not in one of the above forms
- Only
2.2.2.2. Exercise: building an ufunc from scratch
The Mandelbrot fractal is defined by the iteration
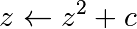
其中 is a complex number. This iteration is repeated – if
  stays finite no matter how long the iteration runs,
  belongs to the Mandelbrot set.
Make ufunc called
mandel(z0, c)that computes:z = z0 for k in range(iterations): z = z*z + c
例如迭代100次,或者直到
z.real**2 + z.imag**2 > 1000。Use it to determine which c are in the Mandelbrot set.Our function is a simple one, so make use of the
PyUFunc_*helpers.用Cython编写
另见
mandel.pyx, mandelplot.py
Reminder: some pre-made Ufunc loops:
PyUfunc_f_f |
float elementwise_func(float input_1) |
PyUfunc_ff_f |
float elementwise_func(float input_1, float input_2) |
PyUfunc_d_d |
double elementwise_func(double input_1) |
PyUfunc_dd_d |
double elementwise_func(double input_1, double input_2) |
PyUfunc_D_D |
elementwise_func(complex_double *input, complex_double* output) |
PyUfunc_DD_D |
elementwise_func(complex_double *in1, complex_double *in2, complex_double* out) |
Type codes:
NPY_BOOL, NPY_BYTE, NPY_UBYTE, NPY_SHORT, NPY_USHORT, NPY_INT, NPY_UINT,
NPY_LONG, NPY_ULONG, NPY_LONGLONG, NPY_ULONGLONG, NPY_FLOAT, NPY_DOUBLE,
NPY_LONGDOUBLE, NPY_CFLOAT, NPY_CDOUBLE, NPY_CLONGDOUBLE, NPY_DATETIME,
NPY_TIMEDELTA, NPY_OBJECT, NPY_STRING, NPY_UNICODE, NPY_VOID
2.2.2.3. Solution: building an ufunc from scratch
# The elementwise function
# ------------------------

cdef void mandel_single_point(double complex *z_in,
                              double complex *c_in,
                              double complex *z_out) nogil:
    #
    # The Mandelbrot iteration
    #

    #
    # Some points of note:
    #
    # - It's *NOT* allowed to call any Python functions here.
    #
    #   The Ufunc loop runs with the Python Global Interpreter Lock released.
    #   Hence, the ``nogil``.
    #
    # - And so all local variables must be declared with ``cdef``
    #
    # - Note also that this function receives *pointers* to the data;
    #   the "traditional" solution to passing complex variables around
    #

    cdef double complex z = z_in[0]
    cdef double complex c = c_in[0]
    cdef int k  # the integer we use in the for loop

    # Straightforward iteration

    for k in range(100):
        z = z*z + c
        if z.real**2 + z.imag**2 > 1000:
            break

    # Return the answer for this point
    z_out[0] = z


# Boilerplate Cython definitions
#
# Pulls definitions from the Numpy C headers.
# -------------------------------------------

from numpy cimport import_array, import_ufunc
from numpy cimport (PyUFunc_FromFuncAndData,
                    PyUFuncGenericFunction)
from numpy cimport NPY_CDOUBLE
from numpy cimport PyUFunc_DD_D

# Required module initialization
# ------------------------------

import_array()
import_ufunc()


# The actual ufunc declaration
# ----------------------------

cdef PyUFuncGenericFunction loop_func[1]
cdef char input_output_types[3]
cdef void *elementwise_funcs[1]

loop_func[0] = PyUFunc_DD_D

input_output_types[0] = NPY_CDOUBLE
input_output_types[1] = NPY_CDOUBLE
input_output_types[2] = NPY_CDOUBLE

elementwise_funcs[0] = <void*>mandel_single_point

mandel = PyUFunc_FromFuncAndData(
    loop_func,
    elementwise_funcs,
    input_output_types,
    1, # number of supported input types
    2, # number of input args
    1, # number of output args
    0, # `identity` element, never mind this
    "mandel", # function name
    "mandel(z, c) -> computes iterated z*z + c", # docstring
    0 # unused
    )
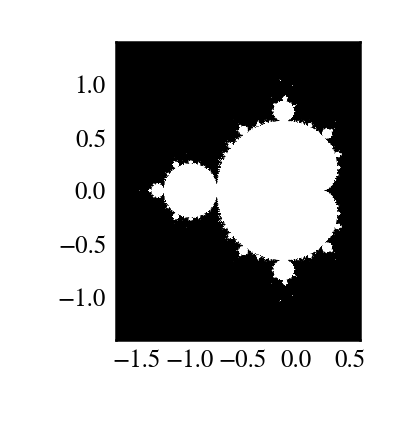
"""
Plot Mandelbrot
================

Plot the Mandelbrot ensemble.

"""

import numpy as np
import mandel
x = np.linspace(-1.7, 0.6, 1000)
y = np.linspace(-1.4, 1.4, 1000)
c = x[None,:] + 1j*y[:,None]
z = mandel.mandel(c, c)

import matplotlib.pyplot as plt
plt.imshow(abs(z)**2 < 1000, extent=[-1.7, 0.6, -1.4, 1.4])
plt.gray()
plt.show()
Note
Most of the boilerplate could be automated by these Cython modules:
Several accepted input types
例如,支持单精度和双精度版本
cdef void mandel_single_point(double complex *z_in,
                              double complex *c_in,
                              double complex *z_out) nogil:
   ...

cdef void mandel_single_point_singleprec(float complex *z_in,
                                         float complex *c_in,
                                         float complex *z_out) nogil:
   ...

cdef PyUFuncGenericFunction loop_funcs[2]
cdef char input_output_types[3*2]
cdef void *elementwise_funcs[1*2]

loop_funcs[0] = PyUFunc_DD_D
input_output_types[0] = NPY_CDOUBLE
input_output_types[1] = NPY_CDOUBLE
input_output_types[2] = NPY_CDOUBLE
elementwise_funcs[0] = <void*>mandel_single_point

loop_funcs[1] = PyUFunc_FF_F
input_output_types[3] = NPY_CFLOAT
input_output_types[4] = NPY_CFLOAT
input_output_types[5] = NPY_CFLOAT
elementwise_funcs[1] = <void*>mandel_single_point_singleprec

mandel = PyUFunc_FromFuncAndData(
    loop_func,
    elementwise_funcs,
    input_output_types,
    2, # number of supported input types   <----------------
    2, # number of input args
    1, # number of output args
    0, # `identity` element, never mind this
    "mandel", # function name
    "mandel(z, c) -> computes iterated z*z + c", # docstring
    0 # unused
    )
2.2.2.4. Generalized ufuncs
ufunc
output = elementwise_function(input)Both
outputandinputcan be a single array element only.
generalized ufunc
outputandinputcan be arrays with a fixed number of dimensions例如,矩阵的积(对角元素的总和):
input shape = (n, n)
output shape = ()      i.e.  scalar

(n, n) -> ()
矩阵的积:
input_1 shape = (m, n)
input_2 shape = (n, p)
output shape  = (m, p)

(m, n), (n, p) -> (m, p)
- This is called the “signature” of the generalized ufunc
- The dimensions on which the g-ufunc acts, are “core dimensions”
Status in NumPy
g-ufuncs are in NumPy already ...
new ones can be created with
PyUFunc_FromFuncAndDataAndSignaturemost linear-algebra functions are implemented as g-ufuncs to enable working with stacked arrays:
>>> import numpy as np
>>> np.linalg.det(np.random.rand(3, 5, 5))
array([ 0.00965823, -0.13344729,  0.04583961])
>>> np.linalg._umath_linalg.det.signature
'(m,m)->()'
we also ship with a few g-ufuncs for testing, ATM:
>>> import numpy.core.umath_tests as ut
>>> ut.matrix_multiply.signature
'(m,n),(n,p)->(m,p)'

>>> x = np.ones((10, 2, 4))
>>> y = np.ones((10, 4, 5))
>>> ut.matrix_multiply(x, y).shape
(10, 2, 5)
in both examples the last two dimensions became core dimensions, and are modified as per the signature
otherwise, the g-ufunc operates “elementwise”
matrix multiplication this way could be useful for operating on many small matrices at once
Generalized ufunc loop
Matrix multiplication (m,n),(n,p) -> (m,p)
void gufunc_loop(void **args, int *dimensions, int *steps, void *data)
{
    char *input_1 = (char*)args[0];  /* these are as previously */
    char *input_2 = (char*)args[1];
    char *output = (char*)args[2];

    int input_1_stride_m = steps[3];  /* strides for the core dimensions */
    int input_1_stride_n = steps[4];  /* are added after the non-core */
    int input_2_strides_n = steps[5]; /* steps */
    int input_2_strides_p = steps[6];
    int output_strides_n = steps[7];
    int output_strides_p = steps[8];

    int m = dimension[1]; /* core dimensions are added after */
    int n = dimension[2]; /* the main dimension; order as in */
    int p = dimension[3]; /* signature */

    int i;

    for (i = 0; i < dimensions[0]; ++i) {
        matmul_for_strided_matrices(input_1, input_2, output,
                                    strides for each array...);

        input_1 += steps[0];
        input_2 += steps[1];
        output += steps[2];
    }
}
2.2.3. Interoperability features
2.2.3.1. Sharing multidimensional, typed data
Suppose you
- Write a library than handles (multidimensional) binary data,
- Want to make it easy to manipulate the data with NumPy, or whatever other library,
- ... but would not like to have NumPy as a dependency.
Currently, 3 solutions:
- the “old” buffer interface
- the array interface
- the “new” buffer interface (PEP 3118)
2.2.3.2. The old buffer protocol
- Only 1-D buffers
- No data type information
- C-level interface;
PyBufferProcs tp_as_bufferin the type object - But it’s integrated into Python (e.g. strings support it)
Mini-exercise using Pillow (Python Imaging Library):
See also
pilbuffer.py
>>> from PIL import Image
>>> data = np.zeros((200, 200, 4), dtype=np.int8)
>>> data[:, :] = [255, 0, 0, 255] # Red
>>> # In PIL, RGBA images consist of 32-bit integers whose bytes are [RR,GG,BB,AA]
>>> data = data.view(np.int32).squeeze()
>>> img = Image.frombuffer("RGBA", (200, 200), data, "raw", "RGBA", 0, 1)
>>> img.save('test.png')
Q:
Check what happens ifdatais now modified, andimgsaved again.
2.2.3.3. The old buffer protocol
"""
From buffer
============

Show how to exchange data between numpy and a library that only knows
the buffer interface.
"""

import numpy as np
import Image

# Let's make a sample image, RGBA format

x = np.zeros((200, 200, 4), dtype=np.int8)

x[:,:,0] = 254 # red
x[:,:,3] = 255 # opaque

data = x.view(np.int32) # Check that you understand why this is OK!

img = Image.frombuffer("RGBA", (200, 200), data)
img.save('test.png')

#
# Modify the original data, and save again.
#
# It turns out that PIL, which knows next to nothing about Numpy,
# happily shares the same data.
#

x[:,:,1] = 254
img.save('test2.png')


2.2.3.4. Array interface protocol
- Multidimensional buffers
- Data type information present
- NumPy-specific approach; slowly deprecated (but not going away)
- Not integrated in Python otherwise
See also
Documentation: http://docs.scipy.org/doc/numpy/reference/arrays.interface.html
>>> x = np.array([[1, 2], [3, 4]])
>>> x.__array_interface__
{'data': (171694552, False),      # memory address of data, is readonly?
 'descr': [('', '<i4')],          # data type descriptor
 'typestr': '<i4',                # same, in another form
 'strides': None,                 # strides; or None if in C-order
 'shape': (2, 2),
 'version': 3,
}
- ::
>>> from PIL import Image
>>> img = Image.open('data/test.png')
>>> img.__array_interface__
{'data': ...,
 'shape': (200, 200, 4),
 'typestr': '|u1'}
>>> x = np.asarray(img)
>>> x.shape
(200, 200, 4)
Note
A more C-friendly variant of the array interface is also defined.
2.2.4. Array siblings: chararray, maskedarray, matrix
2.2.4.1. chararray: vectorized string operations
>>> x = np.array(['a', '  bbb', '  ccc']).view(np.chararray)
>>> x.lstrip(' ')
chararray(['a', 'bbb', 'ccc'],
      dtype='...')
>>> x.upper()
chararray(['A', '  BBB', '  CCC'],
      dtype='...')
Note
.view() has a second meaning: it can make an ndarray an instance of a specialized ndarray subclass
2.2.4.2. masked_array missing data
Masked arrays are arrays that may have missing or invalid entries.
For example, suppose we have an array where the fourth entry is invalid:
>>> x = np.array([1, 2, 3, -99, 5])
One way to describe this is to create a masked array:
>>> mx = np.ma.masked_array(x, mask=[0, 0, 0, 1, 0])
>>> mx
masked_array(data = [1 2 3 -- 5],
             mask = [False False False  True False],
       fill_value = 999999)
Masked mean ignores masked data:
>>> mx.mean()
2.75
>>> np.mean(mx)
2.75
Warning
Not all NumPy functions respect masks, for instance np.dot, so check the return types.
The masked_array returns a view to the original array:
>>> mx[1] = 9
>>> x
array([  1,   9,   3, -99,   5])
2.2.4.2.1. The mask
You can modify the mask by assigning:
>>> mx[1] = np.ma.masked
>>> mx
masked_array(data = [1 -- 3 -- 5],
             mask = [False  True False  True False],
       fill_value = 999999)
The mask is cleared on assignment:
>>> mx[1] = 9
>>> mx
masked_array(data = [1 9 3 -- 5],
             mask = [False False False  True False],
       fill_value = 999999)
The mask is also available directly:
>>> mx.mask
array([False, False, False,  True, False], dtype=bool)
The masked entries can be filled with a given value to get an usual array back:
>>> x2 = mx.filled(-1)
>>> x2
array([ 1,  9,  3, -1,  5])
The mask can also be cleared:
>>> mx.mask = np.ma.nomask
>>> mx
masked_array(data = [1 9 3 -99 5],
             mask = [False False False False False],
       fill_value = 999999)
2.2.4.2.2. Domain-aware functions
The masked array package also contains domain-aware functions:
>>> np.ma.log(np.array([1, 2, -1, -2, 3, -5]))
masked_array(data = [0.0 0.6931471805599453 -- -- 1.0986122886681098 --],
             mask = [False False  True  True False  True],
       fill_value = 1e+20)
Note
Streamlined and more seamless support for dealing with missing data in arrays is making its way into NumPy 1.7. Stay tuned!
Example: Masked statistics
Canadian rangers were distracted when counting hares and lynxes in 1903-1910 and 1917-1918, and got the numbers are wrong. (Carrot farmers stayed alert, though.) Compute the mean populations over time, ignoring the invalid numbers.
>>> data = np.loadtxt('data/populations.txt')
>>> populations = np.ma.masked_array(data[:,1:])
>>> year = data[:, 0]

>>> bad_years = (((year >= 1903) & (year <= 1910))
...            | ((year >= 1917) & (year <= 1918)))
>>> # '&' means 'and' and '|' means 'or'
>>> populations[bad_years, 0] = np.ma.masked
>>> populations[bad_years, 1] = np.ma.masked

>>> populations.mean(axis=0)
masked_array(data = [40472.72727272727 18627.272727272728 42400.0],
             mask = [False False False],
       fill_value = 1e+20)

>>> populations.std(axis=0)
masked_array(data = [21087.656489006717 15625.799814240254 3322.5062255844787],
             mask = [False False False],
       fill_value = 1e+20)
Note that Matplotlib knows about masked arrays:
>>> plt.plot(year, populations, 'o-')
[<matplotlib.lines.Line2D object at ...>, ...]
[source code, hires.png, pdf]

2.2.4.3. recarray: purely convenience
>>> arr = np.array([('a', 1), ('b', 2)], dtype=[('x', 'S1'), ('y', int)])
>>> arr2 = arr.view(np.recarray)
>>> arr2.x
chararray(['a', 'b'],
      dtype='|S1')
>>> arr2.y
array([1, 2])
2.2.4.4. matrix: convenience?
- always 2-D
*is the matrix product, not the elementwise one
>>> np.matrix([[1, 0], [0, 1]]) * np.matrix([[1, 2], [3, 4]])
matrix([[1, 2],
        [3, 4]])
2.2.5. Summary
- Anatomy of the ndarray: data, dtype, strides.
- Universal functions: elementwise operations, how to make new ones
- Ndarray subclasses
- Various buffer interfaces for integration with other tools
- Recent additions: PEP 3118, generalized ufuncs
2.2.6. 贡献NumPy/Scipy 
Get this tutorial: http://www.euroscipy.org/talk/882
2.2.6.1. Why
- “There’s a bug?”
- “I don’t understand what this is supposed to do?”
- “I have this fancy code. Would you like to have it?”
- “I’d like to help! What can I do?”
2.2.6.2. Reporting bugs
- Bug tracker (prefer this)
- http://projects.scipy.org/numpy
- http://projects.scipy.org/scipy
- Click the “Register” link to get an account
- Mailing lists ( scipy.org/Mailing_Lists )
- If you’re unsure
- No replies in a week or so? Just file a bug ticket.
2.2.6.2.1. Good bug report
Title: numpy.random.permutations fails for non-integer arguments

I'm trying to generate random permutations, using numpy.random.permutations

When calling numpy.random.permutation with non-integer arguments
it fails with a cryptic error message::

    >>> np.random.permutation(12)
    array([11,  5,  8,  4,  6,  1,  9,  3,  7,  2, 10,  0])
    >>> np.random.permutation(12.)
    Traceback (most recent call last):
      File "<stdin>", line 1, in <module>
      File "mtrand.pyx", line 3311, in mtrand.RandomState.permutation
      File "mtrand.pyx", line 3254, in mtrand.RandomState.shuffle
    TypeError: len() of unsized object

This also happens with long arguments, and so
np.random.permutation(X.shape[0]) where X is an array fails on 64
bit windows (where shape is a tuple of longs).

It would be great if it could cast to integer or at least raise a
proper error for non-integer types.

I'm using NumPy 1.4.1, built from the official tarball, on Windows
64 with Visual studio 2008, on Python.org 64-bit Python.
What are you trying to do?
Small code snippet reproducing the bug (if possible)
- What actually happens
- What you’d expect
Platform (Windows / Linux / OSX, 32/64 bits, x86/PPC, ...)
Version of NumPy/Scipy
>>> print(np.__version__)
1...
Check that the following is what you expect
>>> print(np.__file__)
/...
In case you have old/broken NumPy installations lying around.
If unsure, try to remove existing NumPy installations, and reinstall...
2.2.6.3. Contributing to documentation
Documentation editor
Registration
Register an account
Subscribe to
scipy-devmailing list (subscribers-only)Problem with mailing lists: you get mail
But: you can turn mail delivery off
“change your subscription options”, at the bottom of
Send a mail @
scipy-devmailing list; ask for activation:To: scipy-dev@scipy.org Hi, I'd like to edit NumPy/Scipy docstrings. My account is XXXXX Cheers, N. N.
- Check the style guide:
- http://docs.scipy.org/doc/numpy/
- Don’t be intimidated; to fix a small thing, just fix it
- Edit
Edit sources and send patches (as for bugs)
Complain on the mailing list
2.2.6.4. Contributing features
Ask on mailing list, if unsure where it should go
Write a patch, add an enhancement ticket on the bug tracket
OR, create a Git branch implementing the feature + add enhancement ticket.
- Especially for big/invasive additions
- http://projects.scipy.org/numpy/wiki/GitMirror
- http://www.spheredev.org/wiki/Git_for_the_lazy
# Clone numpy repository
git clone --origin svn http://projects.scipy.org/git/numpy.git numpy
cd numpy

# Create a feature branch
git checkout -b name-of-my-feature-branch  svn/trunk

<edit stuff>

git commit -a
- Create account on https://github.com (or anywhere)
- Create a new repository @ Github
- Push your work to github
git remote add github git@github:USERNAME/REPOSITORYNAME.git
git push github name-of-my-feature-branch
2.2.6.5. How to help, in general
Bug fixes always welcome!
- What irks you most
- Browse the tracker
Documentation work
API docs: improvements to docstrings
- Know some Scipy module well?
User guide
Needs to be done eventually.
Want to think? Come up with a Table of Contents
Ask on communication channels:
numpy-discussionlistscipy-devlist